- PHP Connect to MySQL
- Should I Use MySQLi or PDO?
- MySQL Examples in Both MySQLi and PDO Syntax
- MySQLi Installation
- PDO Installation
- Open a Connection to MySQL
- Example (MySQLi Object-Oriented)
- Example (MySQLi Procedural)
- Example (PDO)
- Close the Connection
- How to connect an HTML form to a MySQL database in PHP
- Step 1: Set up XAMPP
- Step 2: Create an HTML form
- Step 3: Create a MySQL database
- Step 4: Create a PHP file
- Explanation
- Explanation
- Step 5: Create a connection
- Explanation
- Display Data in an HTML Table Using PHP & MySQL
- Steps to Display Data From MySQL Database with PHP
- 1. Connect PHP to MySQL Database
- 2. Insert Data Into PHPMyAdmin Table
- 3. Fetch Data From MySQL Table
- 4. Display Data in HTML Table
- 5. Test Yourself to insert data
- More Methods to display Data in HTML Table with PHP
- Display Data using MySQLi Procedure
- Display Data Using MySQLi Object-Oriented
- Display Data Using PDO
- Display Data Using Prepared Statement
- Related posts:
PHP Connect to MySQL
PHP 5 and later can work with a MySQL database using:
- MySQLi extension (the «i» stands for improved)
- PDO (PHP Data Objects)
Earlier versions of PHP used the MySQL extension. However, this extension was deprecated in 2012.
Should I Use MySQLi or PDO?
If you need a short answer, it would be «Whatever you like».
Both MySQLi and PDO have their advantages:
PDO will work on 12 different database systems, whereas MySQLi will only work with MySQL databases.
So, if you have to switch your project to use another database, PDO makes the process easy. You only have to change the connection string and a few queries. With MySQLi, you will need to rewrite the entire code — queries included.
Both are object-oriented, but MySQLi also offers a procedural API.
Both support Prepared Statements. Prepared Statements protect from SQL injection, and are very important for web application security.
MySQL Examples in Both MySQLi and PDO Syntax
In this, and in the following chapters we demonstrate three ways of working with PHP and MySQL:
MySQLi Installation
For Linux and Windows: The MySQLi extension is automatically installed in most cases, when php5 mysql package is installed.
PDO Installation
Open a Connection to MySQL
Before we can access data in the MySQL database, we need to be able to connect to the server:
Example (MySQLi Object-Oriented)
$servername = «localhost»;
$username = «username»;
$password = «password»;
// Create connection
$conn = new mysqli($servername, $username, $password);
// Check connection
if ($conn->connect_error) die(«Connection failed: » . $conn->connect_error);
>
echo «Connected successfully»;
?>
Note on the object-oriented example above:
$connect_error was broken until PHP 5.2.9 and 5.3.0. If you need to ensure compatibility with PHP versions prior to 5.2.9 and 5.3.0, use the following code instead:
// Check connection
if (mysqli_connect_error()) die(«Database connection failed: » . mysqli_connect_error());
>
Example (MySQLi Procedural)
$servername = «localhost»;
$username = «username»;
$password = «password»;
// Create connection
$conn = mysqli_connect($servername, $username, $password);
// Check connection
if (!$conn) die(«Connection failed: » . mysqli_connect_error());
>
echo «Connected successfully»;
?>
Example (PDO)
$servername = «localhost»;
$username = «username»;
$password = «password»;
try $conn = new PDO(«mysql:host=$servername;dbname=myDB», $username, $password);
// set the PDO error mode to exception
$conn->setAttribute(PDO::ATTR_ERRMODE, PDO::ERRMODE_EXCEPTION);
echo «Connected successfully»;
> catch(PDOException $e) echo «Connection failed: » . $e->getMessage();
>
?>
Note: In the PDO example above we have also specified a database (myDB). PDO require a valid database to connect to. If no database is specified, an exception is thrown.
Tip: A great benefit of PDO is that it has an exception class to handle any problems that may occur in our database queries. If an exception is thrown within the try < >block, the script stops executing and flows directly to the first catch() < >block.
Close the Connection
The connection will be closed automatically when the script ends. To close the connection before, use the following:
How to connect an HTML form to a MySQL database in PHP
Many candidates are rejected or down-leveled in technical interviews due to poor performance in behavioral or cultural fit interviews. Ace your interviews with this free course, where you will practice confidently tackling behavioral interview questions.
This Answer outlines how to use PHP to connect an HTML form to a MySQL database. We’ll use XAMPP as the server software to create a database and run PHP.
We’ll use the below steps to create a connection:
- Set up XAMPP and configure a PHP development environment
- Create an HTML form
- Create a MySQL database
- Create a PHP file
- Create a connection
Step 1: Set up XAMPP
The method to configure a PHP development environment with XAMPP is shown here.
Step 2: Create an HTML form
This Answer explains what an HTML form is and how to create it.
Step 3: Create a MySQL database
In this step, we’ll create a simple MySQL database since our server is already running.
We’ll open the browser and type http://localhost/phpmyadmin/. This redirects us to the PHP admin page, where we can create and manage databases. Click on the New option in the menu panel on the left side. The image below demonstrates this:
On the next page, we’ll choose a name for our database and click on Create, as shown:
Next, we’ll create a table in the database. We’ll add a table name and choose the number of columns:
Once we click on Create, we’ll be redirected to the following page:
Here, we’ve to give details regarding the table. The columns correspond to our fields in the HTML form. We may also assign each column a data type, characters length, or special privileges such as the primary A unique identifier for each entry in a table. key. A sample table is as follows:
Once we’re done, we’ll click on Save. Our first table in the database is created.
Step 4: Create a PHP file
Now that we have our database and server ready, we’ll create the necessary files. We’ll begin by opening the folder directory containing XAMPP. We traditionally find this folder in Local Disk E or Local Disk C. For Linux users, this will be in the Computer/opt/lampp directory.
Within that folder, open another folder titled htdocs and create a folder in it. We can name it anything, but for this tutorial, we’ll name it educativeform . This new folder will contain our HTML and PHP files.
htdocs/educativeform|-> form.php|-> index.html
The following code snippet contains the HTML code for the form:
Note: If we click on the submit button, it will given an error since we haven’t yet connected it to the database.
Explanation
- Line 6: The method POST is the connection type to send the HTML form entries. The action attribute has the value form.php . This is the name of the PHP file in the working directory, and the form entries will be sent to this file upon submission.
- Lines 8–20: These are the form fields. The last input type is a button that submits the field values to the PHP file.
To confirm that our form is ready, we’ll type localhost/educativeform in the browser. This ensures that the server, MySQL, and Apache is running. Otherwise, we might get an error.
Next, we’ll create the PHP file. The sample code, along with the explanation, is given below:
if(isset($_POST['submit']))$fname = $_POST['fname'];$lname = $_POST['lname'];$email = $_POST['email'];>?>Explanation
- Line 2: We’ll use the $_POST as connection type to get HTML form entries.
- Lines 4–6: We define the fields here. The square brackets contain the values of the name attribute in the input labels of the HTML code.
Step 5: Create a connection
Finally, we’ll connect our HTML form to the database using PHP. The code below is an addition to the previous code snippet, as shown:
// getting all values from the HTML formif(isset($_POST['submit']))$fname = $_POST['fname'];$lname = $_POST['lname'];$email = $_POST['email'];>// database details$host = "localhost";$username = "root";$password = "";$dbname = "sampledb";// creating a connection$con = mysqli_connect($host, $username, $password, $dbname);// to ensure that the connection is madeif (!$con)die("Connection failed!" . mysqli_connect_error());>// using sql to create a data entry query$sql = "INSERT INTO contactform_entries (id, fname, lname, email) VALUES ('0', '$fname', '$lname', '$email')";// send query to the database to add values and confirm if successful$rs = mysqli_query($con, $sql);if($rs)echo "Entries added!";>// close connectionmysqli_close($con);?>Explanation
- Lines 10–14: We’ll specify the permissions of the database. This will allow us to add entries to the table.
- Line 17: We use mysqli_connect to create a connection.
- Lines 20–23: Here, we’ll confirm if the connection is made. If the connection has failed, we’ll get an error message.
- Line 26: We create an SQL query for insertion. Here we add the values that we received from the HTML form.
- Lines 29–33: We send the query to the database over the connection.
- Line 36: This line closes the connection once the entry is inserted.
If everything is running without errors, we should be able to add our HTML form details in the MySQL database.
Learn in-demand tech skills in half the time
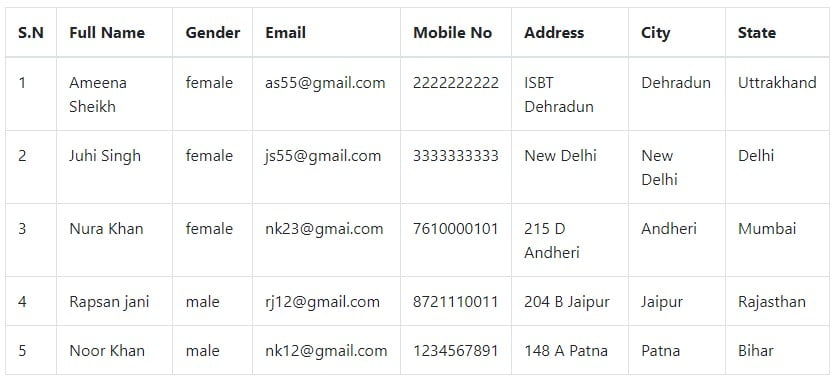
Display Data in an HTML Table Using PHP & MySQL
Hello Developer, In this tutorial, You will learn to display data in an HTML table using PHP and MySQL. Even You will know more to fetch new records from the database and show them in the tabular format using MySQLi procedure, MySQLi Object-oriented, PDO & prepared statement with a new concept & an example.
Steps to Display Data From MySQL Database with PHP
In this step, you will learn to display data from the database dynamically with an advanced coding concept that will help you to improve your coding skills for writing smart & standard code in PHP.
Before getting started, make sure that the local server (xamp/wamp) must be installed in your system and start it if it is not being started already.
Learn Also –
You can test yourself to display data with the following folder structure –
codingstatus/ |__database.php |__table.php |__developers.php |1. Connect PHP to MySQL Database
You can use the following database connection query to connect PHP to the MySQL database
- $hostName – It contains host name
- $userName – It contains database username
- $password – It contains database password
- $databaseName – It contains database name.
connect_error) < die("Connection failed: " . $conn->connect_error); > ?>2. Insert Data Into PHPMyAdmin Table
Before displaying data, you have to insert data into the Database. If you have not already done it and don’t know about it, then you can learn it through the following URL –
3. Fetch Data From MySQL Table
Now, You have to fetch data from the MySQL table. So, just follow these points –
- First of all, include a database connection file database.php
- assign $conn to a new variable $db and table name to another variable $table
- Define columns name in an indexed array and assign them to the $columns
- Also, assign fetch_data() function to the $fetchData
fetch_data() – This function accepts three parameters like $db, $table & $column and It contains MySQLi SELECT query that will return records in an array format by fetching from the database
elseif (empty($columns) || !is_array($columns)) < $msg="columns Name must be defined in an indexed array"; >elseif(empty($tableName))< $msg= "Table Name is empty"; >else< $columnName = implode(", ", $columns); $query = "SELECT ".$columnName." FROM $tableName"." ORDER BY id DESC"; $result = $db->query($query); if($result== true)< if ($result->num_rows > 0) < $row= mysqli_fetch_all($result, MYSQLI_ASSOC); $msg= $row; >else < $msg= "No Data Found"; >>else < $msg= mysqli_error($db); >> return $msg; > ?>4. Display Data in HTML Table
Now, You have to display data in the HTML table. So, you have to follow these points –
- First of all, Include PHP script file developers.php
- Create an HTML table using Bootsrap 4
- Check $fetchData is an array or not with if & else condition
- Then apply foreach loop to the $fetchData
- After that print the required data in the table
S.N Full Name Gender Mobile Number Address City State >else < ?> ?>5. Test Yourself to insert data
After Implementing previous steps, You can test it yourself to open the following URL in your web browser
https://localhost/codingstatus/table.phpMore Methods to display Data in HTML Table with PHP
Now, You should know more methods to display data in the database from the next step. After learning those methods, you can use one of them in your project.
From the next step, I have shared only the source code without a custom function. So that you can directly paste it into your project where you need to implement it.
Display Data using MySQLi Procedure
Display data with MySQLi Procedure
0) < $sn=1; while($data = mysqli_fetch_assoc($result)) < ?> S.N Full Name Gender Mobile No Address City State > else < ?> ?> No data found Display Data Using MySQLi Object-Oriented
Display data with MySQLi Object-Oriented
query($query); ?>num_rows > 0) < $sn=1; while($data = $result->fetch_assoc()) < ?> S.N Full Name Gender Mobile No Address City State > else < ?> ?> No data found Display Data Using PDO
Connect Database with PDO
setAttribute(PDO::ATTR_ERRMODE, PDO::ERRMODE_EXCEPTION); try < $query = "SELECT fullName, gender, email, mobile, address, city, state FROM developers"; $result = $conn->query($query); ?>fetch(PDO::FETCH_ASSOC)) < ?> ?>
catch(PDOException $e) < echo "Error: " . $e->getMessage(); >Display Data Using Prepared Statement
Display data using Prepared Statement with MySQLi –
prepare($query); $prepared->execute(); $result = $prepared->get_result(); ?>num_rows > 0) < $sn=1; while($data = $result->fetch_assoc()) < ?> S.N Full Name Gender Mobile No Address City State > else < ?> ?> No data found Display data using Prepared Statement with PDO –
setAttribute(PDO::ATTR_ERRMODE, PDO::ERRMODE_EXCEPTION); try < $query = "SELECT fullName, gender, email, mobile, address, city, state FROM developers"; $prepared = $conn->prepare($query); $prepared->execute(); $result = $prepared -> fetchAll(PDO::FETCH_ASSOC); ?>?>
catch(PDOException $e) < echo "Error: " . $e->getMessage(); > ?>Related posts: