- How to insert a custom background on WordPress
- To add a custom background to your WordPress site
- How to add a custom background to your WordPress site by using WordPress theme settings
- How to add a custom background to your WordPress site by using CSS
- Conclusion
- Change Your Site’s Background
- Tips for Choosing a Background
- Method 1: Change Your Background in the Site Editor
How to insert a custom background on WordPress
If you want to find out the way to insert a custom background image into your WordPress site, you are in the right place.
As you might not know about, background pictures are widely used to make your site become more attractive, engaging and pleasant to the most visitor.
The majority of themes on WordPress can allow you to customize the background of your site by uploading an image or selecting colors and so on.
Therefore, in this tutorial, you will be guided on how to insert a custom background on WordPress.
To add a custom background to your WordPress site
How to add a custom background to your WordPress site by using WordPress theme settings
Before going further, let’s consider that if your theme can support the background images features, you can use this method to insert your custom background to your site. On the other hand, if your current theme does not support the custom background, you can opt for another method that will be shown in this tutorial.
- Step 1: To help you get started, head to Appearance -> Customize located at the bottom of the right corner.
- Step 2: As it finishes loading, you can take a closer look at color and backgrounds section.
- Step 3: In case your theme supports a custom background, you will notice that there is a rectangle representing your background colors and images.
- Step 4: In order to upload a custom background, press on the rectangle and select the Image button.
- Step 5: Choose a picture from your own Media Library or get a new one uploaded.
- Step 6: After selecting an image, you can go back to the major color area by choosing Done .
- Step 7: As you finish selecting for your own background color, the Option button will appear.
Heading to this button can show you various options. You can simply opt for the image position, title it or set it fixed, which means that the background image will stay in the same place when visitors scroll down along your content.
- Step 8: Add your underlying color or get the background image hidden if you no longer use it anymore.
- Step 9: In case you want to use a solid background color instead of a picture, choose one from the color palette, you can go to pick your own color link below
You had better take note that if you already had your background color, this will override your present image. And don’t forget to save any changes you made in the Customizer section by choosing Save & Publish button at the top left of the page.
Some themes can go with their default background pictures. You are able to scroll through many options and pick one that matches the design of your blog or website.
How to add a custom background to your WordPress site by using CSS
Another way to help you add a custom background to your WordPress site is using CSS. Basically, WordPress can insert some CSS classes to various HTML factors through the WordPress site. By doing this, you can simply insert your own background images to your personal posts, author, categories, and another page applying those WordPress generated CSS classes .
Let’s insert a background image to your category archive page and you might have to add this CSS to your theme also.
You should bear in mind that you need to replace the background image URL, along with the category class with the category.
You are able to add custom backgrounds to your personal pages and posts. WordPress allows you to insert a CSS class with the page or post ID in your body tag. You can use the similar CSS code.
Conclusion
With this above instruction on how to insert a custom background on WordPress, we hope that you can easily add your own custom background images without having any difficulties. Don’t forget to help us share this article if you find it helpful and worthy to read. If you need more instructions, let’s the supporting team help you by leaving a comment or contacting us. We are glad to hear more from you and able to assist you as soon as possible.
Change Your Site’s Background
Give your site a background color or image to personalize its look and feel. Follow the steps in this guide to learn how.
Tips for Choosing a Background
Setting a background color or image can be a great way to show your personality and distinguish your site from others. Keep in mind these tips as you decide on how to customize your site’s background:
- Choose colors that complement each other, without clashing or making it difficult to read your website’s text.
- Depending on the image you use, a background image can make it difficult to read the text on top of it. For best results, choose a subtle image or plain pattern that won’t obscure your site’s content.
- Choose a high-quality image that will span the full width of your site without appearing blurry. Take advantage of our free photo library for high-quality images.
Method 1: Change Your Background in the Site Editor
If your site uses a theme that supports the site editor, you can change your site’s background using this method. A quick way to determine if your site uses the site editor is to check under Appearance in your dashboard. If you see Editor here, you can change your site’s background by following these steps.
Background Color
- In your dashboard, go to Appearance → Editor.
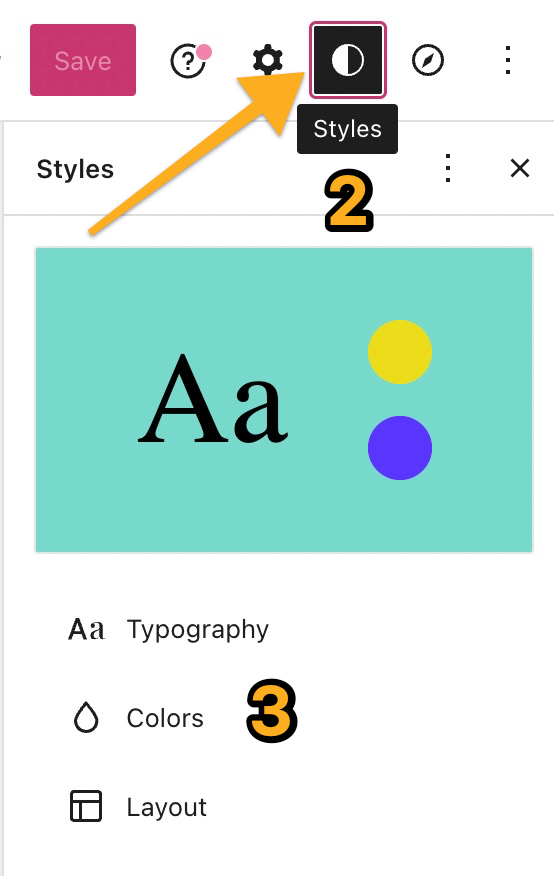
- Click on Styles on the left, or select the Styles icon as shown here. The icon looks like a black-and-white circle.
- Click on the Colors option.
- Click on the Background option.
- Select your desired color using the color picker. You can choose a solid color or define a gradient.
- Click Save.
Background Image
You can use the Cover block to place a background image behind all the content of a page. Follow these steps to add your image with the Cover block and place all the page’s content on top of the image:
- In your dashboard, go to Appearance → Editor.
- Open List View by clicking the three horizontal lines icon in the top left corner.
- Hover on the topmost block in the List View section.
- Click on the three dots on that block’s right side.
- Click on the option to Insert before.

- Insert a Cover block before all the other blocks here.
- Upload your background image to the Cover block.
- Select and move all the other blocks in List View and place them inside of the Cover block. You can click-and-drag as shown in the video below.
- If there are any locked blocks, you can unlock them to enable editing and movement.
- If the text on top of the Cover block becomes difficult to read after you’ve added your background image, you can use the opacity setting to improve visibility.
- Click the Save button in the top right corner.
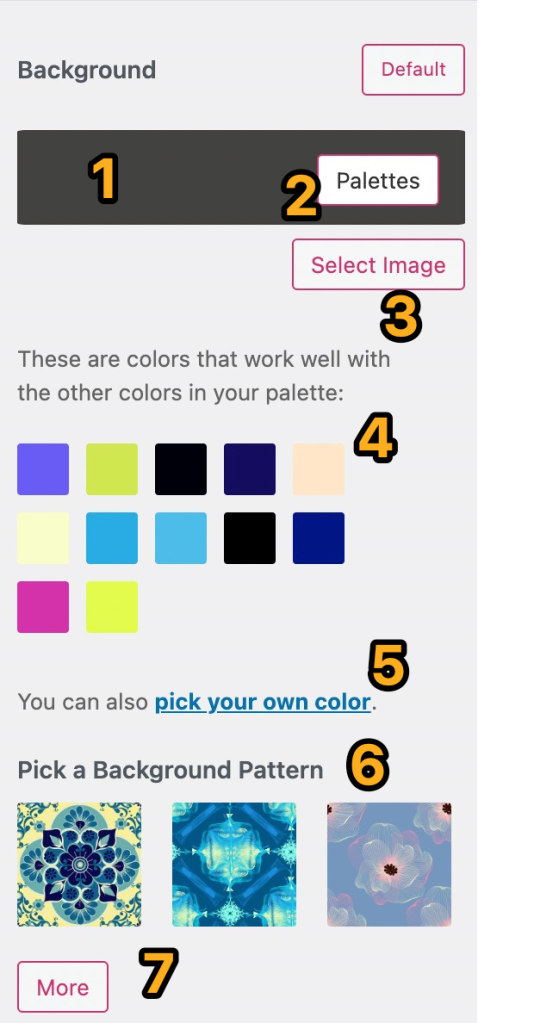
- Click into the colored box area to pull up the options available for customizing the background on your theme.
- Click on Palettes to select a new color palette for your site.
- Click Select Image to choose an image to use for your background. This option will only appear if your theme supports background images. Learn more about Background Image below.
- Click on any of the automatic color suggestions to use it for your site.
- Click on the pick your own color link to open up the color picker and use it to set a custom color for your background.
- Click on any pattern to use it as the background for your site.
- Click on the More button to load additional patterns to choose from. After you’ve clicked the More button once, a Back button will appear next to it. You can use it to load the previous patterns within the selection. Background patterns are provided by COLOURlovers.
Background Image
After you’ve selected an image to use for the background of your site (see #3 above), an Options button will appear directly below it. Click on that, and you’ll see several settings to manage the display of your background image, as explained below:

- Click Select Image to choose an existing image from your media library, or upload a new one.
- Click Options to open up the additional settings for your background image display.
- Click on the icons to adjust the position of your background image.
- Position controls where the background image is aligned: left, center or right.
- Repeat determines if an image appears once, repeats vertically, repeats horizontally, or tiles.
- Fixed Position means the image stays fixed in place when you scroll up and down the page.
- Underlying Color is the color that loads behind the background image.
- Click into the colored box to open up the color picker, where you can select a different Underlying Color for your background.
- Click Hide background image to remove the current image and select a different one, or use a solid background color or pattern instead.
Save Changes
Once you’re finished making changes, click the Save Changes button at the top of the screen to save your background.

Was this guide helpful for you?