- CSS Transitions explained
- Triggering transitions
- Understanding transition-timing-function
- Creating your own timing function with cubic-bezier
- Transitioning two or more properties
- Transitioning in vs transitioning out
- Wrapping up
- Want to become a better Frontend Developer?
- Want to become a better Frontend Developer?
- Плавное изменение background
- Transition background
- Transition background-size
- Комментарии
- Другие публикации
- transition
- Desktop
- Mobile / Tablet
CSS Transitions explained
The simplest (and most straightforward) way to animate your components is through CSS Transitions. In this article, you’ll learn how CSS Transitions work, and how to make animations with it.
A transition occurs when a CSS property changes from one value to another value over a period of time.
You can create CSS Transitions with the transition property:
.selector transition: property duration transition-timing-function delay; >The transition property is a shorthand of four CSS properties, transition-property , transition-duration , transition-timing-function , transition-delay .
.selector transition-property: property; transition-duration: duration; transition-timing-function: timing-function; transition-delay: delay /* The transition property is the shorthand for the above four properties */ transition: property duration timing-function delay; >transition-property refers to the CSS property you wish to transition. It is required in the transition shorthand.
transition-duration refers to the duration of the transition. How long do you want the transition to last? This value is written in seconds with the s suffix (like 3s ). It is also required in the transition shorthand.
transition-timing-function refers to how the transition occurs. You’ll learn more about this later.
transition-delay refers to how long you want to wait before starting the duration. This value is written in seconds with the s suffix (like 3s ). transition-delay is optional in the transition shorthand.
Triggering transitions
You can trigger CSS transitions directly with pseudo classes like :hover (activates when the mouse goes over an element), :focus (activates when a user tabs onto an element, or when a user clicks into an input element), or :active (activates when user clicks on the element).
/* creating transitions directly in CSS */ .button background-color: #33ae74; transition: background-color 0.5s ease-out; > .button:hover background-color: #1ce; >See the Pen CSS Transition by Zell Liew (@zellwk) onCodePen.
You can also trigger CSS transitions through JavaScript by adding or removing a class.
.button background-color: #33ae74; transition: background-color 0.5s ease-out; > .button.is-active background-color: #1ce; >const button = document.querySelector('.button') button.addEventListener('click', _ => button.classList.toggle('is-active'))Understanding transition-timing-function
The transition-timing-function governs how a transition occurs. All transitions have a value of linear by default, which means the property changes evenly until the end of the transition.
.selector transition: transform 1s linear; /* OR */ transition-property: transform; transition-duration: 1s; transition-timing-function: linear; >The thing is, nothing moves linearly in life. That’s not how real objects move. Sometimes, we accelerate; sometimes, we decelerate. The transition-timing-function allows you to capture all of that.
Imagine yourself throwing a tennis ball into an open field. The ball leaves your hand with the maximum speed. As it moves, it loses energy, it decelerates and eventually comes to a halt. This is called ease-out . There’s a timing function for it.
.selector transition-timing-function: ease-out; >Now imagine you’re in a car. It’s not moving right now. When you move the car, it accelerates and goes toward its top speed. This is called ease-in . There’s also a timing function for it.
.selector transition-timing-function: ease-in; >Since you have ease-in and ease-out , there’s also a timing function that combines the two together, ease-in-out . (I advise against using ease-in-out in your transitions unless your transitions last longer than a second. Nothing eases in and out within a second. It simply looks weird.)
.selector transition-timing-function: ease-in-out; >See this pen for a demo of the timing functions you’ve learned so far:
Finally, if you don’t like any of the above choices, you can create your own timing function with cubic-bezier .
Creating your own timing function with cubic-bezier
A Cubic-bezier is a set of four values that determine your transition-timing-function. It looks like this:
.selector transition-timing-function: cubic-bezier(x1, y1, x2, y2); >Don’t worry about the x1 , y1, , x2 and y2 . You’ll never create cubic-bezier curves by writing numbers yourself (unless you already know what they mean and you’re tweaking your timing function for perfection).
You can rely on both Chrome and Firefox’s trusty developer tools to help you create your curves. To use it, you add a transition-timing-function into an element, then open up devtools and click on the timing function.
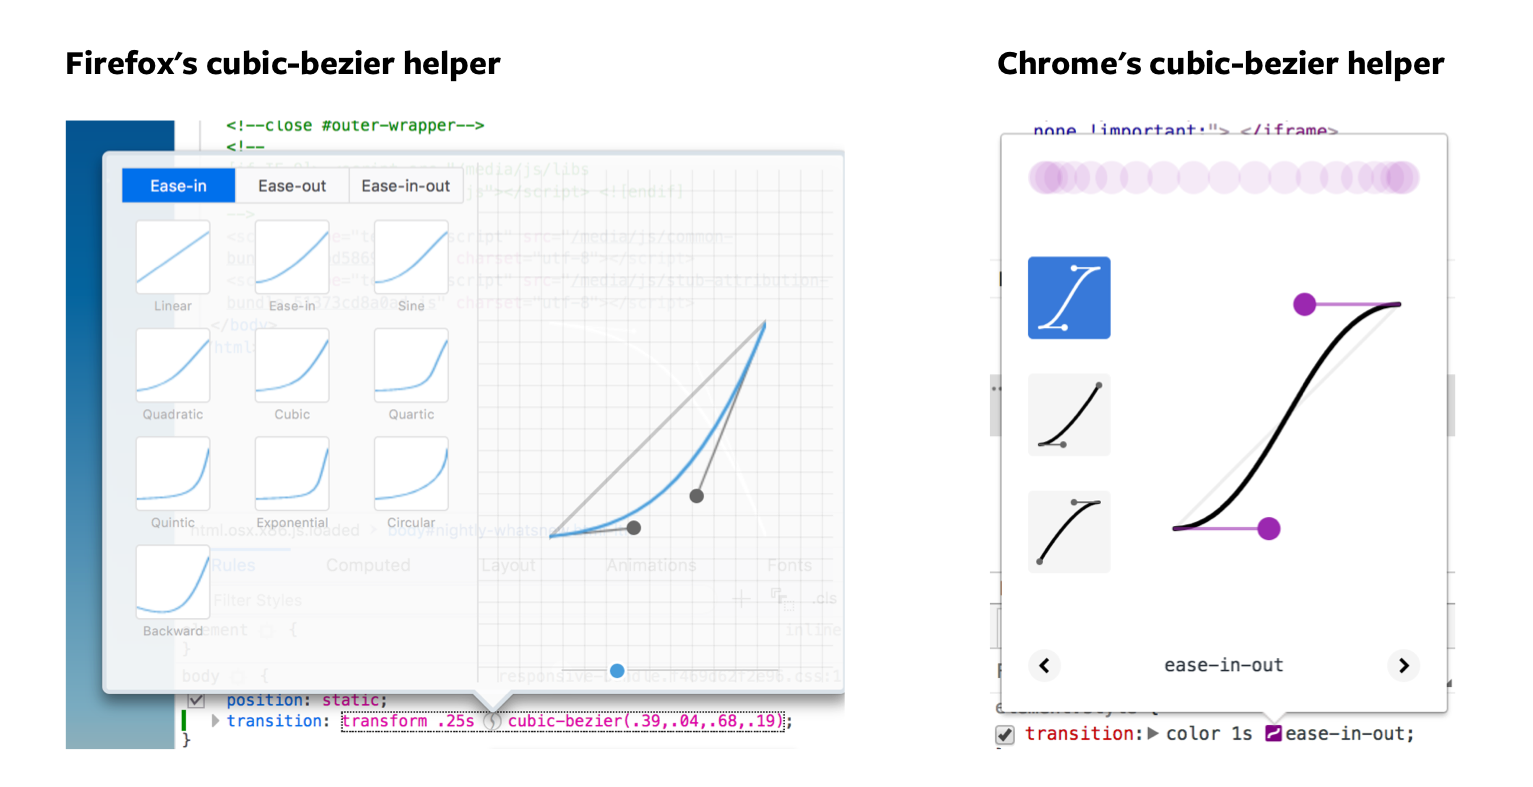
Going in-depth about creating your own bezier curves for your animations is out of scope for today’s article. If you’re interested, you can find more information about cubic-bezier curves in ”Understanding CSS Timing Functions” by Stephen Greig.
Transitioning two or more properties
You can transition two (or more) CSS properties by separating them with a comma in your transition or transition-property property.
You can do the same with duration, timing-functions and delays as well. If the values are the same, you only need to specify one of them.
.selector transition: background-color 1s ease-out, color 1s ease-out; /* OR */ transition-property: background, color; transition-duration: 1s; transition-timing-function: ease-out; >You may be tempted to transition every CSS property with all . Don’t ever do this. This is bad for performance. Always specify the property you’re trying to transition.
/* DON'T EVER DO THIS */ .selector transition-property: all; > /* ALWAYS DO THIS */ .selector transition-property: background-color, color, transform; >Transitioning in vs transitioning out
Sometimes, you want the properties to transition in and out at differently. You want the duration, timing-function or delay to be different.
To do so, you write another set of transition- properties.
.button background-color: #33ae74; transition: background-color 0.5s ease-out; > .button:hover background-color: #1ce; transition-duration: 2s; >When you write transition properties in the triggering (pseudo) class, the transition properties in the triggering class overwrites the original transition properties you’ve stated in the base class.
So, in the example above, when you hover on the button, the background color takes 2 seconds to change from #33ae74 to #1ce .
When you hover out from the button, the background color only takes 0.5s to change back to #1ce because the transition-duration of 2s no longer exists.
Wrapping up
CSS Transitions are the easiest way to perform animations. You can create transitions either with the transition shorthand or with transition- properties.
To create a transition, you overwrite a property in a class (or psuedo class), and you specify the property to transit in transition or transition-property .
Remember to change your transition-timing-function so your animation looks more real!
If you loved this article, you’ll love learn Learn JavaScript—a course that helps you learn to build real components from scratch with Javascript. Click here to find out more about Learn JavaScript if you’re interested.
I hope you found this useful. If you did, I hope you’ll share it with someone else. And feel free to reach out if you have any questions or comments.
Thanks for reading, all the best, and happy coding!
Want to become a better Frontend Developer?
Don’t worry about where to start. I’ll send you a library of articles frontend developers have found useful!
I’ll also send you one article every week to help you improve your FED skills crazy fast!
Want to become a better Frontend Developer?
Don’t worry about where to start. I’ll send you a library of articles frontend developers have found useful!
I’ll also send you one article every week to help you improve your FED skills crazy fast!
© 2013 — 2023 Zell Liew. All rights reserved · Terms
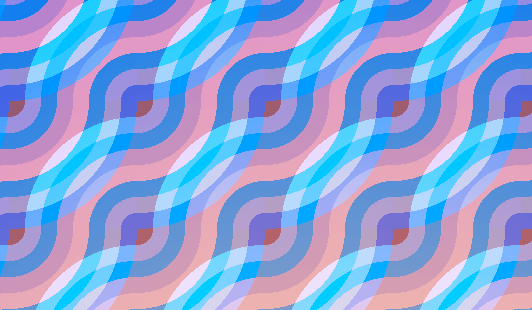
Плавное изменение background
Анимацию можно легко сделать через CSS свойство transition например для кнопок, меню и т.д. Подробнее на htmlbook.ru.
Transition background
Например, изображение меняются при наведении на него курсора мыши ( :hover ).
Transition background-size
Также transition можно применить к размеру изображения ( background-size ).
Как дополнение, можно добаввить смену background-image :
Комментарии
Другие публикации

Такой эффект можно сделать с помощью :before у родительского элемента. Поверх изображения помещается абсолютный блок с.
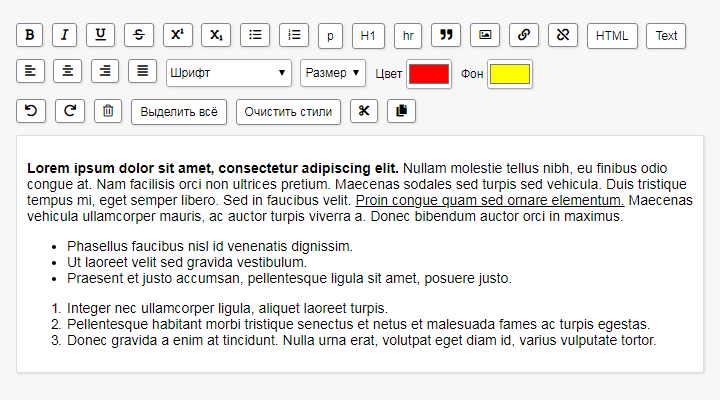
Если добавить атрибут contenteditable к элементу, его содержимое становится доступно для редактирования пользователю, а.

Вопрос генерации QR-кодов в PHP достаточно освещён, есть много библиотек, одной из них является «PHP QR Code» – быстрый и легкий класс, рассмотрим его применение совместно с графической библиотекой.

Градиент в цвет шрифта можно добавить с помощью CSS свойства background-clip: text, которое окрашивает текст в цвет или изображение указанного в background-image.

В CSS3 появилась возможность указать в свойстве background несколько изображений (Multiple Backgrounds), при этом они.
transition
The transition property is a shorthand property used to represent up to four transition-related longhand properties:
transition: [transition-property] [transition-duration] [transition-timing-function] [transition-delay];transition properties allow elements to change values over a specified duration, animating the property changes, rather than having them occur immediately. So, if we have, say, a box with a red background that we want to change to a green background when it is hovered, we can reach right for the transition property to move between background colors:
Specifying which properties to transition
Notice that we’ve called out the background-color property in the transition declaration. That tells the browser that we’re planning to transition background colors and nothing else when a transition occurs between hovered and non-hovered states. Notice, too, that we told the browser that the transition should take two seconds and follow and ease-out timing function, which means the transition starts fast, then slows down towards the end. You can specify a particular property as we have above, or use a value of all to refer to transition properties:
all specified for the transition-property portion of the shorthand. You may also comma separate value sets to do different transitions on different properties:
For the most part, the order of the values does not matter — unless a delay is specified. If you specify a delay, you must first specify a duration. The first value that the browser recognizes as a valid time value will always represent the duration. Any subsequent valid time value will be parsed as the delay. Some properties cannot be transitioned because they are not animatable properties. See the spec for a full list of which properties are animatable. By specifying the transition on the element itself, you define the transition to occur in both directions. That is, when the styles are changed (e.g. on hover on), they properties will transition, and when the styles change back (e.g. on hover off) they will transition. For example, the following demo transitions on hover, but not on hover off:
This browser support data is from Caniuse, which has more detail. A number indicates that browser supports the feature at that version and up.