- Change color of PNG image via CSS?
- 28 Answers 28
- How to Embed a .png Image Into an HTML Page?
- Method 1: How to Embedding a “.png” Image in HTML With Tag?
- Step 1: Insert Heading
- Step 2: Design a div Container
- Step 3: Add “.png” Image
- Method 2: How to Embedding a “.png” Image in HTML With CSS Properties?
- Step 1: Add Heading
- Step 2: Create a “div” Container
- Step 3: Add “.png” Image
- Output
- Conclusion
- Новые форматы графики в CSS с помощью обновлённой функции image-set
- Несколько расширений одного и того же изображения
- Новые форматы изображений
- Использование новых форматов изображений путем указания типа
- Вместо этого используйте для фона
- Mix two .png images with alpha border with CSS
- 4 Answers 4
Change color of PNG image via CSS?
Given a transparent PNG displaying a simple shape in white, is it possible to somehow change the color of this through CSS? Some kind of overlay or what not?
You can set background-color CSS property. You can create non-transparent part that will be fixed, and transparent part of image which will be filled by any color you like via CSS. Is that what you want to achieve?
You can use psuedo-elements with a blending mode to recolor any icon that is 100% black or 100% white (background stays transparent). See my answer here: stackoverflow.com/a/39796437/1472114
For those looking for an actual, up-to-date answer that doesn’t involve those ghastly «filters» which are totally not meant for this, look no further than: stackoverflow.com/a/32736304/671092 You can skip the rest: you’re welcome.
28 Answers 28
You can use filters with -webkit-filter and filter : Filters are relatively new to browsers but supported in over 90% of browsers according to the following CanIUse table: https://caniuse.com/#feat=css-filters
You can change an image to grayscale, sepia and lot more (look at the example).
So you can now change the color of a PNG file with filters.
body < background-color:#03030a; min-width: 800px; min-height: 400px >img < width:20%; float:left; margin:0; >/*Filter styles*/ .saturate < filter: saturate(3); >.grayscale < filter: grayscale(100%); >.contrast < filter: contrast(160%); >.brightness < filter: brightness(0.25); >.blur < filter: blur(3px); >.invert < filter: invert(100%); >.sepia < filter: sepia(100%); >.huerotate < filter: hue-rotate(180deg); >.rss.opacity


How to Embed a .png Image Into an HTML Page?
![]()
The ability to embed images within a message to appear when users view something makes HTML useful for email communication. Since everything is self-contained, you do not need a web server anywhere to host the image. Users can embed any type of image in an HTML document, whether in the form of .png, jpeg, and others.
Let’s get started with embedding a .png image into an HTML page!
Method 1: How to Embedding a “.png” Image in HTML With Tag?
To embed a .png image into an HTML page, use the “ ” tag. Then, insert the “src” attribute and add the “.png” image as the “src” value. For practical implications, follow the steps stated below.
Step 1: Insert Heading
Initially, utilize the HTML “ ” tag to add a heading in the HTML document.
Step 2: Design a div Container
Next, design a div container by adding the “ ” element and insert a class or id attribute according to your choice. Then, set the value of this property for later use.
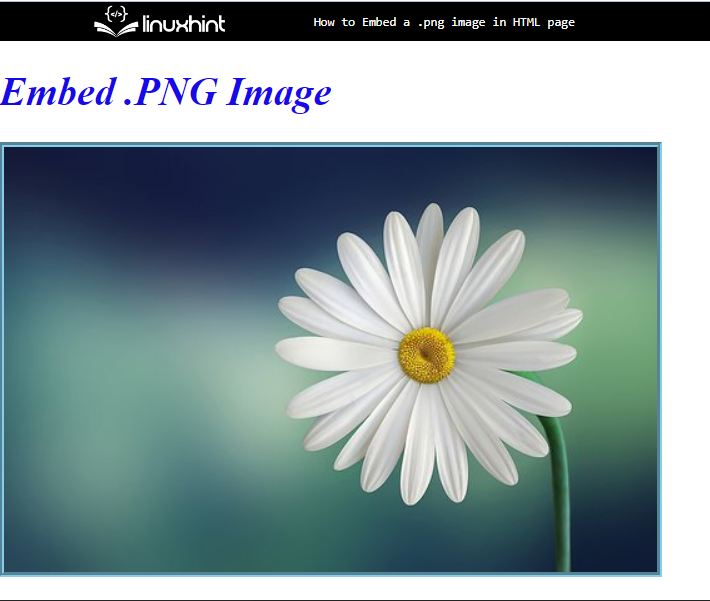
Step 3: Add “.png” Image
Now, use a “ ” tag to add any type of media file to the HTML page. To do so, the “src” attribute was added inside the “ ” tag, and added a png image as the “src” value. Furthermore, you can apply styling by using the inline “style” attribute and setting the CSS properties which you want to apply:
It can be observed that the specified image has been embedded successfully:
Method 2: How to Embedding a “.png” Image in HTML With CSS Properties?
To embed a “.png” image into an HTML page using CSS properties, the “background-image” property can be utilized. For practical implications, try out the stated instructions.
Step 1: Add Heading
In HTML, add a heading with the help of the heading tag from “” to “ ” tag.
Step 2: Create a “div” Container
Then, use the “ ” tag to create a div container in an HTML document:
Embed .PNG Image < / h1 >
< / div >Output
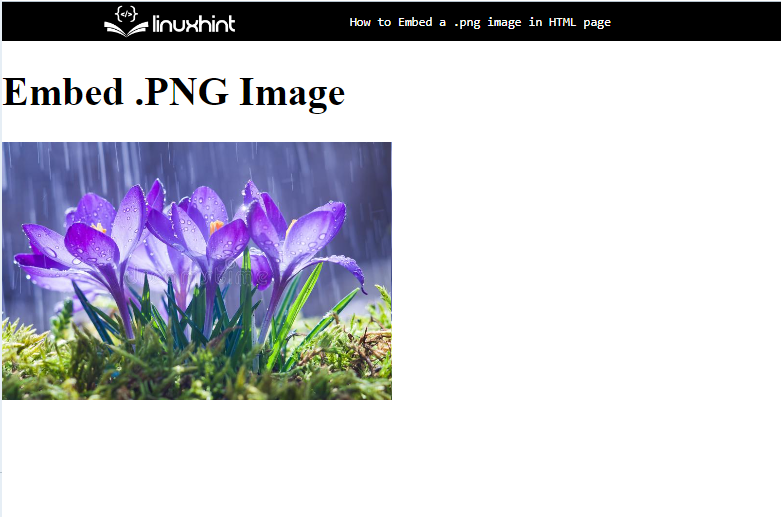
Step 3: Add “.png” Image
Access the div container by using the attribute selector with a particular attribute value as “.div-img”:
.div-img {
height : 50% px ;
width : 50% px ;
background-size : contain ;
background-image : url ( /spring-flowers.png )
}
After that, apply these CSS properties:
- “height” and “width” properties are utilized for setting the size of the stated element
- “background-size” specifies the size of the background image. For that purpose, the value of this property is set as “contain”.
- “background-image” inserts an image by using the “url()” function.
Output
That’s all about embedding a “.png” image into an HTML page.
Conclusion
To embed a “.png” image into an HTML page, the “ ” tag is utilized. Then, add the “src” attribute and insert the “.png” image as the value of “src”. You can also utilize the “background-image” CSS property to add a “.png” image on an HTML page. This tutorial has demonstrated all about embedding the .png image into an HTML page.
Новые форматы графики в CSS с помощью обновлённой функции image-set
CSS функция image-set поддерживается в браузерах на основе Chromium с 2012 года, а Safari начиная с версии 6. Недавно поддержка появилась в Firefox 88. Давайте углубимся в эту тему и посмотрим, что мы можем и чего не можем делать с помощью функции image-set ()
Несколько расширений одного и того же изображения
Вот что говорится в спецификации о функции image-set ():
Обеспечение наиболее подходящего разрешения изображения для устройства пользователя может быть сложной задачей. В идеале изображения должны иметь то же разрешение, что и устройство на котором они просматриваются. Однако, есть факторы которые могут повлиять на то, какое изображение отправить на устройство. Например, если у пользователя медленный интернет, вероятнее всего он захочет получить изображение с низким разрешением и не ждать загрузки большого изображения.
По сути, это CSS фон, эквивалентный HTML атрибуту srcset для тегов img . Используя image-set () , мы можем выбрать несколько расширений для изображения и доверится браузеру, чтобы он выбрал наиболее подходящее расширение. Это можно использовать для указания значения для трех различных CSS свойств: content , cursor и, самое полезное, background-image
1x используется для определения изображения с маленьким разрешением, а 2x используется для определения изображения с большим разрешением. x — расшифровывается как dppx, что означает количество точек на пиксель.
Chrome / Edge / Opera / Samsung Internet в настоящее время работают только с префиксом -webkit-. Если вы используете Autoprefixer, то он подставит этот префикс за вас. В Safari функция image-set не требует префикса -webkit-, но использует старый синтаксис, который требует чтобы функция url() указывала путь к изображению.
Теперь пользователи дорогих устройств увидят сверхчеткое изображение.
Также производительность будет улучшена для пользователей с медленным интернетом или с более дешевыми экранами, поскольку их браузер автоматически будет запрашивать изображение с более низким разрешением. Если вы хотите быть уверены, что изображение с высоким разрешением используется на мощных устройствах, даже при медленном соединении с интернетом , вы можете воспользоваться медиа-запрос min-resolution вместо image-set(). Подробнее о том как показывать четкие изображения на экранах с высокой плотностью пикселей, можно прочитать в недавнем посте Джейка Арчибальда в его блоге.
Всё это очень круто, но что мне действительно нужно, так это иметь возможность использовать новые форматы изображений в CSS, и при этом поддерживать старые браузеры.
Новые форматы изображений
Safari 14 поддерживает webp. А это значит, что теперь webp поддерживается везде (кроме IE). Главное преимущество webp в том, что он весит меньше чем (но при этом имеет такое же качество) JPG, PNG, или GIF.
Также, появляется всё больше и больше новых форматов изображений. Например, изображения в формате AVIF имеют невероятно маленький размер. Chrome, Opera и Samsung Internet уже поддерживают этот формат. В Firefox AVIF доступен за флагом. Этот формат изображений пока не поддерживается многими дизайн инструментами, но вы уже можете конвертировать изображения в AVIF формат с помощью приложения Squoosh, созданного командой Google. WebP 2, HEIF и JPEG XL также, в конечном итоге появятся в браузерах. Все это довольно интересно, но мы хотим чтобы браузеры, которые не поддерживают эти новые форматы, получали изображения в другом формате. К счастью, у image-set() есть для этого синтаксис.
Использование новых форматов изображений путем указания типа
HTML уже много лет поддерживает тег .

Функция image-set предоставляет CSS эквивалент, позволяющий использовать современные форматы изображений, указав MIME-тип изображения:
Если браузер не поддерживает AVIF, он проигнорирует этот формат и загрузит только второе указанное вами изображение. Если AVIF поддерживается, резервное изображение игнорируется.
В пример выше мы использовали изображение AVIF и добавили JPEG в качестве запасного варианта, но запасным вариантом может быть любой широко поддерживаемый формат изображения. Вот пример использования PNG.
В Chromium и Safari указание типа пока не поддерживается. Это значит, что вы можете использовать функцию image-set только для указания разрешений широко поддерживаемых форматов изображений, но не для добавления обратной совместимости при использовании WebP или AVIF в этих браузерах.
Вместо этого используйте для фона
Возможно, вам вообще не нужно фоновое изображение. Если вы хотите использовать современные форматы изображений, вы можете использовать тег , который лучше поддерживается браузерами. Если вы установите для изображения position: absolute , поверх него легко можно будет отобразить другие элементы.
Mix two .png images with alpha border with CSS
Is there a way to blend two PNG images to make perfect match when they both have border with alpha on it? This is an example of the issue that I have:


Or a link to CodePen The situation is that I have two 3D renders that are saved as PNG’s, and both have alpha border with 50% transparency that will do a perfect match if you merge them in Photoshop and/or After Effects. But when creating the same situation in HTML/CSS we got a white line between the elements. After doing some reading about mix-blending-mode and background-blending-mode and do some testing with them it doesn’t seems to help. We think that both of the images (their alpha channels) pre-multiplies with the background and that is why you would get semi transparent line between them (where the border is). Is there a way to achieve this with CSS, or even maybe JavaScript/jQuery? Edit: So we won’t get into more comments on images moving and css tricks on that. It is not an option to remove that 1px, or to hide it since the big picture would not have the same look.
@Kaiido they do if you use Alpha Add Mode in AF. I am not sure if prntscr saves the png’s as indexed, if it does in Photoshop you would have to convert the image in sRGB as Photoshop doesn’t handle indexed images very good
4 Answers 4
This isn’t a matter of premultiplying with the background — it’s that along the border you have partially-transparent pixels from both images in the same position, which lets the background bleed through. 50% transparency plus 50% transparency doesn’t equal 100% opaque.
Rather than fiddling with dropshadows or pixel-adjustments to patch over the problem after the fact, I think you’ll need to adjust the image masks themselves. (I don’t believe there will be a CSS or JS solution to this because there’s no programmatic way to determine what the intended result is.)
If you’re only stacking two images, this is easy — don’t put any alpha channel on the «bottom» image, put one only on the «top» image, and you’re done.
If you need to stack more than two (or if you need a mask on the background image to allow the page background to show through), you’ll have a few options:
- wherever the border between images would cause this bleed-through, use a 1-bit alpha channel on the «bottom» image in the stack. So if you were stacking the «sphere» image above the «cube» image, the cube would have no partial transparency along the border between sphere and cube, all the pixels along the border would be 100% opaque. The sphere’s partial transparency would smooth out the border so you don’t see a pixelated fringe.
- Make the masks on the bottom images one pixel bigger than they currently are. This is the lazy way of accomplishing (1).
- pre-multiply the color within the images themselves — not with the background but with the other images that would otherwise overlap. The colors along the border darken to make up for the white color that would otherwise bleed through. (As is probably obvious this one’s a little outside my area of expertise so I can’t suggest exactly how to calculate the precise colors. )