- Password input with label and hide/show toggle eye svg — A simple tutorial
- Javascript
- CSS
- CSS Forms
- Styling Input Fields
- Example
- Padded Inputs
- Example
- Bordered Inputs
- Example
- Example
- Colored Inputs
- Example
- Focused Inputs
- Example
- Example
- Input with icon/image
- Example
- Animated Search Input
- Example
- Styling Textareas
- Example
- Styling Select Menus
- Example
- Styling Input Buttons
- Example
- Responsive Form
- Aligned Form
- Styling Password Fields To Get Better Dots
Password input with label and hide/show toggle eye svg — A simple tutorial
For HTML we need a container that will wrap everything. We’ll set «password_input_container» class to this element. Then we’ll need an input of type password. Type will be toggled later to text and back to password using javascript. We’ll also set placeholder of input to space (» «), which will allow us to detect with CSS when input has some value, so we can style it differently, because we want the label element to be both label and placeholder. Also, we need a label for password. And the button. Click on this element will fire the function called «toggle()». We’ll create it later in javascript section. Inside the button, we’ll place an eye svg.
class="password_input_container"> placeholder=" " name="password_input" type="password" id="password_input"> for="password_input">Password id="toggle_button" onclick="toggle()"> xmlns="http://www.w3.org/2000/svg" fill="none" viewBox="0 0 24 24" stroke-width="1.5" stroke="currentColor" width="15" height="15"> stroke-linecap="round" stroke-linejoin="round" d="M2.036 12.322a1.012 1.012 0 010-.639C3.423 7.51 7.36 4.5 12 4.5c4.638 0 8.573 3.007 9.963 7.178.07.207.07.431 0 .639C20.577 16.49 16.64 19.5 12 19.5c-4.638 0-8.573-3.007-9.963-7.178z" /> stroke-linecap="round" stroke-linejoin="round" d="M15 12a3 3 0 11-6 0 3 3 0 016 0z" /> Javascript
For javascript, we’ll create a function called «toggle». This function will change input’s type and button’s svg. First, we’ll select button and input by id. Then we’ll check input’s type. If it’s of type ‘password’, we’ll change it to ‘text’ (which means that input’s value will now be visible) and set button’s innerHTML to a crossed eye svg, to indicate that clicking on this button means hiding the input’s value. And if input’s type is ‘text’, we need to hide the password by setting type to ‘password’, and we also need to change button’s svg to an eye.
function toggle() let input_toggle = document.getElementById('toggle_button') let password_input = document.getElementById('password_input') if (password_input.type === 'password') password_input.type = 'text' toggle_button.innerHTML = ` ` > else password_input.type = 'password' toggle_button.innerHTML = ` ` > > CSS
Now the CSS. First, we’ll style the button. We’ll set cursor to pointer and position to absolute with top and right set to 0 with height of 100%, which means that this element will be placed at the end (near the right border, inside of our div element that wraps everything). Using flexbox, we’ll alight svg in the center and set button’s background to transparent. We’ll remove the default border and set color to grey.
.password_input_container button cursor: pointer; position: absolute; height: 100%; display: flex; justify-content: center; align-items: center; top: 0; right: 0; background-color: transparent; border: none; color: #777; > Now we’ll style the input. We’ll remove the outline and set font size to 9 pixels. We’ll add a little paddings and set width to 130 pixels. Also, we’ll set background color to transparent and border to soli grey (same as svg) 1 pixel wide with 4 pixels radius.
We’ll set text color to slightly darker color that the border.
.password_input_container input outline: none; font-size: 9px; padding: 8px; width: 130px; background-color: transparent; border: #777 solid 1px; border-radius: 4px; color: #555; > Now we’ll style the label. This element will also be a placeholder. We’ll add some margins and paddings, set position to absolute, left to 0 and top to 50% with translate Y to -50%, this will place the label in the center of the input. Now we’ll set z index to -1, because we want the input to be on top of this element so the user can click on it. I’ll set a background color to white, because I have white background (you simply set the same color as your background).
We’re doing this because this element will appear as label if input is in focus or has some value and will be moved on top of the input’s top border. Without background color, the input’s border would be seen behind the label. We’ll set color to light grey and font size to 12 pixels and a little transition.
.password_input_container label position: absolute; margin: 0 5px; left: 0; top: 50%; transform: translateY(-50%); z-index: -1; /* Put the same color as background here */ background-color: #fff; padding: 0 2px; color: #aaa; font-size: 12px; transition: .3s; > Now we’ll style the label when input is in focus or when it has some value (when placeholder » » isn’t shown). That’s why we needed an empty placeholder. We’ll set top to 0, to move this element on top of input’s top border, and we’ll set z index to 1, to place this element on top of input. Otherwise the input’s border would be on top of the label. And we’ll decrease a font size a bit.
/* Focus or containing value (placeholder not shown) */ .password_input_container input:focus + label, .password_input_container input:not(:placeholder-shown) + label top: 0; font-size: 8px; z-index: 1; > Lastly, we’ll style the label whe input is in focus. We’ll just set label’s text color and input’s border to green.
/* Only when focused */ .password_input_container input:focus + label color: rgb(15, 156, 116); font-size: 8px; > .password_input_container input:focus border-color: rgb(15, 156, 116); > CSS Forms
The look of an HTML form can be greatly improved with CSS:
Styling Input Fields
Use the width property to determine the width of the input field:
Example
The example above applies to all elements. If you only want to style a specific input type, you can use attribute selectors:
- input[type=text] — will only select text fields
- input[type=password] — will only select password fields
- input[type=number] — will only select number fields
- etc..
Padded Inputs
Use the padding property to add space inside the text field.
Tip: When you have many inputs after each other, you might also want to add some margin , to add more space outside of them:
Example
Note that we have set the box-sizing property to border-box . This makes sure that the padding and eventually borders are included in the total width and height of the elements.
Read more about the box-sizing property in our CSS Box Sizing chapter.
Bordered Inputs
Use the border property to change the border size and color, and use the border-radius property to add rounded corners:
Example
If you only want a bottom border, use the border-bottom property:
Example
Colored Inputs
Use the background-color property to add a background color to the input, and the color property to change the text color:
Example
Focused Inputs
By default, some browsers will add a blue outline around the input when it gets focus (clicked on). You can remove this behavior by adding outline: none; to the input.
Use the :focus selector to do something with the input field when it gets focus:
Example
Example
Input with icon/image
If you want an icon inside the input, use the background-image property and position it with the background-position property. Also notice that we add a large left padding to reserve the space of the icon:
Example
input[type=text] <
background-color: white;
background-image: url(‘searchicon.png’);
background-position: 10px 10px;
background-repeat: no-repeat;
padding-left: 40px;
>
Animated Search Input
In this example we use the CSS transition property to animate the width of the search input when it gets focus. You will learn more about the transition property later, in our CSS Transitions chapter.
Example
input[type=text] <
transition: width 0.4s ease-in-out;
>
input[type=text]:focus width: 100%;
>
Styling Textareas
Tip: Use the resize property to prevent textareas from being resized (disable the «grabber» in the bottom right corner):
Example
textarea <
width: 100%;
height: 150px;
padding: 12px 20px;
box-sizing: border-box;
border: 2px solid #ccc;
border-radius: 4px;
background-color: #f8f8f8;
resize: none;
>
Styling Select Menus
Example
select <
width: 100%;
padding: 16px 20px;
border: none;
border-radius: 4px;
background-color: #f1f1f1;
>
Styling Input Buttons
Example
input[type=button], input[type=submit], input[type=reset] <
background-color: #04AA6D;
border: none;
color: white;
padding: 16px 32px;
text-decoration: none;
margin: 4px 2px;
cursor: pointer;
>
/* Tip: use width: 100% for full-width buttons */
For more information about how to style buttons with CSS, read our CSS Buttons Tutorial.
Responsive Form
Resize the browser window to see the effect. When the screen is less than 600px wide, make the two columns stack on top of each other instead of next to each other.
Advanced: The following example uses media queries to create a responsive form. You will learn more about this in a later chapter.
Aligned Form
An example of how to style labels together with inputs to create a horizontal aligned form:
Styling Password Fields To Get Better Dots
Make the dots in a password field bigger with this basic CSS style. It’ll make it easier to see the number of dots in the field, helping both yourself and the visually impaired.
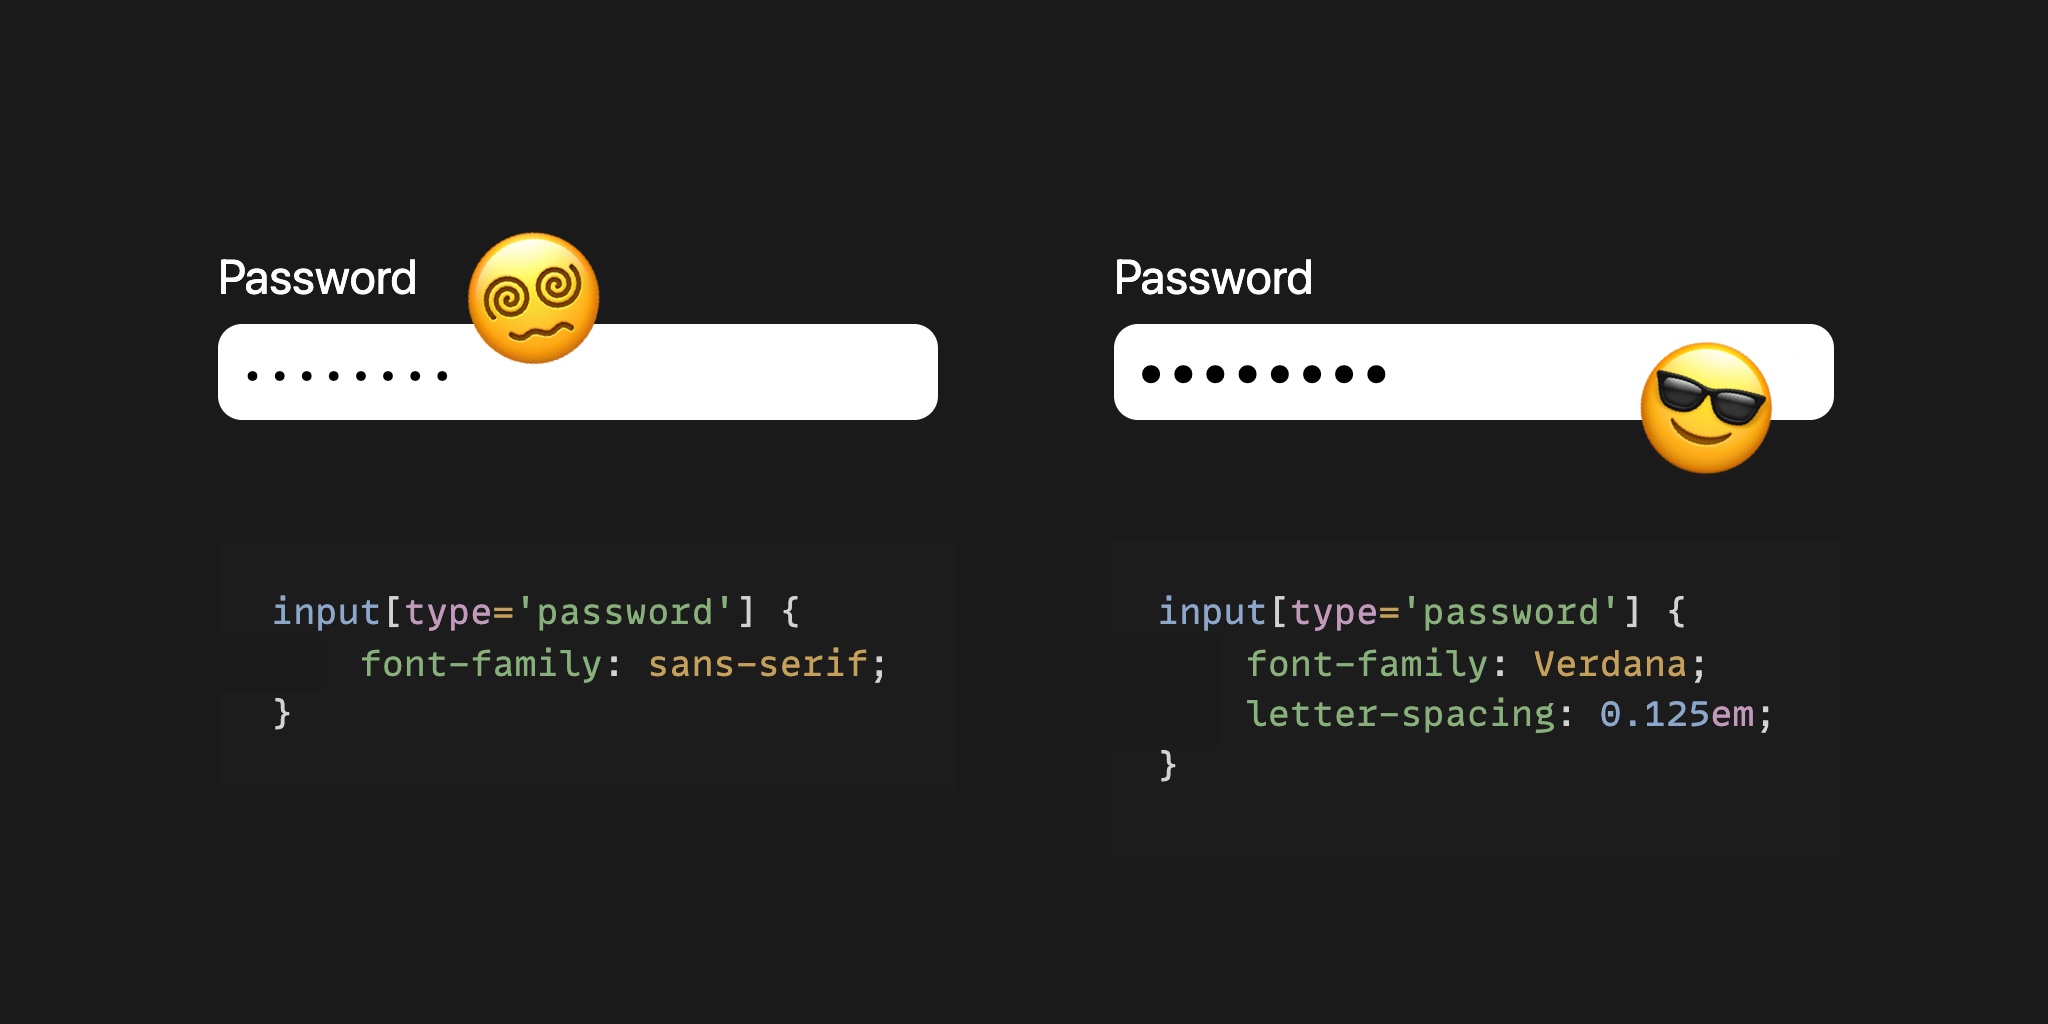
Depending the font used the dots in the password field look like this. The font-family on the field below is set to sans-serif
We can use the Verdana font to scale the dots to a more comfortable size.
input[type='password'] font-family: Verdana; >That’s better already, now let’s separate the individual dots.
input[type='password'] font-family: Verdana; letter-spacing: 0.125em; >Much better. It’s now a lot easier to see the individual dots, and the dots nicely take up space in the field.
This works on Mac Firefox / Mac Chrome / Mac Safari / Win Chrome (+Edge). Android doesn’t have Verdana so shows dots that are a bit smaller.
I share web dev tips on Twitter, if you found this interesting and want to learn more, follow me there
At PQINA I design and build highly polished web components.
Make sure to check out FilePond a free file upload component, and Pintura an image editor that works on every device.