- Using CSS generated content
- Examples
- Text content
- HTML
- CSS
- Output
- Image content
- HTML
- CSS
- Found a content problem with this page?
- MDN
- Support
- Our communities
- Developers
- ::before
- Try it
- Syntax
- Examples
- Adding quotation marks
- HTML
- CSS
- Result
- Decorative example
- HTML
- CSS
- Result
- To-do list
- HTML
- CSS
- JavaScript
- Result
- Special characters
- HTML
- CSS
- Result
- Accessibility concerns
- Specifications
- Browser compatibility
- See also
- Found a content problem with this page?
- MDN
- Support
- Our communities
- Developers
- Популярно о псевдоэлементах :Before и :After
- Синтаксис и поддержка браузерами
- Пример использования псевдоэлементов
- Использование
- Стилизация псевдоэлементов
- Использование вместе с псевдоклассами
- Добавление transition-эффекта
- Немного вдохновения
Using CSS generated content
This article describes some ways in which you can use CSS to add content when a document is displayed. You modify your stylesheet to add text content or images.
One of the important advantages of CSS is that it helps you to separate a document’s style from its content. However, there are situations where it makes sense to specify certain content as part of the stylesheet, not as part of the document. You can specify text or image content within a stylesheet when that content is closely linked to the document’s structure.
Note: Content specified in a stylesheet does not become part of the DOM.
Specifying content in a stylesheet can cause complications. For example, you might have different language versions of your document that share a stylesheet. If you specify content in your stylesheet that requires translation, you have to put those parts of your stylesheet in different files and arrange for them to be linked with the appropriate language versions of your document.
This issue does not arise if the content you specify consists of symbols or images that apply in all languages and cultures.
Examples
Text content
CSS can insert text content before or after an element, or change the content of a list item marker (such as a bullet symbol or number) before a or other element with display: list-item; . To specify this, make a rule and add ::before , ::after , or ::marker to the selector. In the declaration, specify the content property with the text content as its value.
HTML
span class="ref">somethingspan>
CSS
.ref::before font-weight: bold; color: navy; content: "Reference "; > Output
The character set of a stylesheet is UTF-8 by default, but it can also be specified in the link, in the stylesheet itself, or in other ways. For details, see 4.4 CSS style sheet representation in the CSS Specification.
Individual characters can also be specified by an escape mechanism that uses backslash as the escape character. For example, «\265B» is the chess symbol for a black queen ♛. For details, see Referring to characters not represented in a character encoding and Characters and case in the CSS Specification.
Image content
To add an image before or after an element, you can specify the URL of an image file in the value of the content property.
This rule adds a space and an icon after every link that has the class glossary :
HTML
a href="developer.mozilla.org" class="glossary">developer.mozilla.orga>
CSS
a.glossary::after content: " " url("glossary-icon.gif"); > Found a content problem with this page?
This page was last modified on Jun 30, 2023 by MDN contributors.
Your blueprint for a better internet.
MDN
Support
Our communities
Developers
Visit Mozilla Corporation’s not-for-profit parent, the Mozilla Foundation.
Portions of this content are ©1998– 2023 by individual mozilla.org contributors. Content available under a Creative Commons license.
::before
In CSS, ::before creates a pseudo-element that is the first child of the selected element. It is often used to add cosmetic content to an element with the content property. It is inline by default.
Try it
Note: The pseudo-elements generated by ::before and ::after are boxes generated as if they were immediate children of the element on which they are applied, or the «originating element,» and thus can not apply to replaced elements, such as , whose content is outside the scope of the CSS formatting model.
Syntax
Note: Selectors Level 3 introduced the double-colon notation ::before to distinguish pseudo-classes from pseudo-elements. Browsers also accept single-colon notation :before , introduced in CSS2.
Examples
Adding quotation marks
One simple example of using ::before pseudo-elements is to provide quotation marks. Here we use both ::before and ::after to insert quotation characters.
HTML
q>Some quotesq>, he said, q>are better than none.q>
CSS
q::before content: "«"; color: blue; > q::after content: "»"; color: red; > Result
Decorative example
We can style text or images in the content property almost any way we want.
HTML
span class="ribbon">Notice where the orange box is.span>
CSS
.ribbon background-color: #5bc8f7; > .ribbon::before content: "Look at this orange box."; background-color: #ffba10; border-color: black; border-style: dotted; > Result
To-do list
In this example we will create a simple to-do list using pseudo-elements. This method can often be used to add small touches to the UI and improve user experience.
HTML
ul> li>Buy milkli> li>Take the dog for a walkli> li>Exerciseli> li>Write codeli> li>Play musicli> li>Relaxli> ul>
CSS
li list-style-type: none; position: relative; margin: 2px; padding: 0.5em 0.5em 0.5em 2em; background: lightgrey; font-family: sans-serif; > li.done background: #ccff99; > li.done::before content: ""; position: absolute; border-color: #009933; border-style: solid; border-width: 0 0.3em 0.25em 0; height: 1em; top: 1.3em; left: 0.6em; margin-top: -1em; transform: rotate(45deg); width: 0.5em; > JavaScript
const list = document.querySelector("ul"); list.addEventListener( "click", (ev) => if (ev.target.tagName === "LI") ev.target.classList.toggle("done"); > >, false, );
Here is the above code example running live. Note that there are no icons used, and the check-mark is actually the ::before that has been styled in CSS. Go ahead and get some stuff done.
Result
Special characters
As this is CSS; not HTML, you can not use markup entities in content values. If you need to use a special character, and can not enter it literally into your CSS content string, use a unicode escape sequence, consisting of a backslash followed by the hexadecimal unicode value.
HTML
ol> li>Crack Eggs into bowlli> li>Add Milkli> li>Add Flourli> li aria-current="step">Mix thoroughly into a smooth batterli> li>Pour a ladleful of batter onto a hot, greased, flat frying panli> li>Fry until the top of the pancake loses its glossli> li>Flip it over and fry for a couple more minutesli> li>serve with your favorite toppingli> ol>
CSS
li padding: 0.5em; > li[aria-current="step"] font-weight: bold; > li[aria-current="step"]::after content: " \21E6"; /* Hexadecimal for Unicode Leftwards white arrow*/ display: inline; > Result
Accessibility concerns
Using a ::before pseudo-element to add content is discouraged, as it is not reliably accessible to screen readers.
Specifications
Browser compatibility
BCD tables only load in the browser
See also
Found a content problem with this page?
This page was last modified on Jul 7, 2023 by MDN contributors.
Your blueprint for a better internet.
MDN
Support
Our communities
Developers
Visit Mozilla Corporation’s not-for-profit parent, the Mozilla Foundation.
Portions of this content are ©1998– 2023 by individual mozilla.org contributors. Content available under a Creative Commons license.
Популярно о псевдоэлементах :Before и :After
Псевдоэлементы :before и :after позволяют добавлять содержимое (стили) до и после элемента, к которому были применены.

Всего существует несколько типов псевдоэлементов: :first-line, :first-letter, ::selection, :before и :after. В этой статье подробно рассмотрены последние два, как наиболее полезные.
Синтаксис и поддержка браузерами
Псевдоэлементы появились еще в CSS1, но пошли в релиз только в CSS2.1. В самом начале в синтаксисе использовалось одно двоеточие, но в CSS3 используется двойное двоеточие для отличия от псевдоклассов:

Но в любом случае, современные браузеры умеют понимать оба типа синтаксиса псевдоэлементов, кроме Internet Explorer 8, который воспринимает только одно двоеточие. Поэтому надежнее использовать одно.
Пример использования псевдоэлементов
:before Это основной контент. :after
Элементы :before и :after не будут сгенерированы, т.е. не будут видны в коде страницы, поэтому они и называются псевдоэлементами.
Использование
Использовать псевдоэлементы крайне просто: :before добавляется перед нужным элементом, а :after — после.
Для добавление контента внутри псевдоэлементов можно воспользоваться CSS-свойством content.
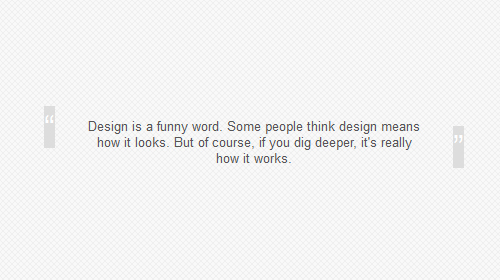
Простой пример: необходимо добавить кавычки для цитаты:

blockquote:before < content: open-quote; >blockquote:after
Стилизация псевдоэлементов
К псевдоэлементом можно применять такие же стили, как и к «реальным»: изменение цвета, добавление фона, регулировка размера шрифта, выравнивание текста и т.д.
blockquote:before < content: open-quote; font-size: 24pt; text-align: center; line-height: 42px; color: #fff; background: #ddd; float: left; position: relative; top: 30px; >blockquote:after
Созданные элементы по умолчанию inline-элементы, поэтому при указании высоты или ширины необходимо установить display: block:
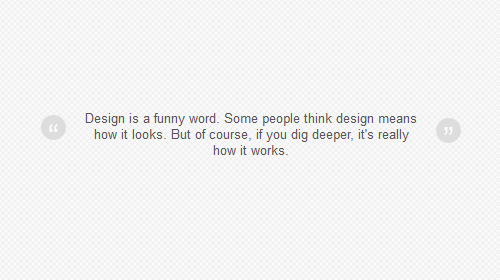
blockquote:before < content: open-quote; font-size: 24pt; text-align: center; line-height: 42px; color: #fff; background: #ddd; float: left; position: relative; top: 30px; border-radius: 25px; /** define it as a block element **/ display: block; height: 25px; width: 25px; >blockquote:after < content: close-quote; font-size: 24pt; text-align: center; line-height: 42px; color: #fff; background: #ddd; float: rightright; position: relative; bottombottom: 40px; border-radius: 25px; /** define it as a block element **/ display: block; height: 25px; width: 25px; >Также внутри псевдоэлемента можно использовать картинку вместо обычного текста, и даже добавлять фоновое изображение.
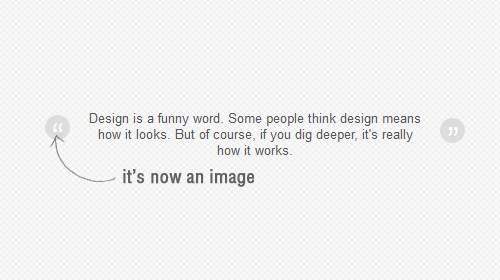
blockquote:before < content: " "; font-size: 24pt; text-align: center; line-height: 42px; color: #fff; float: left; position: relative; top: 30px; border-radius: 25px; background: url(images/quotationmark.png) -3px -3px #ddd; display: block; height: 25px; width: 25px; >blockquote:after < content: " "; font-size: 24pt; text-align: center; line-height: 42px; color: #fff; float: rightright; position: relative; bottombottom: 40px; border-radius: 25px; background: url(images/quotationmark.png) -1px -32px #ddd; display: block; height: 25px; width: 25px; >В этом примере свойство content содержит пустую строку, это необходимо, иначе псевдоэлемент не будет правильно отображаться.
Использование вместе с псевдоклассами
Псевдоэлементы могут быть использованы вместе с псевдоклассами, в нашем примере это поможет добавить hover-эффект кавычкам:
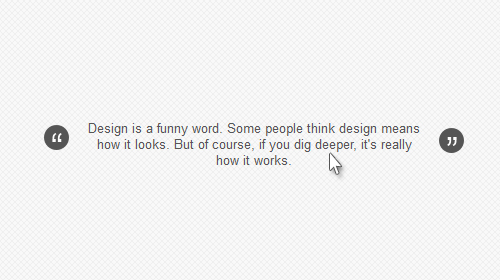
blockquote:hover:after, blockquote:hover:before
Добавление transition-эффекта
Также можно применить свойство transition для плавного изменения цвета кавычек:
transition: all 350ms; -o-transition: all 350ms; -moz-transition: all 350ms; -webkit-transition: all 350ms; К сожалению, это нормально работает только в последних версиях Firefox.
Посмотреть демонстрацию примера из этой статьи.
Немного вдохновения
Три примера использования псевдоэлементов :before и :afte: