- How to Add an Onclick Effect with HTML and CSS
- Example of adding an onclick event by using the checkbox hack:
- Result
- Example of adding an onclick event for resizing the image:
- Example of adding an onclick effect on the tag:
- How to Make Button onclick in HTML
- How to add URL to the window object
- Example of adding URL to the window object:
- Example of using a button onclick to know the current date:
- Example of adding an onclick event:
- Onclick CSS
- Syntax of the onclick event
- In HTML
- In Js
- Example 1: Onclick event to change the text color
- Example 2: Create alerts using the Onclick event
- Example 3: Onclick event to copy the text
- Conclusion
- About the author
- Aqsa Yasin
How to Add an Onclick Effect with HTML and CSS
The most common way of creating a click event with CSS is using the checkbox hack. This method has broad browser support. You need to add a for attribute to the element and an id attribute to the element.
Example of adding an onclick event by using the checkbox hack:
html> html> head> style> label < display: block; background: #dbdbd9; width: 80px; height: 80px; > #box:checked + label < background: #fffc47; color: #666666; > style> head> body> form action="/form/submit" method="post"> input type="checkbox" id="box" /> label for="box">Click here label> form> body> html>Result
In the example above, we applied the same value both to the id attribute of the tag and for attribute of the tag. The label onclick is restyled with the :checked pseudo-class.
Example of adding an onclick event for resizing the image:
html> html> head> style> #btnControl < display: none; > #btnControl:checked + label > img < width: 150px; height: 170px; > style> head> body> input type="checkbox" id="btnControl" /> label class="btn" for="btnControl"> img src="https://images.unsplash.com/photo-1565520651265-1148c3b277f4?ixlib=rb-1.2.1&ixid=eyJhcHBfaWQiOjEyMDd9&auto=format&fit=crop&w=500&q=60" id="btnLeft" /> label> body> html>Since a element can be associated only with one form control, you cannot just place a button inside the tag. But you can add some CSS to change the appearance and behavior of the button.
Example of adding an onclick effect on the tag:
html> html> head> style> #btnControl < display: none; > .btn < width: 80px; height: 30px; background: #ffffff; border-radius: 7px; padding: 1px 3px; box-shadow: 1px 1px 1px #000000; display: block; text-align: center; background-image: linear-gradient(to bottom, #e8e8e8, #a1a1a1); font-family: arial; font-size: 14px; line-height: 30px; > .btn:hover < background-image: linear-gradient(to bottom, #97e8ae, #3be36b); > .btn:active < margin-left: 1px 1px 0; box-shadow: -1px -1px 1px #000; outline: 1px solid #000000; -moz-outline-radius: 7px; background-image: linear-gradient(to top, #97e8ae, #3be36b); > #btnControl:checked + label < width: 70px; height: 74px; line-height: 74px; > style> head> body> input type="checkbox" id="btnControl" /> label class="btn" for="btnControl">Click here label> body> html>How to Make Button onclick in HTML
The onclick attribute is an event attribute that is supported by all browsers. It appears when the user clicks on a button element. If you want to make a button onclick, you need to add the onclick event attribute to the element.
How to add URL to the window object
The button onclick runs a script when the user clicks a button. Let’s see an example where we have a button, clicking on which you’ll go to our website. To achieve this, we’ll just add the URL of the website to the window object.
Example of adding URL to the window object:
html> html> head> title>Title of the document title> head> body> button onclick="window.location.href='https://w3docs.com';">Click Here button> body> html>You can also use a button onclick in order to know the current date just by adding «getElementById(‘demo’).innerHTML=Date()» to the onclick event.
Example of using a button onclick to know the current date:
html> html> head> title>Title of the document title> head> body> p>Click the button to see the current date. p> button onclick="getElementById('demo').innerHTML=Date()">What day is today? button> p id="demo"> p> body> html>The onclick event is used to call a function when an element is clicked. That is why it is mostly used with the JavaScript function. Let’s consider an example where you need to click the button to set a function that will output a message in a element with id=»demo».
Example of adding an onclick event:
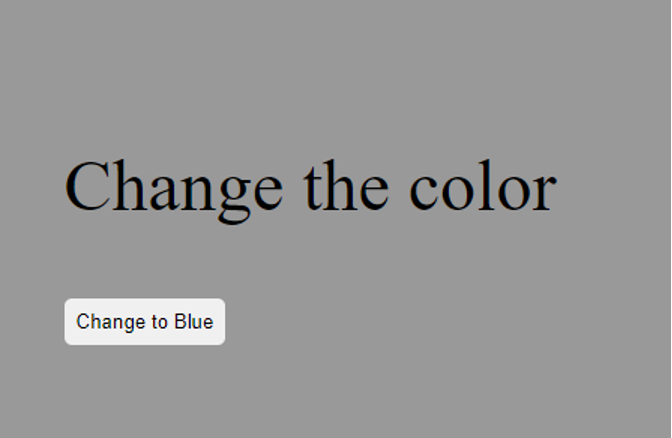
html> html> head> title>Title of the document title> head> body> p>There is a hidden message for you. Click to see it. p> button onclick="myFunction()">Click me! button> p id="demo"> p> script> function myFunction( ) < document.getElementById("demo").innerHTML = "Hello Dear Visitor! We are happy that you've chosen our website to learn programming languages. We're sure you'll become one of the best programmers in your country. Good luck to you!"; > script> body> html>Onclick CSS
![]()
An object’s button or image has an attribute called “OnClick.” When the image or a button is clicked, an expression in it is evaluated. Users can do more than just evaluate variables by using an onclick event. Besides, it can be used to define an attribute of any kind of expression. Also, we can assign a value to a global variable with the help of the: =operator. When the user presses/clicks the element or button, the onclick event occurs. By clicking/pressing the element, it enables us to execute the JavaScript code. This event can also be used to display warnings and validate forms, among other things.
Syntax of the onclick event
In HTML
Here, elements can be a button or something else. In the onclick event we will write a script or a function. The onclick event supports almost all elements of html except , , , , , , , ,
, , and . It means an onclick event cannot be used with these tags.
In Js
In JavaScript, we will assign a function to the onclick event. Inside the parenthesis, we will write the script to perform a task or function.
Example 1: Onclick event to change the text color
When we click a button on a website, the onclick event triggers a certain behavior. This might occur when we submit online forms or data when we modify specific web page content and other similar events. To practice the onclick event in a real-world setting, we will first write some simple HTML with some styling.
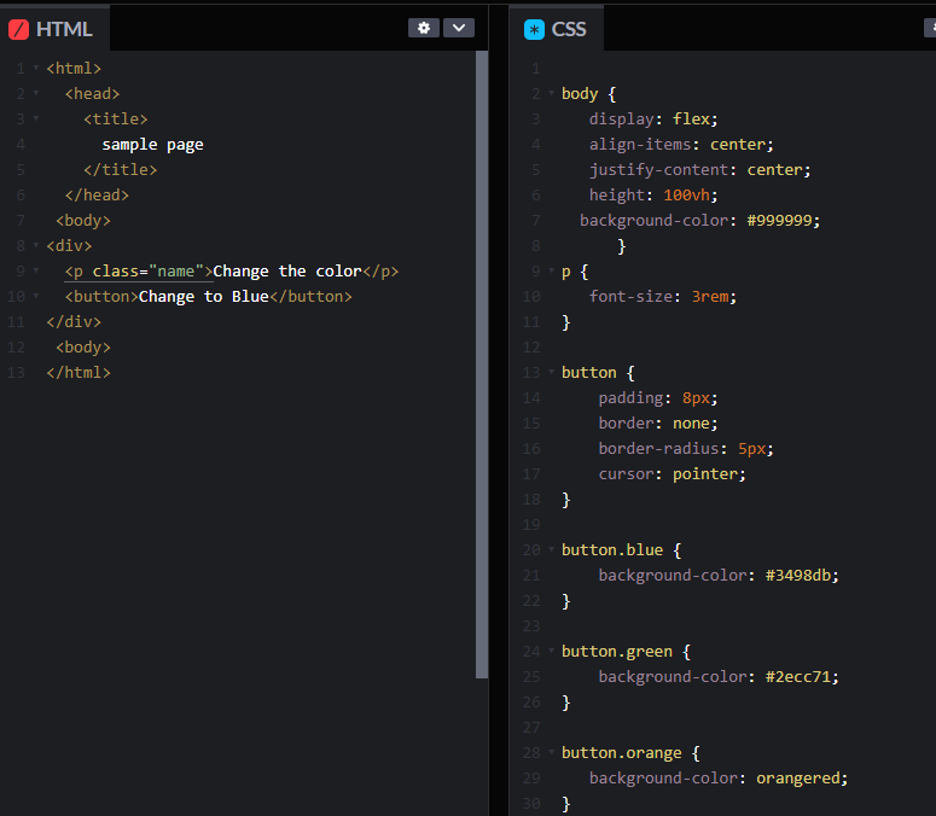
We have created a simple HTML page on which there is some text with a button. To stylize the page we have used some CSS.
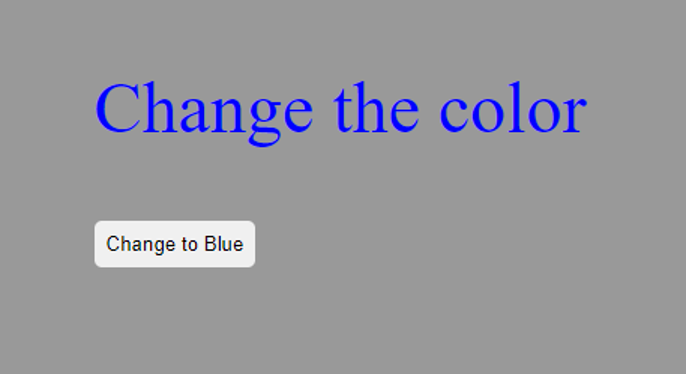
When we click the button, we intend to make the text blue.
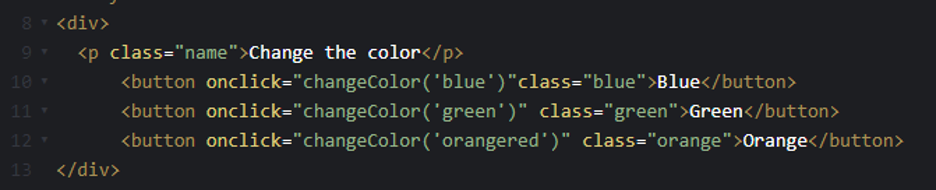
After writing the JavaScript method to alter the color, we must add an onclick property to our button. Therefore, we must slightly alter our HTML:
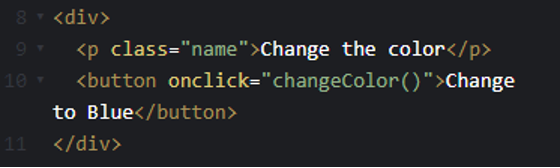
We have added an onclick event inside the button tag. We have assigned a function named changeColor() to execute. For the result, we have to create a Js file to write it in a JavaScript file or a tag in an HTML file. However, we will write our script inside the HTML file.
First, we must choose the element we wish to modify, which is the text “Change the color” contained within the
tag. The DOM’s getElementsByClassName(), getElementById(), or querySelector() methods in JavaScript can be used to accomplish this. The value is then assigned to the variable. We will use querySelector() in this example because it’s more up-to-date and quicker. Additionally, the variables will be declared using const. It is safer because it helps to make variables read-only.

Now, inside the script tag, we will write our function.
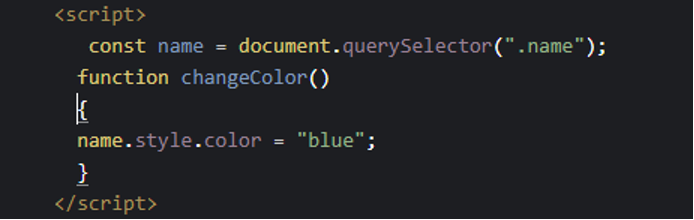
As seen above in HTML, the function we will use is changeColor(). This is the reason changeColor is set as our function identifier (name). It won’t function if the name matches what is in the HTML. In DOM to alter anything related to style, you must write “style” followed by a dot (.). The modification you want to make is then made, which could be the color, background color, text size, etc. To access our “Change the color” text, we will use the declared variable name in our function, then we set the text’s color to blue. When we press the button, the text’s color changes to blue:
By adding more colors to our text, we might take things a step further:
So, what we’d like to do is make the writing orange-red, green, and blue. This time, the onclick HTML functions accept the values for the color we wish to apply to the text. In JavaScript, these are referred to as parameters. We’ll construct a function that accepts its parameters as well. We’ll call them “color”. Our website has undergone minor changes:
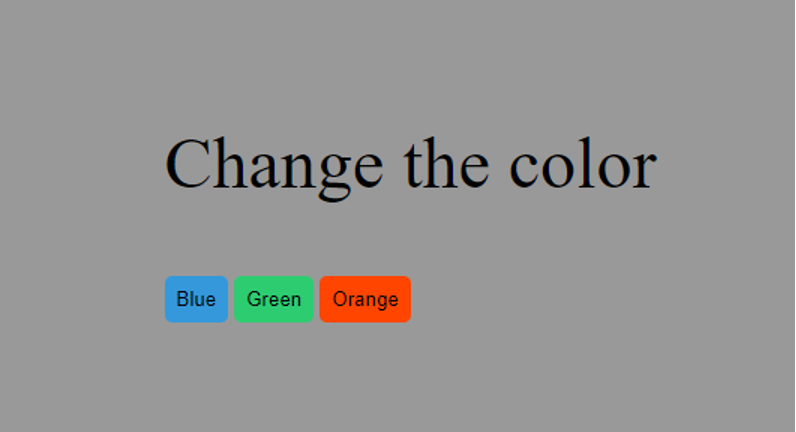
So, let’s choose our “Change the color” text and enter the code to make it orange-red, blue, and green:

The function’s code first sets the color to whatever was supplied to the changeColor() calls in the HTML buttons after retrieving the name variable, which was used to store the text “Change the color.”
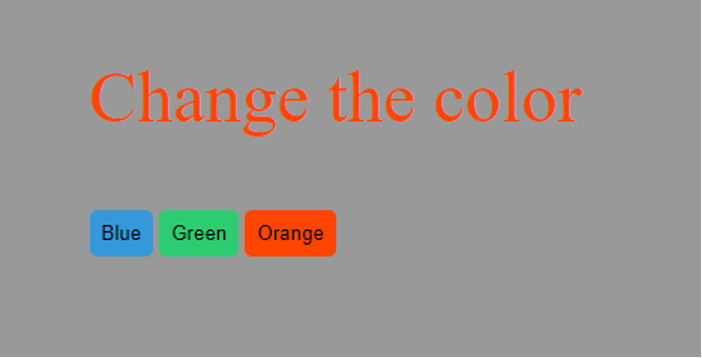
When we press one of those buttons (blue, green, and orange) the color of the text will change accordingly.
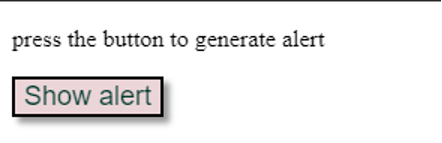
Example 2: Create alerts using the Onclick event
In this example, let’s create a sample webpage page with a button using HTML. When the button will be pressed, we will get an alert message on the top of the screen. To create a webpage, we will use the following code:

A web page consisting of a button will be created using this code:
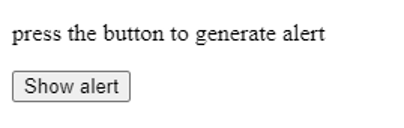
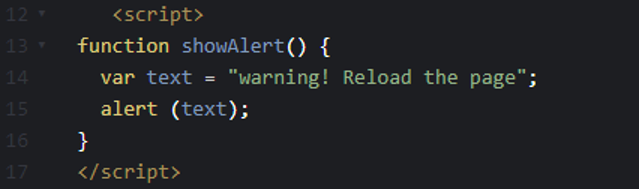
Now, we have to write a JavaScript function that will be executed to generate alerts. Let’s create a function showAlert() inside the script tags inside the same HTML code like the following:
So, after writing the JavaScript method to alter the color, we must add an onclick property to our button. Therefore, we must slightly alter our HTML:
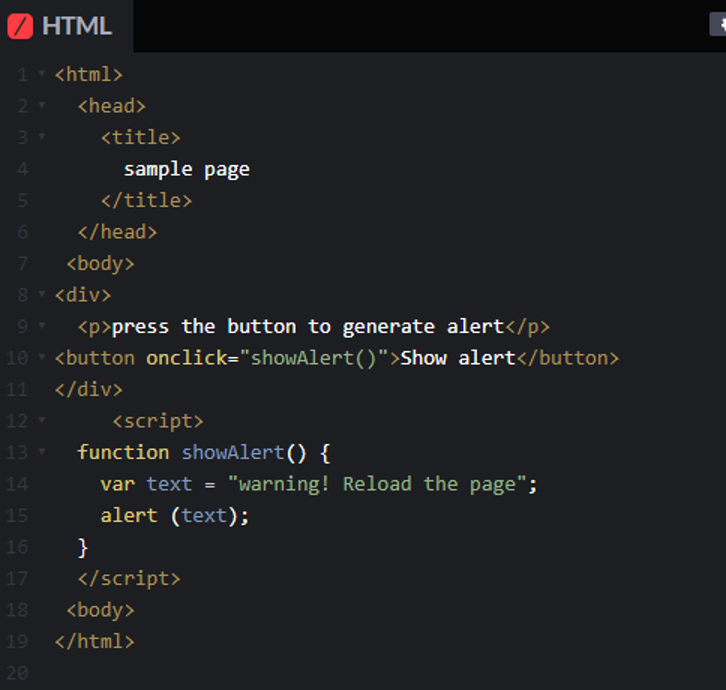
Updating this code will add functionality to the button. When a user hits the button, the onclick property on the button causes the showAlert() function to be triggered. Keyboard users can also use the onclick event. The notice will also be sent if a user uses the tab key to move to the button and then presses enter.
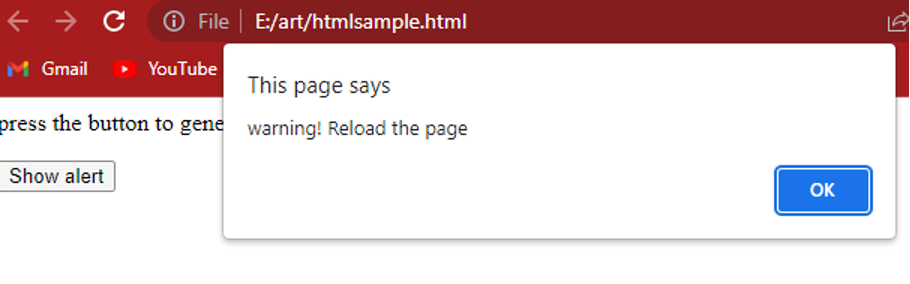
As you can see above, after pressing the show alert button we got an alert message.
For the button element, a new style can be added. To modify the button’s appearance when users mouse over it or keyboard tab to it, use the CSS pseudo-classes (:hover, :focus, and :active).

The above code will stylize a button. It is just for the user’s experience. Stylizing the button will not affect the button’s functionality.
Try clicking the button after styling it. If all goes according to plan, hovering over the button should cause a change in style, and like before, pressing the button should cause the alert to appear with your custom text displayed. To make sure it works for keyboard users as well, test it now without a mouse.
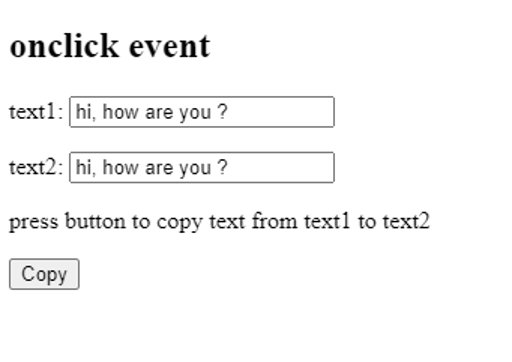
Example 3: Onclick event to copy the text
We can also copy text from one field to another by using the onclick event and a Javascript function. Let’s create an HTML page with two input text fields so we can write data to copy.

We have to write the function inside the script tags so, we can call them using the onclick event as follows:
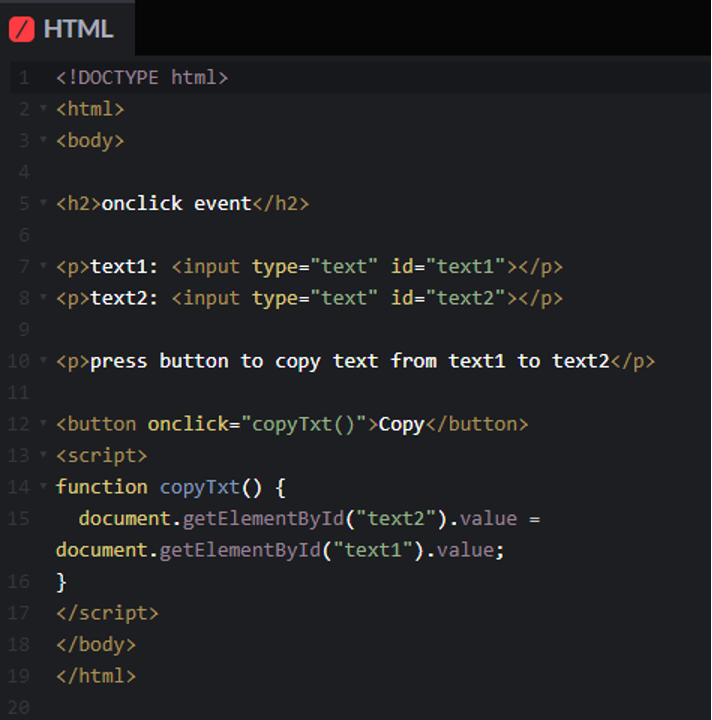
After updating the code, when you press the button, the onclick event will call the function copyTxt and the text of the text1 field will be copied to the text2 field.
Conclusion
In this tutorial, we have seen that when an element is clicked, the onclick event enables a programmer to run a JavaScript function. We can use it for many different functionalities, such as warning messages and form validation, etc. We implemented three examples in this post to show you how you can change the color of text, how to create alerts, and how to copy text from one field to another by using the onclick event and JavaScript functions.
About the author
Aqsa Yasin
I am a self-motivated information technology professional with a passion for writing. I am a technical writer and love to write for all Linux flavors and Windows.