- CSS Transitions
- Browser Support for Transitions
- How to Use CSS Transitions?
- Example
- Example
- Change Several Property Values
- Example
- Specify the Speed Curve of the Transition
- Example
- Delay the Transition Effect
- Example
- Transition + Transformation
- Example
- More Transition Examples
- Example
- Example
- CSS Transition Properties
- transition
- Constituent properties
- Syntax
- Formal definition
- Formal syntax
- Examples
- Simple example
- HTML
- CSS
- Specifications
- Browser compatibility
- See also
- Found a content problem with this page?
- MDN
- Support
- Our communities
- Developers
- CSS-анимации
- CSS transitions
- transition-property
- transition-duration
- transition-delay
- transition-timing-function
- Кривая Безье
- Шаги steps
CSS Transitions
CSS transitions allows you to change property values smoothly, over a given duration.
Mouse over the element below to see a CSS transition effect:
In this chapter you will learn about the following properties:
- transition
- transition-delay
- transition-duration
- transition-property
- transition-timing-function
Browser Support for Transitions
The numbers in the table specify the first browser version that fully supports the property.
| Property | |||||
|---|---|---|---|---|---|
| transition | 26.0 | 10.0 | 16.0 | 6.1 | 12.1 |
| transition-delay | 26.0 | 10.0 | 16.0 | 6.1 | 12.1 |
| transition-duration | 26.0 | 10.0 | 16.0 | 6.1 | 12.1 |
| transition-property | 26.0 | 10.0 | 16.0 | 6.1 | 12.1 |
| transition-timing-function | 26.0 | 10.0 | 16.0 | 6.1 | 12.1 |
How to Use CSS Transitions?
To create a transition effect, you must specify two things:
Note: If the duration part is not specified, the transition will have no effect, because the default value is 0.
The following example shows a 100px * 100px red element. The element has also specified a transition effect for the width property, with a duration of 2 seconds:
Example
The transition effect will start when the specified CSS property (width) changes value.
Now, let us specify a new value for the width property when a user mouses over the element:
Example
Notice that when the cursor mouses out of the element, it will gradually change back to its original style.
Change Several Property Values
The following example adds a transition effect for both the width and height property, with a duration of 2 seconds for the width and 4 seconds for the height:
Example
Specify the Speed Curve of the Transition
The transition-timing-function property specifies the speed curve of the transition effect.
The transition-timing-function property can have the following values:
- ease — specifies a transition effect with a slow start, then fast, then end slowly (this is default)
- linear — specifies a transition effect with the same speed from start to end
- ease-in — specifies a transition effect with a slow start
- ease-out — specifies a transition effect with a slow end
- ease-in-out — specifies a transition effect with a slow start and end
- cubic-bezier(n,n,n,n) — lets you define your own values in a cubic-bezier function
The following example shows some of the different speed curves that can be used:
Example
Delay the Transition Effect
The transition-delay property specifies a delay (in seconds) for the transition effect.
The following example has a 1 second delay before starting:
Example
Transition + Transformation
The following example adds a transition effect to the transformation:
Example
More Transition Examples
The CSS transition properties can be specified one by one, like this:
Example
div <
transition-property: width;
transition-duration: 2s;
transition-timing-function: linear;
transition-delay: 1s;
>
or by using the shorthand property transition :
Example
CSS Transition Properties
The following table lists all the CSS transition properties:
| Property | Description |
|---|---|
| transition | A shorthand property for setting the four transition properties into a single property |
| transition-delay | Specifies a delay (in seconds) for the transition effect |
| transition-duration | Specifies how many seconds or milliseconds a transition effect takes to complete |
| transition-property | Specifies the name of the CSS property the transition effect is for |
| transition-timing-function | Specifies the speed curve of the transition effect |
transition
Transitions enable you to define the transition between two states of an element. Different states may be defined using pseudo-classes like :hover or :active or dynamically set using JavaScript.
Constituent properties
This property is a shorthand for the following CSS properties:
Syntax
/* Apply to 1 property */ /* property name | duration */ transition: margin-right 4s; /* property name | duration | delay */ transition: margin-right 4s 1s; /* property name | duration | easing function */ transition: margin-right 4s ease-in-out; /* property name | duration | easing function | delay */ transition: margin-right 4s ease-in-out 1s; /* Apply to 2 properties */ transition: margin-right 4s, color 1s; /* Apply to all changed properties */ transition: all 0.5s ease-out; /* Global values */ transition: inherit; transition: initial; transition: revert; transition: revert-layer; transition: unset;
The transition property is specified as one or more single-property transitions, separated by commas.
Each single-property transition describes the transition that should be applied to a single property (or the special values all and none ). It includes:
- zero or one value representing the property to which the transition should apply. This may be any one of:
- the keyword none
- the keyword all
- a naming a CSS property.
See how things are handled when lists of property values aren’t the same length. In short, extra transition descriptions beyond the number of properties actually being animated are ignored.
Formal definition
- transition-delay : 0s
- transition-duration : 0s
- transition-property : all
- transition-timing-function : ease
- transition-delay : as specified
- transition-duration : as specified
- transition-property : as specified
- transition-timing-function : as specified
Formal syntax
transition =
#=
[ none | ] ||
||
||=
all |=
linear |
|
|
=
linear( )=
ease |
ease-in |
ease-out |
ease-in-out |
cubic-bezier( , , , )=
step-start |
step-end |
steps( [, ]? )=
[ ]#=
jump-start |
jump-end |
jump-none |
jump-both |
start |
end=
&&
?=
Examples
Simple example
In this example, when the user hovers over the element, there is a one-second delay before the four-second font-size transition occurs.
HTML
a class="target">Hover over mea>
CSS
.target font-size: 14px; transition: font-size 4s 1s; > .target:hover font-size: 36px; >There are several more examples of CSS transitions included in the Using CSS transitions article.
Specifications
Browser compatibility
BCD tables only load in the browser
See also
Found a content problem with this page?
This page was last modified on Jul 18, 2023 by MDN contributors.
Your blueprint for a better internet.
MDN
Support
Our communities
Developers
Visit Mozilla Corporation’s not-for-profit parent, the Mozilla Foundation.
Portions of this content are ©1998– 2023 by individual mozilla.org contributors. Content available under a Creative Commons license.CSS-анимации
Материал на этой странице устарел, поэтому скрыт из оглавления сайта.
Более новая информация по этой теме находится на странице https://learn.javascript.ru/css-animations.
Все современные браузеры, кроме IE9- поддерживают CSS transitions и CSS animations, которые позволяют реализовать анимацию средствами CSS, без привлечения JavaScript.
Однако, как мы увидим далее, для более тонкого контроля анимации JavaScript вовсе не будет лишним.
CSS transitions
Идея проста. Мы указываем, что некоторое свойство будет анимироваться при помощи специальных CSS-правил. Далее, при изменении этого свойства, браузер сам обработает анимацию.
Например, CSS, представленный ниже, 3 секунды анимирует свойство background-color .
Теперь любое изменение фонового цвета будет анимироваться в течение 3х секунд.
При клике на эту кнопку происходит анимация её фона:
Есть всего 5 свойств, задающих анимацию:
- transition-property
- transition-duration
- transition-timing-function
- transition-delay
Далее мы изучим их все, пока лишь заметим, что общее свойство transition может перечислять их все, в порядке: property duration timing-function delay , а также задавать анимацию нескольких свойств сразу.
Например, при клике на эту кнопку анимируются одновременно цвет и размер шрифта:
Далее мы рассмотрим свойства анимации по отдельности.
transition-property
Список свойств, которые будут анимироваться, например: left , margin-left , height , color .
Анимировать можно не все свойства, но многие. Значение all означает «анимировать все свойства».
transition-duration
Продолжительность анимации, задаётся в формате CSS time, то есть в секундах s или ms .
transition-delay
Задержка до анимации. Например, если transition-delay: 1s , то анимация начнётся через 1 секунду после смены свойства.
Возможны отрицательные значения, при этом анимация начнётся с середины.
Например, вот анимация цифр от 0 до 9 :
Она осуществляется сменой margin-left у элемента с цифрами, примерно так:
В примере выше JavaScript просто добавляет элементу класс – и анимация стартует:
Можно стартовать её «с середины», с нужной цифры, например соответствующей текущей секунде, при помощи отрицательного transition-delay .
В примере ниже при клике на цифру она начнёт двигаться с текущей секунды:
В JavaScript это делается дополнительной строкой:
transition-timing-function
Временнáя функция, которая задаёт, как процесс анимации будет распределён во времени, например начнётся ли анимация медленно, чтобы потом ускориться или наоборот.
Самое сложное, но при небольшом изучении – вполне очевидное свойство.
У него есть два основных вида значения: кривая Безье и по шагам. Начнём с первого.
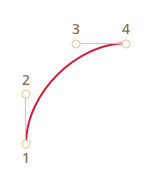
Кривая Безье
В качестве временной функции можно выбрать любую кривую Безье с 4 опорными точками, удовлетворяющую условиям:
- Начальная точка (0,0) .
- Конечная точка (1,1) .
- Для промежуточных точек значения x должны быть в интервале 0..1 , y – любыми.
Синтаксис для задания кривой Безье в CSS: cubic-bezier(x2, y2, x3, y3) . В нём указываются координаты только двух точек: второй и третьей, так как первая и последняя фиксированы.
Она указывает, как быстро развивается процесс анимации во времени.
- По оси x идёт время: 0 – начальный момент, 1 – конец времени transition-duration .
- По оси y – завершённость процесса: 0 – начальное значение анимируемого свойства, 1 – конечное.
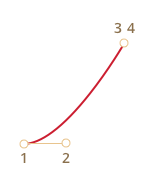
Самый простой вариант – это когда процесс развивается равномерно, «линейно» по времени. Это можно задать кривой Безье cubic-bezier(0, 0, 1, 1) .

…Как видно, это просто прямая. По мере того, как проходит время x , завершённость анимации y равномерно приближается от 0 к 1 .
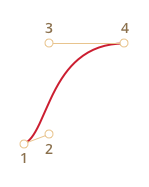
Поезд в примере ниже с постоянной скоростью «едет» слева направо, используя такую временную функцию:
Как нам показать, что поезд тормозит?
Для этого используем кривую Безье: cubic-bezier(0.0, 0.5, 0.5 ,1.0) .
Как видно, процесс вначале развивается быстро – кривая резко идёт вверх, а затем всё медленнее, медленнее.
Вы можете увидеть эту временную функцию в действии, кликнув на поезд:
Существует несколько стандартных обозначений кривых: linear , ease , ease-in , ease-out и ease-in-out .
Значение linear – это прямая, мы её уже видели.
Остальные кривые являются короткой записью следующих cubic-bezier :
ease * ease-in ease-out ease-in-out (0.25, 0.1, 0.25, 1.0) (0.42, 0, 1.0, 1.0) (0, 0, 0.58, 1.0) (0.42, 0, 0.58, 1.0) * – По умолчанию, если никакой временной функции не указано, используется ease .
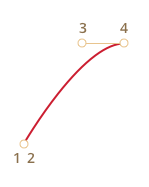
Кривая Безье может заставить анимацию «выпрыгивать» за пределы диапазона.
Допустимо указывать для кривой Безье как отрицательные y , так и сколь угодно большие. При этом кривая Безье будет также по y выскакивать за пределы диапазона 0..1 , представляющего собой начало-конец значения.
В примере ниже CSS-код анимации таков:
Свойство left должно меняться от 100px до 400px .
Однако, если кликнуть на поезд, то мы увидим, что:
- Он едет сначала назад, то есть left становится меньше 100px .
- Затем вперёд, причём выезжает за назначенные 400px .
- А затем опять назад – до 400px .
Почему так происходит – отлично видно, если взглянуть на кривую Безье с указанными опорными точками:
Мы вынесли координату y для второй опорной точки на 1 ниже нуля, а для третьей опорной точки – на 1 выше единицы, поэтому и кривая вышла за границы «обычного» квадрата. Её значения по y вышли из стандартного диапазона 0..1 .
Как мы помним, значению y = 0 соответствует «нулевое» положение анимации, а y = 1 – конечное. Получается, что значения y1 – больше итогового left .
Это, конечно, «мягкий» вариант. Если поставить значения y порядка -99 , 99 , то поезд будет куда более сильно выпрыгивать за диапазон.
Итак, кривая Безье позволяет задавать «плавное»» течение анимации. Подобрать кривую Безье вручную можно на сайте https://cubic-bezier.com/.
Шаги steps
Временная функция steps(количество шагов[, start/end]) позволяет разбить анимацию на чёткое количество шагов.
Проще всего это увидеть на примере. Выше мы видели плавную анимацию цифр от 0 до 9 при помощи смены margin-left у элемента, содержащего 0123456789 .
Чтобы цифры сдвигались не плавно, а шли чётко и раздельно, одна за другой – мы разобьём анимацию на 9 шагов: