- How to create a dynamic table in HTML using JavaScript
- Create an HTML table using JavaScript
- Add Table Header
- Add Some Style to Table
- How to add multiple rows dynamically in a table using javascript
- Remove dynamically added rows from a table
- Conclusion:
- Leave a Comment Cancel reply
- Trending Now
- Create Table Using JavaScript
- Various Tags Used to Create a Table in HTML
- Create a Table Using JavaScript
- Related Article — JavaScript DOM
How to create a dynamic table in HTML using JavaScript
Creating a dynamic HTML table is one of the most common tasks for web developers. Not only are tables used to display data, but they can also be used as interfaces. In this blog post, I will walk you through how to create a dynamic table in HTML using JavaScript.
We are also going to add some rows dynamically to our newly generated table created using JavaScript. So, let’s check the code step by step.
Create an HTML table using JavaScript
In order to create a table, I am going to use a pure JavaScript function i.e. document.createElement() . Let’s check the code first.
- First, create a table var userTable = document.createElement(‘table’);
- Give an id to our dynamically created table userTable.setAttribute(‘id’, ‘userTable’);
- Add the table to element using .appenChild() method i.e. document.body.appendChild(userTable); .
Add Table Header
In our previous steps, we have successfully created a user table. Now we need to add a Table Header. To do that, follow the code below.
- By using .insertRow() method, we have to add a row to our userTable.
- Now store the all column name into an array.
- Loop through the tableHeadArray to get each element.
- Now create element by using document.createElement(‘th’); method.
- Store each array element value into a dynamically generated tag.
- Append each column into tableHeadRow i.e. tableHeadRow.appendChild(th);
Add Some Style to Table
We have already created a table as well as a table header. Now add some style to it. As we have set our table id i.e. userTable, we can add style using CSS for example #userTable < your style here >or we can add using .setAttribute() method.

How to add multiple rows dynamically in a table using javascript
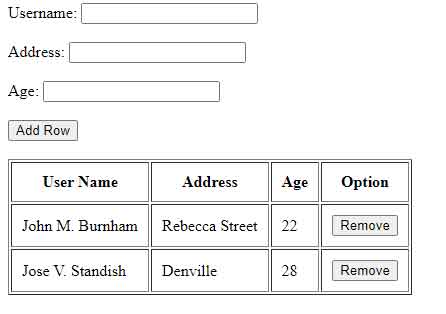
We have created a simple dynamic table. Now we are going to add multiple rows dynamically based on user input.
In order to add a row, we need three text boxes and a button. Let’s create it first.
I have written here a simple HTML code for example purposes. You can add your own style as per your requirement. Now add the following code to add a row.
var td = tr.insertCell(-1); // add a button var button = document.createElement('button'); // set button attributes. button.setAttribute('type', 'button'); button.innerHTML = 'Remove'; // set onclick event. button.setAttribute('onclick', 'remRow(this)'); td.appendChild(button); username.value = ""; address.value = ""; age.value = ""; >); - First store all textboxes into different const i.e. username, address, age.
- Add a row using .insertRow(-1) method. Here -1 is used to append the row to the table. If you use 0, it will prepend the row into the table.
- Using insertCell(-1) the method, add the cell data.
- Create a button element at the end of the row and add a function remRow(this) to it.
Remove dynamically added rows from a table
Sometimes, we need to remove some rows from a table. That’s why we have already set a remove button and also add a function to it. Let’s check the remRow() function.
Conclusion:
In this blog post, I have walked you through how to create a dynamic table in HTML using JavaScript. If you’ve been looking for an easy way to display data or create interfaces with tables on your website, hopefully, the tips and tricks we covered will help you out! Thank you so much for reading this article. We hope that it was helpful!
About Ashis Biswas
A web developer who has a love for creativity and enjoys experimenting with the various techniques in both web designing and web development. If you would like to be kept up to date with his post, you can follow him.
Leave a Comment Cancel reply
Enjoying the articles? I would appreciate a coffee to help me keep writing and coding!
Trending Now
Create Table Using JavaScript

- Various Tags Used to Create a Table in HTML
- Create a Table Using JavaScript
The JavaScript programming language allows us to create and manipulate DOM (Document Object Model) elements. It gives us much more flexibility and makes it a lot easier for everyone to work with DOM, especially if you are a backend developer.
There are two ways of adding HTML elements like tables to an HTML document, the first is by adding the HTML table tag directly into our HTML webpage, and the second way is by creating the entire table inside our JavaScript code. The second option is the most popular way of creating and adding the table to the DOM.
But before diving deep into how the table is created with JavaScript, let’s first visually understand the various table tags used to create a table and what each of those tags exactly means. This will give you a visual representation of the table, making it much easier for you to understand the code part later in this article.
Various Tags Used to Create a Table in HTML
Below is the list of tags that are used to create a table in HTML.
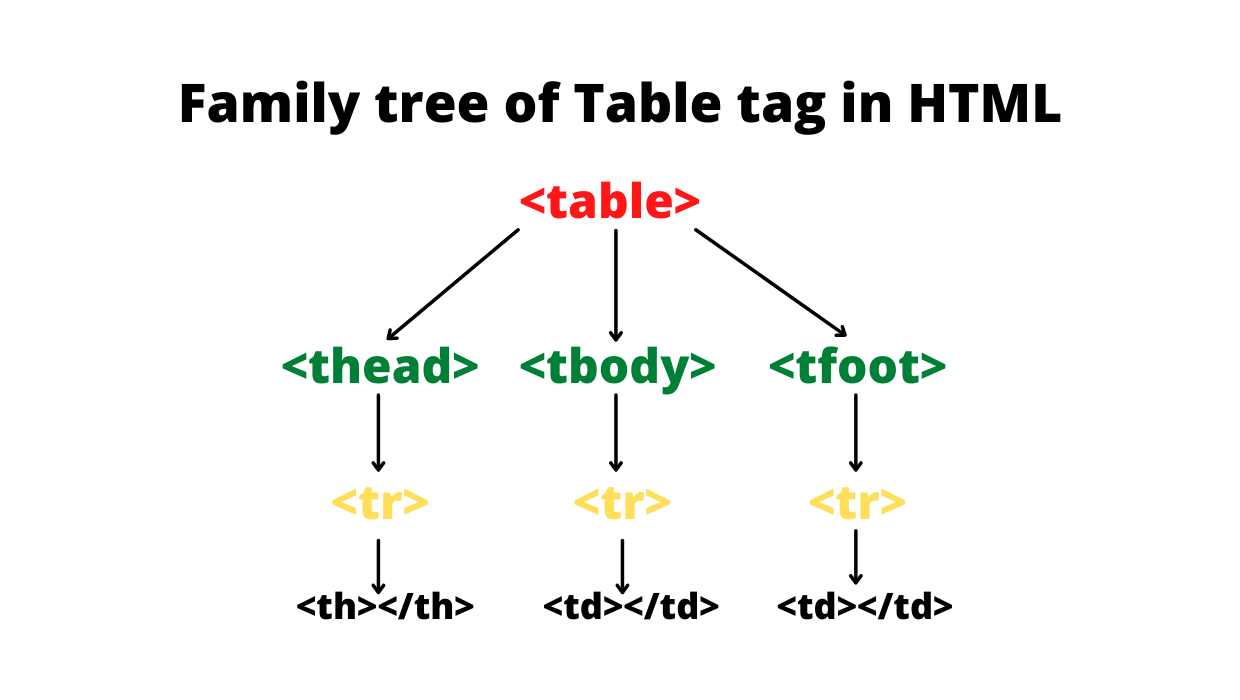
- table : The table HTML tag represents the entire table in HTML. This is the starting tag of the table inside which all the other tags related to the table (like thead , tr , td , etc) will be used depending upon how you want to structure the table.
- thead : The thead stands for table heading. This tag is used to add heading to the tables. It usually represents the first row of the table. To add data inside the thead tag, we use the th tag. If you don’t want to add a heading to your tables, you can skip the thead tag.
- tbody : The tbody stands for table body. This tag represents the entire body or contents of the table.
- tfoot : The tfoot stands for table footer. It usually represents the last row of the table. This tag is optional. We don’t use this tag that often.
- tr : The tr stands for table row. This represents the entire row of the table. To insert data into the table either inside the heading, body, or footer of the table, we first have to create a row, and then inside that row, we can insert the data with the help of the td tag.
- th : The th is only used inside the thead tag. It represents the single cell of the heading row. It makes the headings of the table in bold format.
- td : The td stands for table data. It represents the single cell of the table. It is similar to th , but the only difference is that th is used only inside the thead tag, and td is used elsewhere. The td tag can be used with the tbody and tfoot tags.
If you combine all of these tags in nested form i.e, one inside another, then this is how the table will look like after it is created.
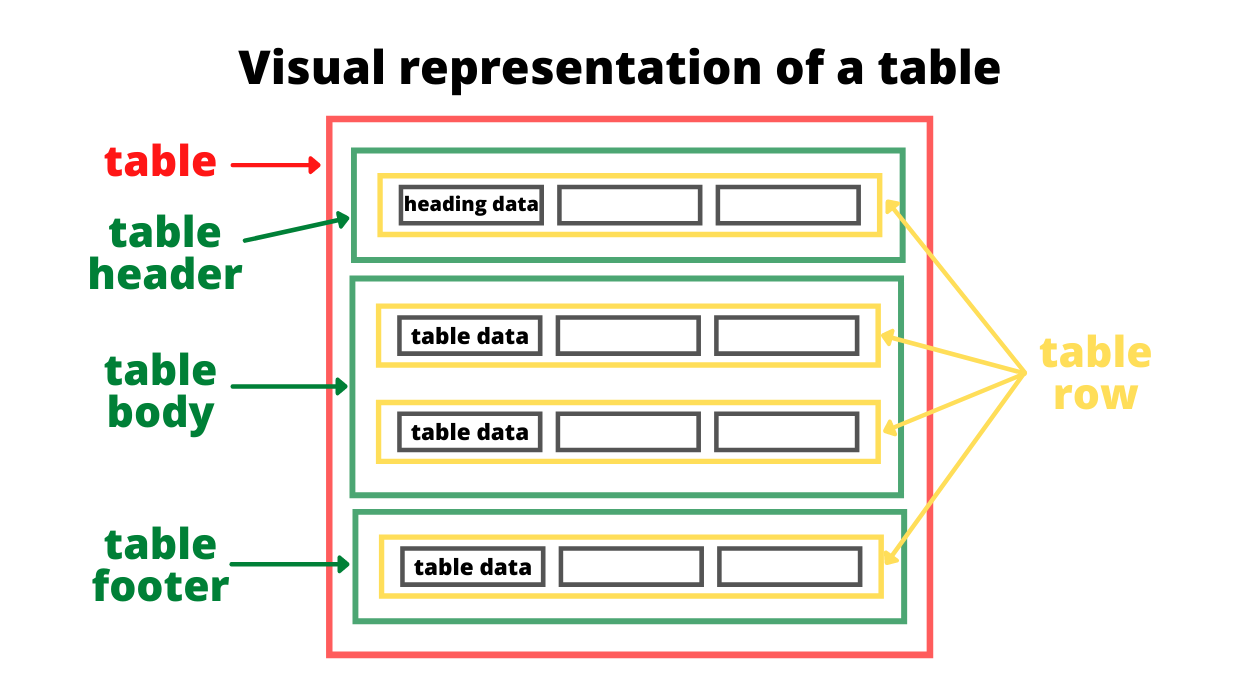
The red border represents the entire table. Inside this, we have 3 tags, table header ( thead ), table body ( tbody ), and table footer ( tfoot ), which are represented with the green border. To insert data inside these three tags we first have to create a row with the help of the tr tag. This row is represented with the yellow border. And then, to insert data into the table header, we use the th tag, and to insert data within the table body or table footer, we use the td tags. It is shown with the help of grey color.
Create a Table Using JavaScript
To create an HTML element using JavaScript we have to use a method called document.createElement() that takes tag name which is a string as a parameter. For instance, we want to create a table, so we will pass the string table as an input to the createElement() method document.createElement(‘table’) .
The above table has 4 rows. The first row contains all the heading, and the next three rows contain the data.
Below we have the HTML, CSS, and JS code. Inside our body tag, we initially don’t have anything. We will create our table inside the JavaScript, and at the end, we will append the entire table to the body tag so that it will be visible on the webpage. Inside the style tag, we have given some basic styling to our table.
html lang="en"> head> meta charset="UTF-8"> meta http-equiv="X-UA-Compatible" content="IE=edge"> meta name="viewport" content="width=device-width, initial-scale=1.0"> title>Documenttitle> style> table border-collapse: collapse; border-spacing: 0; > th, td padding: 10px 20px; border: 1px solid #000; > style> head> body id="body"> script src="script.js">script> body> html> To create a table, we will first create the table tag. Then we will store this tag into a variable table so that later we can use it. In the same way, we will also create thead and tbody tags and store them inside the variables. Then we append thead and tbody to the table tag.
let table = document.createElement('table'); let thead = document.createElement('thead'); let tbody = document.createElement('tbody'); table.appendChild(thead); table.appendChild(tbody); // Adding the entire table to the body tag document.getElementById('body').appendChild(table); You have to append or add that table that you have created in JavaScript to the body tag. We first have to get the HTML body tag using its id , and then we will append the table using something called the appendChild() method. Since we already have stored our table inside the table variable, we will just have to append the table we created as a child to this body element.
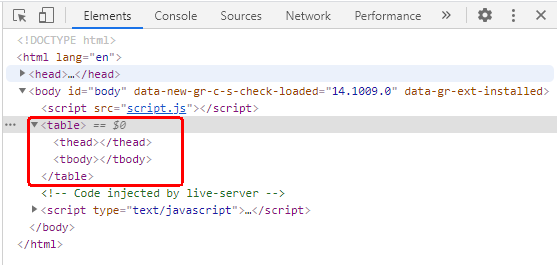
At this point, this is how the structure of our table looks like.
To add rows and data to our table, we will create table rows ( tr ), table heading ( th ), and table data ( td ) tags using the createElement() method, and then we will add the data inside those elements with the help of the innerHTML property.
// Creating and adding data to first row of the table let row_1 = document.createElement('tr'); let heading_1 = document.createElement('th'); heading_1.innerHTML = "Sr. No."; let heading_2 = document.createElement('th'); heading_2.innerHTML = "Name"; let heading_3 = document.createElement('th'); heading_3.innerHTML = "Company"; row_1.appendChild(heading_1); row_1.appendChild(heading_2); row_1.appendChild(heading_3); thead.appendChild(row_1); // Creating and adding data to second row of the table let row_2 = document.createElement('tr'); let row_2_data_1 = document.createElement('td'); row_2_data_1.innerHTML = "1."; let row_2_data_2 = document.createElement('td'); row_2_data_2.innerHTML = "James Clerk"; let row_2_data_3 = document.createElement('td'); row_2_data_3.innerHTML = "Netflix"; row_2.appendChild(row_2_data_1); row_2.appendChild(row_2_data_2); row_2.appendChild(row_2_data_3); tbody.appendChild(row_2); // Creating and adding data to third row of the table let row_3 = document.createElement('tr'); let row_3_data_1 = document.createElement('td'); row_3_data_1.innerHTML = "2."; let row_3_data_2 = document.createElement('td'); row_3_data_2.innerHTML = "Adam White"; let row_3_data_3 = document.createElement('td'); row_3_data_3.innerHTML = "Microsoft"; row_3.appendChild(row_3_data_1); row_3.appendChild(row_3_data_2); row_3.appendChild(row_3_data_3); tbody.appendChild(row_3); After inserting the data using the innerHTML property, we will append that data to their respective rows. For example, first, we are adding the headings (i.e heading_1 , heading_2 , heading_3 ) to row_1 . And then we are appending our first row, i.e., row_1 , to the thead tag as a child.
Similarly, we are creating another 2 rows i.e row_2 and row_3 and then appending ( row_2_data_1 , row_2_data_2 , row_2_data_3 ) and ( row_3_data_1 , row_3_data_2 , row_3_data_3 ) variables respectively to these 2 rows. And at the end, we are appending these 2 rows to the tbody tag as it’s children’s.
Now, this is how the table and its HTML structure look like in the developer’s console.
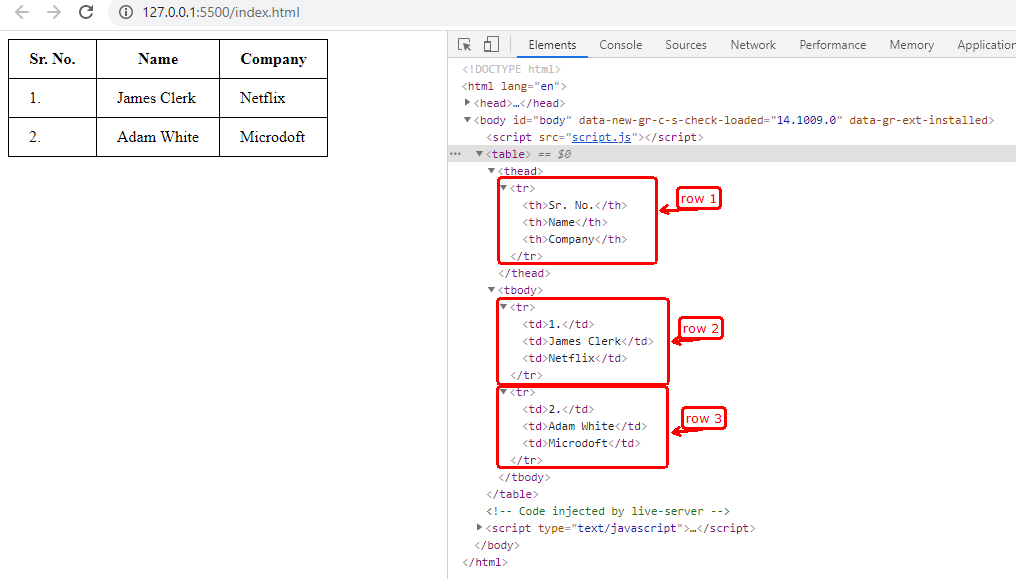
At the left, we have the table, and at the right, we have the browser-generated code. You can customize the js code based on how you want the table to look. We have only used 3 JavaScript methods ( createElement() , innerHTML , appendChild() ) in order to achieve this.
Sahil is a full-stack developer who loves to build software. He likes to share his knowledge by writing technical articles and helping clients by working with them as freelance software engineer and technical writer on Upwork.