MySQLi — Select Query
The SQL SELECT command is used to fetch data from the MySQL database. You can use this command at mysql> prompt as well as in any script like PHP.
Syntax
Here is generic SQL syntax of SELECT command to fetch data from the MySQL table −
SELECT field1, field2. fieldN FROM table_name1, table_name2. [WHERE Clause] [OFFSET M ][LIMIT N]
- You can use one or more tables separated by comma to include various conditions using a WHERE clause, but the WHERE clause is an optional part of the SELECT command.
- You can fetch one or more fields in a single SELECT command.
- You can specify star (*) in place of fields. In this case, SELECT will return all the fields.
- You can specify any condition using the WHERE clause.
- You can specify an offset using OFFSET from where SELECT will start returning records. By default, the offset starts at zero.
- You can limit the number of returns using the LIMIT attribute.
Fetching Data from a Command Prompt
This will use SQL SELECT command to fetch data from the MySQL table tutorials_tbl.
Example
The following example will return all the records from the tutorials_tbl table −
root@host# mysql -u root -p password; Enter password:******* mysql> use TUTORIALS; Database changed mysql> SELECT * from tutorials_tbl +-------------+----------------+-----------------+-----------------+ | tutorial_id | tutorial_title | tutorial_author | submission_date | +-------------+----------------+-----------------+-----------------+ | 1 | Learn PHP | John Poul | 2007-05-21 | | 2 | Learn MySQL | Abdul S | 2007-05-21 | | 3 | JAVA Tutorial | Sanjay | 2007-05-21 | +-------------+----------------+-----------------+-----------------+ 3 rows in set (0.01 sec) mysql>
Fetching Data Using a PHP Script
PHP uses mysqli query() or mysql_query() function to select records from a MySQL table. This function takes two parameters and returns TRUE on success or FALSE on failure.
Syntax
Required — SQL query to select records from a MySQL table.
Optional — Either the constant MYSQLI_USE_RESULT or MYSQLI_STORE_RESULT depending on the desired behavior. By default, MYSQLI_STORE_RESULT is used.
Example
Try the following example to select a record from a table −
Copy and paste the following example as mysql_example.php −
    ", $mysqli→connect_error); exit(); > printf('Connected successfully.
'); $sql = "SELECT tutorial_id, tutorial_title, tutorial_author, submission_date FROM tutorials_tbl"; $result = $mysqli->query($sql); if ($result->num_rows > 0) < while($row = $result->fetch_assoc()) < printf("Id: %s, Title: %s, Author: %s, Date: %d
", $row["tutorial_id"], $row["tutorial_title"], $row["tutorial_author"], $row["submission_date"]); > > else < printf('No record found.
'); > mysqli_free_result($result); $mysqli→close(); ?>
Output
Access the mysql_example.php deployed on apache web server and verify the output. Here we’ve entered multiple records in the table before running the select script.
Connected successfully. Id: 1, Title: MySQL Tutorial, Author: Mahesh, Date: 2021 Id: 2, Title: HTML Tutorial, Author: Mahesh, Date: 2021 Id: 3, Title: PHP Tutorial, Author: Mahesh, Date: 2021 Id: 4, Title: Java Tutorial, Author: Mahesh, Date: 2021 Id: 5, Title: Apache Tutorial, Author: Suresh, Date: 2021
PHP Select Option
Summary: in this tutorial, you will learn how to use the element to create a drop-down list and a list box and how to get the selected values from the element in PHP.
A quick introduction to the element
The is an HTML element that provides a list of options. The following shows how to define a element in HTML:
label for="color">Background Color: label> select name="color" id="color"> option value="">--- Choose a color --- option> option value="red">Red option> option value="green">Green option> option value="blue">Blue option> select>Code language: HTML, XML (xml)The element has two important attributes:
- id – the id associates the element with a element
- name – the name attribute associates with the value for a form submission.
The element nested inside the element defines an option in the menu. Each option has a value attribute. The value attribute stores data submitted to the server when it is selected.
If an option doesn’t have the value attribute, the value attribute defaults to the text inside the element.
To select an option when the page loads for the first time, you can add the selected attribute to the element.
The following example selects the Green option when the page first loads:
label for="color">Background Color: label> select name="color" id="color"> option value="">--- Choose a color --- option> option value="red">Red option> option value="green" selected>Green option> option value="blue">Blue option> select>Code language: HTML, XML (xml)Getting the selected value from a element
We’ll create a form that uses a element.
First, create the following folders and files:
├── css | └── style.css ├── inc | ├── footer.php | ├── get.php | ├── header.php | └── post.php └── index.php Code language: JavaScript (javascript)Second, place the following code in the header.php file:
html> html lang="en"> head> meta charset="UTF-8"> meta name="viewport" content="width=device-width, initial-scale=1.0"> link rel="stylesheet" href="css/style.css"> title>PHP select option title> head> body class="center"> main>Code language: HTML, XML (xml)Third, place the following code in the footer.php file:
main> body> html>Code language: HTML, XML (xml) Fourth, add the following code to the get.php file to create a form that has one element with a submit button:
form action="" method="post"> div> label for="color">Background Color: label> select name="color" id="color"> option value="">--- Choose a color --- option> option value="red">Red option> option value="green" selected>Green option> option value="blue">Blue option> select> div> div> button type="submit">Select button> div> form>Code language: HTML, XML (xml)The form uses the POST method to submit data to the webserver.
Finally, add the following code to the post.php file:
$color = filter_input(INPUT_POST, 'color', FILTER_SANITIZE_STRING); ?> if ($color) : ?> p>You selected span style="color:"> echo $color ?> span> p> p>a href="index.php">Back to the form a> p> else : ?> p>You did not select any color p> endif ?>Code language: HTML, XML (xml)To get the selected value of the element, you use the $_POST superglobal variable if the form method is POST and $_GET if the form method is GET .
Alternatively, you can use the filter_input() function to sanitize the selected value.
If you select the first option of the element, the selected value will be empty. Otherwise, the selected value is red, green, or blue.
Select with multiple options
To enable multiple selections, you add the multiple attribute to the element:
select name="colors[]" id="colors" multiple> . select>Code language: HTML, XML (xml)When you select multiple options of a element and submit the form, the name will contain multiple values rather than a single value. To get multiple selected values, you add the square brackets ( []) after the name of element.
Let’s take a look at an example of using a element with multiple selections.
First, create the following folders and files:
. ├── css | └── style.css ├── inc | ├── footer.php | ├── get.php | ├── header.php | └── post.php └── index.phpCode language: JavaScript (javascript)Second, place the following code into the header.php file:
html> html lang="en"> head> meta charset="UTF-8" /> meta name="viewport" content="width=device-width, initial-scale=1.0" /> title>PHP Listbox title> link rel="stylesheet" href="css/style.css"> head> body class="center"> main>Code language: HTML, XML (xml)Third, add the following code to the footer.php file:
main> body> html>Code language: HTML, XML (xml) Fourth, include the header.php and footer.php files in the index.php :
require __DIR__ . '/inc/header.php'; $request_method = strtoupper($_SERVER['REQUEST_METHOD']); if ($request_method === 'GET') < require __DIR__ . '/inc/get.php'; > elseif ($request_method === 'POST') < require __DIR__ . '/inc/post.php'; > require __DIR__ . '/inc/footer.php'; Code language: HTML, XML (xml)If the HTTP request is GET, the index.php file will show a form from the get.php file. When the form is submitted, the post.php file will handle the form submission.
Fifth, create a form that contains a element with the multiple attribute in the get.php file. The name of the element has an opening and closing square bracket [] so that PHP can create an array that holds the select values.
form action="" method="post"> div> label for="colors">Background Color: label> select name="colors[]" id="colors" multiple> option value="red">Red option> option value="green">Green option> option value="blue">Blue option> option value="purple">Purple option> option value="magenta">Magenta option> option value="cyan">Cyan option> select> div> div> button type="submit">Submit button> div> form>Code language: HTML, XML (xml)Finally, handle the form submission in the post.php file:
$selected_colors = filter_input( INPUT_POST, 'colors', FILTER_SANITIZE_STRING, FILTER_REQUIRE_ARRAY ); ?> if ($selected_colors) : ?> p>You selected the following colors: p> ul> foreach ($selected_colors as $color) : ?> li style="color:"> echo $color ?> li> endforeach ?> ul> p> p> else : ?> p>You did not select any color. p> endif ?> a href="index.php">Back to the form a>Code language: HTML, XML (xml)The post.php file uses the filter_input() function to get the selected colors as an array. If you select one or more colors, the post.php file will display them.
Summary
- Use the element to create a dropdown list.
- Use the multiple attribute to create a list that allows multiple selections.
- Use $_POST to get the selected value of the select element if the form method is POST (or $_GET if the form method is GET ).
- Add square brackets( [] ) after the name of the element to get multiple selected values.
Обработка select в PHP
Исходные файлы текущей статьи вы можете скачать по ссылке.
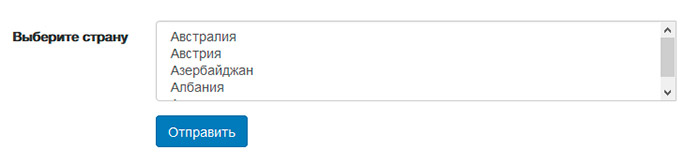
Итак, давайте создадим простейший выпадающий список из нескольких стран:

Онлайн курс по JavaScript
Научитесь создавать приложения со сложными интерфейсами
Это основной язык для современной веб-разработки — почти 100% сайтов работает на JavaScript. Освойте его с нуля всего за 4 месяца, и вы сможете зарабатывать от 70 000 рублей.
Вот такой список мы получили.

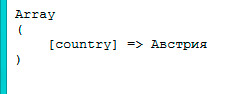
Попробуем теперь выбрать страну и получить данные на сервере. Сделать это крайне просто. Данные отправляются методом POST и страна будет доступна в одноименном массиве, который можно распечатать в обработчике:
Достаточно просто. Хорошо, а что если мы хотим дать возможность пользователю выбрать несколько стран из списка select? Это можно сделать, добавив тегу select атрибут multiple:
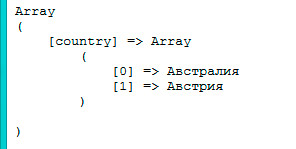
Теперь можно выбрать несколько стран, зажимая клавишу Ctrl. Попробуем выбрать несколько стран и отправить форму. Я выберу первые две страны. Однако в результате я получу только вторую страну. Куда же делать еще одна? Для того, чтобы мы могли отправить более одного значения, необходимо немного изменить атрибут name списка select. А именно, мы должны указать, что значением данного списка может быть не одно значение, а массив значений. Делается это так:
Мы добавили квадратные скобки к имени поля. Эти скобки как раз сделают возможным сохранить более одного значения. Теперь данные на сервере будут выглядеть так:
Достаточно просто, не так ли? Ну и последний вопрос, который мы рассмотрим, это генерирования списка select с помощью PHP. Зачем это нужно? Смотрите, сейчас мы выводим список стран вручную. Если стран немного, это не составит больших неудобств. Однако, если мы решим сформировать список из сотен стран, тогда это будет проблемой. Гораздо проще сформировать такой список программно, буквально несколькими строками кода. Страны будут храниться в базе данных, откуда нам останется их получить и вывести в цикле.
Чтобы упростить пример, мы вместо стран сформируем список с годами. Такой список может пригодиться, если мы создаем форму регистрации и нам необходим выпадающий список с годами. Скажем, это будет список, начиная с 1900 до текущего года. Задача решается в несколько строк кода: