Creating java program eclipse

Еще одной очень популярной средой для разработки приложений под Java является Eclipse . IDE Eclipse первоначально была создана и развивалась компанией IBM, но впоследствии разработка была выделена в отдельный проект Eclipse Foundation. Eclipse является бесплатной средой, которая к тому же обладает большими возможностями, позволяя создавать на Java самые разные приложения.
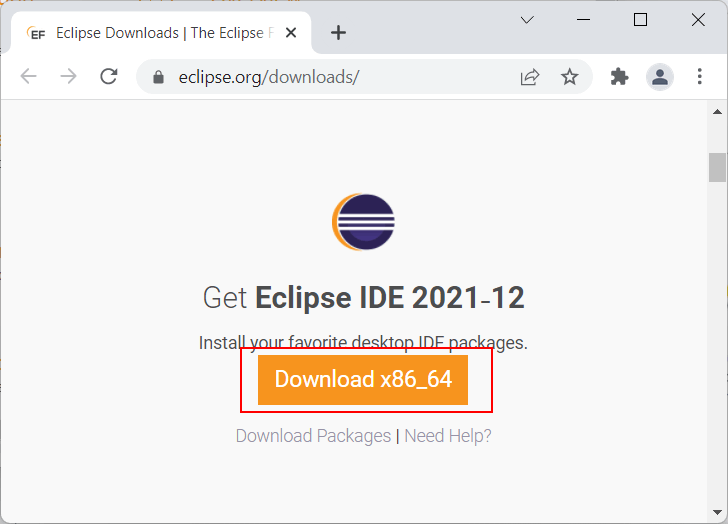
Для начала установим последнюю версию Eclipse, которую можно найти по адресу https://www.eclipse.org/downloads/. На странице загрузок найдем рядом с названием текущей версии Eclipse (на момент написания статьи это версия Oxygen) кнопку «Download» и нажмем на нее.
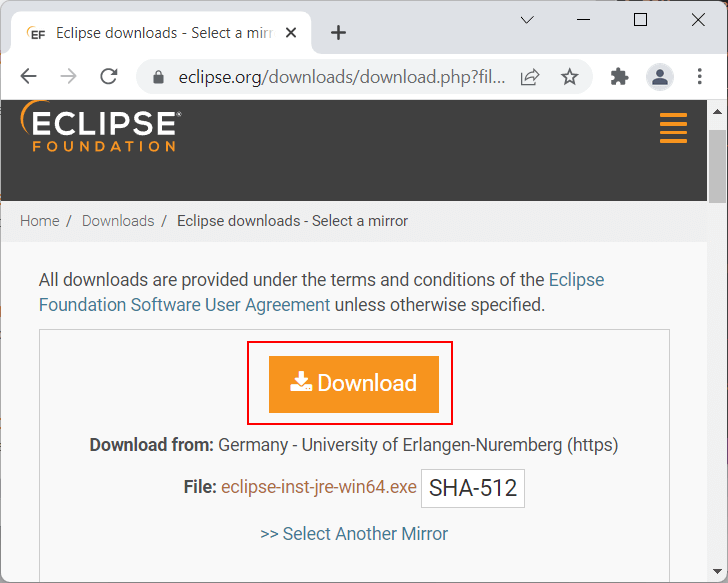
После нажатия на кнопку нас перенаправит собственно на страницу загрузки, где необходимо будет нажать на кнопку «Download» для загруки установочного пакета:
После загрузки установочного пакета запустим его:
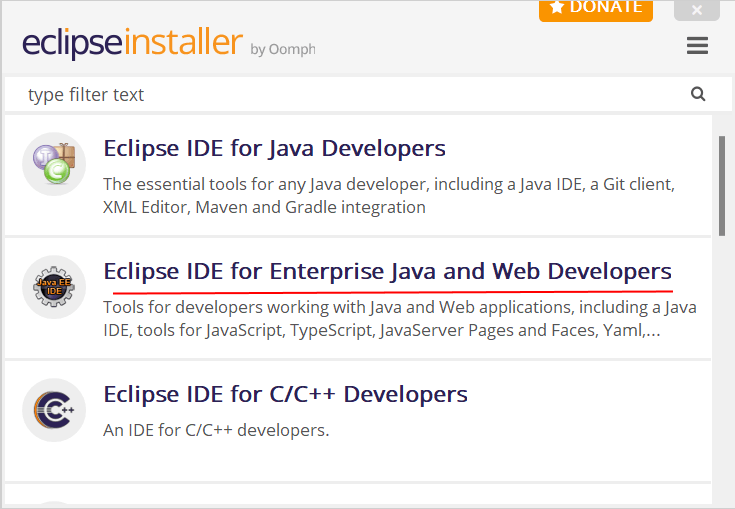
По факту Eclipse — это целый набор сред для разных ситуаций и языков программирования. И программа установки предлагает нам выбрать одну из опций для инсталляции. Поскольку мы собираемся работать с Java, то нас будут интересовать в данном случае прежде всего две опции:
- Eclipse IDE for Java Developers
- Eclipse IDE for Enterprise Java and Web Developers
Первая опция предоставляет базовые возможности для работы с Java, а вторая позволяет также создавать веб-приложения и сервисы. По сути вторая опция включает и первую опцию. Поэтому выберем Eclipse IDE for Enterprise Java and Web Developers . Далее надо будет указать папку для установки (или оставить выбранную папку по умолчанию), а также указать путь к JDK и нажать на кнопку Install: 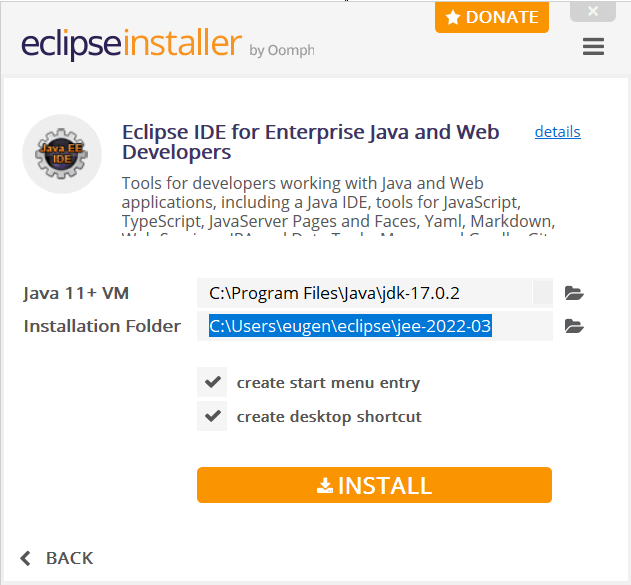 Далее надо будет принять лицензионное соглашение:
 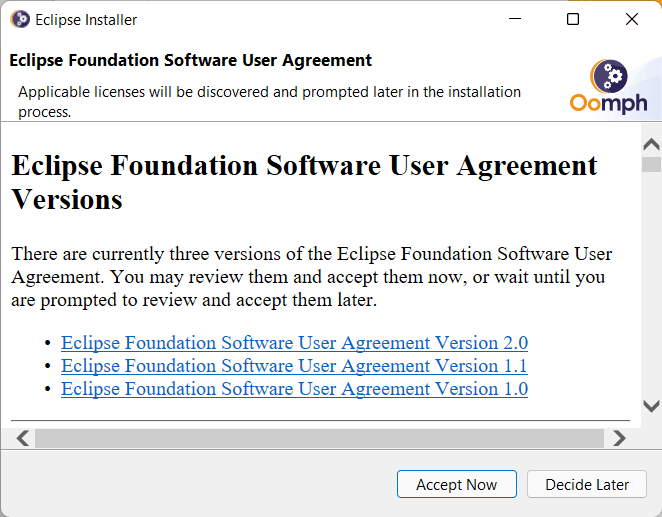 И затем собственно начнется установка. После установки запустим Eclipse. Вначале будет предложено установить каталог для проектов. Оставим значение по умолчанию и нажмем на кнорку Launch:
  Далее перейдем к пункту меню File -> New -> Project :
 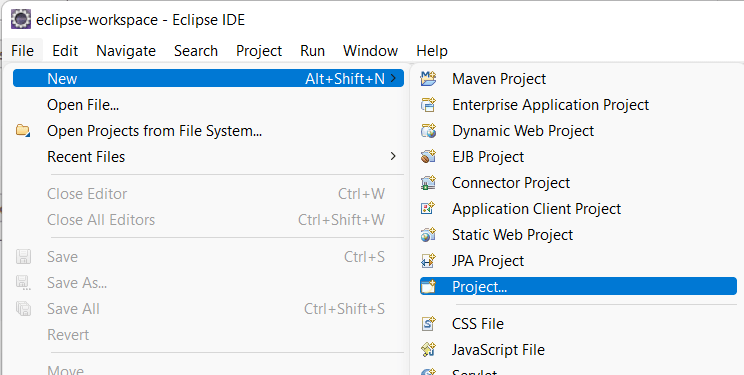 Далее нам откроется окно выбора шаблона проекта. Выберем Java Project и нажмем на кнопку Next:
 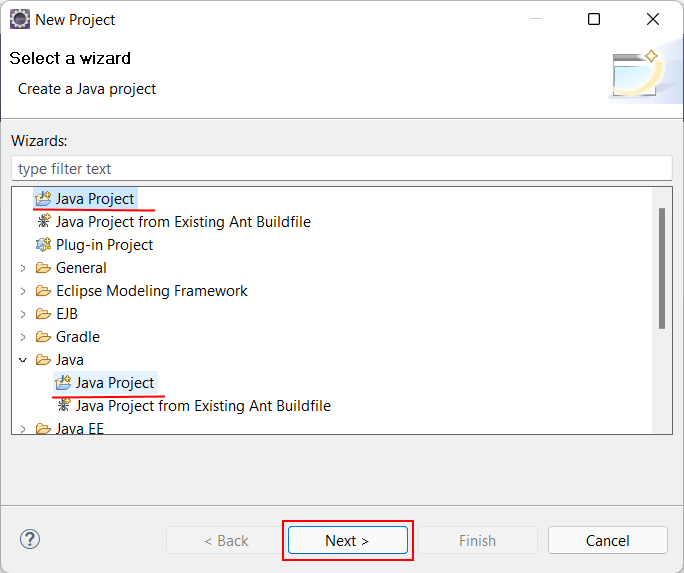 Затем будет предложено установить настройки проекта. В частности, в поле Project Name необходимо задать имя проекта. Допустим, оно будет helloapp:
 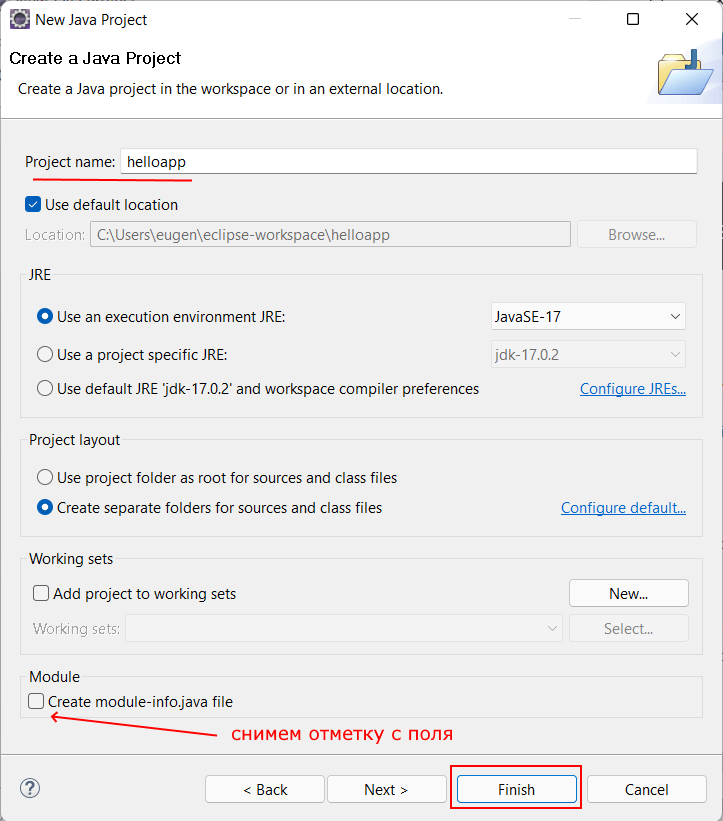 Также обращаю внимание на поле JRE , которое задает используемую версию Java. Здесь можно использовать версию по умолчанию или изменить ее в зависимости от того, какую версию JDK/JRE мы хотим использовать. Кроме того, в самом низу окна есть поле Create module-info.java file . Пока эта опция не принципиальна, поэтому чтобы не создавать лишние файлы в проекте, можно снять отметку с этого поля. Все остальные настройки можно оставить по умолчанию, и в конце нажмем на кнопку Finish для создания проекта. Следующее диалоговое окно спросит, надо ли открывать перспективу проекта:
 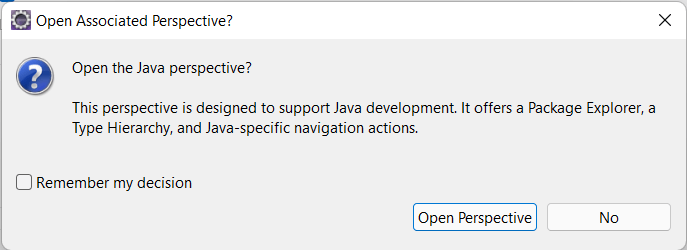 В данном случае эта возможность не имеет значения, но нажмем на кнопку Open Perspective . После создания проект будет открыт в Eclipse. Если среда не открывает по умолчанию проект, то необходимо нажать на кнопку Restore:
 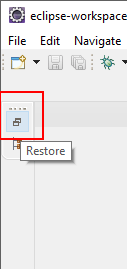 По умолчанию проект будет пуст.
 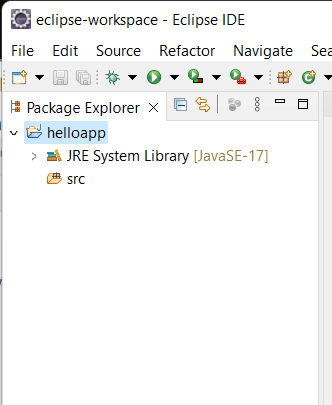 Все файлы с исходным кодом на Java в проекте помещаются в папку src . Нажмем на нее правой кнопкой мыши и в контекстном меню выберем New -> Class :
 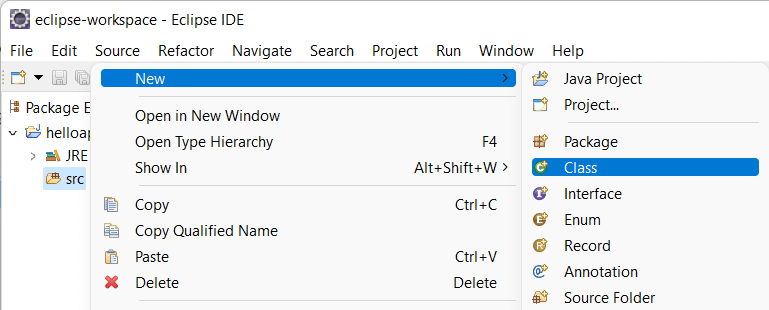 Затем откроется окно настройки класса. Здесь в поле Name необходимо задать название класса. Допустим, он будет называться Program. Все остальные настройки можно оставить по умолчанию:
 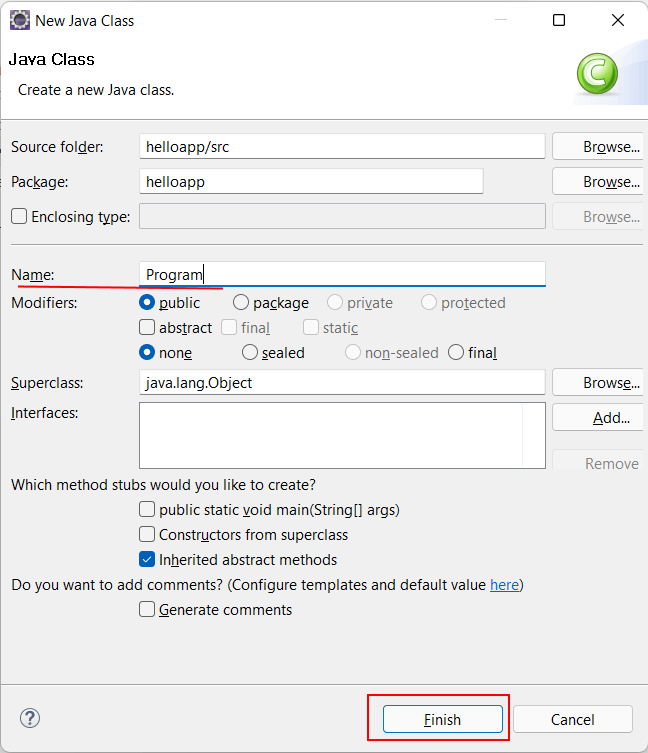 После этого в проект будет добавлен файл Program.java, а в центральной части Eclipse мы сможем увидеть его код. Изменим этот код на следующий:
package helloapp; public class Program < public static void main(String[] args) < System.out.println("Hello Eclipse!"); >> 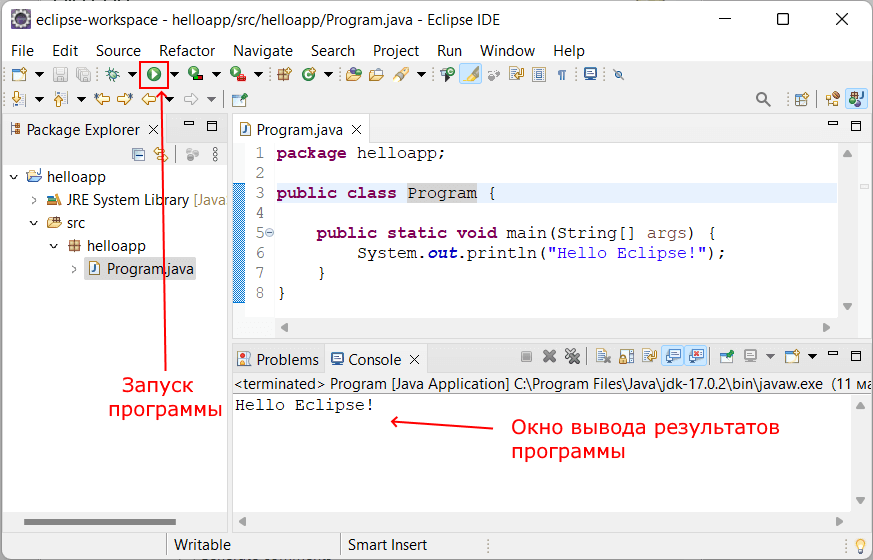
Для запуска проекта нажмем на панели инструментов на зеленую стрелочку, либо на пункт меню Run -> Run . И внизу среды в поле Console мы увидим результат работы программы (то есть фактически консольный вывод).
How to Create a New Java Project in Eclipse
wikiHow is a “wiki,” similar to Wikipedia, which means that many of our articles are co-written by multiple authors. To create this article, 16 people, some anonymous, worked to edit and improve it over time.
This article has been viewed 325,613 times.
Eclipse is one of the most popular development environments for Java, as it contains everything you need to build a Java project from scratch. Before you can start working on your new project, you’ll need to create it first. Creating a new Java project in Eclipse is fairly straightforward, but can be confusing if you’ve already installed Eclipse for a different programming language.

- If you installed Eclipse for a different programming language, you can add Java support from within Eclipse. Click the «Help» menu and select «Install New Software». Select «All Available Sites» from the top drop-down menu, and then type «java» into the Filter field. Check the «Eclipse Java Development Tools» box and click «Next». Follow the prompts to download and install the Java tools. Eclipse will restart once the installation is complete.

- If you don’t see the «Java Project» option but have the Java Development Tools installed, select «Project. » from the «New» menu. Expand the «Java» folder and select «Java Project».

Give the project a name. This doesn’t have to be the final name for your program, but should help you and others identify the project.

Select the location for the project files. The files are saved to the Eclipse directory by default. You can set a custom location if you prefer.

Select Java Runtime Environment (JRE) you want to use. If you are creating a program for a specific JRE, select it from the drop-down menu. By default, the newest JRE will be selected.

Select your project layout. You can choose to either use the project folder, or create separate folders for sources and class files. The default option is «Create separate folders. «, though you may need to change depending on the needs of your project. [2] X Research source

Click «Next» to open the «Java Settings» window. This is where you’ll define additional sources as well as add libraries to your project.

Use the Source tab to define your build path. The build path is what the compiler uses to build the program. You can create additional source folders, link external sources, and add or remove folders from the build path. The compiler uses the build path to determine which sources to compile.

Use the Libraries tab to add libraries to the project. This tab will allow you to add JAR files to include in your project, as well as select built-in libraries to use. Importing JAR files allows you to use libraries from other projects.

- Your project will be displayed in the «Package Explorer» frame on the left side of the window. If you just see the Eclipse Welcome tab, click the small Java button on the left side of the window. [3] X Research source
- See How to Write Your First Program in Java for a detailed guide on creating your first Java program.
Community Q&A
Eclipse is useful as it streamlines certain activities that are done regularly in Java programming. These activities include running, debugging, and compiling. Eclipse also checks the syntax of your code and makes sure the classes you use actually exist. It can also help you add libraries.
Thanks! We’re glad this was helpful.
Thank you for your feedback.
As a small thank you, we’d like to offer you a $30 gift card (valid at GoNift.com). Use it to try out great new products and services nationwide without paying full price—wine, food delivery, clothing and more. Enjoy! Claim Your Gift If wikiHow has helped you, please consider a small contribution to support us in helping more readers like you. We’re committed to providing the world with free how-to resources, and even $1 helps us in our mission. Support wikiHow
Assuming the server is running Linux, you’ll want to export the project into an executable jar by right-clicking and selecting Export, then going through the wizard. After this, you can use something like WinSCP to transfer the file to your server. Then you can log into your server (make sure Java is installed) on putty, create a new tmux session (by typing tmux) and run the program (sudo java -jar *name*.jar).
Thanks! We’re glad this was helpful.
Thank you for your feedback.
As a small thank you, we’d like to offer you a $30 gift card (valid at GoNift.com). Use it to try out great new products and services nationwide without paying full price—wine, food delivery, clothing and more. Enjoy! Claim Your Gift If wikiHow has helped you, please consider a small contribution to support us in helping more readers like you. We’re committed to providing the world with free how-to resources, and even $1 helps us in our mission. Support wikiHow
If you ever want to change your project’s settings after it’s been created, right click the project’s name and navigate to your desired option.

You Might Also Like


Use Easy Windows CMD Commands to Check Your Java Version

How to Set JAVA_HOME for JDK & JRE: A Step-by-Step Guide

How to Do Division in Java (Integer and Floating Point)

How to Compile and Run Java Programs Using Notepad++