- How to Create HTML Forms
- Building the Form Tag
- Adding Form Options
- Closing Your Form
- Community Q&A
- HTML Forms
- Example
- The Element
- The Element
- Text Fields
- Example
- The Element
- Radio Buttons
- Example
- Checkboxes
- Example
- The Submit Button
- Example
- Example
- How to Create a Simple HTML and PHP Form
- How to Write a PHP Script to Capture User Inputs
How to Create HTML Forms
This article was co-authored by wikiHow staff writer, Nicole Levine, MFA. Nicole Levine is a Technology Writer and Editor for wikiHow. She has more than 20 years of experience creating technical documentation and leading support teams at major web hosting and software companies. Nicole also holds an MFA in Creative Writing from Portland State University and teaches composition, fiction-writing, and zine-making at various institutions.
This article has been viewed 95,192 times.
You can add a form to an existing HTML document inside the tags. These tags act as a container for all of your form data, such as text fields, lists, and buttons. When someone submits information through your form, the data will be sent to a sever that will save, process, send, or display results based on the content. Learn how to set up the tag so your form does what you want, as well as how to add inputs to collect information.
Building the Form Tag


Open the element. To start your form, scroll to the location in your file where the form should begin and type on its own line. This tag signifies the beginning of your form.

- For example: (if the script that will parse the form data is located in a directory on your server called “cgi-bin”).
- If the script is on another server:
- To send the form data to an email address (not a script): [2] X Research source

- Use method=”get” to request data from a resource. You should only use GET to retrieve data. Never use GET with sensitive information like passwords or social security numbers.
- Use method=”post” to submit data to be processed. Use this if the form data is sensitive, such as for passwords or credit card numbers.
- The end result should follow this format:
Adding Form Options

- For example, First Name: creates a text box prefaced by “First Name:” so users know what to type into the box.
- Change the “id=” value (“name” in the example) to match what you’re doing with the data. If the data is sent to a script, this value should correspond with something in the script.


Learn more advanced form options. There are so many types of inputs and lists you can include in your form. A great way to expand your HTML form knowledge is to browse W3school’s HTML Forms site. Additionally, there are many helpful wikiHows articles to walk you through setting up items like selectable lists, reset/clear buttons, and check boxes.
Closing Your Form

- Replace “Send your message” with the text you want to appear on the button.

Type
at the end of the form. This tag indicates that the form is over. Remember, all form content must be inside
.

Upload your document to your web server. Now that you’ve added a form to your HTML document, upload it to your web server and give it a test run!
Community Q&A
Thanks! We’re glad this was helpful.
Thank you for your feedback.
As a small thank you, we’d like to offer you a $30 gift card (valid at GoNift.com). Use it to try out great new products and services nationwide without paying full price—wine, food delivery, clothing and more. Enjoy! Claim Your Gift If wikiHow has helped you, please consider a small contribution to support us in helping more readers like you. We’re committed to providing the world with free how-to resources, and even $1 helps us in our mission. Support wikiHow
That space is automatically put there by the browser you are using. To get rid of it, you need to use CSS. That is a language used to manipulate the appearance of websites. Good CSS tutorials can be found on websites like Codecademy and W3Schools, but wikiHow has good explanations as well.
Thanks! We’re glad this was helpful.
Thank you for your feedback.
As a small thank you, we’d like to offer you a $30 gift card (valid at GoNift.com). Use it to try out great new products and services nationwide without paying full price—wine, food delivery, clothing and more. Enjoy! Claim Your Gift If wikiHow has helped you, please consider a small contribution to support us in helping more readers like you. We’re committed to providing the world with free how-to resources, and even $1 helps us in our mission. Support wikiHow
For collection of data you need to use a serves side language like PHP. You then need to use the get or post method on the action attribute on your form. It is recommended to use Post as it is safe.
Thanks! We’re glad this was helpful.
Thank you for your feedback.
As a small thank you, we’d like to offer you a $30 gift card (valid at GoNift.com). Use it to try out great new products and services nationwide without paying full price—wine, food delivery, clothing and more. Enjoy! Claim Your Gift If wikiHow has helped you, please consider a small contribution to support us in helping more readers like you. We’re committed to providing the world with free how-to resources, and even $1 helps us in our mission. Support wikiHow
HTML Forms
An HTML form is used to collect user input. The user input is most often sent to a server for processing.
Example
The Element
The HTML element is used to create an HTML form for user input:
The element is a container for different types of input elements, such as: text fields, checkboxes, radio buttons, submit buttons, etc.
All the different form elements are covered in this chapter: HTML Form Elements.
The Element
The HTML element is the most used form element.
An element can be displayed in many ways, depending on the type attribute.
| Type | Description |
|---|---|
| Displays a single-line text input field | |
| Displays a radio button (for selecting one of many choices) | |
| Displays a checkbox (for selecting zero or more of many choices) | |
| Displays a submit button (for submitting the form) | |
| Displays a clickable button |
All the different input types are covered in this chapter: HTML Input Types.
Text Fields
The defines a single-line input field for text input.
Example
A form with input fields for text:
This is how the HTML code above will be displayed in a browser:
Note: The form itself is not visible. Also note that the default width of an input field is 20 characters.
The Element
Notice the use of the element in the example above.
The tag defines a label for many form elements.
The element is useful for screen-reader users, because the screen-reader will read out loud the label when the user focuses on the input element.
The element also helps users who have difficulty clicking on very small regions (such as radio buttons or checkboxes) — because when the user clicks the text within the element, it toggles the radio button/checkbox.
The for attribute of the tag should be equal to the id attribute of the element to bind them together.
Radio Buttons
The defines a radio button.
Radio buttons let a user select ONE of a limited number of choices.
Example
A form with radio buttons:
Choose your favorite Web language:
This is how the HTML code above will be displayed in a browser:
Choose your favorite Web language:
Checkboxes
The defines a checkbox.
Checkboxes let a user select ZERO or MORE options of a limited number of choices.
Example
This is how the HTML code above will be displayed in a browser:
I have a bike
I have a car
I have a boat
The Submit Button
The defines a button for submitting the form data to a form-handler.
The form-handler is typically a file on the server with a script for processing input data.
The form-handler is specified in the form’s action attribute.
Example
A form with a submit button:
This is how the HTML code above will be displayed in a browser:
The Name Attribute for
Notice that each input field must have a name attribute to be submitted.
If the name attribute is omitted, the value of the input field will not be sent at all.
Example
This example will not submit the value of the «First name» input field:
How to Create a Simple HTML and PHP Form

David Clinton

If you have a website, it’s only a matter of time before you feel the irrepressible urge to gather information about your site’s users.
The most direct way to do that is to ask them some questions. And, in the HTML world, the best tool for recording the answers to those questions is the simple HTML form.
In this guide, I’m going to show you how that’s done using basic HTML and just a dash of PHP.
As you’ll soon see, the HTML you’ll need to present a form is, in fact, pretty straightforward. But that’ll only solve half of your problem.
A form will prompt users to enter whatever information you’re asking for. But, if we leave it there, nothing will actually happen when they hit the Submit button. And that’s because we don’t have anything running on our server to collect and process that information.
Building the back end that’ll integrate your form with a database engine or an associated application can get really complicated and is way beyond our scope here. But, once we understand the HTML form here, I will show you how you can add some PHP code to handle the code in a basic way.
This article comes from my Complete LPI Web Development Essentials Study Guide course. If you’d like, you can follow the video version here:
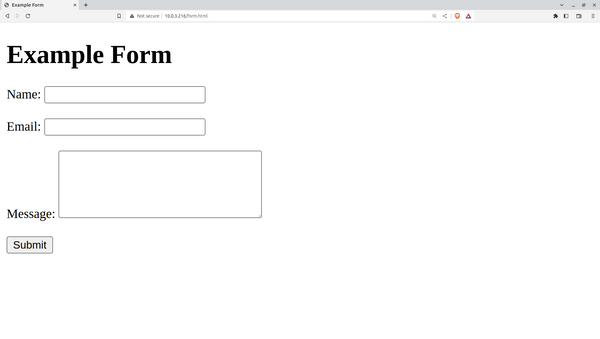
Feel free to type something into the Name, Email, and Message fields, but there’s no point hitting the Submit button just yet. That’s because, without some PHP magic, nothing will happen. And I haven’t shown you that PHP yet.
How to Write a PHP Script to Capture User Inputs
PHP, by the way, is a web-friendly scripting language that’s a popular choice for adding programmed functionality to web pages. In fact, you can even incorporate PHP code directly into your HTML code. But here’s how it’ll look on its own, in a file called submit.php :
"; echo "Email: " . $email . "
"; echo "Message: " . $message . "
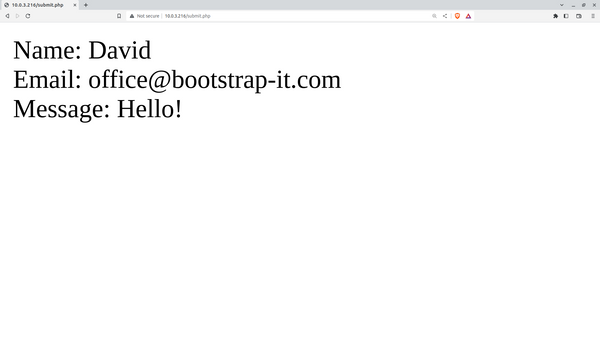
"; > ?>Remember how our HTML post method sent the form data to this file? Well here’s what PHP is going to do with it. The if block looks for posted data and then organizes it by field: name, email, and message. Normally, you’d probably send that data along to a database but, for simplicity, this code will just print it back to the page to prove that we actually had it.
Let’s see what that’ll look like. I click the Submit button and the form is replaced by the text I’d entered. Nothing spectacular, but it does nicely illustrate how forms work with PHP.
With this simple code, you’re now able to create your own HTML forms that collect and process user input.
Your next step will be to connect with a back end database so you can save and manipulate that data. For for now, enjoy this accomplishment!