Lesson 1 — Introduction to form applications in Java Swing
Welcome to the first lesson of an online course where we’ll learn how to create window (form) applications in Java and try to use individual components. We’ll work with buttons, text fields, tables, but also with pictures, timers, and other components available in these applications.
I’ll write the series in such a way that you don’t need any advanced knowledge. However, I suppose you know at least the basics of object-oriented programming.
Swing
Swing is a framework that allows to create form applications simply. We’ll find there a full set of prepared components for most situations. And, if we need more, of course, we can create our own or modify an existing one. This series will be all about Swing.
Swing is based on AWT, an older framework that encapsulates the interface of the operating system itself. Compared to AWT, Swing provides richer and more comfortable components, plus supports the MVC architecture, we’ll see all this further in the series.
At present, besides Swing, there’s also a more modern framework, and that’s JavaFX. It includes better separation of the logic and output, supports faster rendering, animations, multimedia, and other new technologies. However, it has more complex installation. In practice, both frameworks are used for developing form applications.
First form application

Let’s start with nothing else but the classic Hello World application. This time, it’ll be a form application If you haven’t read the previous courses here, let me repeat that it’ll be a simple application that does nothing but prints some text.
Ways to design a form
There are basically two ways to create Swing applications, more precisely how forms can be created.
- Graphic Designer — Modern IDEs allow us to create forms using a graphic designer. Working with a designer is very simple. We drag-and-drop components to the form and the IDE generates its source code. This method is ideal for most applications and saves a lot of work.
- Manual design — The code of the form is written by the programmer himself. Creating forms like this, mainly the larger ones, is very challenging and you need to position the elements manually using different spaces, panels, tables, and so on. This part is done by IDE for us in the first method. The manual form design is especially popular in schools and we’ll skip it in this course.
Create a new project in NetBeans, select a standard Java Application as the project type. Choose HelloSwing as the name and uncheck Create Main Class:

Right-click the created project in the Projects window and add a new JFrame form:

It’ll be the main window of our application. As the name, we’ll choose MainJFrame .
Your NetBeans window should now look like this:

Let’s describe its individual parts that we’ll use to develop form applications. Important parts are highlighted in red in the picture above.
- Designer — In Designer, we can see how the form looks like. So far, it’s just an empty window (empty area).
- Properties — In the Properties window, we can see the properties of the currently selected component on the form. If you don’t see the window, turn it on in the menu View -> IDE Tools.
- Palette — In the palette, you can find the components you can insert onto the form.
- The Source / Design buttons toggle between the graphic designer and the form’s source code. We’re about to describe the code in a moment.
Setting component properties
When we select a component on the form or the form itself, we can change the properties of the component in the Properties window.
Since we have no element on the form yet, the form itself is selected. We’ll set the title of the form to Greetings . Find the title property and enter the value Greetings . In this way, we’ll set the properties of all the components on the form.
Adding a component to a form
Now, select Label in the palette. The label is a text component. In the palette, always choose the Swing components. You can find the original AWT components below in the palette, but we’ll not use them. Drag-and-drop the label onto the form. Scale down the form and simply drag-and-drop the label to the center with your mouse. Set the label text to Greetings from the form in the Properties window.
You can run your first window application with the green Play button or the F6 key as always. When you first run the app, you’ll be asked to select the main application class, select the class of the form and confirm. You should get something like this:

You can download the application below in case something didn’t work for you. You can do so in every lesson of this course. Next time, in the lesson Java Swing under the hood, we’ll explain how the application works under the hood, that is, the generated source code.
Did you have a problem with anything? Download the sample application below and compare it with your project, you will find the error easily.
Download
Downloaded 4x (19.93 kB)
Application includes source codes in language Java
JAVA Swing Form Example
With this example we are going to demonstrate creation of form using JAVA Swing. JAVA provides a huge set of libraries to develop a Graphical User Interface. Swing API is built on top of AWT API and are widely being used instead of AWT API.
1. Introduction
- Container: Can be simply thought as Something which contain or holds the component. For example, JFrame , JPanel etc. Container has to have some layout which is managed by layout manager. By default JFrame has BorderLayout and JPanel has Flowlayout.
- Component: An element which can be seen on the screen and occupies some space. For example, JTextbox , JButton , JTextarea , JLabel etc.
2. JAVA Swing Form Example
JAVA swing form example shows how to create a form using Eclipse.
This article will focus on creation of form having components such as TextBox, TextArea, Label, RadioButton, Button, CheckBox etc. and also how to handle events if generated by a particular component.
2.1. Setup
This example is developed on Eclipse therefore a compatible Eclipse IDE is required to be installed on the system.
We also need WindowBuilder tool to be installed on Eclipse IDE for the easiness of the work.
Following Steps are required to install the WindowBuilder tool.
- Go to Eclipse →Help→ Install New Software
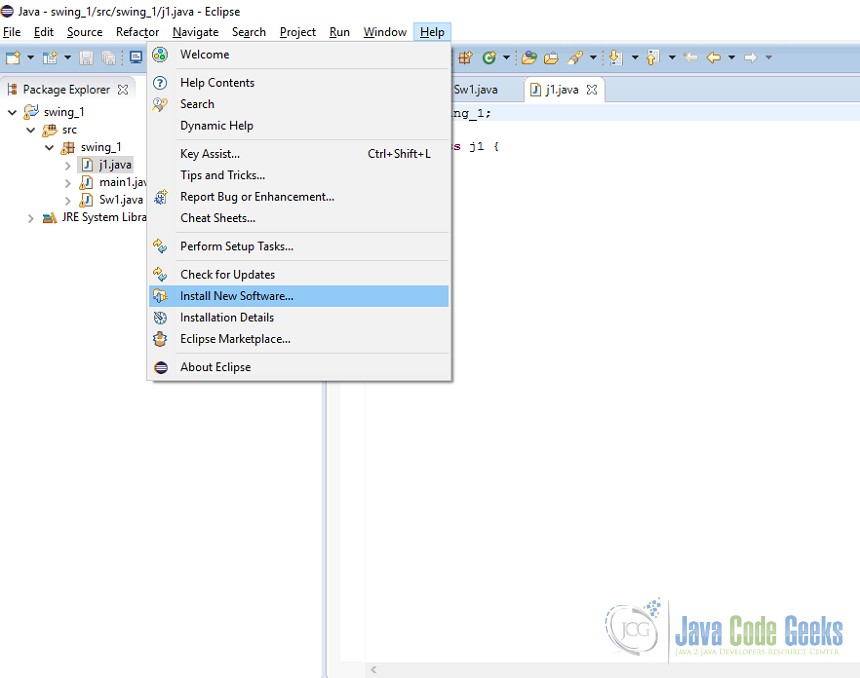
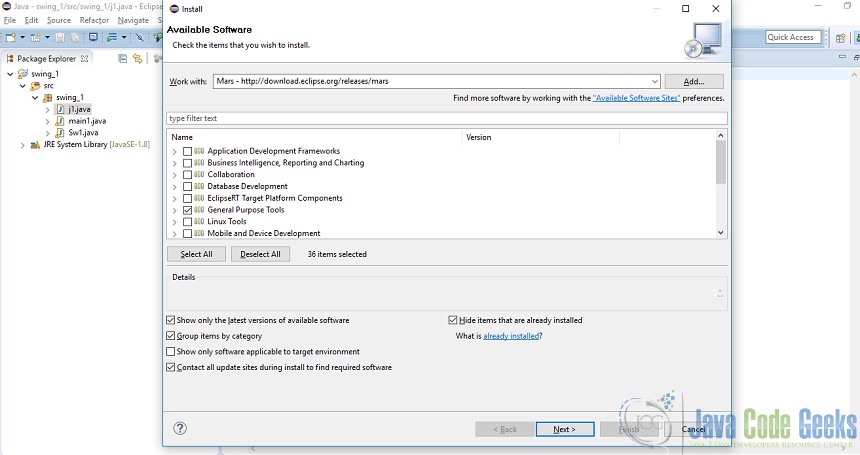
- Select your version of eclipse version/download/eclipse.org/release/eclipse version, For example, Mars – http://download.eclipse.org/releases/mars
- Select General purpose tools from the dropdown and click next.
This will take some time to install the software, restart eclipse in order to see the changes.
2.2 Java Swing Form
Create a new JAVA project lets say swing_1
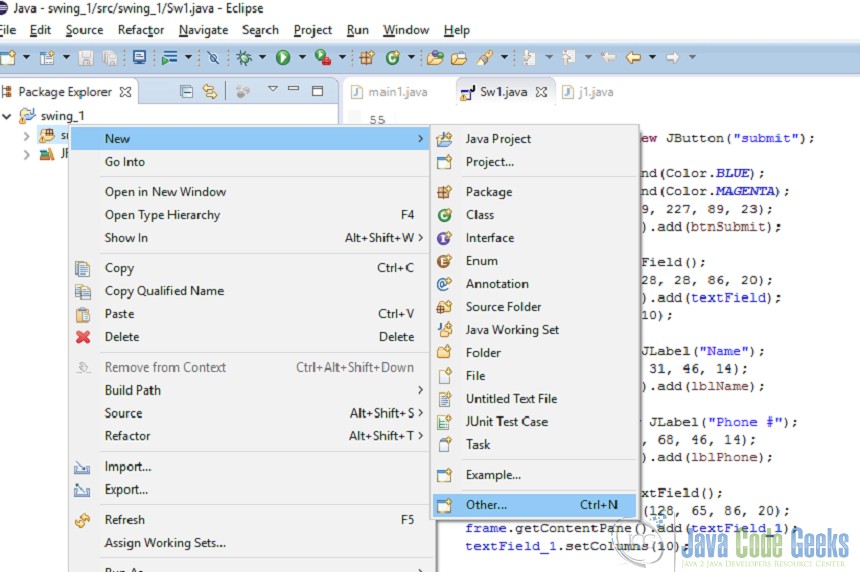
- Go to src→ right click→ New→ Other→ WindowBuilder→ select Swing Designer→ Application Window
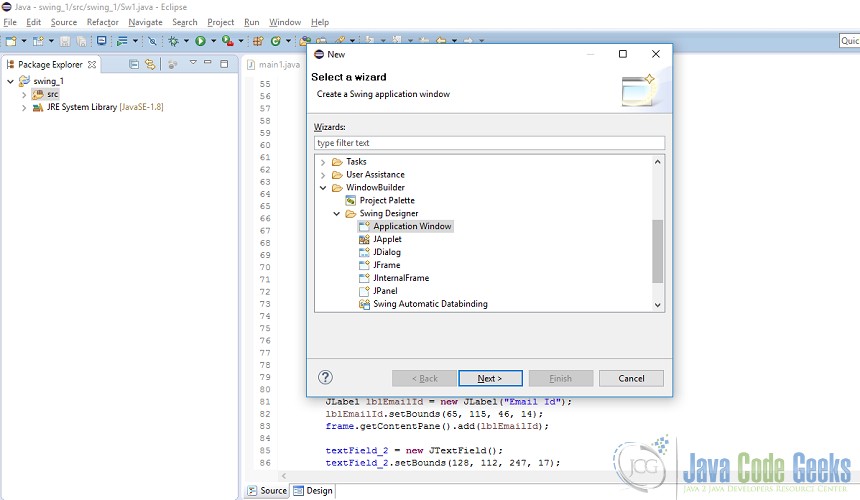
Enter the name of the application(eg. JAVASwingFormExample) and click finish.
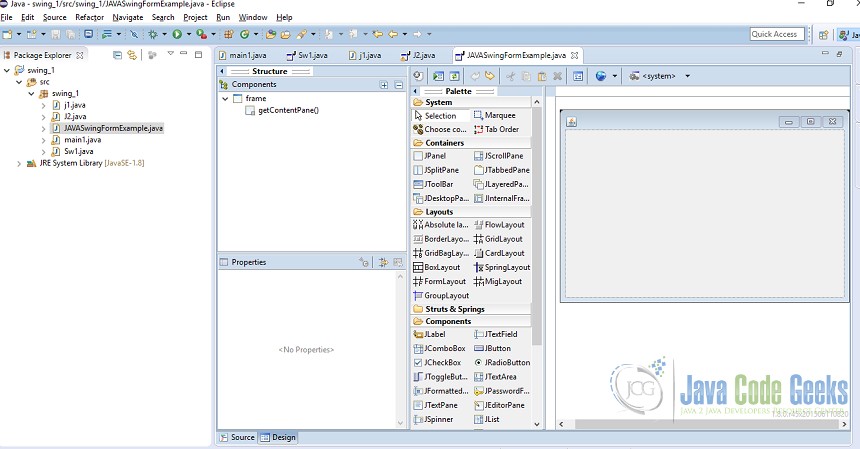
This will create JAVASwingFormExample.java file and will provide Source and Design tab.
3 Code
Source file will look like this. Basically, a Frame is being created here.
package swing_1; import java.awt.EventQueue; import javax.swing.JFrame; import javax.swing.JOptionPane; import javax.swing.JButton; import java.awt.Color; import java.awt.event.ActionListener; import java.awt.event.ActionEvent; import javax.swing.JTextField; import javax.swing.JLabel; import javax.swing.JTextArea; import javax.swing.JRadioButton; import javax.swing.JToggleButton; import javax.swing.JScrollBar; import javax.swing.JComboBox; import javax.swing.JCheckBox; public class JAVASwingFormExample < private JFrame frame; private JTextField textField; private JTextField textField_1; private JTextField textField_2; /** * Launch the application. */ public static void main(String[] args) < EventQueue.invokeLater(new Runnable() < public void run() < try < JAVASwingFormExample window = new JAVASwingFormExample(); window.frame.setVisible(true); >catch (Exception e) < e.printStackTrace(); >> >); > /** * Create the application. */ public JAVASwingFormExample() < initialize(); >/** * Initialize the contents of the frame. */ private void initialize() < frame = new JFrame(); frame.setBounds(100, 100, 730, 489); frame.setDefaultCloseOperation(JFrame.EXIT_ON_CLOSE); frame.getContentPane().setLayout(null); >>
EventQueue.invokeLater(new Runnable()) is an Event-Dispatch thread where events are fired and handled.
Design tab will look like the one below. Components from the pallet can be added to the frame and the code for the following gets amended in the source file.
In this example a simple form is being created.To create a form consider the following scenario, ask user to enter his/her name, phone number, Email id, Address, Gender and Occupation.
All the fields are mandatory and data will be submitted if all the entries are filled by user, a message will be displayed, i.e, data submitted if user has entered the data correctly or data missing will be displayed. A user can reset the field and can re-enter the data anytime by using clear button.
To begin with, we need 3 textfield, 1 textarea, 8 labels and 2 buttons, 2 radio buttons and combo box.
Before adding any component to the window frame a layout for the frame needs to be selected. In this example Absolute Layout is being set as a layout, you can try and explore all other layouts and can feel the difference.
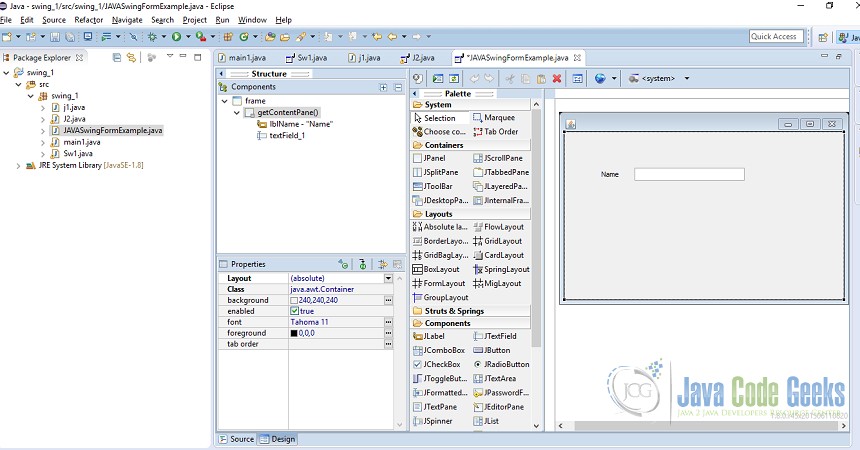
Click on Absolute Layout and then click on the frame.
Click on the component such as, Jlabel , Jtextfield etc. and then click in the window frame as shown. Components can be placed anywhere in the container.
Similarly other fields such as, Phone number, Email ID etc will be added.
Source and Design will look like the one below.
textField = new JTextField(); textField.setBounds(128, 28, 86, 20); frame.getContentPane().add(textField); textField.setColumns(10); JLabel lblName = new JLabel("Name"); lblName.setBounds(65, 31, 46, 14); frame.getContentPane().add(lblName); 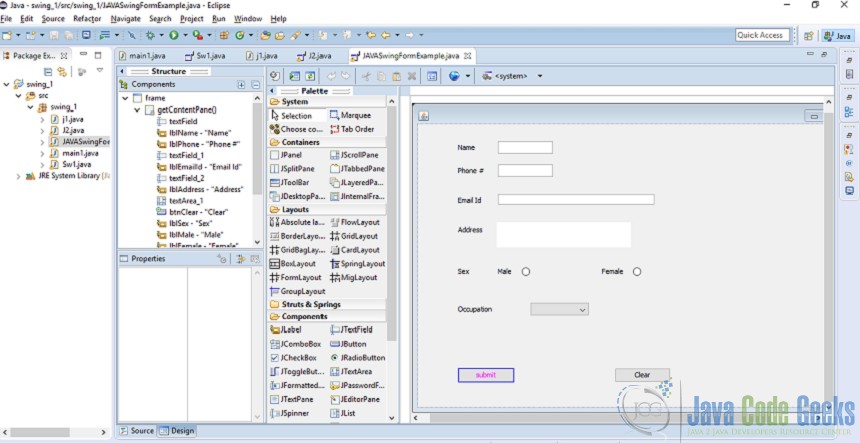
Similarly, we will add other fields such as, Phone number, Email ID, Address, Gender and Occupation.
Here is how Design and Source file will look like.
JLabel lblPhone = new JLabel("Phone #"); lblPhone.setBounds(65, 68, 46, 14); frame.getContentPane().add(lblPhone); textField_1 = new JTextField(); textField_1.setBounds(128, 65, 86, 20); frame.getContentPane().add(textField_1); textField_1.setColumns(10); JLabel lblEmailId = new JLabel("Email Id"); lblEmailId.setBounds(65, 115, 46, 14); frame.getContentPane().add(lblEmailId); textField_2 = new JTextField(); textField_2.setBounds(128, 112, 247, 17); frame.getContentPane().add(textField_2); textField_2.setColumns(10); JLabel lblAddress = new JLabel("Address"); lblAddress.setBounds(65, 162, 46, 14); frame.getContentPane().add(lblAddress); JTextArea textArea_1 = new JTextArea(); textArea_1.setBounds(126, 157, 212, 40); frame.getContentPane().add(textArea_1); JButton btnClear = new JButton("Clear"); btnClear.setBounds(312, 387, 89, 23); frame.getContentPane().add(btnClear); JLabel lblSex = new JLabel("Sex"); lblSex.setBounds(65, 228, 46, 14); frame.getContentPane().add(lblSex); JLabel lblMale = new JLabel("Male"); lblMale.setBounds(128, 228, 46, 14); frame.getContentPane().add(lblMale); JLabel lblFemale = new JLabel("Female"); lblFemale.setBounds(292, 228, 46, 14); frame.getContentPane().add(lblFemale); JRadioButton radioButton = new JRadioButton(""); radioButton.setBounds(337, 224, 109, 23); frame.getContentPane().add(radioButton); JRadioButton radioButton_1 = new JRadioButton(""); radioButton_1.setBounds(162, 224, 109, 23); frame.getContentPane().add(radioButton_1); JLabel lblOccupation = new JLabel("Occupation"); lblOccupation.setBounds(65, 288, 67, 14); frame.getContentPane().add(lblOccupation); JComboBox comboBox = new JComboBox(); comboBox.addItem("Select"); comboBox.addItem("Business"); comboBox.addItem("Engineer"); comboBox.addItem("Doctor"); comboBox.addItem("Student"); comboBox.addItem("Others"); comboBox.addActionListener(new ActionListener() < public void actionPerformed(ActionEvent arg0) < >>); comboBox.setBounds(180, 285, 91, 20); frame.getContentPane().add(comboBox); JButton btnSubmit = new JButton("submit"); btnSubmit.setBackground(Color.BLUE); btnSubmit.setForeground(Color.MAGENTA); btnSubmit.setBounds(65, 387, 89, 23); frame.getContentPane().add(btnSubmit); > Frame.getContentPane().add(lblName) adds the label to the frame.
We have added 2 buttons in this form, i.e., Submit and Clear. We need to listen whether these components have generated any event. If so an action needs to be performed. The code for doing so is described below.
btnSubmit.addActionListener(new ActionListener() < public void actionPerformed(ActionEvent arg0) < if(textField.getText().isEmpty()||(textField_1.getText().isEmpty())||(textField_2.getText().isEmpty())||(textArea_1.getText().isEmpty())||((radioButton_1.isSelected())&&(radioButton.isSelected()))||(comboBox.getSelectedItem().equals("Select"))) JOptionPane.showMessageDialog(null, "Data Missing"); else JOptionPane.showMessageDialog(null, "Data Submitted"); >>); btnClear.addActionListener(new ActionListener() < public void actionPerformed(ActionEvent e) < textField_1.setText(null); textField_2.setText(null); textField.setText(null); textArea_1.setText(null); radioButton.setSelected(false); radioButton_1.setSelected(false); comboBox.setSelectedItem("Select"); >>); submit button will continuously listen for an event and requires method actionPerformed to be implemented in order to take an action if an event is generated. If any of the field is empty submit button will show a message Data Missing or else Data will be Submitted. Similarly, for clear button if any event is generated actionPerformed will reset the data to null.
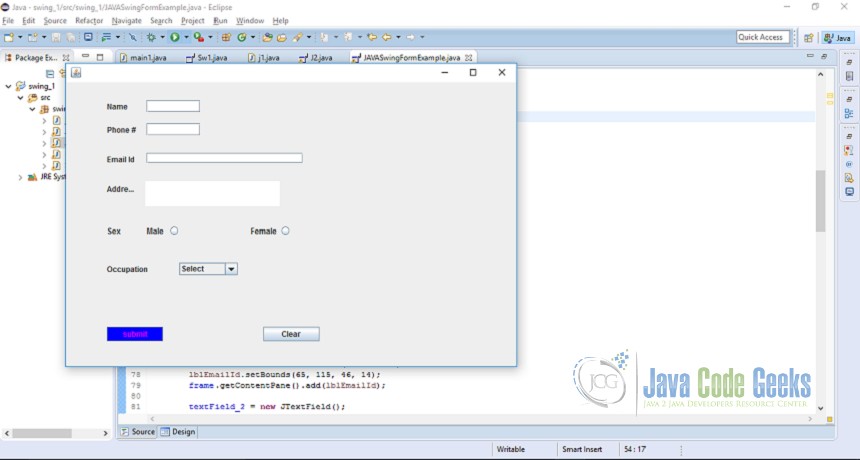
After execution of the code form will look like this:
4. Download the Source Code
This was an example of creation of JAVA Swing form.