- How to Use Tables in Java
- How to Create a Table in Java
- How to Create a Table Using a Model in Java
- How to Manage Column Width & Height in Java
- Final Thoughts on Java Tables
- Создание таблиц
- Ключи в таблице
- Настройки типа данных
- JAVA JDBC – Create, Update and Delete Table in MySQL Database
- Programming Example
- Updating Table
- Rename Table
- Deleting Table
- Summary
How to Use Tables in Java
Developer.com content and product recommendations are editorially independent. We may make money when you click on links to our partners. Learn More.
In Java, tables are used to arrange data into columns and rows. A column is space that runs horizontally on a table, while a row is a space that runs horizontally in your table. The intersection between a column and a row is called a cell and is used to hold singular piece of data.
In Java, developers can use the JTable method to create a table in their applications. JTable is a Swing component that inherits from the JComponent class.
How to Create a Table in Java
To create a table, you need to make an instance of the JTable class. You need to provide two arguments (row and column) in its constructor for the table to be constructed, as shown in this example code snippet:
JTable table = new JTable (row, column);
The row and column values can consist of two integer values, like below:
JTable table = new JTable (5,3);
The above statement creates a table with 5 rows and 3 columns.
Instead of providing the JTable constructor with integers, programmers can also supply a two dimensional array for the data in each row, and a one dimensional array for the column names. Here is how you can use arrays to create a table in Java:
JTable(Object[][] rowData, Object[] columnNames)
Here is some example code showing how to create a table in Java and fill it with data:
import javax.swing.*; import javax.swing.table.*; import java.awt.*; class Table< public static void main(String args[])< JFrame frame = new JFrame(); String[] columnNames = ; Object[][] data = < , , , , >; JTable table = new JTable(data, columnNames); frame.add(table); frame.setDefaultCloseOperation(JFrame.EXIT_ON_CLOSE); frame.setSize(400,400); frame.setLocationRelativeTo(null); frame.setVisible(true); > >
If you run this code in your integrated development environment (IDE) or code editor, it will produce the following output:

When you click on any one of the above cells, you will notice that the data in it is editable. This is not a particularly desirable feature if you are just presenting data to your user. Also, all the data is treated as a string when in its presentation to a user.
Another point of concern is that, in case you were querying a database object for particular values, you would have to copy all values to an array or vector.
To avoid these problems, you can instead create your Java table using a model.
How to Create a Table Using a Model in Java
First, it is important to understand how table data is handled. All tables (including a table created using JTable()) use a table model to manage their data. When developers do not provide a table model to the constructor of JTable, an instance of DefaultTableModel will be automatically created for it. Therefore, if you need to use a custom model, you need to provide it to the JTable constructor, as shown in this example code:
JTable table = new JTable(new MyTableModel());
To define a table model, programmers need to create a class that extends the AbstractTableModel class:
class MyTableModel extends AbstractTableModel
In your table model, you can include the data for your rows and column names, just as shown in the earlier JTable example. To ensure that your table model class is a concrete class, you need to implement the following three methods of AbstractTableModel:
public int getRowCount(); public int getColumnCount(); public Object getValueAt(int row, int column);
You can implement more methods, but you must ensure that the above methods are among those you implement. You can find the description of other methods from the official Oracle API docs.
The code example below shows how you can use a table model in Java:
import javax.swing.*; import javax.swing.table.*; import java.awt.*; class TableUsingModel < public static void main(String args[])< JFrame frame = new JFrame(); JTable table = new JTable(new MyTableModel()); frame.add(table); frame.setDefaultCloseOperation(JFrame.EXIT_ON_CLOSE); frame.setSize(400,400); frame.setLocationRelativeTo(null); frame.setVisible(true); >> class MyTableModel extends AbstractTableModel < String[] columnNames = ; Object[][] data = < , , , , >; public int getRowCount() < return data.length; >public int getColumnCount() < return columnNames.length; >public Object getValueAt(int row, int col) < return data[row][col]; >>
This results in the following output (Display):
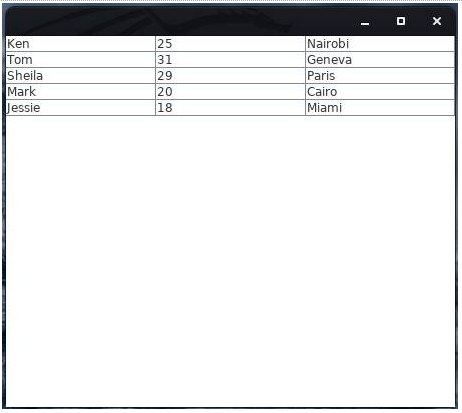
This time, if you try double-clicking on any cell, you will notice that it is not editable.
How to Manage Column Width & Height in Java
If you want to set the height of rows, you can use the setRowHeight() method.
JTable table = new JTable(data, columnNames); table.setRowHeight(80);
The above example sets the height of each row 80 pixels.
To set the width of columns, you can use the setPreferredWidth() method. First, you need to create a column model of type TableColumnModel. Then you can get the particular column you want and then set its preferred width. Here is some example code showing how to set the column width of a table in Java:
TableColumnModel columnModel = table.getColumnModel(); columnModel.getColumn(2).setPreferredWidth(200);
Final Thoughts on Java Tables
In this programming tutorial, programmers learned how to use JTable, or a table model, to create a table in Java. The code examples shown above add the tables directly to the JFrame container. However, you can instead add your table to a scroll pane so that your user can easily navigate through the data when it does not fit its container.
Создание таблиц
В предыдущих лекциях мы уже немного познакомились с запросами для создания таблиц, теперь настало время разобраться в этом поглубже.
Создание таблицы очень напоминает объявление класса в Java и имеет такой шаблон:
CREATE TABLE table_name ( column1 datatype, column2 datatype, column3 datatype, . ); Давай для примера напишем запрос, который создает таблицу с пользователями:
CREATE TABLE user ( id INT, name VARCHAR(100), level INT, created_date DATE, ); Выглядит очень просто, потому что тут не указано куча нюансов.
Во-первых, у таблицы могут быть дополнительные настройки.
А во-вторых, у каждой колонки могут быть дополнительные настройки.
И начнем мы с настроек создания колонок.
Ключи в таблице
У колонки таблицы кроме имени и типа данных могут быть еще такие настройки:
| PRIMARY KEY | Колонка является ключом таблицы |
| UNIQUE KEY | Все значения колонки должны быть уникальны |
| DEFAULT value | Значение по умолчанию |
| NOT NULL | Запрет принимать значение NULL |
| AUTO_INCREMENT | SQL-сервер будет автоматически увеличивать значение при добавлении новой записи в таблицу |
| GENERATED | Вычисляемое поле |
| STORAGE | Где хранить данные: на диске или в памяти |
| COMMENT | Комментарий к колонке, например, название на локальном языке |
Ниже мы рассмотрим некоторые из них.
Во-первых, это PRIMARY KEY.
Чаще всего это отдельная колонка с именем id и типом INT. Это так называемый “главный ключ” таблицы, и все ее строки имеют уникальные значения этого ключа. В первую очередь он используется для того, чтобы другие таблицы могли ссылаться на записи нашей таблицы и указывать на ее определенную запись.
Во-вторых, это UNIQUE KEY.
Чем-то он похож на PRIMARY KEY, хотя смысловая нагрузка у него абсолютно другая. Если колонка имеет атрибут UNIQUE, то все значения этой колонки должны быть уникальны. Хороший пример отличия UNIQUE KEY и PRIMARY KEY – это список людей в паспортном столе.
Налоговый номер – это PRIMARY KEY, он используется для того, чтобы легко было ссылаться на нужного человека из других таблиц.
Номер паспорта – это UNIQUE KEY. Не может быт двух людей с одинаковым номером паспорта. Однако номер паспорта можно поменять. Например, при смене фамилии. А налоговый номер останется с вами навсегда. Это и есть основная задача PRIMARY KEY. Пример запроса с указанием PRIMARY KEY:
CREATE TABLE user ( id INT PRIMARY KEY, name VARCHAR(100), level INT, created_date DATE, ); Настройки типа данных
Есть менее важные, но полезные атрибуты.
DEFAUL value
При вставке данных (добавлении новой строки) в таблицу можно не указывать значения некоторых колонок, если те имеют значение по умолчанию. В таком случае SQL-сервер просто установит значение колонки сам.
Начиная с 8-й версии MySQL в качестве значения можно указывать выражение.
Если при создании таблицы у колонки указать атрибут NOT NULL, то SQL-сервер будет следить за тем, чтобы в эту колонку нельзя было сохранить значение NULL. По умолчанию у любой колонки может быть значение NULL, даже у колонки с типом INT. Что немного неочевидно для Java-программиста.
AUTO_INCREMENT
Обычно он используется для id колонок. Когда ты добавляешь новую строку в таблицу, то очень хочется, чтобы SQL-сервер сам присвоил id для этой записи. Кто как не сервер лучше всего знает, сколько у него строк в таблице. Особенно если к одному SQL-серверу идут запросы с разных клиентов.
Именно это и делает атрибут AUTO_INCREMENT. При добавлении новой строки мы просто не передаем ничего в качестве id, и SQL-сервер сам укажет нужный ID для этой записи: он просто возьмет ID последней существующей записи и увеличит его на 1. Этот атрибут можно использовать только с типами целых и вещественных чисел. И, конечно же, давай сделаем пример создания такой таблицы:
CREATE TABLE user ( id INT PRIMARY KEY AUTO_INCREMENT, name VARCHAR(100) NOT NULL, level INT DEFAULT 1, created_date DATE NOT NULL, ); JAVA JDBC – Create, Update and Delete Table in MySQL Database
After creating database using JDBC in Java, next is creating and working with MySQL table in JDBC. Here, I am going to write a program which will create, update, rename and delete the table. Inserting and manipulating data will be discussed in next chapter so, keep focus on creating, updating and deleting table in this chapter.
Programming Example
In the previous chapter we created a database STOREDB. We will use this database to store table.
package TableDemo; import java.sql.*; public class CreateTable < static final String JDBC_DRIVER = "com.mysql.jdbc.Driver"; static final String dburl = "jdbc:mysql://localhost/STOREDB"; static final String dbuser = "root"; static final String dbpass = "root"; public static void main(String[] args) < Connection con = null; Statement stmt = null; try < //Step 1 : Connecting to server and database con = DriverManager.getConnection(dburl, dbuser, dbpass); //Step 2 : Initialize Statement stmt=con.createStatement(); //Step 3 : SQL Query String query="CREATE TABLE ITEM(" + "ID int NOT NULL AUTO_INCREMENT," + "PRODUCT varchar(50)," + "PRICE varchar(10)," + "PRIMARY KEY(ID))"; //Step 4 : Run Query stmt.executeUpdate(query); System.out.println("TABle ITEM Created Successfully"); >catch (SQLException e) < System.err.println("Cannot connect ! "); e.printStackTrace(); >finally < System.out.println("Closing the connection."); if (con != null) try < con.close(); >catch (SQLException ignore) <> > > > Updating Table
Several times you need to alter table definition mostly when you want to add more field or remove a column or sometimes changing column range. Here is an example of Table Update in JDBC is given below.
Programming Example
package TableDemo; import java.sql.*; public class UpdateTable < static final String JDBC_DRIVER = "com.mysql.jdbc.Driver"; static final String dburl = "jdbc:mysql://localhost/STOREDB"; static final String dbuser = "root"; static final String dbpass = "root"; public static void main(String[] args) < Connection con = null; Statement stmt = null; try < //Step 1 : Connecting to Server con = DriverManager.getConnection(dburl, dbuser, dbpass); //Step 2 : Initialize Statement stmt=con.createStatement(); //Step 3 : SQL Query //Add New Column Quantity String query="ALTER TABLE ITEM ADD Quantity int(5)"; //Remove Column PRICE String query1="ALTER TABLE ITEM DROP COLUMN PRICE"; //Edit Column PRODUCT String query2="ALTER TABLE ITEM MODIFY COLUMN PRODUCT varchar(200)"; //Step 4 : Run Query stmt.executeUpdate(query); System.out.println("Column Quantity Added Successfully"); stmt.executeUpdate(query1); System.out.println("Table Price Removed"); stmt.executeUpdate(query2); System.out.println("Changed PRODUCT varchar(50) to PRODUCT nvarchar(200)"); >catch (SQLException e) < System.err.println("Cannot connect ! "); e.printStackTrace(); >finally < System.out.println("Closing the connection."); if (con != null) try < con.close(); >catch (SQLException ignore) <> > > > Column Quantity Added Successfully
Table Price Removed
Changed PRODUCT varchar(50) to PRODUCT nvarchar(200)
Closing the connection.
Rename Table
When you need to rename MySQL Table using JDBC in your java program you can use the following program to rename table.
package TableDemo; import java.sql.*; public class RenameTable < static final String JDBC_DRIVER = "com.mysql.jdbc.Driver"; static final String dburl = "jdbc:mysql://localhost/STOREDB"; static final String dbuser = "root"; static final String dbpass = "root"; public static void main(String[] args) < Connection con = null; Statement stmt = null; try < //Step 1 : Connecting to server and database con = DriverManager.getConnection(dburl, dbuser, dbpass); //Step 2 : Initialize Statement stmt=con.createStatement(); //Step 3 : SQL Query String query="RENAME TABLE ITEM TO COSMETIC"; //Step 4 : Run Query stmt.executeUpdate(query); System.out.println("TABLE ITEM Renamed to COSMETIC Successfully"); >catch (SQLException e) < System.err.println("Cannot connect ! "); e.printStackTrace(); >finally < System.out.println("Closing the connection."); if (con != null) try < con.close(); >catch (SQLException ignore) <> > > > Deleting Table
Finally when you no longer need to Table you can delete it using DROP command. Here, is the complete program.
Programming Example
package TableDemo; import java.sql.*; public class DeleteTable < static final String JDBC_DRIVER = "com.mysql.jdbc.Driver"; static final String dburl = "jdbc:mysql://localhost/STOREDB"; static final String dbuser = "root"; static final String dbpass = "root"; public static void main(String[] args) < Connection con = null; Statement stmt = null; try < //Step 1 : Connecting to server and database con = DriverManager.getConnection(dburl, dbuser, dbpass); //Step 2 : Initialize Statement stmt=con.createStatement(); //Step 3 : SQL Query String query="DROP TABLE COSMETIC"; //Step 4 : Run Query stmt.executeUpdate(query); System.out.println("TABLE COSMETIC Deleted Successfully"); >catch (SQLException e) < System.err.println("Cannot connect ! "); e.printStackTrace(); >finally < System.out.println("Closing the connection."); if (con != null) try < con.close(); >catch (SQLException ignore) <> > > > NOTE: You must recreate ITEM Table because this table will be used to storing or updating data in next chapter.
Summary
In this tutorial I explained how can you create, delete, update or rename table using JDBC. You must recreate ITEM table because this table will be used for demo example in next chapter. Hope, you wouldn’t have face any difficulties learning this tutorial. The next chapter is Inserting, Updating, Selecting or Deleting Data in Table.