PHP Code Insert/Store Data Into MySQL Database From Form
PHP code for inserting data into database from form using mysql. Through this tutorial, you will learn how to store or insert/save/store form data into MySQL database table using PHP.
This tutorial shows you an easy way to insert/save/store your html form data into a MySQL database table using a simple PHP Code.
How to Insert HTML Form Data in Database from From in PHP MySQL
1. Create a Database Connection File
2. Create Html form
3. Create Insert.php file to Store Data Into Database using PHP Script
1. Create a Database Connection File
In this step, you will create a file name db.php and update the below code into your file.
The below code is used to create a MySQL database connection in PHP. When we insert form data into MySQL database, there we will include this file:
2. Create Html form
In this step, you need to create an HTML form that name is contact.php file and add the below code into your contact.php file.
We will create three fields the first name is a name, the second is email and the third field name is mobile. In these three fields in HTML form, we will insert our database table name users.
.wrapper
Contact Form
Please fill this form and submit to add employee record to the database.
Name
Email
Mobile
3. Create Insert.php file to Store Data Into Database using PHP Script
In this step, you need to create one file name insert.php and update the below code into your file.
The below code inserts your form data into the MySQL database table using a PHP script.
Conclusion
In this tutorial, you have learned how to store form data into a MySQL database table using PHP code.
This is a very basic and easy example of inserting the form data into a MySQL database table using a PHP script. In the next tutorial, we will show you how you can retrieve and display data from the database in PHP using MySQL.
How to connect HTML to database with MySQL using PHP? An example
How to connect HTML to database with MySQL using PHP? An example – This article helps to become a custom PHP developer. You will get complete steps for storing HTML form input field in MySQL database connection in a db table using the PHP programming with example . This article provide you HTML form, DB + Table SQL code, Bootstrap 5 with CSS, Form Validation and database connection + submission code . In the conclusion step, you will be GIT download link so no need to copy-paste the code.
Tools Required to connect HTML Form with MySQL Database using PHP
First of all, you must be install any XAMPP or WAMP or MAMP (for Mac OS) kind of software on your laptop or computer. With this software, you will get a local webserver i.e. Apache, PHP language, and MySQL database. The complete code is on Github and the download link is the last of this article.
In this article, my PHP, MySQL example is with database connection in xampp code.
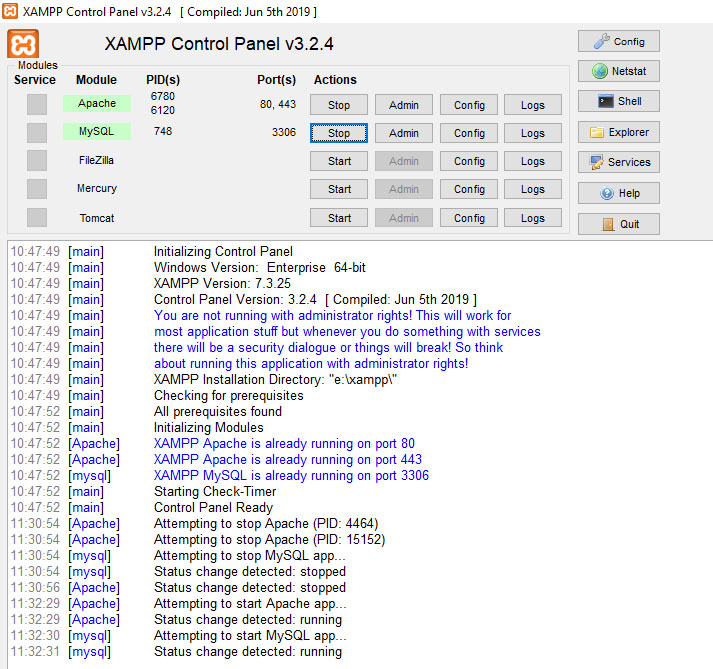
After installation you need to on the Xampp see the image below:
After installation of any of these laptop or desktop software you need to check your localhost is working or not. Open your browser and check this URL http://127.0.0.1 or http://localhost/ . If this is working it means you have the local webserver activated with PHP/MySQL.
Also, GUI PHPmyAdmin coming for handling CRUD operations i.e. insert(create), update, delete, and select(read) records from tables. This interface is browser-based and very helpful, easy to use for creating and managing phpmyadmin database in table(column, row).
If you have the above installation you can go ahead to start your coding.
If you have not a LAMP stack-based web server then you can do this directly in your hosting space.
If you have any more query then you can comment on this post. We will reply to your query.
Suppose you have a web page to insert contact form field data in your DB. For this you need to follow the following steps:
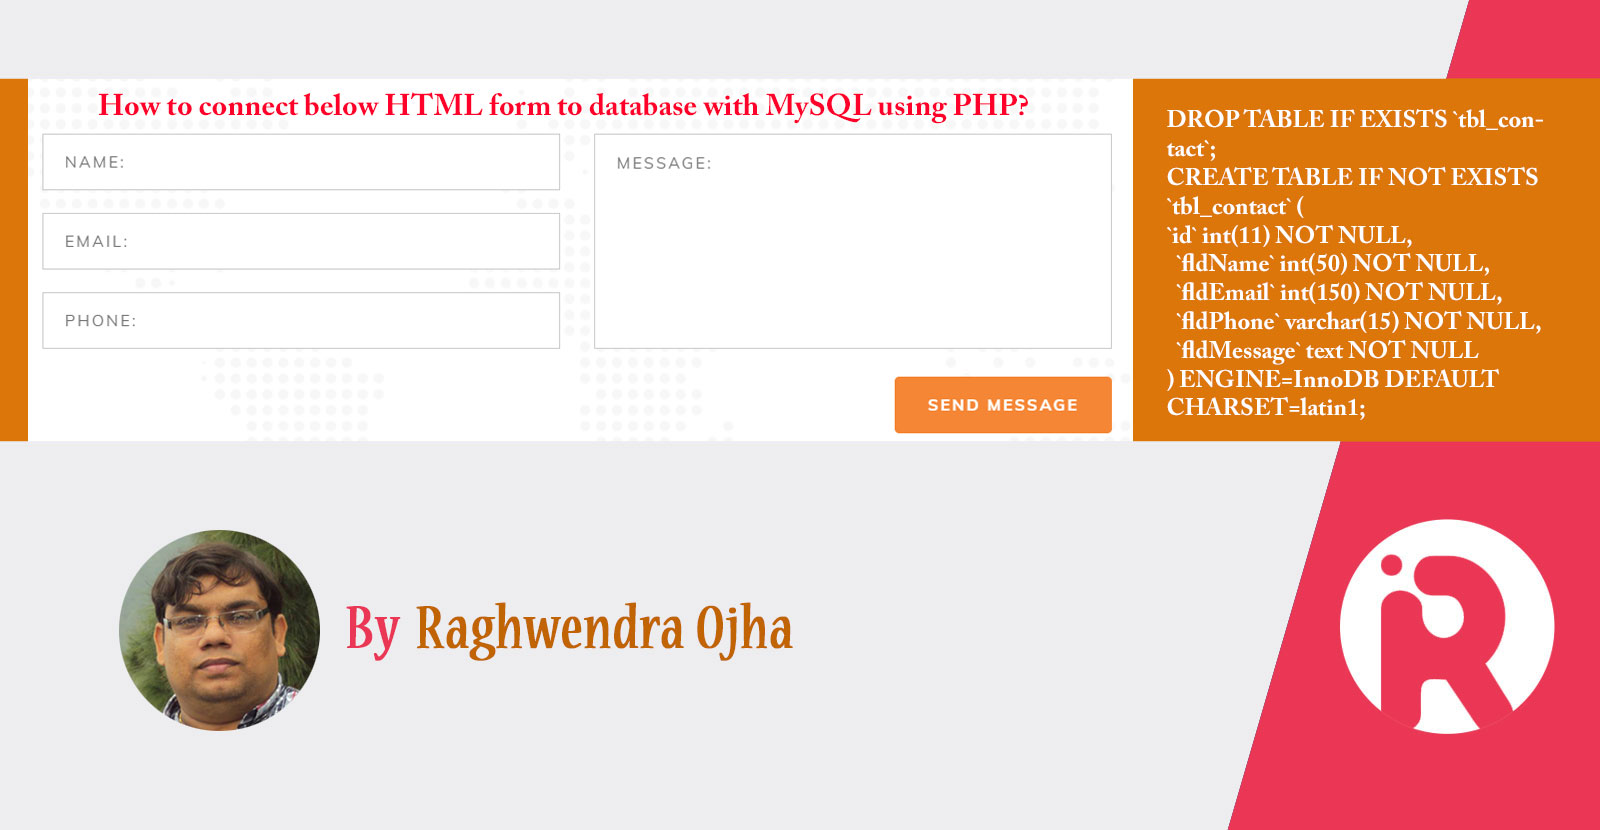
Step 1: Filter your HTML form requirements for your contact us web page
Suppose you selected the form field Name (text input), Email(email input), Phone (number input), and message (multi-line text). The form submit button also necessary for submitting the form. You will get the complete form in HTML coding in step 3.
Step 2: Create a database and a table in MySQL
Open a web browser (chrome, firefox, edge, etc., ) and type this http://localhost/phpmyadmin/ or http://127.0.0.1/phpmyadmin/ for open GUI for managing DB on your computer. See the xampp screen below how it is coming.
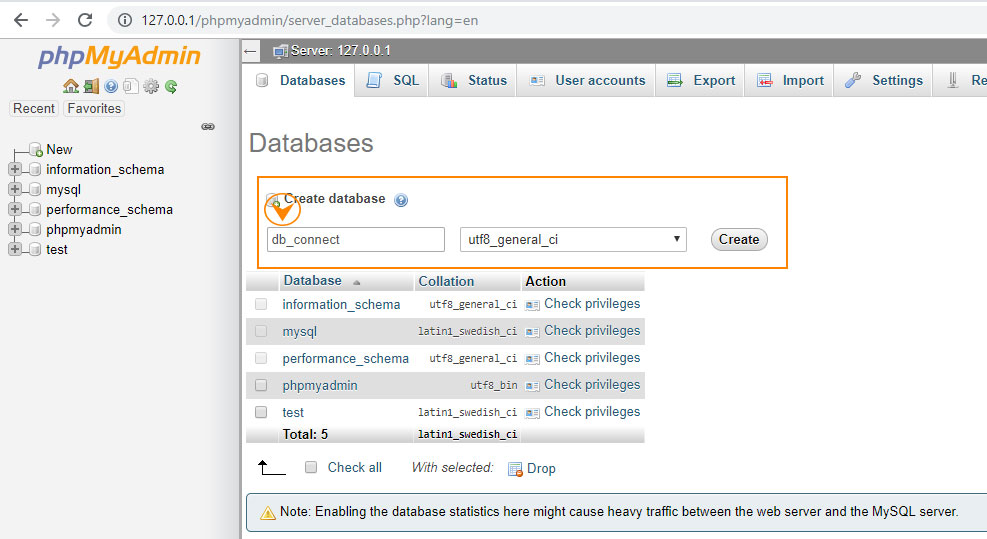
Click on the databases link and create your db by the name “db_contact”. See the image below:
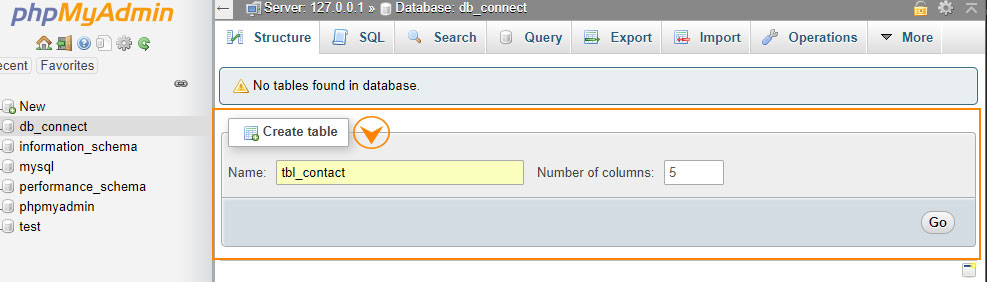
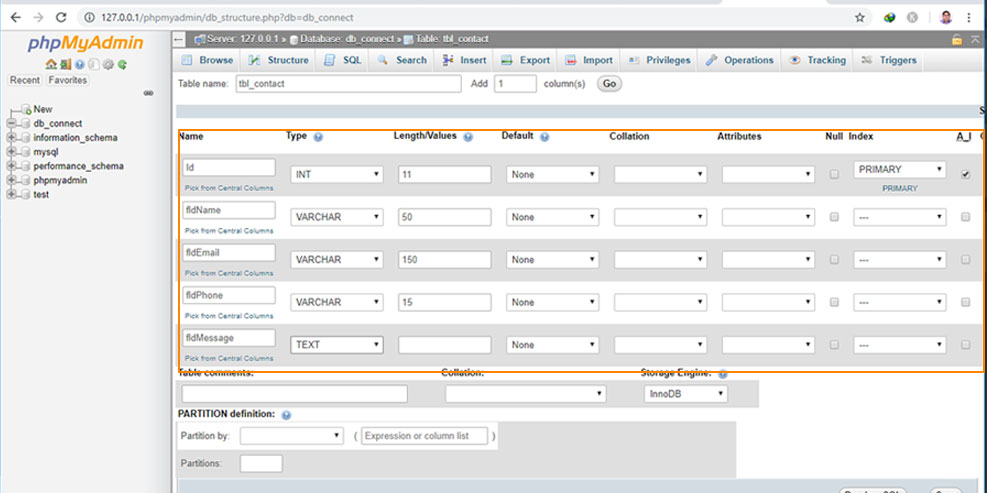
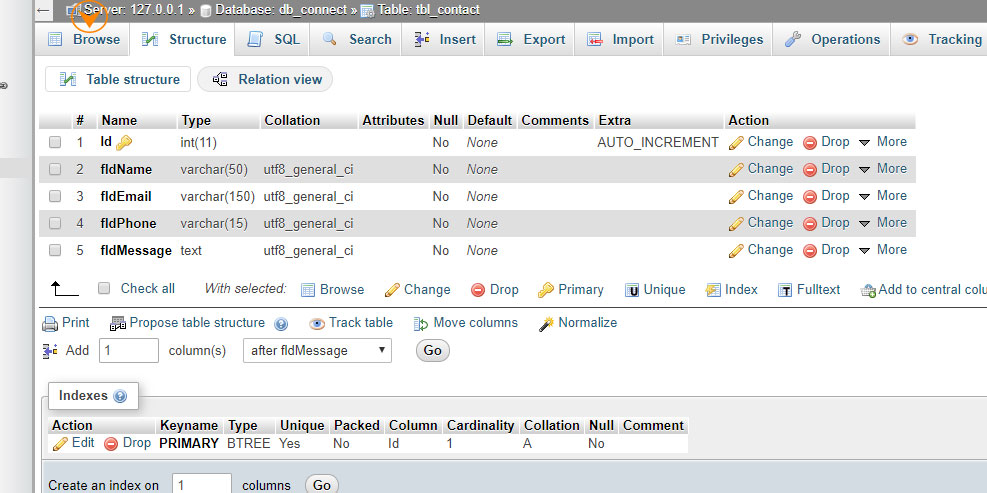
After creating your DB you need to create a table by any name I choose “tbl_contact” with the number of field 5. We choose 4 fields on top Name, Email, Phone, and Message. The first column we will keep for maintaining the serial number and in technical terms primary key(unique number of each recor). See the image below
When you will click to go button you will get this screen. Now we need to feed every field information.
See the below image in which I added field information. So for field Name used field Name – fldName, Email – fldEmail, Phone – fldPhone, Message – fldMessage.
Now click on the save button that is on the bottom right of your screen. After saving your table it is created in your database.
You can create your DB and table using the SQL below. You have to copy the following code and paste it into your MySQL GUI phpmyadmin database or any other GUI or command prompt. At the bottom of the blog, you will get a git download link to download the SQL file.
-- -- Database: `mydb` -- CREATE DATABASE IF NOT EXISTS `db_contact` DEFAULT CHARACTER SET latin1 COLLATE latin1_swedish_ci; USE `db_contact`; -- -------------------------------------------------------- -- -- Table structure for table `tbl_contact` -- DROP TABLE IF EXISTS `tbl_contact`; CREATE TABLE IF NOT EXISTS `tbl_contact` ( `id` int(11) NOT NULL, `fldName` varchar(50) NOT NULL, `fldEmail` varchar(150) NOT NULL, `fldPhone` varchar(15) NOT NULL, `fldMessage` text NOT NULL ) ENGINE=InnoDB DEFAULT CHARSET=latin1; -- -- Indexes for dumped tables -- -- -- Indexes for table `tbl_contact` -- ALTER TABLE `tbl_contact` ADD PRIMARY KEY (`id`); -- -- AUTO_INCREMENT for dumped tables -- -- -- AUTO_INCREMENT for table `tbl_contact` -- ALTER TABLE `tbl_contact` MODIFY `id` int(11) NOT NULL AUTO_INCREMENT;
Step 3: Create HTML form for connecting to database
Now you have to create an HTML form. For this, you need to create a working folder first and then create a web page with the name “contact.html”. If you install xampp your working folder is in folder this “E:\xampp\htdocs”. You can create a new folder “contact” on your localhost working folder. Create a “contact.html” file and paste the following code.
Now your form is ready. You may test it in your localhost link http://localhost/contact/contact.html In the next step, I will go with creating PHP / MySQL code.
Step 4: Create a PHP page to save data from HTML form to your MySQL database
The contact HTML form action is on “contact.php” page. On this page, we will write code for inserting records into the database.
For storing data in MySQL as records, you have to first connect with the DB. Connecting the code is very simple. The mysql_connect in PHP is deprecated for the latest version therefore I used it here mysqli_connect.
You need to place value for your localhost username and password. Normally localhost MySQL database username is root and password blank or root. For example, the code is as below
$con = mysqli_connect('localhost', 'root', '',’db_contact’); The “db_contact” is our database name that we created before. After connection database you need to take post variable from the form. See the below code $txtName = $_POST['txtName']; $txtEmail = $_POST['txtEmail']; $txtPhone = $_POST['txtPhone']; $txtMessage = $_POST['txtMessage'];
When you will get the post variable then you need to write the following SQL command.
For fire query over the database, you need to write the following line
Here is PHP code for inserting data into your database from a form.
Step 5: All done!
Now the coding part is done. Download code from github
If you would like to check then you can fill the form http://localhost/contact/contact.html and see the result in the database. You may check via phpmyadmin your inserted record.
Why skills as a custom PHP developer?
Php is the most popular server-side programming language. It is used more than 70% in comparison to other website development languages. As a lot of CMS and custom PHP applications developed already on PHP, therefore, it will be a demanding language for the next 5 years.
The worldwide PHP development company is looking for cheap PHP developers in India. Many companies also like to freelance PHP developers in Delhi, London, Bangalore, Mumbai (locally). If you would like to hire a dedicated developer then you need to skills yourself.
See more answer about PHP script connect to Mysql on Facebook Group
Please join Facebook group for discussion click here Post your question here with the HASH tag #connectphpmysql #connecthtmlmysql . We will approve and answer your question.
Please view more answer on this hashtag on Facebook Group #connectphpmysql #connecthtmlmysql
3 Steps To Save HTML Form Into Database In PHP MySQL
Welcome to a beginner’s tutorial on how to save an HTML form into the database with PHP and MySQL. So you have finally come to fight the boss stage of full-stack programming – Combining HTML, PHP, and MySQL to save a submitted form into the database.
Saving an HTML form into the database is a simple 3-step process.
Create a database table with the fields you want to capture.
Create the corresponding HTML form, that submits to a PHP script.
In the PHP script, open a database connection and insert the submitted fields.
Yep, it’s really that simple but read on for an actual example!
TLDR – QUICK SLIDES
TABLE OF CONTENTS
SAVE HTML FORM INTO DATABASE
All right, let us now get started on an example of saving an HTML form into the database.
STEP 1) CREATE THE DATABASE TABLE
CREATE TABLE `survey` ( `email` varchar(255) NOT NULL, `name` varchar(255) NOT NULL, `color` varchar(128) NOT NULL ) ENGINE=InnoDB DEFAULT CHARSET=utf8mb4; ALTER TABLE `survey` ADD PRIMARY KEY (`email`);
For this example, we will be doing a simple “survey” on the favorite color that the users like; We will be capturing 3 fields – The email, name, and the color itself.
STEP 2) CREATE THE HTML FORM
?>
Shouldn’t have any trouble with this one too. This is an HTML form with exactly what we want to capture – The email, name, and favorite color. Take note of that if (isset($_POST[«email»])) though, we will only include the “save to database” PHP script only when the form is submitted.
Need to send out an email? Just add a few more lines after the database insert is done.
DOWNLOAD & NOTES
Here is the download link to the example code, so you don’t have to copy-paste everything.
SUPPORT
600+ free tutorials & projects on Code Boxx and still growing. I insist on not turning Code Boxx into a «paid scripts and courses» business, so every little bit of support helps.
EXAMPLE CODE DOWNLOAD
Click here for the source code on GitHub gist, just click on “download zip” or do a git clone. I have released it under the MIT license, so feel free to build on top of it or use it in your own project.
EXTRA BITS & LINKS
That’s all for this guide, and here is a small section on some extras and links that may be useful to you.
LINKS & REFERENCES
TUTORIAL VIDEO
INFOGRAPHIC CHEAT SHEET
THE END
Thank you for reading, and we have come to the end of this guide. I hope that it has helped you with your project, and if you want to share anything with this guide, please feel free to comment below. Good luck and happy coding!