- Icons Tutorial
- Font Awesome 5 Icons
- Example
- Font Awesome 4 Icons
- Example
- Bootstrap 3 Icons
- Example
- Google Icons
- Example
- Как создать фавиконку и подключить ее к сайту
- Характеристики значков
- Формат
- Размер
- Как сделать иконку для сайта HTML?
- Рисуем Favicon в Sketch или Photoshop
- Преобразуем готовое изображение в фавиконку
- Рисуем значок в браузере
- Конвертируем текст или эмоджи в значок
- Как подключить Favicon к сайту?
- The complete guide to HTML icons — iOS, Android, desktop and more…
- Getting started
- The icon
- Browser tab icons (favicons)
- Safari home screen and bookmark icons
- Android icons
- Windows tiles
- If you’re too lazy… 😴
- Conclusion
- Want more posts like this? Sign up to my newsletter.
Icons Tutorial
To insert an icon, add the name of the icon class to any inline HTML element.
The and elements are widely used to add icons.
All the icons in the icon libraries below, are scalable vector icons that can be customized with CSS (size, color, shadow, etc.)
Font Awesome 5 Icons
To use the Free Font Awesome 5 icons, go to fontawesome.com and sign in to get a code to use in your web pages.
Read more about how to get started with Font Awesome in our Font Awesome 5 chapter.
Note: No downloading or installation is required!
Example
Font Awesome 4 Icons
To use the Font Awesome 4 icons, add the following line inside the section of your HTML page:
Note: No downloading or installation is required!
Example
Bootstrap 3 Icons
To use the Bootstrap 3 glyphicons, add the following line inside the section of your HTML page:
Note: No downloading or installation is required!
Example
Note: Glyphicons are not supported in Bootstrap 4.
For more information about Bootstrap 3 and Glyphicons, visit our Bootstrap 3 Tutorial.
Google Icons
To use the Google icons, add the following line inside the section of your HTML page:
Note: No downloading or installation is required!
Example
cloud
favorite
attachment
computer
traffic
For a complete list of ALL icons (font awesome, bootstrap and google), visit the Icon Reference.
Как создать фавиконку и подключить ее к сайту
Favicon (сокращение от Favorites Icon) — иконка с логотипом или первой буквой названия сайта, которая отображается на вкладках браузера, в списке закладок и в интерфейсе некоторых поисковых систем.
Этот мини-логотип, по сути, олицетворяет сайт и помогает пользователям быстрее отыскать его среди сохраненных страниц или в бесконечном списке открытых вкладок. Чтобы облегчить потенциальному посетителю эту задачу, каждому веб-ресурсу, от мелкого блога на WordPress до интернет-магазина с огромной аудиторией, нужны наглядные и узнаваемые Фавиконки.
Так Favicon выглядят на вкладках в браузере Safari:
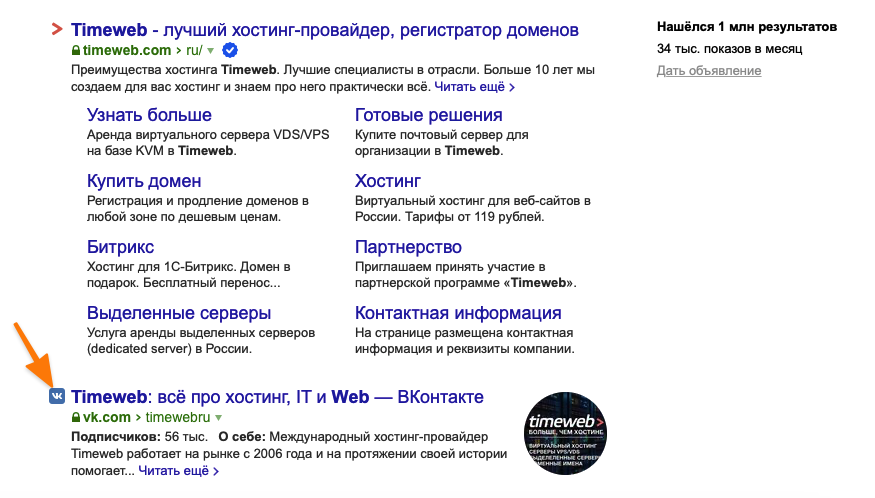
А вот так в поисковой выдаче Яндекса:
Такие значки должны опираться на стилистику бренда, поэтому важно, чтобы они были с ним тесно связаны.
Вот, как это реализовано у Apple и Яндекса:

Далее разберемся, как сделать иконку сайта и подключить ее к нему.
Характеристики значков
Взять любую понравившуюся картинку и с ходу использовать ее как Favicon не получится. Надо соблюсти два несложных требования: выбрать подходящее расширение и размер.
Формат
Тут есть из чего выбирать:
- .ico (.icns в macOS) — своего рода стандарт, используется повсеместно.
- .png — более современный вариант, тоже широко распространен и поддерживается даже во многих старых браузерах.
- .svg — перспективный векторный формат с вариативным разрешением под нужды конкретной страницы. Настраивается через CSS.
.svg не поддерживается в старых браузерах для ПК и некоторых Android-браузерах
У .png поддержка заметно шире
Можно использовать и другие форматы. Какой-нибудь .jpeg или .gif. Проблема может возникнуть лишь в поддержке со стороны программного обеспечения клиента.
Из-за особенностей браузеров в разных ОС я бы рекомендовал выбрать .ico. Самый каноничный формат, с которым точно не ошибешься.
Размер
Здесь тоже есть некие стандарты, но они разнятся от системы к системе. Часто используются размеры:
При желании можно использовать несколько вариантов, чтобы адаптировать фавиконку под требования нескольких платформ.
Как сделать иконку для сайта HTML?
В лучшем случае вам все нарисует грамотный дизайнер, но если под рукой такого не нашлось, можно и самому склепать значок.
Рисуем Favicon в Sketch или Photoshop
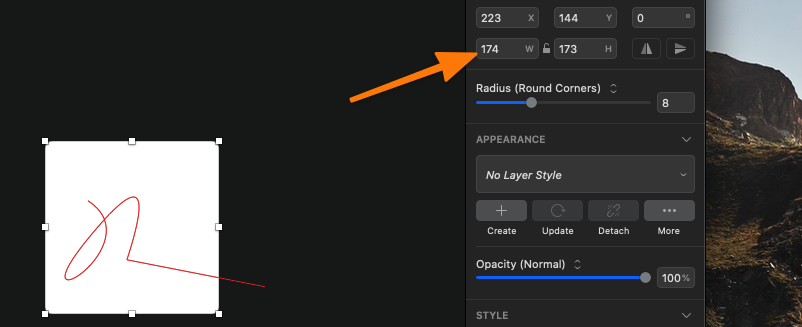
Значок можно нарисовать там же, где рисуются и другие части интерфейса. Например, Photoshop или Sketch. Покажу, как это работает на примере Sketch:
- Открываем редактор и рисуем иконку.
- Потом выделяем нарисованный элемент и меняем разрешение в боковом меню.

- Затем одновременно нажимаем клавиши Shift + Cmd + E.
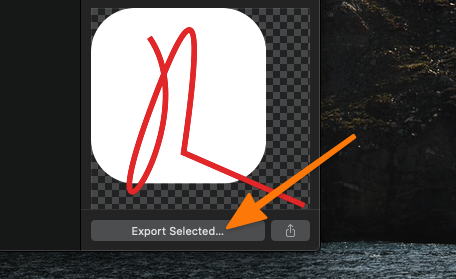
- После этого нажимаем на кнопку Export Selected…
То же самое можно сделать в Photoshop или условном Pixelmator, разве что интерфейсы настройки изображений и экспорта будут отличаться.
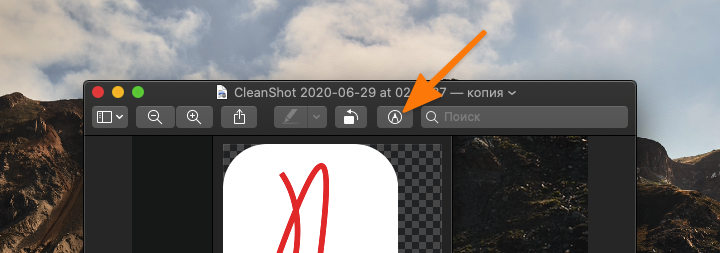
Большинство редакторов не умеют экспортировать в .ico по умолчанию. Придется скачать сторонний плагин для Фотошопа или шаблон для Sketch.
Преобразуем готовое изображение в фавиконку
Если уже есть рабочий вариант дизайна в неподходящем формате (.jpeg, .gif), можно конвертировать его в .png. Для этого сойдет любой базовый редактор изображений.
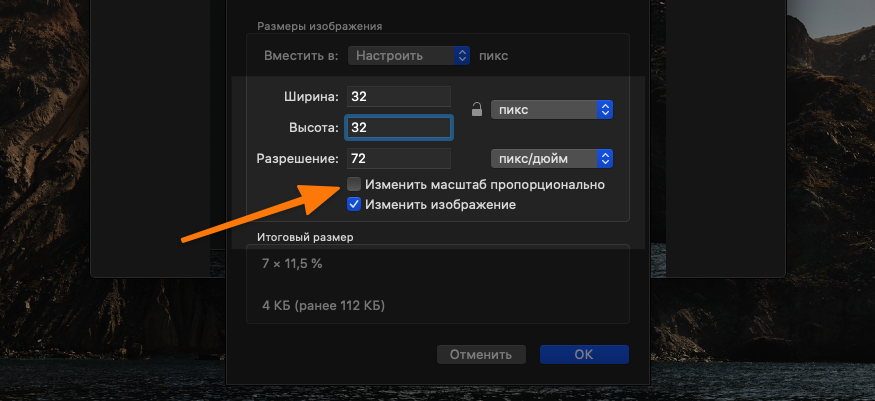
- Открываем будущую иконку.
- Меняем размер.
- Указываем нужный размер и формат. Сохраняем.
- Открываем меню «Файл» и нажимаем на пункт «Экспортировать…».
- Указываем расширение .png.
Рисуем значок в браузере
Если нет Фотошопа или просто не нужен какой-то сложный дизайн, то можно на скорую руку нарисовать себе лого на сайте Favicon.cc. В этом случае все запредельно просто:
- Рисуем любую картинку во встроенном редакторе.
- А потом нажимаем на кнопку Download внизу.
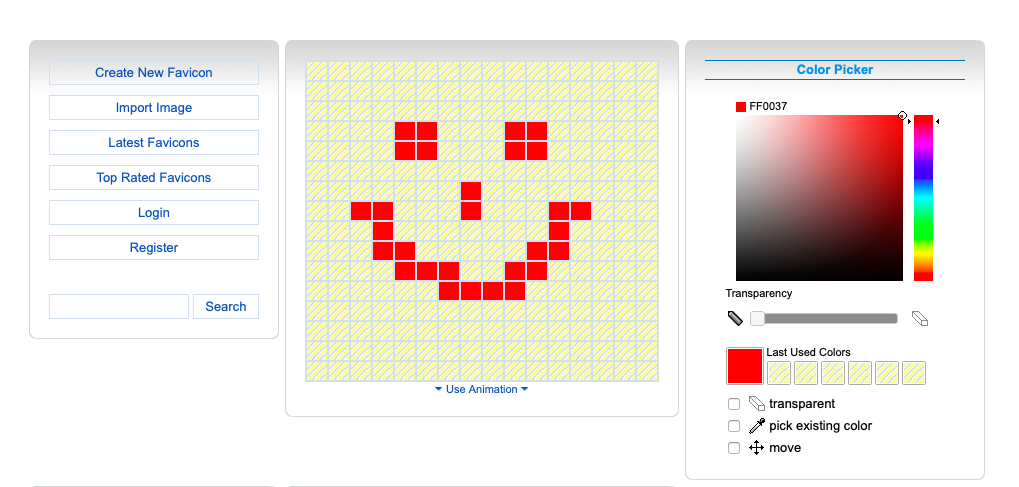
Тут же можно посмотреть, как нарисованная иконка выглядит в адресной строке браузера.
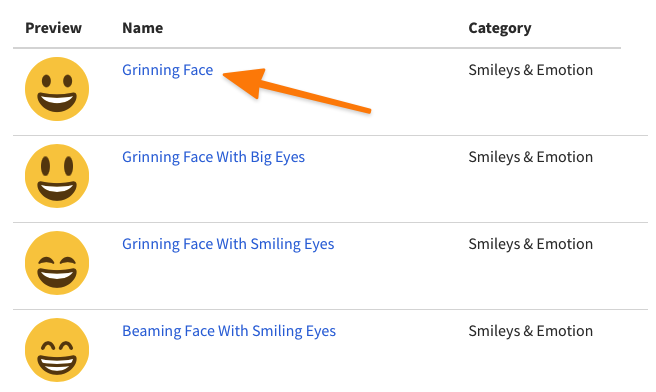
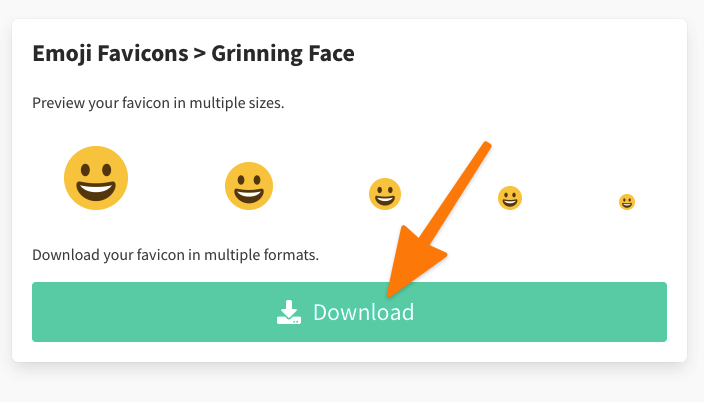
Конвертируем текст или эмоджи в значок
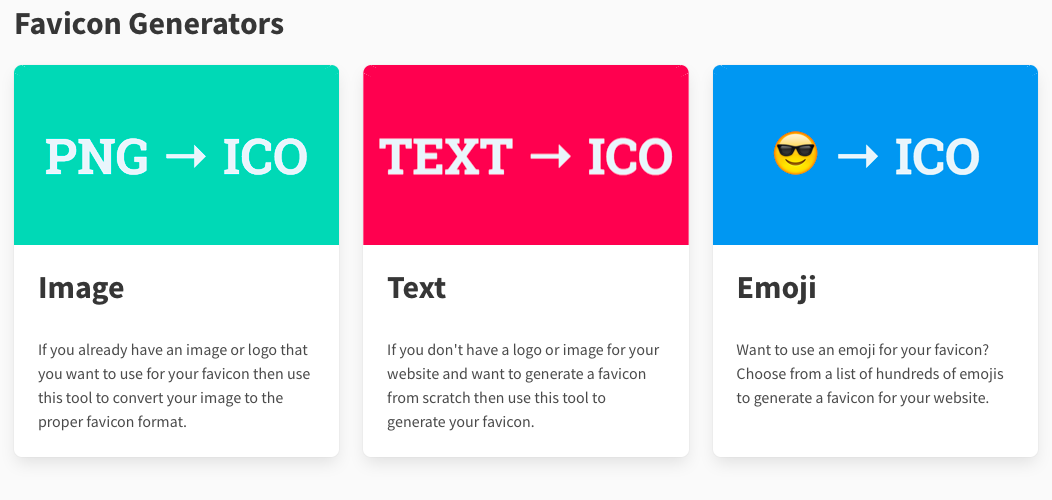
Есть вариант еще проще — сервис Favicon.io. На нем есть три конвертера: из картинки, из текста или из эмоджи в значок.
Здесь же есть и конвертер .png в .ico. Можно загрузить в сервис готовый логотип и получить обратно несколько иконок в разных форматах для нужд всех ходовых операционных систем.
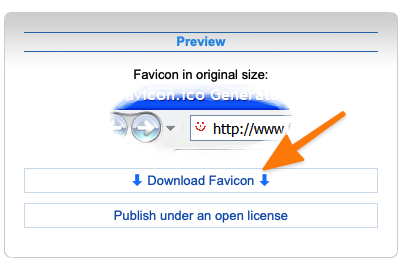
Но я попробую скачать иконку с эмоджи:
- Нажимаю на соответствующий конвертер.
- Кликаю по названию понравившегося смайлика.
- А потом жму на кнопку Download.
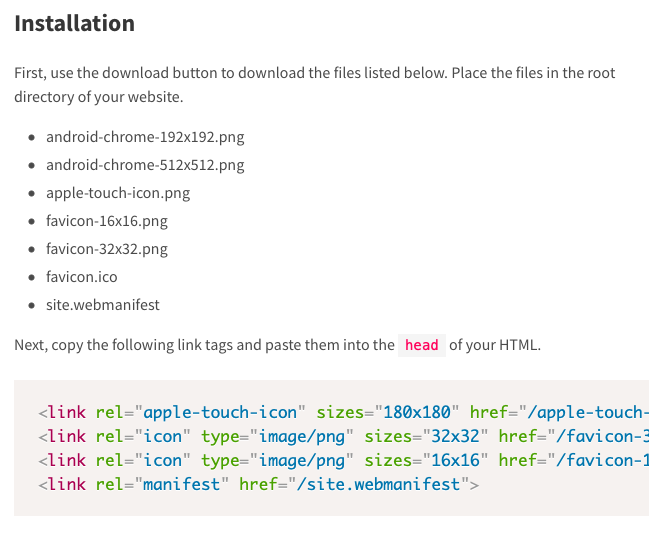
Как подключить Favicon к сайту?
Теперь, когда у меня есть фавиконка (неважно откуда), надо ее подключить. Для этого надо вставить в html-код основной страницы строчку, в который будут указаны тип ресурса, адрес и тип данных.
icon указывает на тип используемого ресурса.
Здесь указывается путь до файла. Можно ввести ссылку до сервера или внешнего каталога.
Тут указывается тип изображения. Например, image/png для картинок в формате .png, image/svg для .svg. или image/x-icon для .ico
Можно вписать несколько разных значков. Браузер все равно сам выберет подходящую иконку. Такой подход предлагается в Favicon.io.
Например, я скачал себе .ico с сайта. Затем делаю следующее:
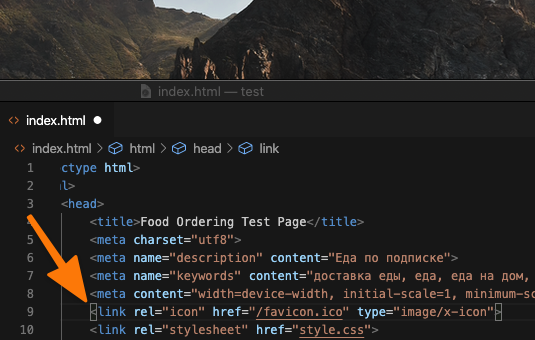
- Кидаю картинку в корневой каталог ресурса (туда же, где лежит index.html).
- Потом открываю index.html и прописываю в head строчку .
Это самый простой способ. Естественно, файл со значком может называться как угодно и располагаться на внешнем сервере. Главное, корректно оформить код на сайте.
Теперь вы знаете, как сделать иконку сайта на вкладке HTML. Рисуем картинку в .ico или .svg, кидаем ее в любое удобное место, а затем прописываем адрес с форматом в head.
The complete guide to HTML icons — iOS, Android, desktop and more…
![]()
Learn how to make an icon for iOS, Android, desktop and more using HTML in this article…
Getting started
Feel free to follow along! You may not have all the devices, operating systems or browsers I will be talking about, but you will at least be able to test one or two 😉 To get started create an HTML file with the following basic code:
![]()
Open it up in a browser — it should look like this: Now you’re ready to go!
The icon
![]()
In the examples today, we’ll be using this waffle icon that I made (with ice-cream on top of course 🍦 😉):
Browser tab icons (favicons)
![]()
If you take a look at the little icon on your tab right now (these are also known as favicons), it will just give us a boring default icon — nobody wants that!
Note that depending on what browser you’re using, the tabs and default icon might look slightly different. This and most of the other browser screenshots in this article are taken in Google Chrome.
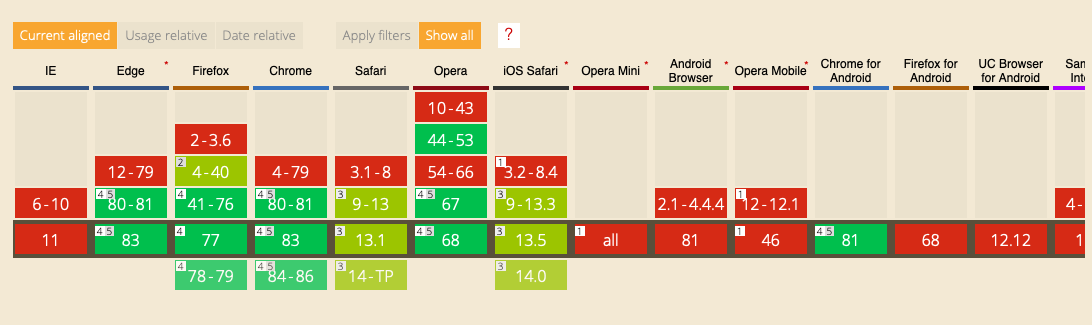
The type attribute depends on the image we are using. In this case, we are using a .png file, so we’ll set our type to image/png . There are other type s you can use such as image/ico for .ico files. Click here for a list of supported file types. Also, make sure that your icon is either 16px by 16px , 32px by 32px or 64px by 64px . You need to make sure that the actual image has those dimensions as well as the sizes attribute — you can resize your images online. Note that other sizes also work, but they are not supported by all browsers. In this case, our image is 64px by 64px — I recommend that you use this size because it is the highest resolution out of the three. Anyway, here is the result: ![]() There is now an icon next to our page title! 🎉 🎉
There is now an icon next to our page title! 🎉 🎉 ![]()
Safari home screen and bookmark icons
![]()
If we add our website to the home screen on iOS, it will give us a very ugly and weirdly-sized screenshot by default: Let’s add our own icon instead! To do so, add this line below your favicon line in your :
As you can see, this is very similar to how we declare our favicon, except that we use apple-touch-icon as the rel attribute instead. Make sure that your icon is always 180px by 180px . Now if we add it to the home screen again, we get a much better result! ![]() This also gives our website an icon for Safari bookmarks on iOS:
This also gives our website an icon for Safari bookmarks on iOS: ![]() And on Mac:
And on Mac: ![]()
Android icons
Websites can also be added to the home screen using Google Chrome on Android. Luckily, we don’t need to specify icons just for Android! It will either use the favicon or an apple-touch-icon if you have one.
Windows tiles
On Windows, if you don’t know already, there are these things called tiles: ![]() They are also used on Windows phones:
They are also used on Windows phones: ![]() As you can see in the photos above, we also need to create a rectangular version of our logo, for if the tile is rectangular. Here is a rectangular version of the waffle that I made:
As you can see in the photos above, we also need to create a rectangular version of our logo, for if the tile is rectangular. Here is a rectangular version of the waffle that I made: ![]() In our HTML, we need to define this icon as well as three square icon sizes: 70px by 70px , 150px by 150px and 310px by 310px . Our rectangular icon needs to be 310px wide by 150px high. One important thing though: When making icons for Windows tiles, always have a transparent background. Here are our icons but with a transparent background:
In our HTML, we need to define this icon as well as three square icon sizes: 70px by 70px , 150px by 150px and 310px by 310px . Our rectangular icon needs to be 310px wide by 150px high. One important thing though: When making icons for Windows tiles, always have a transparent background. Here are our icons but with a transparent background: ![]()
![]() Here is the HTML — add it below your Safari icon and favicon in the :
Here is the HTML — add it below your Safari icon and favicon in the :
![]()
These are slightly different to the icon types we’ve discussed so far, because they use tags instead of tags. But if the icons have a transparent background, won’t it look weird? Yes. The reason that they need to have a transparent background is so that Windows can put a color beneath them. Take this tile as an example: Here, the map icon would be the image (with a transparent background), and then Windows would put the pink/purple color beneath it. But how do we tell Windows which color? This is where the msapplication-TileColor meta tag comes in handy. In this case our waffle icon background hex color is #2e2e2e . With that in mind, add this line underneath our icons inside the :
![]()
Here is the result of the icons and tile color meta tags:
If you’re too lazy… 😴
There is this awesome website called Real Favicon Generator which generates favicons, Safari icons, Windows icons and more for you. However, I recommend that you don’t use this until you are quite confident with doing it yourself — otherwise, you will never learn. That said, you can always look it up if you need. So it’s up to you.
Conclusion
Woo! That’s all there is for today. Hopefully, you learned something! If you did, I’d love it if you shared it or signed up to the newsletter to get new posts in your inbox. If you do either of these things, you are awesome and deserve a space-taco if that’s even a thing! 😎 🌮 🚀 I talked about icons for lots of different platforms today, and you don’t have to use all of them — although it’s a good idea. But for a start, you could just try getting used to favicons (the first part). If you need help, have feedback or wanna say hi 👋 then I’d be stoked if you did so in the comments below. Next time, I’ll be doing a special post on Quick-reference sites to help you along your coding journey. See you then!
Want more posts like this? Sign up to my newsletter.
I’ve worked hard on these tutorials and as of now do not make any money on them, so I’d really appreciate if you signed up 😉
This article was originally published at Code The Web, a fun and easy-to-understand blog to help you learn web development 🚀
Learn: HTML | CSS | JavaScript