- Structure of a program
- Comments
- Using namespace std
- C++ Getting Started
- C++ Install IDE
- C++ Quickstart
- myfirstprogram.cpp
- Learning C++ At W3Schools
- Walkthrough: Creating a Standard C++ Program (C++)
- Prerequisites
- To create a project and add a source file
- To create a C++ project in Visual Studio
- To create a C++ project in Visual Studio 2017
- To create a C++ project in Visual Studio 2015
- Add a new source file
Structure of a program
The best way to learn a programming language is by writing programs. Typically, the first program beginners write is a program called «Hello World», which simply prints «Hello World» to your computer screen. Although it is very simple, it contains all the fundamental components C++ programs have:
// my first program in C++ int main() < std::cout "Hello World!"; >The left panel above shows the C++ code for this program. The right panel shows the result when the program is executed by a computer. The grey numbers to the left of the panels are line numbers to make discussing programs and researching errors easier. They are not part of the program.
Let’s examine this program line by line:
Line 1: // my first program in C++ Two slash signs indicate that the rest of the line is a comment inserted by the programmer but which has no effect on the behavior of the program. Programmers use them to include short explanations or observations concerning the code or program. In this case, it is a brief introductory description of the program.
Line 2: #include Lines beginning with a hash sign ( # ) are directives read and interpreted by what is known as the preprocessor. They are special lines interpreted before the compilation of the program itself begins. In this case, the directive #include , instructs the preprocessor to include a section of standard C++ code, known as header iostream, that allows to perform standard input and output operations, such as writing the output of this program ( Hello World ) to the screen.
Line 3: A blank line. Blank lines have no effect on a program. They simply improve readability of the code.
Line 4: int main () This line initiates the declaration of a function. Essentially, a function is a group of code statements which are given a name: in this case, this gives the name «main» to the group of code statements that follow. Functions will be discussed in detail in a later chapter, but essentially, their definition is introduced with a succession of a type ( int ), a name ( main ) and a pair of parentheses ( () ), optionally including parameters.
The function named main is a special function in all C++ programs; it is the function called when the program is run. The execution of all C++ programs begins with the main function, regardless of where the function is actually located within the code.
Lines 5 and 7: < and >The open brace ( < ) at line 5 indicates the beginning of main 's function definition, and the closing brace ( >) at line 7, indicates its end. Everything between these braces is the function’s body that defines what happens when main is called. All functions use braces to indicate the beginning and end of their definitions.
Line 6: std::cout
This statement has three parts: First, std::cout , which identifies the standard character output device (usually, this is the computer screen). Second, the insertion operator (
Notice that the statement ends with a semicolon ( ; ). This character marks the end of the statement, just as the period ends a sentence in English. All C++ statements must end with a semicolon character. One of the most common syntax errors in C++ is forgetting to end a statement with a semicolon.
You may have noticed that not all the lines of this program perform actions when the code is executed. There is a line containing a comment (beginning with // ). There is a line with a directive for the preprocessor (beginning with # ). There is a line that defines a function (in this case, the main function). And, finally, a line with a statements ending with a semicolon (the insertion into cout ), which was within the block delimited by the braces ( < >) of the main function.
The program has been structured in different lines and properly indented, in order to make it easier to understand for the humans reading it. But C++ does not have strict rules on indentation or on how to split instructions in different lines. For example, instead of
all in a single line, and this would have had exactly the same meaning as the preceding code.
In C++, the separation between statements is specified with an ending semicolon ( ; ), with the separation into different lines not mattering at all for this purpose. Many statements can be written in a single line, or each statement can be in its own line. The division of code in different lines serves only to make it more legible and schematic for the humans that may read it, but has no effect on the actual behavior of the program.
Now, let’s add an additional statement to our first program:
// my second program in C++ int main () < std::cout "Hello World! "; std::cout "I'm a C++ program"; >Hello World! I'm a C++ program
In this case, the program performed two insertions into std::cout in two different statements. Once again, the separation in different lines of code simply gives greater readability to the program, since main could have been perfectly valid defined in this way:
int main () < std::cout " Hello World! "; std::cout " I'm a C++ program "; >The source code could have also been divided into more code lines instead:
int main () < std::cout "Hello World!"; std::cout "I'm a C++ program"; >And the result would again have been exactly the same as in the previous examples.
Preprocessor directives (those that begin by # ) are out of this general rule since they are not statements. They are lines read and processed by the preprocessor before proper compilation begins. Preprocessor directives must be specified in their own line and, because they are not statements, do not have to end with a semicolon ( ; ).
Comments
As noted above, comments do not affect the operation of the program; however, they provide an important tool to document directly within the source code what the program does and how it operates.
C++ supports two ways of commenting code:
// line comment /* block comment */The first of them, known as line comment, discards everything from where the pair of slash signs ( // ) are found up to the end of that same line. The second one, known as block comment, discards everything between the /* characters and the first appearance of the */ characters, with the possibility of including multiple lines.
Let’s add comments to our second program:
/* my second program in C++ with more comments */ int main () < std::cout "Hello World! "; // prints Hello World! std::cout "I'm a C++ program"; // prints I'm a C++ program >Hello World! I'm a C++ program
If comments are included within the source code of a program without using the comment characters combinations // , /* or */ , the compiler takes them as if they were C++ expressions, most likely causing the compilation to fail with one, or several, error messages.
Using namespace std
If you have seen C++ code before, you may have seen cout being used instead of std::cout . Both name the same object: the first one uses its unqualified name ( cout ), while the second qualifies it directly within the namespace std (as std::cout ).
cout is part of the standard library, and all the elements in the standard C++ library are declared within what is called a namespace: the namespace std .
In order to refer to the elements in the std namespace a program shall either qualify each and every use of elements of the library (as we have done by prefixing cout with std:: ), or introduce visibility of its components. The most typical way to introduce visibility of these components is by means of using declarations:
The above declaration allows all elements in the std namespace to be accessed in an unqualified manner (without the std:: prefix).
With this in mind, the last example can be rewritten to make unqualified uses of cout as:
// my second program in C++ using namespace std; int main () < cout "Hello World! "; cout "I'm a C++ program"; >Hello World! I'm a C++ program
Both ways of accessing the elements of the std namespace (explicit qualification and using declarations) are valid in C++ and produce the exact same behavior. For simplicity, and to improve readability, the examples in these tutorials will more often use this latter approach with using declarations, although note that explicit qualification is the only way to guarantee that name collisions never happen.
Namespaces are explained in more detail in a later chapter.
| Previous: Compilers | Index | Next: Variables and types |
C++ Getting Started
There are many text editors and compilers to choose from. In this tutorial, we will use an IDE (see below).
C++ Install IDE
An IDE (Integrated Development Environment) is used to edit AND compile the code.
Popular IDE’s include Code::Blocks, Eclipse, and Visual Studio. These are all free, and they can be used to both edit and debug C++ code.
Note: Web-based IDE’s can work as well, but functionality is limited.
We will use Code::Blocks in our tutorial, which we believe is a good place to start.
You can find the latest version of Codeblocks at http://www.codeblocks.org/. Download the mingw-setup.exe file, which will install the text editor with a compiler.
C++ Quickstart
Let’s create our first C++ file.
Open Codeblocks and go to File > New > Empty File.
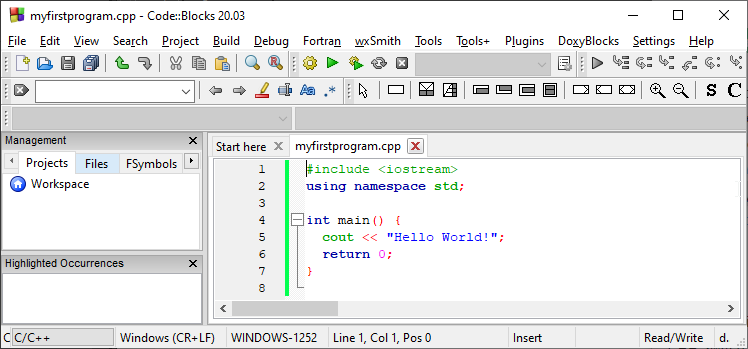
Write the following C++ code and save the file as myfirstprogram.cpp (File > Save File as):
myfirstprogram.cpp
Don’t worry if you don’t understand the code above — we will discuss it in detail in later chapters. For now, focus on how to run the code.
In Codeblocks, it should look like this:
Then, go to Build > Build and Run to run (execute) the program. The result will look something to this:
Congratulations! You have now written and executed your first C++ program.
Learning C++ At W3Schools
When learning C++ at W3Schools.com, you can use our «Try it Yourself» tool, which shows both the code and the result. This will make it easier for you to understand every part as we move forward:
Walkthrough: Creating a Standard C++ Program (C++)
You can use Visual Studio to create Standard C++ programs. By following the steps in this walkthrough, you can create a project, add a new file to the project, modify the file to add C++ code, and then compile and run the program by using Visual Studio.
You can type your own C++ program or use one of the sample programs. The sample program in this walkthrough is a console application. This application uses the set container in the C++ Standard Library.
If conformance with a specific version of the C++ language standard (for example, C++14, C++17, or C++20) is required, use the /std:c++14 , /std:c++17 , or /std:c++20 compiler option. (Visual Studio 2017 and later.)
Prerequisites
To complete this walkthrough, you must understand the fundamentals of the C++ language.
To create a project and add a source file
The following steps vary depending on which version of Visual Studio you are using. To see the documentation for your preferred version of Visual Studio, use the Version selector control. It’s found at the top of the table of contents on this page.
To create a C++ project in Visual Studio
- From the main menu, choose File >New >Project to open the Create a New Project dialog box.
- At the top of the dialog, set Language to C++, set Platform to Windows, and set Project type to Console.
- From the filtered list of project types, choose Console App then choose Next. In the next page, enter a name for the project, and specify the project location if desired.
- Choose the Create button to create the project.
To create a C++ project in Visual Studio 2017
- Create a project by pointing to New on the File menu, and then clicking Project.
- In the Visual C++ project types pane, click Windows Desktop, and then click Windows Console Application.
- Type a name for the project. By default, the solution that contains the project has the same name as the project, but you can type a different name. You can also type a different location for the project.
- Click OK to create the project.
To create a C++ project in Visual Studio 2015
- Create a project by pointing to New on the File menu, and then clicking Project.
- In the Visual C++ project types pane, click Windows Desktop, and then click Windows Console Application.
- In the New Project dialog box, expand Installed >Templates >Visual C++, and then select Win32. In the center pane, select Win32 Console Application.
- Type a name for the project. By default, the solution that contains the project has the same name as the project, but you can type a different name. You can also type a different location for the project.
- Click OK to create the project.
- Complete the Win32 Application Wizard.
- Click Next, then make sure Console Application is selected and uncheck the Precompiled Headers box.
- Click Finish.
Add a new source file
- If Solution Explorer isn’t displayed, on the View menu, click Solution Explorer.
- Add a new source file to the project, as follows.
- In Solution Explorer, right-click the Source Files folder, point to Add, and then click New Item.
- In the Code node, click C++ File (.cpp), type a name for the file, and then click Add.
The .cpp file appears in the Source Files folder in Solution Explorer, and the file is opened in the Visual Studio editor.