- How to Compile and Run Java Programs in CMD or ECLIPSE
- Download Required Java Compile and Run Tools for Windows 10
- 1. Compile and Run Java Programs using a Text Editor like Notepad++
- 2. Compile and Run Java Programs using ECLIPSE IDE Editor
- How to Start and Compile a Short Java Program in Eclipse
- Компиляция, запуск и отладка программ Java
- Создание первой программы с использованием Eclipse IDE
How to Compile and Run Java Programs in CMD or ECLIPSE

To Compile a Java Program, You need to install a Java Compiler or Java SE (Java Standard Edition) or JDK (Java Developer Kit). It is just an installable software.
To Create and Edit a Java Program, You need a Text Editor or an advanced IDE (Integrated Development Environment) Software. The Most popular Java IDE is ECLIPSE.
To Run a Java Program, You need a JRE (Java Runtime Environment) Software and CMD (Command Prompt) Tool. Java IDE Software includes GUI and Keyboard Options to execute CMD commands without directly using it.
Download Required Java Compile and Run Tools for Windows 10
- First complete downloading java and setting up JAVA Environment on your PC on Windows operating system.
- Now download a Text Editor like Notepad++ OR an ECLIPSE IDE for Java Software. These tools are free of cost. Visit Eclipse Packages site to get the latest IDE tools.
1. Compile and Run Java Programs using a Text Editor like Notepad++
Step 1: Create a new folder for keeping Java Files.
Step 2: Open Notepad++ and Type the below sample Java Program.
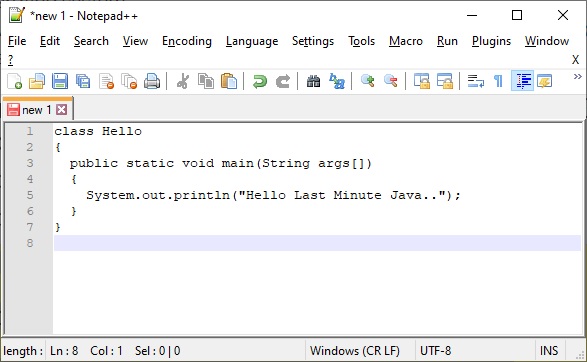
Step 3: Save the program as Hello.java. File name should be the same as that of a class name.
Step 4: Now open Command Prompt or CMD. Go to the folder using CD (Change Directory) command.
Step 5: Compile the java program using JAVAC command in lower case. Mentioning file name extension is mandatory.
C:\testingfolder>javac Hello.java
Step 6: Run the java program using JAVA command in lower case. We have dropped file name extension here for running.
C:\testingfolder>java Hello Hello Last Minute Java..
2. Compile and Run Java Programs using ECLIPSE IDE Editor
Step 1: Create a new Java Project with any name.
Step 2: Right Click on the Project Name, click New and choose Class File. Give Class name as Hello.
Step 3: Type the below java program.
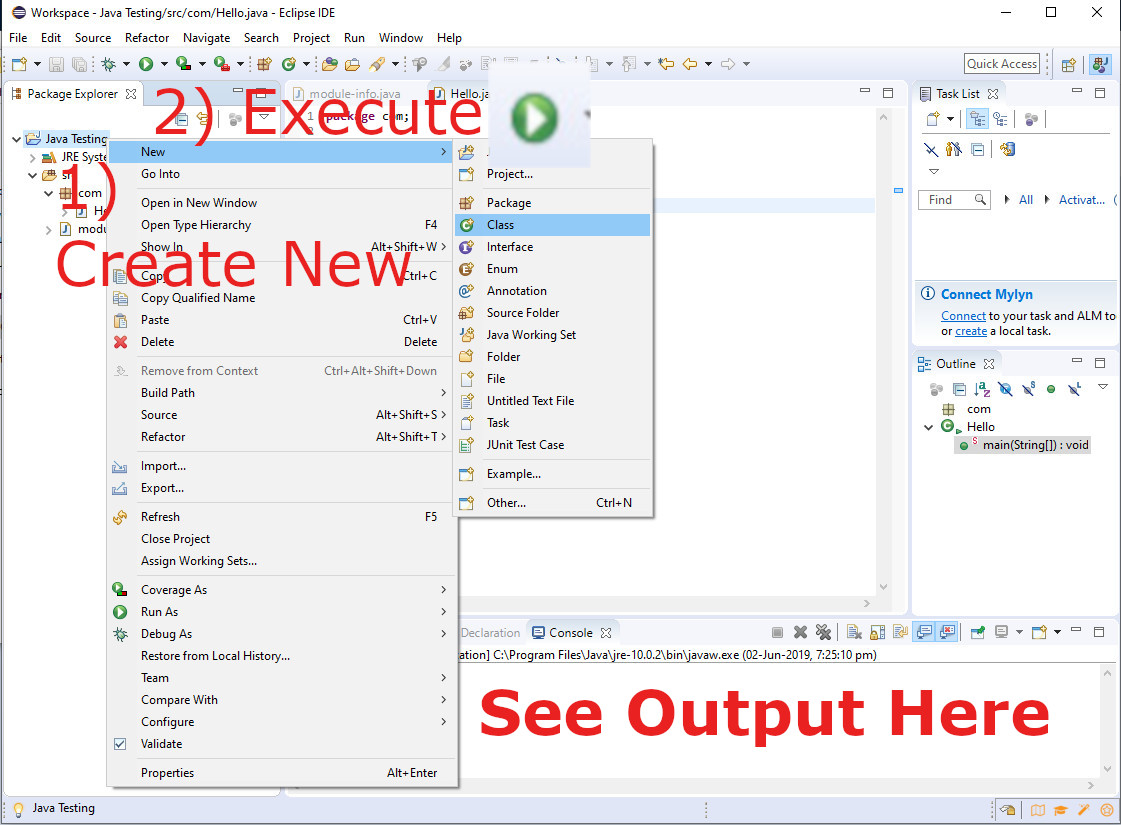
Step 4: Click the green icon to execute the Java Program and see the output in the bottom Console Pane. Note that this process does both compiling and running the java program by Eclipse.
Congratulations on compiling and running your first java program. Share this tutorial with your friends and colleagues to encourage authors.
How to Start and Compile a Short Java Program in Eclipse
wikiHow is a “wiki,” similar to Wikipedia, which means that many of our articles are co-written by multiple authors. To create this article, volunteer authors worked to edit and improve it over time.
This article has been viewed 87,244 times.
These instructions will teach you how to start and compile a short Java program using the Indigo release of Eclipse. Eclipse is a free, open-source integrated development environment that you can use to develop Java programs, as well as programs in other languages. This tutorial assumes that you already have Eclipse installed on your computer. The purpose of this tutorial is to help you navigate Eclipse and to show off a few of its many features. Eclipse is easy to learn and will increase your productivity dramatically.

Begin by creating a new Java project. There are a few different ways of accomplishing this. You can click the arrow next to the left-most icon on the toolbar and select «Java Project» from the drop-down menu. Alternately, you can start a new Java project by choosing «File,» then «New,» followed by «Java Project.» You can also use the shortcut Alt+Shift+N.

Enter a project name. You will see a window titled «Create a Java Project.» The buttons «Next» and «Finish» at the bottom of the window will be greyed out until a project name is entered in the first field. To proceed, give your project a name and enter it into this field. For this tutorial, we will use the name «Project1.» Enter the name and then click «Finish.» Your new project will appear on the left-hand side of the screen under «Package Explorer» among existing projects. Projects are listed in alphabetical order.

Start a new Java class. Before you begin writing code, you will need to create a new Java class. A class is a blueprint for an object. It defines the data stored in the object as well as its actions. Create a class by clicking the «New Java Class» icon, which looks like a green circle with the letter «C» in the center of it.

Enter the name of your class. You will see a window titled «Java Class.» To proceed, enter the name of your class into the field «Name.» Since this class will be the main class of the simple project, check the selection box labeled «public static void main(String[] args)» to include the method stub. Afterwards, click «Finish.»

Enter your Java code. Your new class called Class1.java is created. It appears with the method stub «public static void main(String[] args)» along with some automatically generated comments. A method will contain a sequence of instructions to be executed by the program. A comment is a statement that is ignored by the compiler. Comments are used by programmers to document their code. Edit this file and insert the code for your Java program.

Watch out for errors in your code. Any errors will be underlined in red, and an icon with an «X» will show up on the left. Fix your errors. By mousing over an error icon, you can see a suggestion box that lists the ways you can fix the error. In this tutorial, we will double-click «Create local variable answer» so that the variable is declared first before it is used.

Ensure that your entire program is free of errors. There are three types of errors you must beware of: syntax errors, run-time errors, and logic errors. The compiler will alert you of the first of these three, the syntax errors. Examples of syntax errors are misspelled variable names or missing semi-colons. Until you remove all syntax errors from your code, your program will not compile. Unfortunately, the compiler will not catch run-time errors or logic errors. An example of a run-time error is trying to open a file that does not exist. An example of a logic error is opening and using data from the wrong file.

Compile your program. Now that your program is free from errors, click the triangular icon to run your program. Another way to run your program is to select «Run» from the main menu and then select «Run» again from the drop-down menu. The shortcut is Ctrl+F11.

Verify that the output is what you expected. When your program runs, the output, should there be any, will be displayed on console at the bottom of the screen. In this tutorial, our Java program added two integers together. As two plus two equals four, the program is running as intended.

Fix any run-time or logic errors. As stated previously, the compiler will only catch syntax errors. If the output of your program is different from what you’ve expected, then there might have been an error even though the program compiled. For example, if the output was zero instead of four, then there was a mistake in the program’s calculation.
Компиляция, запуск и отладка программ Java
Создание первой программы с использованием Eclipse IDE
Eclipse IDE — это продукт с открытым исходным кодом, который был изначально создан с существенным пожертвованием кода IBM сообществу Java, и с этого момента Eclipse был на 100% ориентированным на сообщество продуктом. Он начинался как IDE для разработки программ на Java, но теперь у него есть разные варианты для разных языков программирования, таких как PHP, Spring, Scala и т. Д.
В предыдущем уроке мы видели, как загрузить Eclipse. После распаковки затмения вы можете увидеть что-то вроде рисунка, приведенного ниже структуры папок. Где синий кружок EXE-файл является отправной точкой. Дважды щелкните файл eclipse.exe (вы также можете создать ярлык на рабочем столе).

Новое диалоговое окно на рисунке ниже откроет, чтобы создать или открыть рабочую область (Рабочая область — это папка / каталог, в которой будут находиться все проекты Java). Мы будем использовать каталог «C: javadevelopment» для рабочей области. После выбора рабочей области нажмите кнопку ОК, и вы увидите страницу приветствия затмения, которую вы можете закрыть, нажав «X».

На рисунке ниже приведен снимок недавно установленной IDE с пустым рабочим пространством.

Чтобы быть точным, вы смотрите на перспективу Java EE (обратите внимание на вкладку Java EE вверху), которая представляет собой набор представлений. Слева вы видите представление Project Explorer. Область посередине зарезервирована для представления редактора кода — вы начнете использовать его, как только создадите свой первый класс Java. Вид Outline справа — вы увидите имена ваших классов, методов и переменных (см. Урок 3) там, где они доступны.
Есть много других видов, которые вы можете открывать и закрывать самостоятельно, выбрав Окно ➪ Показать вид. К ним относятся Консоль, Поиск, Серверы и другие.
Давайте начнем с создания первого Java-проекта под названием HelloWorldProject
Шаг 1: Выберите File -> New -> Java Project и введите HelloWorldProject в качестве имени проекта во всплывающем окне, как показано на рисунке ниже.

Вы можете выбрать версию JRE, с которой хотите работать. Eclipse может скомпилировать код с любой выбранной вами версией JRE.
Нажмите Next>. Вам будет предложено выбрать папку для хранения скомпилированных классов (см. Рисунок ниже). Мы продолжим с выбором по умолчанию и нажмем на финиш.

В этом проекте есть пустая папка src — вы можете сохранить исходный код HelloWorld.java там, когда будете готовы. Папка JRE содержит все необходимые библиотеки, поддерживающие JVM, где будет работать HelloWorld. (см. рисунок ниже)

Шаг 2: Создайте Java-программу «HelloWorld» внутри пакета sct (вы можете выбрать имя пакета или имя класса по вашему выбору)
Выберите File> New> Class и введите HelloWorld в поле Name и sct в поле Package, как показано на рисунке ниже. Также установите флажок для основного метода, который автоматически создаст основной метод после нажатия кнопки завершения.

Теперь вы сможете увидеть экран, как показано на рисунке ниже. Где вы можете скопировать и вставить содержимое нашего класса HelloWorld или только одну строку внутри метода main (). Если вы попытаетесь написать заявление, IDE поможет вам с доступными опциями, как показано на рисунке ниже. Таким образом, мы можем уменьшить синтаксическую ошибку программирования.
System.out.println («Привет, мир из Java»);


После того, как мы завершим написание нашего кода, мы можем сохранить файл, нажав маленькое изображение дискеты на панели инструментов или используя комбинацию клавиш Ctrl + S. По умолчанию сохранение кода приводит к вызову компилятора. Если вы не допустили никаких синтаксических ошибок, Eclipse создаст HelloWorld.class в каталоге bin HelloWorldProject. В случае какой-либо ошибки компиляции он будет показан красным подчеркиванием и красным крестиком, как показано на рисунке выше.
Шаг 3: Запуск Java-программы:
Теперь вы можете запустить программу, нажав круглую зеленую кнопку на панели инструментов. Вывод программы будет показан на панели просмотра консоли в нижней части Eclipse IDE, как показано на рисунке ниже.

Другой способ запустить Java-программу: щелкните правой кнопкой мыши на пустом месте редактора и откроется меню, в котором есть опция запуска программы, как показано на рисунке ниже.

- Для разработки Java требовалась установка JDK, а JRE будет использоваться для запуска Java-программы.
- Java-программа может быть написана с использованием простого текстового редактора и скомпилирована с использованием командного окна, но IDE (Integration Development Environment) обеспечит лучший и более быстрый способ разработки.
- Запуск Java-программы состоит из трех этапов: создание исходного файла Java, компиляция Java-файла и запуск Java-программы с помощью команды Java.