- theme_templates │ хук-фильтр │ WP 4.9.6
- Использование
- Примеры
- #1 Добавим свой шаблон в список для всех типов записей
- #2 Добавим свой шаблон в список для страниц
- #3 Добавим свой шаблон из плагина
- Список изменений
- WordPress: Class wp_theme not found – How to fix
- What causes the ‘WordPress: Class wp_theme not found’ error
- Steps to fix ‘WordPress: Class wp_theme not found’
- Conclusion
- PREVENT YOUR SERVER FROM CRASHING!
- Search Our Database
theme_templates │ хук-фильтр │ WP 4.9.6
Позволяет добавить/удалить файлы-шаблонов страниц (постов) используемые в селекте выбора шаблона записи при редактировании записи.
Этот фильтр является общим для всех типов постов. Чтобы не делать в коде проверку на тип записи можно воспользоваться похожим фильтром theme_(post_type)_templates.
Использование
add_filter( 'theme_templates', 'wp_kama_theme_templates_filter', 10, 4 ); /** * Function for `theme_templates` filter-hook. * * @param string[] $post_templates Array of template header names keyed by the template file name. * @param WP_Theme $theme The theme object. * @param WP_Post|null $post The post being edited, provided for context, or null. * @param string $post_type Post type to get the templates for. * * @return string[] */ function wp_kama_theme_templates_filter( $post_templates, $theme, $post, $post_type )< // filter. return $post_templates; >
$post_templates(массив) Массив файлов-шаблонов для постов. Ключ массива — это путь до файла относительно папки темы, значение — это имя файла-шаблона.
Array( [page-my-tpl.php] => Мой супер шаблон в корне темы [template/page-default.php] => Мой дефолтный шаблон в папке template [template/portfolio/page-full.php] => Шаблон портфолио на всю ширину в папке template -> portfolio [template/portfolio/page-mini.php] => Шаблон портфолио минимальный в папке template -> portfolio )
$this(WP_Theme) Экземпляр класса WP_Theme . $post(WP_Post/null) Объект записи (при редактировании) или null. $post_type(строка) Тип записи, для которого запрашивается список шаблонов.
Примеры
#1 Добавим свой шаблон в список для всех типов записей
WordPress по умолчанию ищет шаблоны в корне темы и в папках 1 уровня. Добавим свой шаблон в более глубокой папке. Мы добавляем шаблон без проверки на тип записи, а значит он будет доступен для всех типов постов.
add_filter( 'theme_templates', 'add_my_template_to_list', 10, 4 ); function add_my_template_to_list( $templates, $wp_theme, $post, $post_type ) < $templates['template/defaults/page.php'] = 'Мой дефолтный шаблон'; return $templates; >
#2 Добавим свой шаблон в список для страниц
add_filter( 'theme_templates', 'add_my_template_to_list', 10, 4 ); function add_my_template_to_list( $templates, $wp_theme, $post, $post_type ) < if ( 'page' === $post_type ) < $templates['template/defaults/page.php'] = 'Мой дефолтный шаблон страницы'; >return $templates; >
Если у вас другой тип записи, то page замените на нужный тип или, чтобы не делать проверку в коде, можно использовать похожий хук theme_(post_type)_templates.
#3 Добавим свой шаблон из плагина
Пусть нам нужна страница со своим индивидуальным шаблоном, который надо добавить с помощью плагина. Создадим плагин со следующей структурой:
plugin-my-tpl (папка плагина) ├── plugin-my-tpl.php (основной файл плагина) └── templates (папка с шаблонами) ├── page-tpl-1.php (шаблон №1) └── page-tpl-2.php (шаблон №2)
Файл plugin-my-tpl.php
/** * Plugin Name: plugin-my-tpl */ add_filter( 'theme_templates', 'add_my_template_to_list', 10, 4 ); add_filter( 'template_include', 'my_plugin_template_include' ); // Добавляем в список свои шаблоны для страниц function add_my_template_to_list( $templates, $wp_theme, $post, $post_type ) < if ( 'page' === $post_type ) < // Дополняем массив шаблонов своими собственными $templates += my_plugin_templates(); >return $templates; > // Формируем массив с шаблонами function my_plugin_templates() < $base_path = basename( __DIR__ ); return [ $base_path . '/templates/page-tpl-1.php' =>'Шаблон из плагина №1', $base_path . '/templates/page-tpl-2.php' => 'Шаблон из плагина №2', ]; > // Подключает шаблон страницы из плагина function my_plugin_template_include( $template ) < // Если это не страница - возвращаем что есть if ( ! is_page() ) < return $template; >// Получаем сохранённый шаблон $path_slug = get_post_meta( get_the_ID(), '_wp_page_template', true ); // Если шаблон не плагина - возвращаем что есть if ( ! in_array( $path_slug, array_keys( my_plugin_templates() ) ) ) < return $template; >// Создаем полный путь к файлу $path_file = wp_normalize_path( WP_PLUGIN_DIR . '/' . $path_slug ); // Проверяем, есть ли физически файл шаблона и, если да - отдаем движку if ( file_exists( $path_file ) ) < return $path_file; >return $template; >
Решение в стиле ООП можно посмотреть в статье Add Page Templates to WordPress with a Plugin. Добавить свой пример
Список изменений
WordPress: Class wp_theme not found – How to fix
This is a WordPress error that often occurs while trying to upgrade WordPress manually. And this kind of WordPress error can cause the website to load with a blank page.
Here at Bobcares we often handle similar WordPress errors for our customers using websites with WordPress as a part of our Server Management Services.
Today let’s see how our Support Techs fix this issue for our customers.
What causes the ‘WordPress: Class wp_theme not found’ error
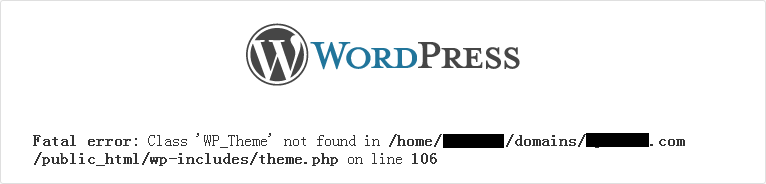
A typical error message looks like the one given below:
The main cause for this error is missing base files.
Steps to fix ‘WordPress: Class wp_theme not found’
Here we will see how to perform a manual WordPress upgrade so that this error does not pop up.
Following are the steps for doing this:
1. First, we need to get the latest WordPress zip (or tar.gz) file.
2. Then unpack the zip file that we downloaded.
3. After that we have to deactivate plugins.
4. And delete the old wp-includes and wp-admin directories on our web host.
5. Now, using FTP or shell access, we will upload the new wp-includes and wp-admin directories to our web host. Thus overwriting the old files.
6. Next, we will upload the individual files from the new wp-content folder to the existing wp-content folder, overwriting existing files.
We should not delete the existing wp-content folder except for the one being overwritten by new files.
7. Finally, we will upload all new loose files from the root directory of the new version to the existing WordPress root directory.
Skipping step 7 will lead to ‘WordPress: Class wp_theme not found’ error message
Therefore, to avoid this issue, or to fix this issue, we must ensure to upload all the files from the root directory of the new version to the existing WordPress root directory.
[Need help with the setup? We can help you]
Conclusion
In short, we saw how our Support Engineers fix ‘WordPress: Class wp_theme not found’ for our customers.
PREVENT YOUR SERVER FROM CRASHING!
Never again lose customers to poor server speed! Let us help you.
Our server experts will monitor & maintain your server 24/7 so that it remains lightning fast and secure.
Search Our Database
This is an article on how to fix the following issue when upgrading your WordPress manually:
Class WP_Theme not found in theme.php on line 106
According to the official WordPress updating guide, here are the simple steps to perform a manual WordPress upgrade:
1. Get the latest WordPress zip (or tar.gz) file.
2. Unpack the zip file that you downloaded.
4. Delete the old wp-includes and wp-admin directories on your web host (through your FTP or shell access).
5. Using FTP or your shell access, upload the new wp-includes and wp-admin directories to your web host, overwriting old files.
6. Upload the individual files from the new wp-content folder to your existing wp-content folder, overwriting existing files. Do NOT delete your existing wp-content folder. Do NOT delete any files or folders in your existing wp-content directory (except for the one being overwritten by new files).
7. Upload all new loose files from the root directory of the new version to your existing WordPress root directory.
However, if you did not perform step 7, you would see this error message when trying to complete your upgrade:
Class WP_Theme not found in theme.php on line 106
Hence, to avoid this issue, or to fix this issue, make sure you perform step 7 and continue on the remaining steps for the manual WordPress updating process.