- Tutorial
- Working with a checkout
- Create a workbook
- Playing with data
- Accessing one cell
- Accessing many cells
- Values only
- Data storage
- Saving to a file
- Saving as a stream
- Loading from a file
- Errors loading workbooks
- Чтение и запись файлов Excel (XLSX) в Python
- Установка Pandas
- Запись в файл Excel с python
- Запись нескольких DataFrame в файл Excel
- Чтение файлов Excel с python
Tutorial
Install openpyxl using pip. It is advisable to do this in a Python virtualenv without system packages:
There is support for the popular lxml library which will be used if it is installed. This is particular useful when creating large files.
To be able to include images (jpeg, png, bmp,…) into an openpyxl file, you will also need the “pillow” library that can be installed with:
or browse https://pypi.python.org/pypi/Pillow/, pick the latest version and head to the bottom of the page for Windows binaries.
Working with a checkout
Sometimes you might want to work with the checkout of a particular version. This may be the case if bugs have been fixed but a release has not yet been made.
$ pip install -e hg+https://foss.heptapod.net/openpyxl/openpyxl/@3.1#egg=openpyxl
Create a workbook
There is no need to create a file on the filesystem to get started with openpyxl. Just import the Workbook class and start work:
>>> from openpyxl import Workbook >>> wb = Workbook()
A workbook is always created with at least one worksheet. You can get it by using the Workbook.active property:
This is set to 0 by default. Unless you modify its value, you will always get the first worksheet by using this method.
You can create new worksheets using the Workbook.create_sheet() method:
>>> ws1 = wb.create_sheet("Mysheet") # insert at the end (default) # or >>> ws2 = wb.create_sheet("Mysheet", 0) # insert at first position # or >>> ws3 = wb.create_sheet("Mysheet", -1) # insert at the penultimate position
Sheets are given a name automatically when they are created. They are numbered in sequence (Sheet, Sheet1, Sheet2, …). You can change this name at any time with the Worksheet.title property:
Once you gave a worksheet a name, you can get it as a key of the workbook:
You can review the names of all worksheets of the workbook with the Workbook.sheetname attribute
>>> print(wb.sheetnames) ['Sheet2', 'New Title', 'Sheet1']
You can loop through worksheets
>>> for sheet in wb: . print(sheet.title)
You can create copies of worksheets within a single workbook:
>>> source = wb.active >>> target = wb.copy_worksheet(source)
Only cells (including values, styles, hyperlinks and comments) and certain worksheet attributes (including dimensions, format and properties) are copied. All other workbook / worksheet attributes are not copied — e.g. Images, Charts.
You also cannot copy worksheets between workbooks. You cannot copy a worksheet if the workbook is open in read-only or write-only mode.
Playing with data
Accessing one cell
Now we know how to get a worksheet, we can start modifying cells content. Cells can be accessed directly as keys of the worksheet:
This will return the cell at A4, or create one if it does not exist yet. Values can be directly assigned:
There is also the Worksheet.cell() method.
This provides access to cells using row and column notation:
>>> d = ws.cell(row=4, column=2, value=10)
When a worksheet is created in memory, it contains no cells . They are created when first accessed.
Because of this feature, scrolling through cells instead of accessing them directly will create them all in memory, even if you don’t assign them a value.
>>> for x in range(1,101): . for y in range(1,101): . ws.cell(row=x, column=y)
will create 100×100 cells in memory, for nothing.
Accessing many cells
Ranges of cells can be accessed using slicing:
Ranges of rows or columns can be obtained similarly:
>>> colC = ws['C'] >>> col_range = ws['C:D'] >>> row10 = ws[10] >>> row_range = ws[5:10]
You can also use the Worksheet.iter_rows() method:
>>> for row in ws.iter_rows(min_row=1, max_col=3, max_row=2): . for cell in row: . print(cell)
Likewise the Worksheet.iter_cols() method will return columns:
>>> for col in ws.iter_cols(min_row=1, max_col=3, max_row=2): . for cell in col: . print(cell)
For performance reasons the Worksheet.iter_cols() method is not available in read-only mode.
If you need to iterate through all the rows or columns of a file, you can instead use the Worksheet.rows property:
>>> ws = wb.active >>> ws['C9'] = 'hello world' >>> tuple(ws.rows) ((, , ), (, , ), (, , ), (, , ), (, , ), (, , ), (, , ), (, , ), (, , ))
or the Worksheet.columns property:
For performance reasons the Worksheet.columns property is not available in read-only mode.
Values only
If you just want the values from a worksheet you can use the Worksheet.values property. This iterates over all the rows in a worksheet but returns just the cell values:
for row in ws.values: for value in row: print(value)
Both Worksheet.iter_rows() and Worksheet.iter_cols() can take the values_only parameter to return just the cell’s value:
>>> for row in ws.iter_rows(min_row=1, max_col=3, max_row=2, values_only=True): . print(row) (None, None, None) (None, None, None)
Data storage
Once we have a Cell , we can assign it a value:
>>> c.value = 'hello, world' >>> print(c.value) 'hello, world' >>> d.value = 3.14 >>> print(d.value) 3.14
Saving to a file
The simplest and safest way to save a workbook is by using the Workbook.save() method of the Workbook object:
>>> wb = Workbook() >>> wb.save('balances.xlsx')
This operation will overwrite existing files without warning.
The filename extension is not forced to be xlsx or xlsm, although you might have some trouble opening it directly with another application if you don’t use an official extension.
As OOXML files are basically ZIP files, you can also open it with your favourite ZIP archive manager.
If required, you can specify the attribute wb.template=True , to save a workbook as a template:
>>> wb = load_workbook('document.xlsx') >>> wb.template = True >>> wb.save('document_template.xltx')
Saving as a stream
If you want to save the file to a stream, e.g. when using a web application such as Pyramid, Flask or Django then you can simply provide a NamedTemporaryFile() :
>>> from tempfile import NamedTemporaryFile >>> from openpyxl import Workbook >>> wb = Workbook() >>> with NamedTemporaryFile() as tmp: wb.save(tmp.name) tmp.seek(0) stream = tmp.read()
You should monitor the data attributes and document extensions for saving documents in the document templates and vice versa, otherwise the result table engine can not open the document.
>>> wb = load_workbook('document.xlsx') >>> # Need to save with the extension *.xlsx >>> wb.save('new_document.xlsm') >>> # MS Excel can't open the document >>> >>> # or >>> >>> # Need specify attribute keep_vba=True >>> wb = load_workbook('document.xlsm') >>> wb.save('new_document.xlsm') >>> # MS Excel will not open the document >>> >>> # or >>> >>> wb = load_workbook('document.xltm', keep_vba=True) >>> # If we need a template document, then we must specify extension as *.xltm. >>> wb.save('new_document.xlsm') >>> # MS Excel will not open the document
Loading from a file
You can use the openpyxl.load_workbook() to open an existing workbook:
>>> from openpyxl import load_workbook >>> wb = load_workbook(filename = 'empty_book.xlsx') >>> sheet_ranges = wb['range names'] >>> print(sheet_ranges['D18'].value) 3
There are several flags that can be used in load_workbook.
formula (default) or the value stored the last time Excel read the sheet.
not (default). If they are preserved they are still not editable.
memory and is faster but not all features are available (charts, images, etc.)
preserved. The default is False .
openpyxl does currently not read all possible items in an Excel file so shapes will be lost from existing files if they are opened and saved with the same name.
Errors loading workbooks
Sometimes openpyxl will fail to open a workbook. This is usually because there is something wrong with the file. If this is the case then openpyxl will try and provide some more information. Openpyxl follows the OOXML specification closely and will reject files that do not because they are invalid. When this happens you can use the exception from openpyxl to inform the developers of whichever application or library produced the file. As the OOXML specification is publicly available it is important that developers follow it.
You can find the spec by searching for ECMA-376, most of the implementation specifics are in Part 4.
This ends the tutorial for now, you can proceed to the Simple usage section
© Copyright 2010 — 2023, See AUTHORS Revision de5eaa97998c .
Versions latest stable 3.1.2 3.1.1 3.1.0 3.1 3.0 2.6 2.5.14 2.5 2.4 Downloads html On Read the Docs Project Home Builds Free document hosting provided by Read the Docs.
Чтение и запись файлов Excel (XLSX) в Python
Pandas можно использовать для чтения и записи файлов Excel с помощью Python. Это работает по аналогии с другими форматами. В этом материале рассмотрим, как это делается с помощью DataFrame.
Помимо чтения и записи рассмотрим, как записывать несколько DataFrame в Excel-файл, как считывать определенные строки и колонки из таблицы и как задавать имена для одной или нескольких таблиц в файле.
Установка Pandas
Для начала Pandas нужно установить. Проще всего это сделать с помощью pip .
Если у вас Windows, Linux или macOS:
pip install pandas # или pip3В процессе можно столкнуться с ошибками ModuleNotFoundError или ImportError при попытке запустить этот код. Например:
ModuleNotFoundError: No module named 'openpyxl'В таком случае нужно установить недостающие модули:
pip install openpyxl xlsxwriter xlrd # или pip3Запись в файл Excel с python
Будем хранить информацию, которую нужно записать в файл Excel, в DataFrame . А с помощью встроенной функции to_excel() ее можно будет записать в Excel.
Сначала импортируем модуль pandas . Потом используем словарь для заполнения DataFrame :
import pandas as pd
df = pd.DataFrame( 'FC Bayern München', 'FC Barcelona', 'Juventus'],
'League': ['English Premier League (1)', 'Spain Primera Division (1)',
'English Premier League (1)', 'German 1. Bundesliga (1)',
'Spain Primera Division (1)', 'Italian Serie A (1)'],
'TransferBudget': [176000000, 188500000, 90000000,
100000000, 180500000, 105000000]>)Ключи в словаре — это названия колонок. А значения станут строками с информацией.
Теперь можно использовать функцию to_excel() для записи содержимого в файл. Единственный аргумент — это путь к файлу:
А вот и созданный файл Excel:
Стоит обратить внимание на то, что в этом примере не использовались параметры. Таким образом название листа в файле останется по умолчанию — «Sheet1». В файле может быть и дополнительная колонка с числами. Эти числа представляют собой индексы, которые взяты напрямую из DataFrame.
Поменять название листа можно, добавив параметр sheet_name в вызов to_excel() :
df.to_excel('./teams.xlsx', sheet_name='Budgets', index=False)Также можно добавили параметр index со значением False , чтобы избавиться от колонки с индексами. Теперь файл Excel будет выглядеть следующим образом:
Запись нескольких DataFrame в файл Excel
Также есть возможность записать несколько DataFrame в файл Excel. Для этого можно указать отдельный лист для каждого объекта:
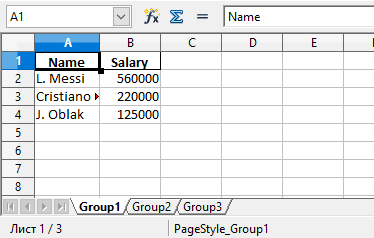
salaries1 = pd.DataFrame( 'Salary': [560000, 220000, 125000]>)
salaries2 = pd.DataFrame( 'Salary': [370000, 270000, 240000]>)
salaries3 = pd.DataFrame( 'Salary': [160000, 260000, 250000]>)
salary_sheets =
writer = pd.ExcelWriter('./salaries.xlsx', engine='xlsxwriter')
for sheet_name in salary_sheets.keys():
salary_sheets[sheet_name].to_excel(writer, sheet_name=sheet_name, index=False)
writer.save()Здесь создаются 3 разных DataFrame с разными названиями, которые включают имена сотрудников, а также размер их зарплаты. Каждый объект заполняется соответствующим словарем.
Объединим все три в переменной salary_sheets , где каждый ключ будет названием листа, а значение — объектом DataFrame .
Дальше используем движок xlsxwriter для создания объекта writer . Он и передается функции to_excel() .
Перед записью пройдемся по ключам salary_sheets и для каждого ключа запишем содержимое в лист с соответствующим именем. Вот сгенерированный файл:
Можно увидеть, что в этом файле Excel есть три листа: Group1, Group2 и Group3. Каждый из этих листов содержит имена сотрудников и их зарплаты в соответствии с данными в трех DataFrame из кода.
Параметр движка в функции to_excel() используется для определения модуля, который задействуется библиотекой Pandas для создания файла Excel. В этом случае использовался xslswriter , который нужен для работы с классом ExcelWriter . Разные движка можно определять в соответствии с их функциями.
В зависимости от установленных в системе модулей Python другими параметрами для движка могут быть openpyxl (для xlsx или xlsm) и xlwt (для xls). Подробности о модуле xlswriter можно найти в официальной документации.
Наконец, в коде была строка writer.save() , которая нужна для сохранения файла на диске.
Чтение файлов Excel с python
По аналогии с записью объектов DataFrame в файл Excel, эти файлы можно и читать, сохраняя данные в объект DataFrame . Для этого достаточно воспользоваться функцией read_excel() :