- How to change default Java version on Linux
- Support Xmodulo
- How to change the default Java version on Ubuntu
- You might also like.
- Change default Java version in Ubuntu 20.04 LTS
- Install different versions of OpenJDK Development Kit and Java Runtime Environment
- Change default Java version in Ubuntu 20.04 LTS
- Change Java version on Mac
- Downgrade to Java version 1.8
- Conclusion
- 12 Comments
How to change default Java version on Linux
Question: When I am trying to run a Java program on Linux, I am getting the following error. Looks like the Java program is compiled for a different Java version than the default Java program installed on my Linux. How can I switch the default Java version on Linux?
Exception in thread "main" java.lang.UnsupportedClassVersionError: com/xmodulo/hmon/gui/NetConf : Unsupported major.minor version 51.0
When a Java program is compiled, the build environment sets a target which is the oldest JRE version the program can support. If you run the Java program on a Linux system which does not meet the lowest JRE version requirement, you will encounter the following error while starting the program.
Exception in thread "main" java.lang.UnsupportedClassVersionError: com/xmodulo/hmon/gui/NetConf : Unsupported major.minor version 51.0
For example, in this case the program is compiled for Java JRE 1.7 but the system only has Java JRE 1.6.
To solve this problem, you need to change the default Java version you are using to Java JRE 1.7 or higher (assuming that such JRE is already installed).
First, check available Java versions on your Linux system by using update-alternatives command:
$ sudo update-alternatives --display java
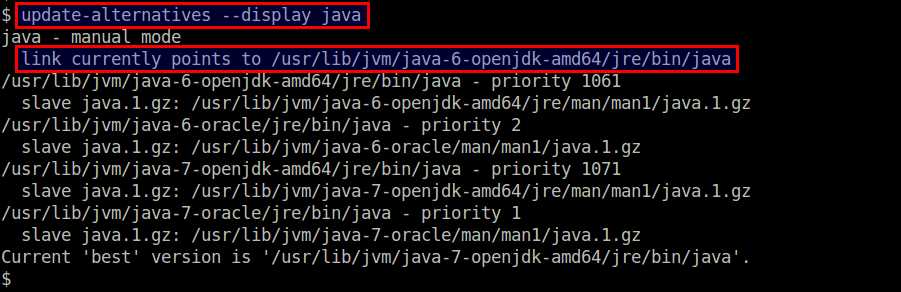
In this example, there are four different Java versions that are installed: OpenJDK JRE 1.6, Oracle Java JRE 1.6, OpenJDK JRE 1.7 and Oracle Java JRE 1.7. The default Java version is currently set to OpenJDK JRE 1.6.
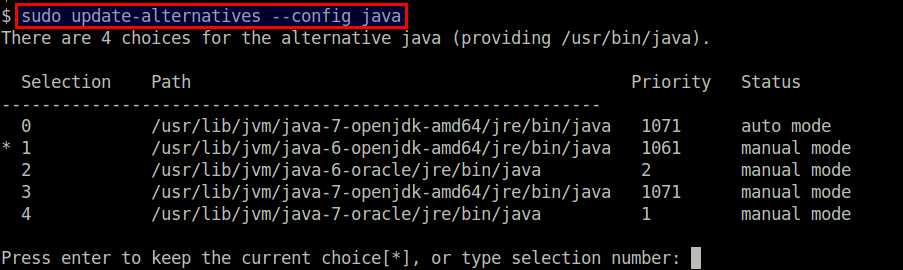
Now that there are suitable candidates to change to, you can switch the default Java version among available Java JREs by running the following command:
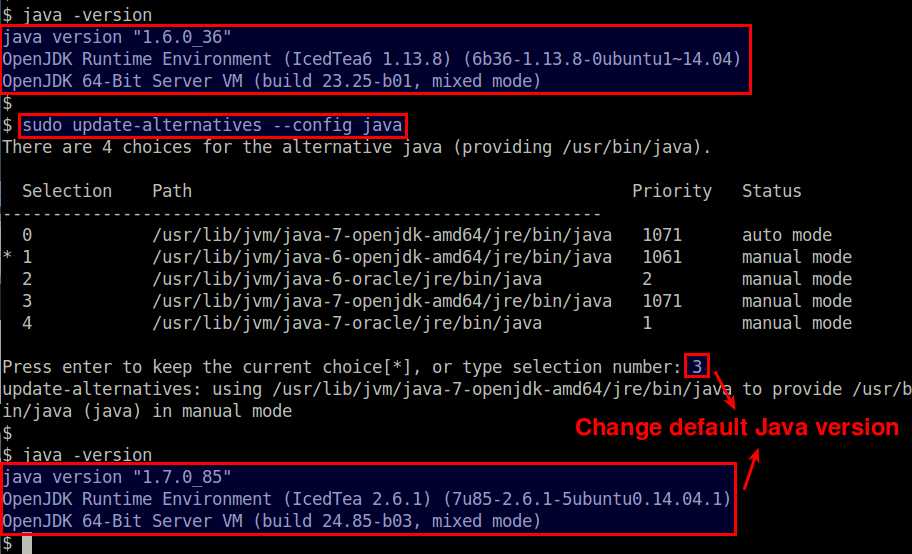
$ sudo update-alternatives --config java
When prompted, select the Java version you would like to use. In this example, we choose Oracle Java JRE 1.7.
Now you can verify the default Java version as follows.
Finally, if you defined JAVA_HOME environment variable somewhere, update the variable according to the newly set default Java version.
Support Xmodulo
This website is made possible by minimal ads and your gracious donation via PayPal or credit card
Please note that this article is published by Xmodulo.com under a Creative Commons Attribution-ShareAlike 3.0 Unported License. If you would like to use the whole or any part of this article, you need to cite this web page at Xmodulo.com as the original source.
How to change the default Java version on Ubuntu
If you are a Java developer, it is normal to have multiple Java versions installed on your machine to support different build environments. When a Java program is compiled, the build environment sets the oldest JRE version the program can support. Now, if you run this program on a Linux machine where an unsupported Java version is installed, you will encounter an exception.
For example, if your program is compiled on Java 11, it can’t be run on a machine where Java 8 is installed. But the good thing is you can install multiple Java versions on your machine and quickly change the default JRE version.
In this tutorial, I’ll explain how to change the default Java version on a Linux machine. First of all, run the following command to check the current Java version:
$ java -version openjdk version "1.8.0_191" OpenJDK Runtime Environment (build 1.8.0_191-8u191-b12-2ubuntu0.18.10.1-b12) OpenJDK 64-Bit Server VM (build 25.191-b12, mixed mode) As you can see above, the default Java version is currently set to OpenJDK JRE 1.8. Now, let’s run the following command to see all available Java versions:
$ sudo update-alternatives --config java Running the above command displays a list of installed Java JDKs and JREs allowing you to select the one as you want to set as default.
There are 2 choices for the alternative java (providing /usr/bin/java). Selection Path Priority Status ------------------------------------------------------------ 0 /usr/lib/jvm/java-11-openjdk-amd64/bin/java 1111 auto mode 1 /usr/lib/jvm/java-11-openjdk-amd64/bin/java 1111 manual mode * 2 /usr/lib/jvm/java-8-openjdk-amd64/jre/bin/java 1081 manual mode Press enter> to keep the current choice[*], or type selection number: When prompted, select the Java version you would like to use. If the list does not include your desired Java version, you can always install it.
Now you can verify the default Java version as fellows:
$ java -version openjdk version "11.0.2" 2019-01-15 OpenJDK Runtime Environment (build 11.0.2+9-Ubuntu-3ubuntu118.10.3) OpenJDK 64-Bit Server VM (build 11.0.2+9-Ubuntu-3ubuntu118.10.3, mixed mode, sharing) That’s it. The default Java version is changed to OpenJDK 11.
If you frequently switch between different Java versions, it is a good idea to write a short script to automate the process. Here is the script I used for switching to OpenJDK 8 on my machine. java8.sh
sudo update-java-alternatives -s java-1.8.0-openjdk-amd64 export JAVA_HOME=/usr/lib/jvm/java-1.8.0-openjdk-amd64/ export PATH=$PATH:$JAVA_HOME Similarly, you can create scripts for other Java versions installed on your machine. The next step is to add these scripts as aliases to .bashrc file.
... # Java Alias alias java8='source /opt/java/switch/java8.sh' alias java11='source /opt/java/switch/java11.sh' Read Next: How to install Java on Ubuntu 18.04 ✌️ Like this article? Follow me on Twitter and LinkedIn. You can also subscribe to RSS Feed.
You might also like.
Change default Java version in Ubuntu 20.04 LTS
We consider this article to be an extension to the previous article – Install OpenJDK JRE / JDK in Ubuntu 20.04 LTS . As you would notice, we have already installed version 11 of OpenJDK JRE / JDK in Ubuntu 20.04 LTS release. Now, consider a scenario wherein we have also installed version 8 of OpenJDK JRE. In that case, the default version would still be the one which we have installed earlier i.e. version 11.0.7. So, in this article we would discuss how to change the default Java version in Ubuntu 20.04 LTS.
Just for clarity, we would first install OpenJDK Development Kit v11.0.7 and OpenJDK Java Runtime Environment v1.0.8_252. Thereafter, we would issue the specific command to change the default version of Java.
Note: Following operations would require you to have superuser privileges. In case you don’t have one, then contact your System Administrator for assistance.
Install different versions of OpenJDK Development Kit and Java Runtime Environment
Since the packages are already available in standard Ubuntu repository. Therefore, first update the Ubuntu repository to make the latest version of the package available. Hence, issue the following in terminal –
Now, to install OpenJDK Development Kit v11.0.7 –
sudo apt install openjdk-11-jdk
Next, to install OpenJDK Java Runtime Environment v1.8.0_252 –
sudo apt install openjdk-8-jre
Change default Java version in Ubuntu 20.04 LTS
First, verify for the Java version installed –
It would return the output –
openjdk version "11.0.7" 2020-04-14 OpenJDK Runtime Environment (build 11.0.7+10-post-Ubuntu-3ubuntu1) OpenJDK 64-Bit Server VM (build 11.0.7+10-post-Ubuntu-3ubuntu1, mixed mode, sharing)
Although we already installed version 1.8.0_252, But, when we pass the java -version command then it doesn’t mention the said version. Because, as of now v11.0.7 is the default version. To change that, we need to issue command –
sudo update-alternatives --config java
It would show us all the Java versions installed. Enter the selection number for OpenJDK JRE v1.8.0_252. Again –
This time it would return with –
openjdk version "1.8.0_252" OpenJDK Runtime Environment (build 1.8.0_252-8u252-b09-1ubuntu1-b09) OpenJDK 64-Bit Server VM (build 25.252-b09, mixed mode)
In conclusion, we have discussed how to change the default version of Java in Ubuntu 20.04 LTS release.
Change Java version on Mac

Please refer to change default version on macOS BigSur: https://www.lotharschulz.info/2021/01/11/change-default-java-version-on-macos-11-bigsur-persist-it/
Today I had to downgrade the default java version on Mac because we did start a transition of an existing service. Last time I did install java 1.8 was quite some manual effort (ls.info/…/java-1-8-and-spring-4-0-3-migration/). This time I wanted to use the existing Mac OS capabilities.
Downgrade to Java version 1.8
Installing java 1.8 worked best with
$ brew cask install adoptopenjdk/openjdk/adoptopenjdk8
That one installed java 1.8 however the system java version remained untouched.
$ java -version
openjdk version «11.0.2»
In order to set java 1.8 as default, I needed to find out which versions are installed:
$ /usr/libexec/java_home -V
Matching Java Virtual Machines (2):
11.0.2, x86_64: «OpenJDK 11.0.2»
/Library/. /openjdk-11.0.2.jdk/Contents/Home
1.8.0_222, x86_64:»AdoptOpenJDK 8″
/Library/. /adoptopenjdk-8.jdk/Contents/Home
With that, I could set the new default version (in my case as part of .zshrc setup):
export JAVA_HOME=`/usr/libexec/java_home -v 1.8.0_222`
Finally java -version returned as expected:
$ java -version
openjdk version «1.8.0_222»
Conclusion
Change default java version on Mac
$ brew cask install adoptopenjdk/openjdk/adoptopenjdk8
# which java versions installed
$ /usr/libexec/java_home -V
Matching Java Virtual Machines (2):
11.0.2, x86_64: «OpenJDK 11.0.2»
/Library/. /openjdk-11.0.2.jdk/Contents/Home
1.8.0_222, x86_64:»AdoptOpenJDK 8″
/Library/. /adoptopenjdk-8.jdk/Contents/Home
# set the new default version
export JAVA_HOME=`/usr/libexec/java_home -v 1.8.0_222`
12 Comments
thanks a lot! react native wouldn’t build on android until i reverted default java version from 15 to the one mentioned above. after a lot of failed attempts, you saved me!
do you have any idea why it gets reset back to java 15 after restarting the mac? i’d like it to remember this setting forever
The command
export JAVA_HOME=`/usr/libexec/java_home -v 1.8.0_222`
is ephemeral if issued only in the terminal. Please consider to persist the JAVA_HOME env in your .bashrc or bash_profile file like this:
. #set JAVA_HOME JAVA_HOME=`/usr/libexec/java_home -v 1.8.0_222` export JAVA_HOME #add JAVA_HOME to PATH export PATH=$PATH:$JAVA_HOME .
Add this to your ~/.zshrc jdk() <
version=$1
export JAVA_HOME=$(/usr/libexec/java_home -v”$version”);
java -version
> It’ll allow you to simply type ‘jdk 1.8’ at any given time.
Awesome! Please make sure you pass an installed java version as the first command-line argument to the shell script.
You can specify the major version only like:
jdk 1.8 See also switch between different jdk versions in gh.com/AdoptOpenJDK repository.
Something must have changed with Big Sur (11.1). I installed the jdk 8 as shown here and I then set the version with these two lines in my .profile JAVA_HOME=`/usr/libexec/java_home -v 1.8.0_275`
export JAVA_HOME But when I run java -version it is still showing the old prior version that is being active… xxx@yyy ~ % java -version
java version “1.8.0_271”
Java(TM) SE Runtime Environment (build 1.8.0_271-b09)
Java HotSpot(TM) 64-Bit Server VM (build 25.271-b09, mixed mode) Hmmm. It should be 1.8.0_275 and not 1.8.0_271.
Thanks for the detailed information. I also noticed changes when switching the default java version on macOS BigSur.
Please see how to change the default java version on macOS BigSur as an update of this post.