- Install and Upgrade Java Version on CentOs ,Red Hat and Fedora Linux
- Downloading Latest Java Version Linux Binary
- Linux x64 Java Development Kit
- Installation of Latest Java
- Update Java
- Check updated Java Version :
- How to Install Java 11 & 12 on CentOS 7
- Java Versions
- Install Java On CentOS
- Install OpenJDK 11
- Install OpenJRE 11
- Install Oracle Java 11
- Verify Java is Installed on Your System
- Install Specific Version of Java
- Install JDK 8
- Install JRE 8
- Install Oracle Java 12
- How to Set Default Java Version
- How to Set JAVA_HOME Environment Variable
- How to Uninstall Java on CentOS
- Как установить несколько версий Java в CentOS
- Установка Java на CentOS
- Установка OpenJDK 11
- Проверка версии Java
- Установите OpenJDK 8
- Установка версии Java по умолчанию
- Заключение
- Похожие записи:
Install and Upgrade Java Version on CentOs ,Red Hat and Fedora Linux
When the server OS is installed on the server or system, most of the time java version is not updated or not installed on the operating system, and also sometimes we need to update or upgrade the java version on the server. Earlier in our article, we had to install any version of Java on a freshly installed server. Now we are going to upgrade or update the Java version from the old java version to the latest version. Here you can see also the multiple version of java also installed on the server. Recently Java version 16 also launched.
Below is my java version, I ran the command to check the java version java -version, Nowhere is the output of my command.
[[email protected]]# java --version openjdk 11 2018-09-25 OpenJDK Runtime Environment 18.9 (build 11+28) OpenJDK 64-Bit Server VM 18.9 (build 11+28, mixed mode)
Below are the steps to installed or upgrade the java version.
Downloading Latest Java Version Linux Binary
Here was the java launch recently update OpenJDK 16, so we have downloaded it on the server through the below command. You can find the latest version of java on the official site page. Oracle also provides the latest OpenJDK release at jdk.java.net under the GPL License.
Run below command to download and extract the downloaded file .
Linux x64 Java Development Kit
# cd /tmp # wget https://download.java.net/java/GA/jdk16.0.1/7147401fd7354114ac51ef3e1328291f/9/GPL/openjdk-16.0.1_linux-x64_bin.tar.gz # tar xzf openjdk-16.0.1_linux-x64_bin.tar.gz # mv jdk-16.0.1 /opt
As we have earlier discussed in other articles that –no-cookies and –header options with curl or wget because oracle does not give download unless we have not accepted their license or terms .for accept header and license use the above syntax for download.
Installation of Latest Java
Update Java
Now go to the java extracted folder through the below command and install or switch to java version through alternatives command. This is the best way to install or switch the java version to other. When we run the alternatives –config java , the command output will show different java programs which provide java, We need to choose or select command.Here we have selected /opt/jdk-16.0.1/bin/java .Follow below command to set up.
# cd /opt/jdk-16.0.1 # alternatives --install /usr/bin/java java /opt/jdk-16.0.1/bin/java 2 # alternatives --config java
Now set the jar and javac path .
# alternatives --install /usr/bin/jar jar /opt/jdk-16.0.1/bin/jar 2 # alternatives --install /usr/bin/javac javac /opt/jdk-16.0.1/bin/javac 2 # alternatives --set jar /opt/jdk-16.0.1/bin/jar # alternatives --set javac /opt/jdk-16.0.1/bin/javac
Now set the Environment Variables path of Java,Jre home variable through below commands
# export JAVA_HOME=/opt/jdk-16.0.1/ # export JRE_HOME=/opt/jdk-16.0.1/jre
Check updated Java Version :
[[email protected] jdk-16.0.1]# java --version openjdk 16.0.1 2021-04-20 OpenJDK Runtime Environment (build 16.0.1+9-24) OpenJDK 64-Bit Server VM (build 16.0.1+9-24, mixed mode, sharing)
I am a professional freelance contributor and founder of tech transit. Love to write and lover of education, culture, and community. I have been using it, setting, supporting, and maintaining it since 2009.Linux rocks!
How to Install Java 11 & 12 on CentOS 7
As a highly popular programming language, Java is used for developing anything from lightweight mobile to desktop applications.
This step-by-step guide will show you how to install Java on CentOS 7.
Note: These installation instructions apply for CentOS7 as well as versions 6 and 6.5, RHEL, and recent Fedora releases. For a dedicated Fedora guide, please refer to How To Install Java On Fedora.
And for other systems, check our tutorial on how to install Java on Windows.
- A user account with sudo privileges
- Access to the command-line/terminal window
- The yum package manager, included by default
Java Versions
Currently, there are four Java platforms available:
In this document, we look at different packages within the Java SE.
There are two (2), open-source Java packages, Java Development Kit (Open JDK) and Java Runtime Environment (Open JRE). You use JRE for running Java-based applications, while JDK is for developing and programming with Java.
Also available is Java Oracle, another SE implementation, which has additional commercial features. You can find the official Oracle JDK through a third-party repository or on the official Oracle webpage. However, bear in mind its license only allows non-commercial use of the software.
Install Java On CentOS
You can install one or several Java packages on your machine. You can also decide which version you want on your system by installing a specific version number. The current default, Long-Term-Support (LTS) version is Java 11.
Install OpenJDK 11
1. Update the package repository to ensure you download the latest software:
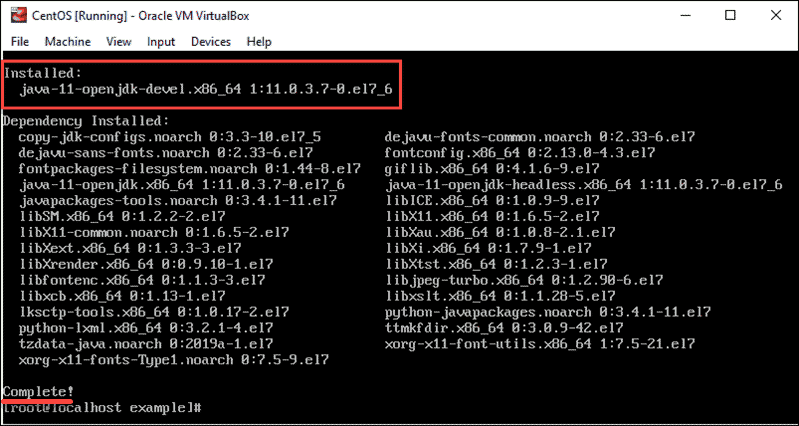
2. Then, install the Java Development Kit with the following command:
sudo yum install java-11-openjdk-develThe output displays the downloaded and installed JDK, as in the image below:
Install OpenJRE 11
Java Runtime Environment 11 (Open JRE 11) is a subset of OpenJDK. Therefore, both packages are included in the command:
sudo yum install java-11-openjdkInstall Oracle Java 11
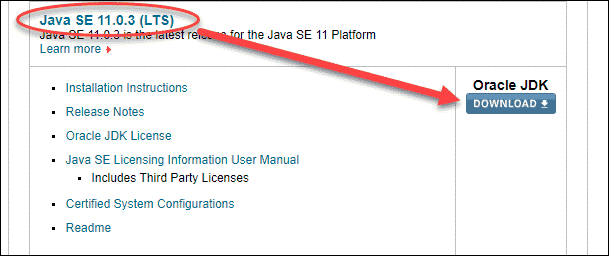
1. The official Oracle JDK is not available for download from the local repository. You have to download the .rpm package from the Java SE Downloads page.
2. The latest release is Java SE 12. However, Oracle Java 11 is LTS, meaning it is the latest stable version.
Locate Java SE 11.0.3 (LTS) on the webpage and click on DOWNLOAD.
3. After the download is complete, you can install the package with the command:
sudo yum localinstall jre-VERSION-linux-x64.rpmVerify Java is Installed on Your System
The following command shows which Java release you have and confirms installation was successful:
If Java was successfully downloaded and installed, the output details should match the image below:

Install Specific Version of Java
You can also install any of the other versions of Java by changing the version number in the command.
Install JDK 8
You may decide to use Open JDK 8, instead of the default OpenJDK 11.
To do so, type in the following command in the terminal:
sudo yum install java-1.8.0-openjdk-develInstall JRE 8
As a subset of Open JDK 8, you can install Open JRE 8 by typing in the command:
sudo yum install java-1.8.0-openjdkInstall Oracle Java 12
As previously mentioned, you have to download Oracle Java from its official page.
To install the newest version, simply download the appropriate package from their webpage and continue with the installation.
How to Set Default Java Version
Since you can have multiple versions of Java installed on your system, you can decide which one is the default one. To do so;
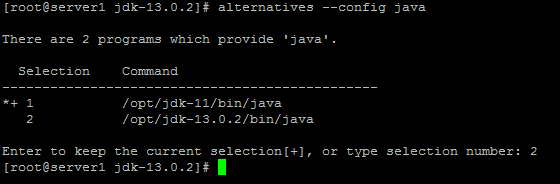
Run a command that shows all the installed versions on your computer:
sudo alternatives --config java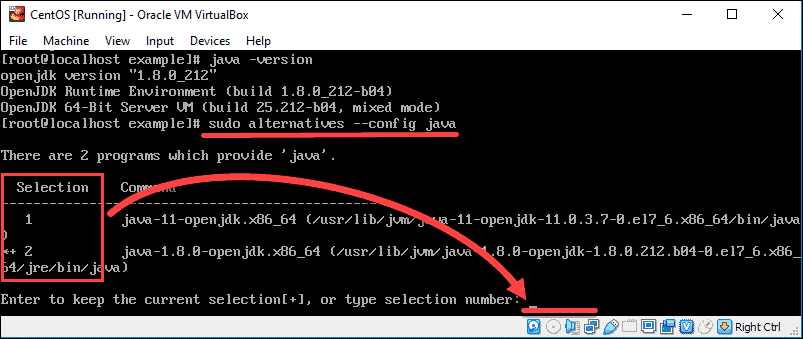
The image above shows that there are two alternatives to this system. These choices are represented by numbers 1 (Java 11) and 2 (Java 8).
To change the default version, type the associated number (in this case, 1 or 2) and press Enter.
How to Set JAVA_HOME Environment Variable
Setting the JAVA_HOME environment variable helps other applications compiled in this programming language to access Java’s installation path easily.
1. First, locate where Java is installed:
sudo update-alternatives --config java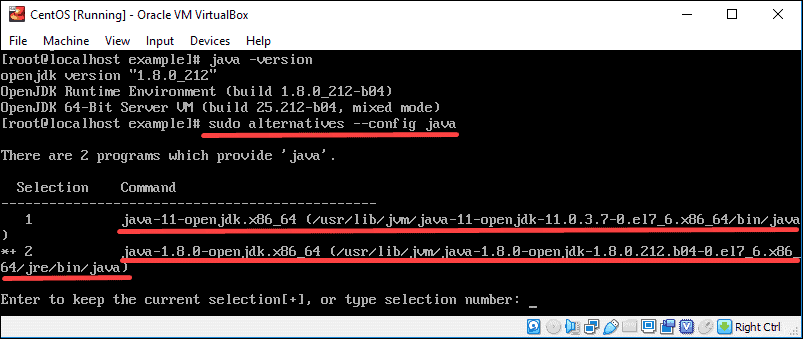
In the output, you can find the path for each Java package installed on the system.
- /usr/lib/jvm/java-11-openjdk-11.0.3.7-0.el7_6.x86_64/bin/java (where OpenJDK 11 is located)
- /usr/lib/jvm/java-1.8.0-openjdk-1.8.0.212.b04-0.el7_6.x86_64/jre/bin/java (where OpenJDK 8 is located)
2. Once you see all the paths, copy the one of your preferred Java version.
3. Then, open the .bash_profile with any text editor. In this example, we use vim:
4. At the bottom of the file, add a line which specifies the location of JAVA_HOME in the following manner:
JAVA_HOME=”/your/installation/path/”For example, if we copy the installation path for Java 11 in the previous step, the added line in the text editor will be:
/usr/lib/jvm/java-11-openjdk-11.0.3.7-0.el7_6.x86_64/bin/javaHow to Uninstall Java on CentOS
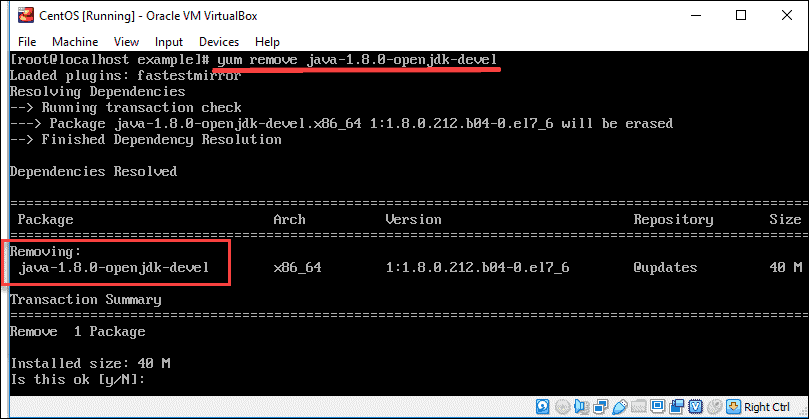
In case you need to remove any of the Java packages installed, use the yum remove command.
For example, to remove Open JDK 8 use the following command:
sudo yum remove java-1.8.0-openjdk-develConfirm the process by pressing y (yes), and it will uninstall the package from CentOS, as in the image below:
In this tutorial, you have learned how to install Java on CentOS 7.
We also covered changing the default version and setting the home environment variable. You are now ready to get started with Java!
If you are using a newer version of CentOS, check out our article on how to install Java 8 & 11 on Centos 8.
Как установить несколько версий Java в CentOS
Java является одним из наиболее широко используемых языков программирования высокого уровня и был первоначально разработан компанией Sun Microsystems. Он используется для создания полноценного приложения или системы, которая может работать на одной компьютерной системе или в распределенной серверной среде. Кроме того, Java также используется для создания небольшого приложения или апплета, который является частью веб-страницы.
Java имеет две различные реализации — OpenJDK и Java Oracle. Обе они примерно одинаковы и ничем не отличаются, за исключением того, что Java Oracle предоставляет дополнительную функциональность. OpenJDK — это платформа для реализации Java с открытым исходным кодом. Java Oracle подлежит лицензированию, что означает, что его можно использовать только в некоммерческих целях, например, для личного пользования и разработки.
Установка Java на CentOS
Чтобы установить java, вам необходимо установить две различные реализации Java в вашей системе. Для установки Java на CentOS выполните следующие действия:
- Во-первых, вам необходимо войти в систему как администратор или пользователь root.
- Откройте терминал, используя метод быстрого доступа ‘Ctrl+Alt+t’.
Установка OpenJDK 11
Лучшей практикой является установка последней версии Java — JDK 11. Некоторые приложения, основанные на java, могут нуждаться в конкретной версии java, поэтому в такой ситуации необходимо сначала прочитать документацию приложения.
Для установки openJDK11 в вашей системе CentOS выполните следующую команду:
sudo dnf install java-11-openjdk-devel 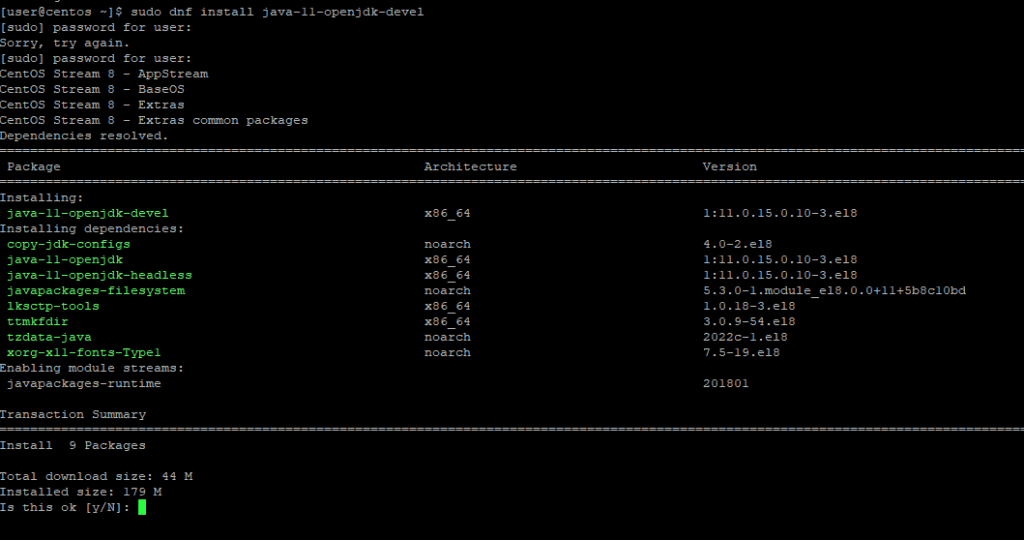
Во время установки на терминале появится запрос подтверждения пользователя. Вы должны нажать ‘y’ и клавишу ‘Enter’, чтобы разрешить установку пакетов Java на вашу систему.
Вы увидите, что для установки OpenJDK 11 на терминале отображается статус «Complete!».
Проверка версии Java
После завершения установки, теперь вы можете проверить установку java, показав установленную версию java. Для этого необходимо выполнить следующую команду:

На этом этапе Java была успешно установлена на вашу систему CentOS.
Вы также можете установить на CentOS headless версию java, которая поддерживает минимальное время выполнения java, необходимое для выполнения приложений без использования графического интерфейса, то есть без мыши, клавиатуры и поддержки систем отображения. Безголовая версия лучше подходит для серверных приложений.
Вам нужно ввести следующую команду, чтобы установить только headless версию OpenJDK 11 в вашей системе:
sudo dnf install java-11-openjdk-headlessЕсли на CentOS уже установлен вышеуказанный тип, то пакет headless будет установлен как зависимость.
Установите OpenJDK 8
Аналогичным образом вы можете установить OpenJDK 8 в вашей системе. Репозиторий CentOS по умолчанию содержит две основные последние версии Java LTS, Java 8 и 11. OpenJDK 8 также является часто используемой версией. Для установки Java 8 необходимо выполнить следующую команду:
sudo dnf install java-1.8.0-openjdk-devel 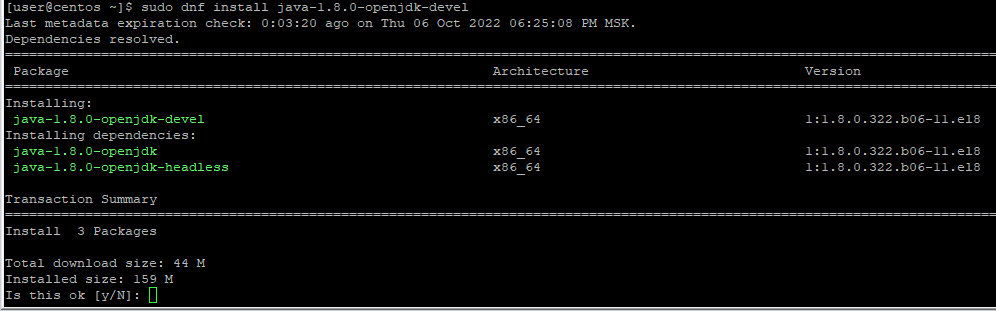
После завершения установки Java 8, теперь вы можете проверить ее, проверив информацию о версии следующим образом:
Вы также можете установить headless Java 8.
Установка версии Java по умолчанию
Если на CentOS установлено несколько версий Java, в этом случае вы можете использовать версию Java по умолчанию. Это означает, что когда вы введете java в терминале, какая версия будет использоваться по умолчанию, как показано ниже:
Если вы хотите изменить вышеуказанную версию с помощью новых альтернатив, то выполните следующую команду:
sudo alternatives --config java 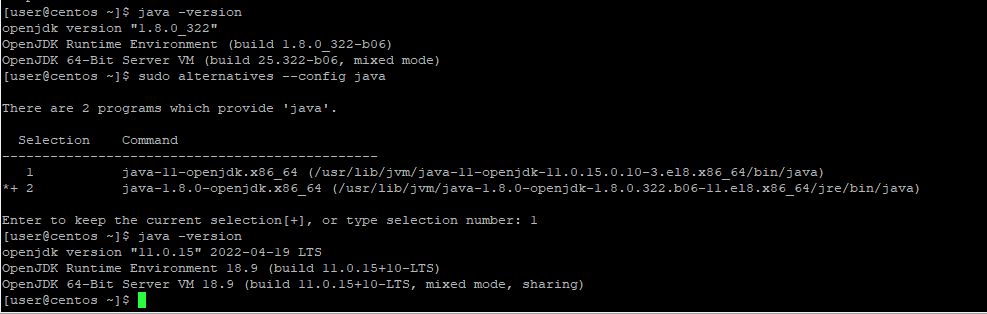
После выполнения вышеуказанной команды на терминале появится список установленных версий java. Теперь вам нужно выбрать ту, которую вы хотите установить по умолчанию.
Заключение
В этой статье вы узнали, как можно установить различные версии Java на CentOS. Более того, вы увидели, как установить версию Java по умолчанию, если в системе установлено несколько версий.