- How to Put Image Inline With Text
- Method 1: How to Put an Image inline With Text in HTML?
- Method 2: How to Put an Image Inline With Text Using CSS Properties?
- Conclusion
- Place Text Next to Image in HTML
- Use the float CSS Property to Place the Text Next to an Image in HTML
- Use display: inline-block and vertical-align: top to Place the Text Next to an Image in HTML
- Related Article — HTML Text
- Related Article — HTML Image
- Insert inline image or graphics in text in Elementor and CSS
- Style your linked image in the ‘text’ tab
- How to Center an Image Using Text Align: Center
- Example
- Object Fit
- Syntax
- Values
How to Put Image Inline With Text
![]()
While publishing research papers, inline images with the text data are used for a better understanding of the user. Inline images are utilized for conveying value and information. It also supports a broad range of data formats, including “GIFs”, “JPG”, “PNG”, and “SVG”. Furthermore, users can also utilize this format for making the webpage. To do so, HTML/CSS provides different properties to add the image inline with the text.
This write-up will explain:
Method 1: How to Put an Image inline With Text in HTML?
To put an image inline with text in HTML, utilize inline styling in HTML. To do so, follow the given instructions.
Step 1: Add an Image
Initially, add an image with the help of the “ ” tag. Then, apply inline styling by utilizing the “style” attribute. The description of the attribute is mentioned below:
-
- The HTML “style” tag contains several CSS properties and value pairs that can be utilized directly. To do so, the value of this attribute is set as “vertical-align: middle”.
- The “vertical-align” property is applied to control the element’s vertical alignment.
- “src” is used for inserting a media file inside the element.
Step 2: Make a “div” Container
Next, use the “ ” element to make a div container in the HTML page. Then, insert the “style” attribute with the following values:
-
- “vertical-align: middle” is set for inline styling and setting the container alignment.
- “display: inline” tells the element to fit itself on the same line.
- After that, embed the text in between the “div” tag:
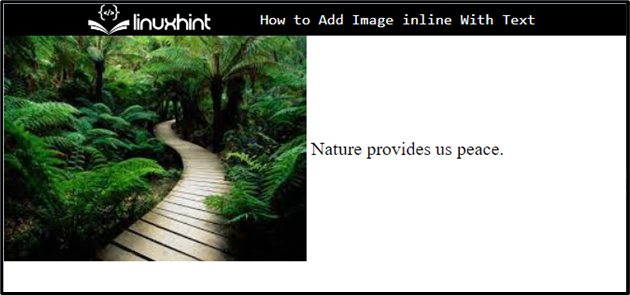
It can be noticed that the image has been added inline with the text on the HTML page:

Method 2: How to Put an Image Inline With Text Using CSS Properties?
To put an image inline with the text, the CSS “vertical-align” property with the value “middle” and “display” as “inline” can be applied.
Step 1: Create Main div Container
First, create a div container using the “ ” tag and add an id attribute with a specific name.
Step 2: Create a Nested div Container
Next, create a next container between the first “div” container and insert a “class” attribute with a particular name. Then, embed text in between the “div” tag.
Step 3: Add an Image
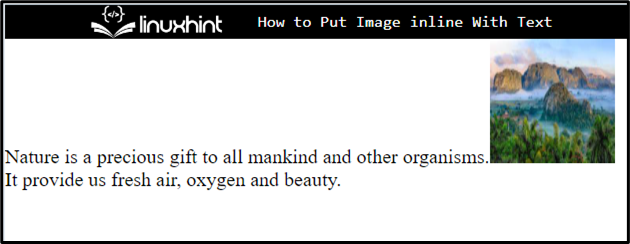
After that, add an image by utilizing the “ ” tag. Then, add the below-listed attributes in the image tag:
-
- “src” is used to add the media file. To do so, we have set the file name as this attribute value.
- “width” and “height” determines the size of the added image element:
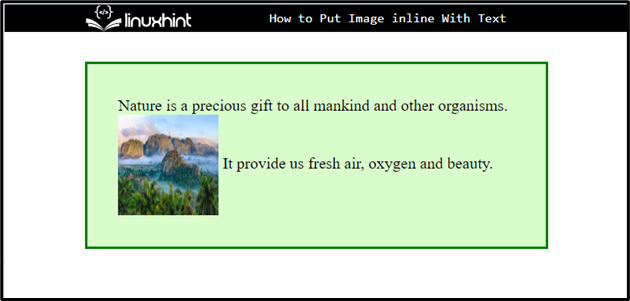
Step 4: Style “div” Container
Access the div element with the help of the value of the id as “#main”:
#main <
margin: 30px 80px;
background-color: rgb ( 217 , 252 , 203 ) ;
border: 3px solid green;
padding: 30px;
}Then, apply the CSS properties mentioned in the above code snippet:
-
- “margin” defines a space outside of the defined boundary.
- “background-color” property allocated the color at the backside of the defined element.
- “border” determines a boundary around the element.
- “padding” is used for adding the space inside of the defined border.
Step 5: Make Image Inline With Text
Access the nested div container with the class name “.main-content” and apply the listed CSS properties:
-
- “height” and “width” properties are utilized for setting the element’s size.
- “vertical-align” is used for setting the vertical alignment as “middle”.
- “display” controls how an element is handled as a block or inline component, as well as the arrangement of its children.
That’s all about putting an image inline with the text.
Conclusion
To put the image inline with the text, first, add an image and text in the div container. Then, the user can utilize the inline styling in HTML and apply CSS properties. To do so, apply the “vertical-align” CSS property with the value “middle” and “display” set as “inline” to put the image in line with the text. This post explained the method to put the image inline with the text.
Place Text Next to Image in HTML
- Use the float CSS Property to Place the Text Next to an Image in HTML
- Use display: inline-block and vertical-align: top to Place the Text Next to an Image in HTML
The article explains the ways to place text beside images by using HTML and CSS.
Use the float CSS Property to Place the Text Next to an Image in HTML
We can use the float CSS property to define how an element can float. An element can float to the right or the left. Some other options are none which means the element will not float and, inherit which, will exhibit its parent’s behavior. We use the float property to specify the positioning and formatting of an element. We can also use the property to place a text next to an image.
We can easily achieve the following style by wrapping both image and text content with a div. The HTML should be structured as below.
div> div> img src="url" /> div> div> Text content goes here div> div>Now that the HTML is structured, we can add our CSS as inline, internal, or external. For this example, we will be implementing the styles using inline CSS. First, set the float property to left for the div wrapping the image. Use the URL https://loremflickr.com/320/240 as the image source. Next, write any text of your choice and wrap it with another div .
div> div style="float: left"> img src="https://loremflickr.com/320/240" /> div> div> Text content goes here div> div>Here, the property float: left is given to the wrapper of the image. The float: left property will place the image at the left, and another wrapper wrapping the text content will be placed just beside the image. In this way, we can use the CSS float property to place a text next to an image.
Use display: inline-block and vertical-align: top to Place the Text Next to an Image in HTML
We can use the display and vertical-align properties to place a text next to an image in HTML. The display defines how an element displays in HTML. We can set an element’s display property as inline , inline-block , block , etc. When we assign display to inline-block , it will make the element an inline element, but we still can set height and width properties to it. Thus, we will be able to place the text beside an image. The vertical-align property defines the vertical alignment of an element. When we use the value top , the element will be aligned to the top of the tallest element on the line.
Here, we can again structure our code as below.
div> img src="" alt="img"/> div> div> p> Text Here, p> div>For example, set the display property to inline-block and the vertical-align property to top for the image wrapper div . As for the wrapper, div of the text set the display property to inline-block .
div style="display:inline-block;vertical-align:top;"> img src="https://loremflickr.com/320/240" alt="img"/> div> div style="display:inline-block;"> p> Here goes the text content. p> div>Here, the property display: inline-block sets the property of the wrapper that is wrapping image an inline-block property. The inline-block option does not add a line break beside the element. Therefore, the elements will align next to one another. We again wrap the text wrapper with the display: inline-block property as well. Similar to the previous wrapper, it will place the text content right beside the image.
Ashok is an avid learner and senior software engineer with a keen interest in cyber security. He loves articulating his experience with words to wider audience.
Related Article — HTML Text
Related Article — HTML Image
Copyright © 2023. All right reserved
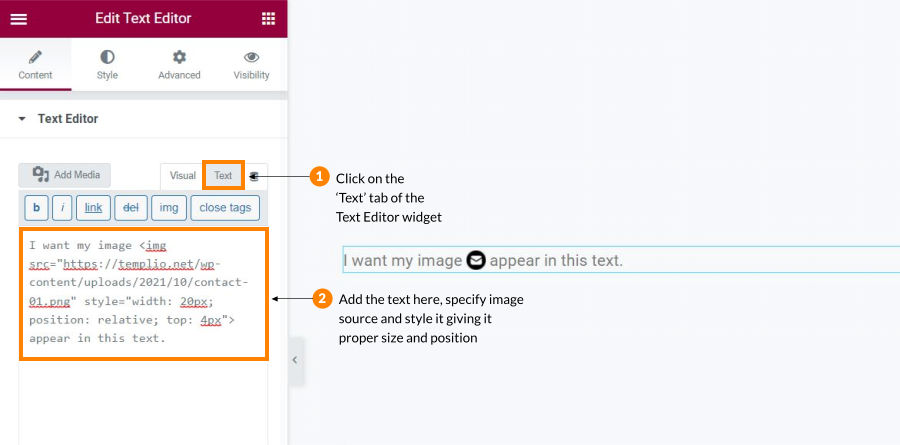
Insert inline image or graphics in text in Elementor and CSS
In this post, we will cover how to insert an inline image or graphics using Elementor and some simple CSS.
Check this video on how to create just that or continue reading below!
Style your linked image in the ‘text’ tab
Type in ‘style’ where you can add all the properties: the width, ‘position: relative’ and specify this position using the ‘top’ property for example to align the image with the text properly. Then use some margins on the left and right side if needed. Play with these values to give it the correct parameters and make it pretty.
The final code could look something like this:
I want my imageto appear in this text.*This post may contain affiliate links. If you click on a link and make a purchase, I will receive a commission from the sale, with no extra cost to you. That way you are supporting my blog and allowing me to keep making videos and posts like this. I only promote products that I use, have experience with and support, such as Elementor Pro.
*This post may contain affiliate links. If you click on a link and make a purchase, I will receive a commission from the sale, with no extra cost to you. That way you are supporting my blog and allowing me to keep making videos and posts like this. I only promote products that I use, have experience with and support, such as Elementor Pro.
How to Center an Image Using Text Align: Center

An
element is an inline element (display value of inline-block ). It can be easily centered by adding the text-align: center; CSS property to the parent element that contains it.
To center an image using text-align: center; you must place the
inside of a block-level element such as a div . Since the text-align property only applies to block-level elements, you place text-align: center; on the wrapping block-level element to achieve a horizontally centered
.
Example
.img-container
Note: The parent element must be a block element. If it is not a block element, you should add display: block; CSS property along with the text-align property.
.img-container
Demo: Codepen
Object Fit
Once your image is centered, you might want to resize it. The object-fit property specifies how an element responds to the width / height of it’s parent box.
This property can be used for image, video, or any other media. It can also be used with the object-position property to get more control on how the media is displayed.
Basically we use the object-fit property to define how it stretch or squish an inline media.
Syntax
Values
- fill : This is the default value. Resize the content to match its parent box regardless of the aspect-ratio.
- contain : Resize the content to fill its parent box using the correct aspect-ratio.
- cover : similar as contain but often cropping the content.
- none : display the image in its original size.
- scale-down : compare the difference between none and contain to find the smallest concrete object size.

 to appear in this text.