- Center Align CSS Button
- 1. By placing a text-align property of body tag to the center (text-align: center)
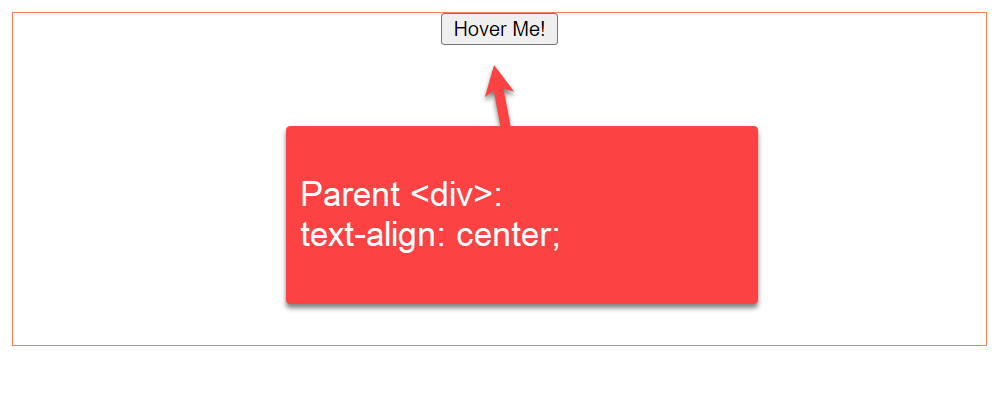
- 1.1 By setting text-align property of parent div tag to the center (text-align: center)
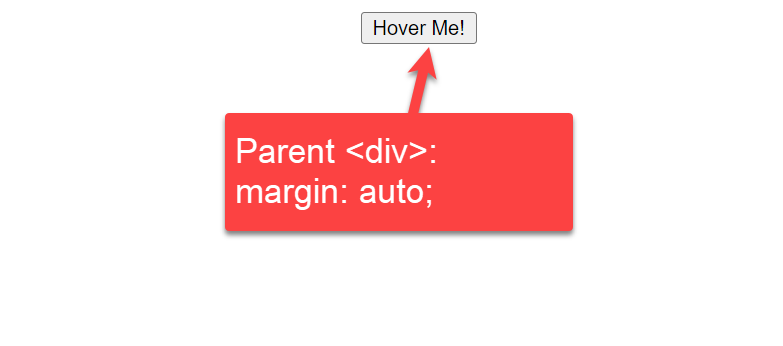
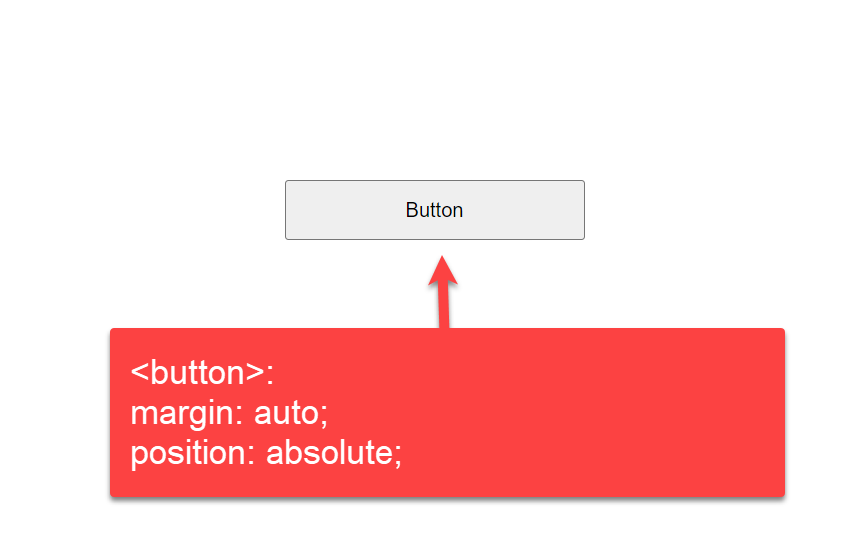
- 2. Center CSS Button by using margin auto (margin: auto)
- 3. Center Button Vertically AND Horizontally
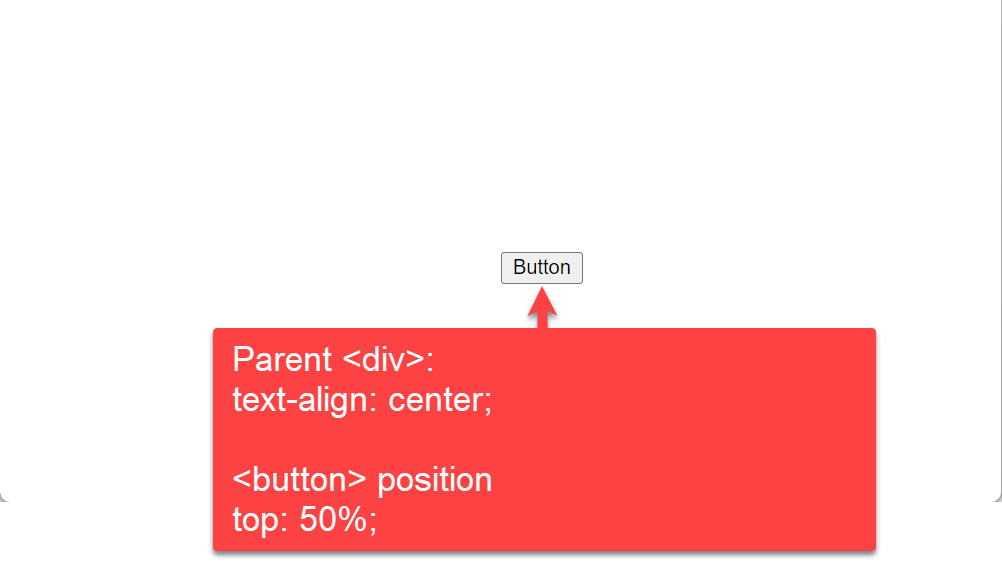
- 3.1: By setting the text-align property of the parent div tag to the center
- 3.2: By setting position property to 50% from top and bottom
- 3.3: By setting margin property to auto
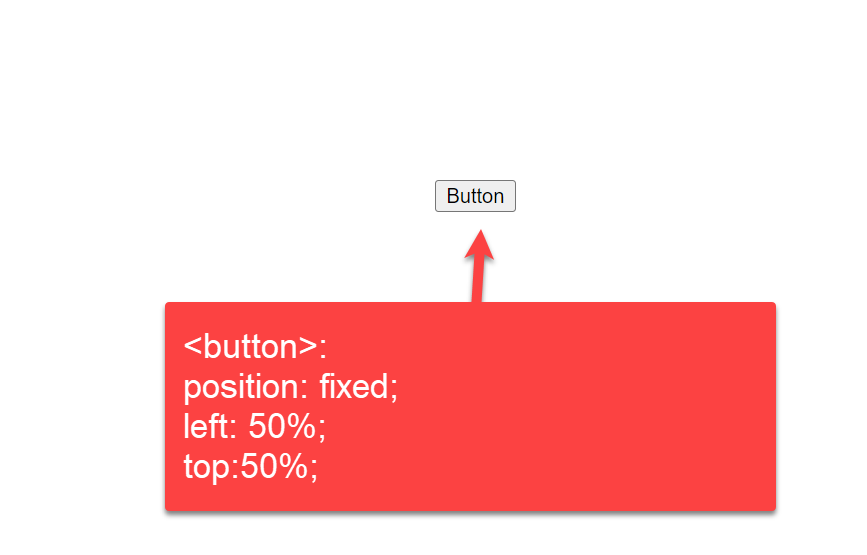
- 4. Center CSS Button using Position fixed
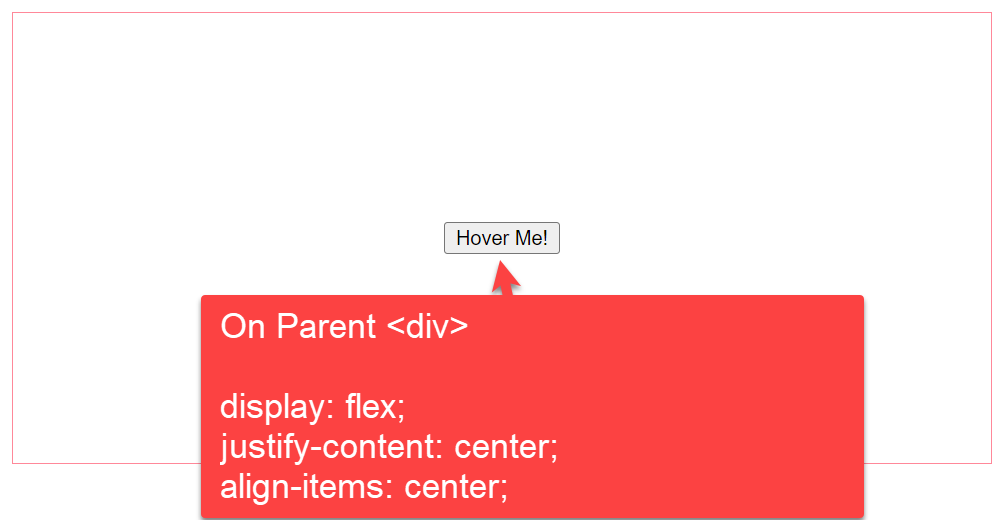
- 5. By setting the display property to flex (display: flex)
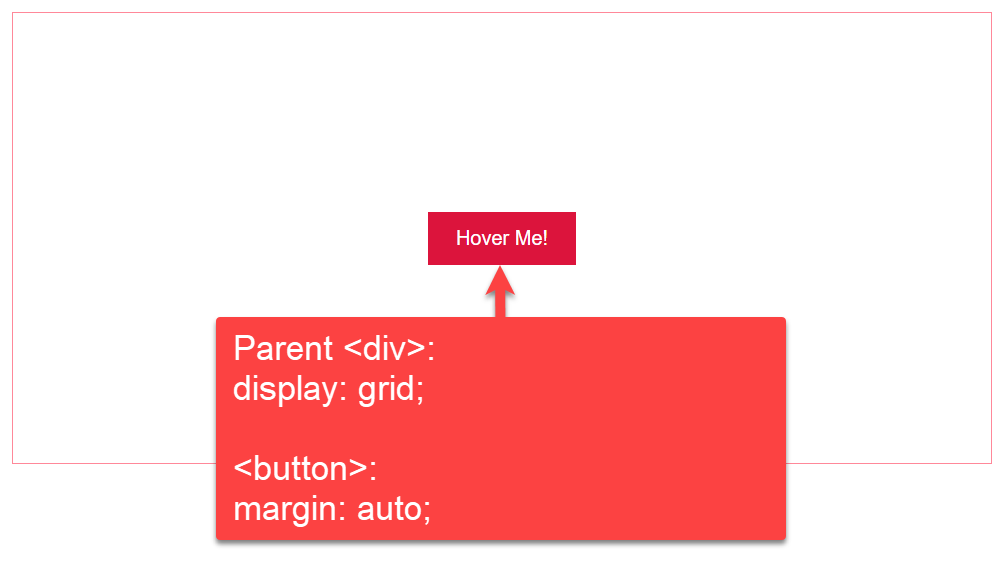
- 6. By setting the display property to the grid (display: grid)
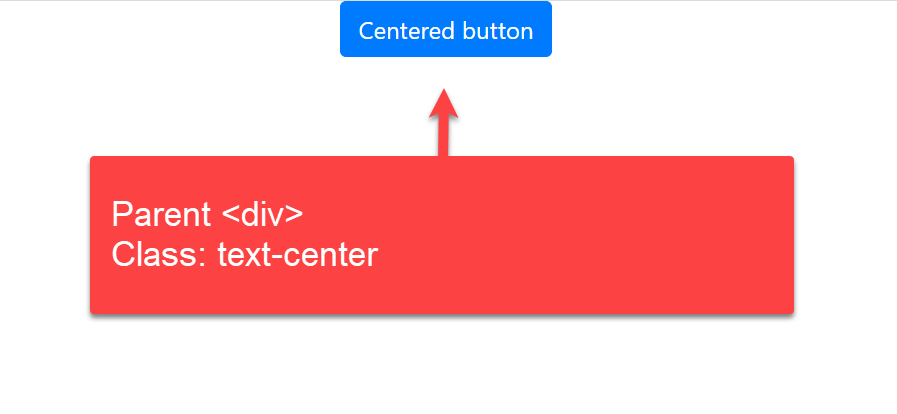
- 7. Using CSS Bootstrap
- Выравниваем блок по центру страницы
- Вариант 1. Отрицательный отступ.
- Вариант 2. Автоматический отступ.
- Вариант 3. Таблица.
- Вариант 4. Псевдо-элемент.
- Вариант 5. Flexbox.
- Вариант 6. Transform.
- Вариант 7. Кнопка.
- Бонус
Center Align CSS Button
Styling and formatting are what all web developers and designers want to apply to their web pages and application to look attractive. It is up to the creator how they want to use Cascading Style Sheets and Hypertext Transfer Protocol to provide the best style for their web page and application.
Users specifically use CSS to add the best attractive look to their web pages and specify the arrangements of the page elements in a systematic order. This article will discuss how to center a button in the HTML page using CSS.
You can Center Align CSS Button using the following method:
- text-align: center — By setting th text-align property of the parent div tag to the center
- margin: auto — By setting margin property to auto
- Center Button Vertically AND Horizontally
- By setting th text-align property of the parent div tag to the center
- By setting position property to 50% from top and bottom
- By setting margin property to auto
1. By placing a text-align property of body tag to the center (text-align: center)
In this example, we are using `text-align` center property on the tag, so everything inside the tag will be center-aligned automatically.
body
1.1 By setting text-align property of parent div tag to the center (text-align: center)
In this example below, we are using `text-align` center property on tag with a class ( button-container-div ) so everything inside this will be center-aligned automatically.
.button-container-div2. Center CSS Button by using margin auto (margin: auto)
In this example, we are using the `margin` auto property. Margin auto moves the div to the center of the screen.
.button-container-div3. Center Button Vertically AND Horizontally
3.1: By setting the text-align property of the parent div tag to the center
We use the text-align property with the parent div tag to align the button to the center. Let us grab a look at this CSS code snippet and understand how to align the button to the center of the HTML page using CSS
In this example, we are using text-align: center property to the parent div and button position 50% from top «top: 50%;«.
.button-container-div < text-align: center; >.buttonIn this example, we have used HTML and CSS to align the button on the web page to the center. Here, we discuss the code block in detail:
We have assigned the style information of the button using the HTML tag. The text-align property of CSS aligns the inline-level content (here button) to a horizontal alignment. In this example, we used text-align: center property to the parent div and button position 50% from top «top: 50%;».
Then, we used the HTML tag that acts as a container of the CSS text-align property. Lastly, we added a button on the web page using the HTML tag. The web page will look like this:
3.2: By setting position property to 50% from top and bottom
We assigned only one property to the button element in the earlier example. This example will show two positions for the top and bottom. We use position property to tag with left: 50% & top: 50%
.buttonExplanation:
The above example shows how to align the button in the HTML page using two position properties of the CSS element. Here, we set the position property as «fixed» and align the button to the center using two properties, namely left and top — to 50%. Finally, we used the HTML button> tag inside the tag to create the main page button.
3.3: By setting margin property to auto
In this example, we are using margin: auto CSS property to tag
.buttonExplanation:
In this example, we are using margin: auto CSS property to tag. This property will set the alignment of the CSS button with white spaces. The margin property creates spaces around elements, and we are assigning it to «auto.» Inside the button element of the tag, we add some styles using properties like height, width, top, bottom, left, right, and position that define the button alignment. Finally, we add the HTML tag inside the tag to create the main page button.
4. Center CSS Button using Position fixed
In this example, we are giving a 50% margin from the left side of the page, and then we are taking the position: fixed so it will adjust the position on the center of the body.
button5. By setting the display property to flex (display: flex)
In this example we are using `display` flex property, `justify-content` and `align-items` to the parent tag with class (button-container-div). The button inside will take place in the center of vertical and horizontal position.
- Display flex will move it to the center vertically.
- Justify-content will move the button to the center horizontally.
- Align-items center keeps it in the center; otherwise, it will start from the div and go at the bottom of the div.
.button-container-div6. By setting the display property to the grid (display: grid)
In this example, we are using `display` grid property on the tag with class ( button-container-div ). The button inside will take place in the center of vertical and horizontal positions.
.button-container-div < width: 100%; height: 300px; border: 1px solid #ff8899; display: grid; >button7. Using CSS Bootstrap
In CSS Bootstrap we can use class «text-center» as given in the example
Explanation:
We will see how to use the CSS Bootstrap with the class «text-center» in this last example. Inside the button, we used the tag with type and class attributes. The rel attribute of the tag defines the relation between the current and the linked document.
The integrity attribute allows the browser to check the fetched script, and the crossorigin attribute sets the request mode to an HTTP CORS Request.
We hope this article has given a crisp idea of how to align the button in the HTML page using different approaches to CSS. We have shown alignment vertically and horizontally using text-align, margin, and position properties of the tag in HTML and CSS Bootstrap.
- Difference between Sensor and Transducer
- BitTorrent vs Utorrent
- Difference between GSM and CDMA
- Difference between NSE and BSE
- HTML Button Link
- HMO vs. PPO
- Diploma vs. Degree
- Difference between FOR and WHILE Loop
- Woocommerce vs Shopify
- Difference between Structure and Union in C
- Difference between StringBuffer and String
- Difference between Money Market and Savings
- Difference between Marketing and Selling
- Arduino vs Raspberry Pi
- Difference between Data and Information
- Differences between Malloc and Calloc Functions in C Language
- Visa vs Mastercard
- Mutex vs Semaphore
- Difference between Analog and Digital Signal
- Difference between Microprocessor and Microcontroller
Выравниваем блок по центру страницы
Очень часто стоит задача выровнять блок по центру страницы / экрана, да ещё и так, чтобы без ява-скрипта, без задания жёстких размеров или отрицательных отступов, ещё чтобы и скроллбары работали у родителя, если блок превышает его размеры. В сети ходят достаточно много однообразных примеров как выровнять блок по центру экрана. Как правило большинство из них основаны на одних принципах.
Ниже представлены основные способы решения задачи, их плюсы и минусы. Чтобы понимать суть примеров, рекомендую уменьшить высоту / ширину окошка Result в примерах по указанным ссылкам.
Вариант 1. Отрицательный отступ.
Позиционируем блок атрибутами top и left на 50%, и заранее зная высоту и ширину блока, задаём отрицательный margin, который равен половине размера блока. Огромным минусом данного варианта является то, что нужно подсчитывать отрицательные отступы. Так же блок не совсем корректно ведёт себя в окружении скроллбаров — он попросту обрезается так как имеет отрицательные отступы.
Вариант 2. Автоматический отступ.
Менее распространённый, но схожий с первым. Для блока задаём ширину и высоту, позиционируем атрибутами top right bottom left на 0, и задаём margin auto. Плюсом данного варианта являются рабочие скроллбары у родителя, если у последнего задана 100% ширина и высота. Минусом данного способ является жёсткое задание размеров.
Вариант 3. Таблица.
Задаём родителю табличные стили, ячейке родителя устанавливаем выравнивание текста по центру. А блоку задаём модель строчного блока. Минусами мы получаем не рабочие скроллбары, и в целом не эстетичность «эмуляции» таблицы.
Чтобы добавить скролл в данный пример, придётся добавить в конструкцию ещё один элемент.
Пример: jsfiddle.net/serdidg/xkb615mu.Вариант 4. Псевдо-элемент.
Данный вариант лишён всех проблем, перечисленных у предыдущих способов, а так же решает первоначально поставленные задачи. Суть состоит в том, чтобы у родителя задать стили псевдо-элементу before, а именно 100% высоту, выравнивание по центру и модель строчного блока. Так же само и у блока ставится модель строчного блока, выравнивание по центру. Чтобы блок не «падал» под псевдо-элемент, когда размеры первого больше чем родителя, указываем родителю white-space: nowrap и font-size: 0, после чего у блока отменяем эти стили следующими — white-space: normal. В данном примере font-size: 0 нужен для того, чтобы убрать образовавшийся пробел между родителем и блоком в связи с форматированием кода. Пробел можно убрать и иными способами, но лучшим считается просто его не допускать.
либо, если вам нужно, чтобы родитель занимал только высоту и ширину окна, а не всей страницы:
Вариант 5. Flexbox.
Одним из самых простых и элегантных способов является использования flexbox. Но имейте ввиду, что центральное позиционирование сохраняется даже если родительский блок меньше дочернего, последний будет выходить за рамки и обрезаться.
В случае, если при уменьшении родительского блока дочерний не должен обрезаться по краям, используйте авто маржины:
Вариант 6. Transform.
Подходит в случае если мы ограничены структурой, и нет возможности манипулировать родительским элементом, а блок выровнять как-то нужно. На помощь придёт css функция translate() . При значение 50% абсолютное позиционирование расположит верхний левый угол блока точно по центру, затем отрицательное значение translate сдвинет блок относительно своих собственных размеров. Учтите, что могут всплыть негативные эффекты в виде размытых граней или начертания шрифта. Также подобный способ может привести к проблемах с вычислением положения блока с помощью java-script’а. Иногда для компенсации потери 50% ширины из-за использования css свойства left может помочь заданное у блока правило: margin-right: -50%; .
Вариант 7. Кнопка.
Пользователь azproduction предложил вариант, где блок обрамляется в тег button. Кнопка имеет свойство центрировать всё, что находится у неё внутри, а именно элементы строчной и блочно-строчной (inline-block) модели. На практике использовать не рекомендую.
Бонус
Используя идею 4-го варианта, можно задавать внешние отступы для блока, и при этом последний будет адекватно отображаться в окружении скроллбаров.
Пример: jsfiddle.net/serdidg/ugnp8ry7.Так же можно выравнивать картинку по центру, и в случае если картинка больше родителя, масштабировать её по размеру родителя.
Пример: jsfiddle.net/serdidg/Lhpa1s70.
Пример с большой картинкой: jsfiddle.net/serdidg/tor2yudn.
.png)