So, instead of rewriting the same set of properties for the different selectors, we can simply nest selectors inside other selectors. For instance, if you write a structured CSS module, instead of specifying the separate selectors for every HTML element ie, by using many classes or ID selectors, you can simply specify properties to selectors within other selectors.
Nesting CSS classes
Can I do something like the following?
Update 1: There is a CSS3 spec for CSS level 3 nesting. It’s currently a draft. https://tabatkins.github.io/specs/css-nesting/
Update 2 (2019): We now have a CSSWG editors draft https://drafts.csswg.org/css-nesting-1/
Update 3 (2022): We now have a W3C First Public Working Draft https://www.w3.org/TR/css-nesting-1/
Not possible with vanilla CSS. However you can use something like:
Sass makes CSS fun again. Sass is an extension of CSS3, adding nested rules, variables, mixins, selector inheritance, and more. It’s translated to well-formatted, standard CSS using the command line tool or a web-framework plugin.
Rather than constructing long selector names to specify inheritance, in Less you can simply nest selectors inside other selectors. This makes inheritance clear and style sheets shorter.
Not with pure CSS. The closest equivalent is this:
Not directly. But you can use extensions such as LESS to help you achieve the same.
Css selectors — Nesting CSS classes, Not possible with vanilla CSS. However you can use something like: Sass Sass makes CSS fun again. Sass is an extension of CSS3, adding nested rules, variables, mixins, selector inheritance, and more. It’s translated to well-formatted, standard CSS using the command line tool or a web-framework plugin. Or Less Code sample#header
How to reference nested classes with css?
When using css, how can I specify a nested class.
Phone : 0800 000 000
Web : http://www.example.com
Map : example map address
Email : example@address.com
This css code works correctly for the all the html on the page:
How can I specify the i class in the box1 box-body class?
Here is the code that I have tried:
In CSS, classes are prefixed by a . , ids are prefixed by # , and elements are not prefixed at all.
This is how you need to declare your CSS:
Note that box1 and box-body are both classes, while i is an element.
I have listed three different elements. This is how they would be accessed in CSS:
// first div .class < [some styling] >// second div #id < [some styling] >// third div div
The classes in your CSS need periods before them. Note i doesn’t since it’s an element not a class.
How to reference nested classes with css?, In CSS, classes are prefixed by a ., ids are prefixed by #, and elements are not prefixed at all. This is how you need to declare your CSS: .box1 .box-body i …
Explain nesting and grouping in CSS
The Nesting & Grouping concept is very important for a web developer to write precise codes. You can group and nest items to reduce the amount of code that you write, which will reduce the length of your code and allow pages to load faster. It is a way to simplify your code. With the help of Nesting and Grouping, we can be more specific in our code. In this article, we will see how nesting & grouping helps to optimize the code & make it efficient & increases readability.
Nesting: The nesting property in CSS facilitates nesting one style rule inside another, with the selector of the child rule that is relative to the selector of the parent rule. It helps to increase the modularity and maintainability of CSS stylesheets & hence increase the overall readability of the code. For instance, if you write a structured CSS module, instead of specifying the separate selectors for every HTML element ie, by using many classes or ID selectors, you can simply specify properties to selectors within other selectors. While nesting the CSS properties, HTML elements form a tree-structured shape. Nesting is a shortcut to create CSS rules for multiple selectors for a specific property. So, instead of rewriting the same set of properties for the different selectors, we can simply nest selectors inside other selectors. For this reason, we are not only reducing the size of the code but also reducing the overall loading time.
CSS is a piece of language that is added to another front-end designing language, HTML to create a website or a web page. For the internal and external declaration of CSS, we need to declare ids or classes with the features that we want to apply to the HTML contents.
CSS class:
In CSS or any other programming language, classes play an important role when we talk about the specification of any element. In CSS, classes are created to declare a couple of styles and effects on the HTML elements. All the CSS properties are written inside the class body by assigning values to the properties. For example:
A class is declared with a dot and the class name. These classes are accessed by the HTML contents when the name of the class is written inside the particular tags— as we did for one of the HTML content like paragraph
by mentioning the name all the characteristics of a class are applied to that content. The primary purpose of the creation of this class is for all the characteristics and styles to be allowed to the HTML contents at once.
Just like the simple class, nested classes are also created while designing the web pages. The nested phenomenon is not unknown to the developers and designers as well because this term applies to if-else statements, on loops, and etc. The declaration of the CSS nested class is somehow similar to the nested loops. Not only is the class but also HTML tags are affected by the term ‘nested classes’. An HTML tag of content is once declared with a class name. Then, inside this tag, the other tag of the ‘SAME’ HTML content is declared with another class name. In the end, both the tags are closed collectively. This makes the first tag the outer one and the second tag an inner tag. We can use more than one inner tag at a time. Once the class name is mentioned in the outer tags, all inner tags of other html contents will not need to further add any class name with them.
This was the declaration of the class name inside the HTML body. Now, we will see how the classes are declared in the head section. First, the class of the outer HTML tag is declared and then the inner one.
This is somehow the parent-child class relation. Because the outer html tag, for instance, tag has a class ‘class1’. It is declared along with its paragraph content like:
We cannot use the class of paragraphs directly. Now, consider an inner div tag having another class ‘class2’. For the nested class, we will add the class of both tags. The outer and the inner div one.
This is necessary to specify the html content to its class and to whom it belongs. Now, we will try some examples to elaborate on this concept.
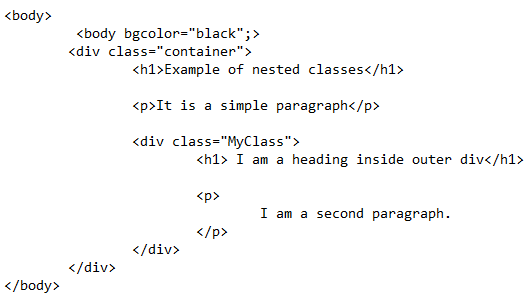
Example 1:
In this example, simple body color is added by using the HTML tag. Then, a div tag is used having a CSS class named container.
Inside this div, a heading tag is used to add a simple heading. A paragraph is used to add a simple sentence. Both tags are not accompanied by the CSS class because these will be directly styled through the name of the div container.
Now inside the div tag, before closing this div, we will add another div with a new CSS class name.
This div again contains both the heading and paragraphs inside it. Close the div, the first closing tag is for the inner div and the second closing tag is for the outer div.
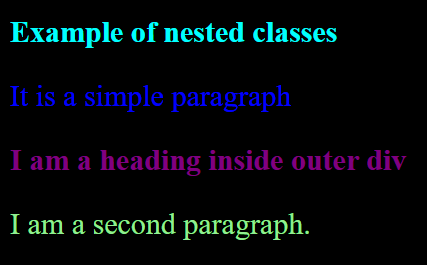
Close the body tag. In the style tag of the head, first, we will declare the class of the first div ‘container’. The heading of the container class is accessed by the class name of the outer div.
Font color and font size are applied to the heading. Similarly, the paragraph is also applied by the CSS having the same font size and color properties. When it comes to the class description for the inner div, we always use the outer div class along with the inner div class and then the elements inside the div. This is to access the HTML content properly. We cannot directly access the class inside the div by its name only, just like the parent-child class in inheritance. First, we write the parent class name and then the child class. In this way, any ambiguity regarding several parents and more than one child’s classes will be removed.
Close all the opened tags and save the code in the text editor file as an html extension. This extension will allow the web page to be displayed in the browser.
On the execution, you will see that a black back-grounded web page will be created with all the headings and paragraphs with the same alignment and hierarchy as they were declared with all the CSS effects. This is because the style sheet contains the CSS property of the class in the same sequence as the classes defined in the HTML tags.
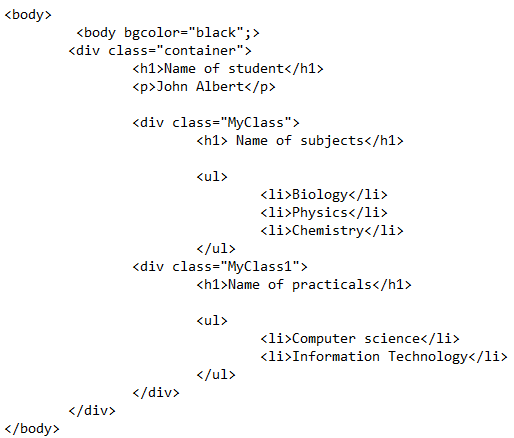
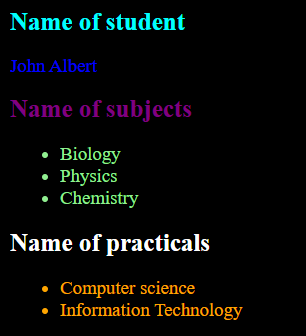
Example 2:
This example is about the use of a list in the HTML code. The same div with a class container is used as an outer div for the nested classes. A simple heading and paragraph tags are used for the contents of the outer div. After that, an inner div is declared with the same class. This div contains HTML unordered list with it.
After this div, another div inside the second div is used to create nested classes. This div contains a different class name to get identified properly.
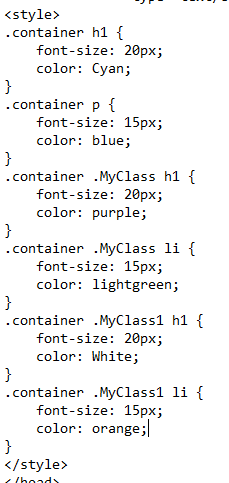
Inside this div, we have used a heading and an unordered list. Now, let us see the CSS section. All the classes and properties are declared in the same way as we did in the past example. Only the addition is the class of the innermost or the 3rd div.
Save the code and execute the file.
You will see that each div and its elements are applied with the effects we provided in the CSS classes.
Conclusion
CSS nested classes is an approach to hierarchically declare classes causing the outer and inner phenomenon of the tags. Make sure that the HTML tags on which we are to implement CSS nested classes are of the same type, for instance, a heading. If a hierarchy of the class declaration is changed or the sequence is disturbed, then it will be hard to apply the CSS properties to the HTML contents in a nested class. We have elaborated on this topic by using two examples, one with a single inner content, whereas the second example contains two inner HTML contents.
About the author
Aqsa Yasin
I am a self-motivated information technology professional with a passion for writing. I am a technical writer and love to write for all Linux flavors and Windows.