- How to Change the Input and Button Images with CSS
- Create HTML
- Add CSS
- Example of changing an input image of the button:
- Result
- Example of changing a button image:
- Example of changing a button image on hover:
- Как сделать кнопку с картинкой в html
- CSS Button Tutorial – How to Styling HTML Buttons with CSS
- A simple “Get Started” button
- Then create the gradients:
- Then give the curved edge for the button
- How to Trigger a button on-hover event
- How to Add a Transparent Background to a CSS Button
- /* Text color */
- /* Remove background color */
- /* Border thickness, line style, and color */
- /* Adds curve to border corners */
- /* Make letters uppercase */
- /*button on hover*/
- Button with CSS Entities
- Button with click animation
- Full CSS: (SCSS)
- Button with an image
- Button with icons
- Conclusion
- CSS Button Image
- Example 01: Using the CSS Style Tag to Add an Image in a Button in an HTML File
- Example 02: Adding an Image in a Button Using an Inline CSS Approach
- Example 03: Using the CSS Style Tags to Add an Image to a Button When it Hovers Over
- Example 04: CSS Style Tag Transformation of a Default Button to an Icon for the Next and Previous Function
- Conclusion
- About the author
- Aqsa Yasin
How to Change the Input and Button Images with CSS
Buttons make your website attractive, but sometimes it can be difficult to style them, especially when we need to change buttons to images. Fortunately, there some ways of doing this.
In our snippet, we’ll show how to change buttons to images with and elements.
Create HTML
input type="submit" class="example" value="" />Add CSS
- Set the background property and specify the needed URL.
- Set the cursor property to «pointer».
- Add the width, height, and border properties.
.example < background: url('https://images.unsplash.com/photo-1518837695005-2083093ee35b?ixlib=rb-1.2.1&ixid=eyJhcHBfaWQiOjEyMDd9&auto=format&fit=crop&w=500&q=60') no-repeat; cursor: pointer; width: 300px; height: 200px; border: none; >Here is the result of our code.
Example of changing an input image of the button:
html> html> head> title>Title of the document title> style> .example < background: url('https://images.unsplash.com/photo-1518837695005-2083093ee35b?ixlib=rb1.2.1&ixid=eyJhcHBfaWQiOjEyMDd9&auto=format&fit=crop&w=500&q=60') no-repeat; cursor: pointer; width: 300px; height: 200px; border: none; > style> head> body> form> input type="submit" class="example" value="" /> form> body> html>Result
In the example above, we used the background property to include a background image. You can also change the image type if required.
Next, see an example where we use the element to change the image button.
Example of changing a button image:
html> html> head> title>Title of the document title> style> button < background-image: url('https://images.unsplash.com/photo-1582747652673-603191169c49?ixlib=rb-1.2.1&ixid=eyJhcHBfaWQiOjEyMDd9&auto=format&fit=crop&w=500&q=60'); background-size: cover; width: 400px; height: 300px; font-size: 2em; > style> head> body> button type="submit">Button button> body> html>In our last example, the image appears when we hover on the button. This can be useful when making buttons that react to the mouse.
Example of changing a button image on hover:
html> html> head> title>Title of the document title> style> button < width: 400px; height: 300px; border: 0; cursor: pointer; font-size: 2em; > button:hover < background-image: url('https://images.unsplash.com/photo-1582747652673-603191169c49?ixlib=rb-1.2.1&ixid=eyJhcHBfaWQiOjEyMDd9&auto=format&fit=crop&w=500&q=60'); background-size: cover; > style> head> body> button type="submit">Button button> body> html>Как сделать кнопку с картинкой в html
Для создания кнопки с картинкой в HTML можно использовать тег и атрибут background-image в CSS. Вот пример кода:
.image-button width: 100px; height: 50px; border: none; background-image: url('path/to/image.jpg'); background-size: cover; > В данном примере мы создаем кнопку с классом «image-button». Задаем ей ширину и высоту, убираем границу и задаем фоновую картинку с помощью атрибута background-image . Картинка будет растянута на всю площадь кнопки благодаря свойству background-size: cover; .
Также можно добавить эффекты при наведении или клике на кнопку с помощью псевдоклассов :hover и :active:
.image-button:hover opacity: 0.8; > .image-button:active transform: scale(0.95); > В данном примере при наведении на кнопку уменьшается прозрачность до 80% с помощью свойства opacity , а при клике на кнопку она уменьшается на 5% с помощью свойства transform: scale(0.95) .
CSS Button Tutorial – How to Styling HTML Buttons with CSS

Buttons have become an inevitable part of front end development. Thus, it is important to keep in mind a few things before you start styling buttons. I have gathered some of the ways of styling buttons using CSS.
A simple “Get Started” button
First, create the button class itself:
Then create the gradients:
background-image: -webkit-linear-gradient(top, #eb94d0, #2079b0); background-image: -moz-linear-gradient(top, #eb94d0, #2079b0); background-image: -ms-linear-gradient(top, #eb94d0, #2079b0); background-image: -o-linear-gradient(top, #eb94d0, #2079b0); background-image: linear-gradient(to bottom, #eb94d0, #2079b0);Then give the curved edge for the button
-webkit-border-radius: 28; -moz-border-radius: 28; border-radius: 28px; text-shadow: 3px 2px 1px #9daef5; -webkit-box-shadow: 6px 5px 24px #666666; -moz-box-shadow: 6px 5px 24px #666666; box-shadow: 6px 5px 24px #666666; font-family: Arial; color: #fafafa; font-size: 27px; padding: 19px; text-decoration: none;>How to Trigger a button on-hover event
How to Add a Transparent Background to a CSS Button
/* Text color */
/* Remove background color */
/* Border thickness, line style, and color */
/* Adds curve to border corners */
/* Make letters uppercase */
border: none; color: white; padding: 16px 32px; text-align: center; display: inline-block; font-size: 16px; margin: 4px 2px; -webkit-transition-duration: 0.4s; /* Safari */ transition-duration: 0.4s; cursor: pointer; text-decoration: none; text-transform: uppercase; > .btn1
/*button on hover*/
Button with CSS Entities
.button span:after < content: '\00bb'; /* CSS Entities. To use HTML Entities, use →*/ position: absolute; opacity: 0; top: 0; right: -20px; transition: 0.5s;>.button:hover span < padding-right: 25px;>.button:hover span:after
Button with click animation
Full CSS: (SCSS)
$gray: #bbbbbb; * < font-family: 'Roboto', sans-serif;>.container < position: absolute; top:50%; left:50%; margin-left: -65px; margin-top: -20px; width: 130px; height: 40px; text-align: center; >.btn < color: #0099CC; /* Text color */ background: transparent; /* Remove background color */ border: 2px solid #0099CC; /* Border thickness, line style, and color */ border-radius: 70px; /* Adds curve to border corners */ text-decoration: none; text-transform: uppercase; /* Make letters uppercase */ border: none; color: white; padding: 16px 32px; text-align: center; text-decoration: none; display: inline-block; font-size: 16px; margin: 4px 2px; -webkit-transition-duration: 0.4s; /* Safari */ transition-duration: 0.4s; cursor: pointer;>.btn1 < background-color: white; color: black; border: 2px solid #008CBA;>.btn1:hover < background-color: #008CBA; color: white; >&:active < letter-spacing: 2px ; >&:after < content:""; >>.onclic < width: 10px !important; height: 70px !important; border-radius: 50% !important; border-color:$gray; border-width:4px; font-size:0; border-left-color: #008CBA; animation: rotating 2s 0.25s linear infinite; &:hover < color: dodgerblue; background: white; >>.validate < content:""; font-size:16px; color: black; background: dodgerblue; border-radius: 50px; &:after < font-family:'FontAwesome'; content:" done \f00c"; >> b < outline:none; height: 40px; text-align: center; width: 130px; border-radius:100px; background: #fff; border: 2px solid #008CBA; color: #008CBA; letter-spacing:1px; text-shadow:0; font:< size:12px; weight:bold; >cursor: pointer; transition: all 0.25s ease; @keyframes rotating < from < transform: rotate(0deg); >to < transform: rotate(360deg); >>function validate() < setTimeout(function() < $("#button").removeClass("onclic"); $("#button").addClass("validate", 450, callback); >, 2250); > function callback() < setTimeout(function() < $("#button").removeClass("validate"); >, 1250); >>);Button with an image
Button with icons
button< border: none; border-radius: 50px;>html,body < font-size: 20px; min-height: 100%; overflow: hidden; font-family: "Helvetica Neue", Helvetica, sans-serif; text-align: center;>.text < padding-top: 50px; font-family: "Helvetica Neue", Helvetica, 'Lucida Sans Unicode', Geneva, Verdana, sans-serif; >.text:hover< cursor: pointer; color: #1565C0;>.main < padding: 0px 0px 0px 0px; margin: 0; background-image: url("https://someimg"); text-align: center; background-size: 100% !important; background-repeat: no-repeat; width: 900px; height: 700px; >.icon-button < background-color: white; border-radius: 3.6rem; cursor: pointer; display: inline-block; font-size: 2rem; height: 3.6rem; line-height: 3.6rem; margin: 0 5px; position: relative; text-align: center; -webkit-user-select: none; -moz-user-select: none; -ms-user-select: none; user-select: none; width: 3.6rem;>.icon-button span < border-radius: 0; display: block; height: 0; left: 50%; margin: 0; position: absolute; top: 50%; -webkit-transition: all 0.3s; -moz-transition: all 0.3s; -o-transition: all 0.3s; transition: all 0.3s; width: 0;>.icon-button:hover span < width: 3.6rem; height: 3.6rem; border-radius: 3.6rem; margin: -1.8rem;>.twitter span < background-color: #4099ff;>/* Icons */.icon-button i < background: none; color: white; height: 3.6rem; left: 0; line-height: 3.6rem; position: absolute; top: 0; -webkit-transition: all 0.3s; -moz-transition: all 0.3s; -o-transition: all 0.3s; transition: all 0.3s; width: 3.6rem; z-index: 10;>.icon-button .icon-twitter < color: #4099ff;>.icon-button:hover .icon-twitter Conclusion
In this tutorial, you’ve learned how to customize buttons using CSS and a bit of Javascript if you need the “after click” function. You can also use CSS3ButtonGenerator to generate simple buttons. Feel free to ping me if you have any questions.
CSS Button Image
![]()
We will be using CSS on the button element of the Hypertext Markup Language in this article. Usually, the default button element is very simple and has no styling and effects present in it. With the help of CSS, we use the different styling properties and add them to this element. These properties are related to text styling, size adjustment, background colors, animation effects, and adding images. In this article, we will primarily focus on adding an image to a button property that is applicable through CSS. To implement this approach, we will be using the Notepad++ which will help us in editing our HTML file and test run it on our browser.
Example 01: Using the CSS Style Tag to Add an Image in a Button in an HTML File
In this example, we will add an image inside a button using the CSS Style Tag in the file header. Inside the Style Tag, we will construct a class for the button, which will be called later in the body. Then, we will create a script in which we will add an image to a button using the technique we previously mentioned.
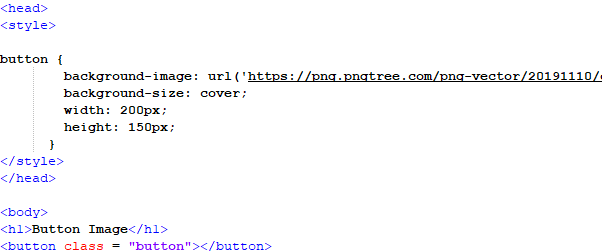
In the previous script, we opened a Style Tag in the file header. In this tag, we open the button class parameters in which we will define several designing properties for the button element. First, we add the image for the button’s background. We can add the image via “URL” or “src”. Then we add the background-size property which is stated as a “cover”. Then we define the width and height of the button as well. After this, we close the Style Tag and move to the body tag. In this tag, we add a heading using the h1 tag. Then, the button tag is called. In this tag, we call the styling class that we created earlier to inherit all the styling that are defined in the class. Then, we close all the remaining tags and save the file in the HTML format.
As we can see in the previous output, the image appears as a button on our browser’s page along with the heading. This justifies that the styling class was successfully inherited by the button tag.
Example 02: Adding an Image in a Button Using an Inline CSS Approach

In this instance, we will add an image to a button using the Inline CSS approach. We will add an image to a default button element of the Hypertext Markup Language by giving it an image’s URL in this method. Now, let us take a look at the script for this technique.:
In the script reflected in the image, we can see that the file header is empty because we will use the Inline CSS approach in this example. We open our button tag. In the tag, we mention the CSS that we want the button to have in the style property. We mention all the styling in this property and separate them with semicolons. We also add an image using the background image keyword and assign an image via URL. Then the button tag is closed along with the body tag. After this, we open this HTML file on our browser.

The previous output is an evidence that the Inline Style Tag approach has been a success. We can see that the image is added to the button and the default button is now transformed into an image.
Example 03: Using the CSS Style Tags to Add an Image to a Button When it Hovers Over
We will add an image to a button that will appear only when the button is hovered upon in this example. We will use the Style Tag CSS to provide a button with such behavior in an HTML file. We will create a separate class to segregate this styling for a specific element in this example. To achieve this goal, we should write the following script:

In the previous script, we opened our head tag for the HTML file. In this tag, the styling of the button is defined by opening a class for the button element. In this class, we define the width and the height of the button first. Then, we add a property that turns the cursor into a pointer, and we give the text a reasonable size as well. Then, we add an inherited method called “hover” to the class. In this function, we add an image to the background via URL and assign a property to the background size called the “cover”.
After this, we close all the styling tags and move toward the body of this file. In the body tag, we add a heading using the h1 tag and the button tag is opened after the heading tag. In the button tag, we call the class that we created in the Style Tag of the file’s header. And then, close the button and body tag. After this, we open this file in our browser to get the following output:

The output that we see in this file is the result after the button has been hovered upon. When we hover over the button, the image that we assigned in the Style Tag of the file header appears.
Example 04: CSS Style Tag Transformation of a Default Button to an Icon for the Next and Previous Function
In this example, we will transform the two default buttons of the Hypertext Markup Language by using the CSS Style Tag. We will transform the two buttons in this example into the next and previous icons by adding an image in the Style Tag. We should write the following script to do so:
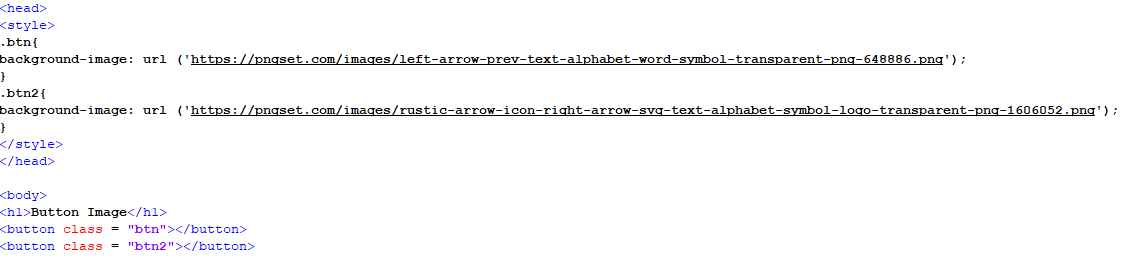
In the previous script, we add a Style Tag in the file header. Then, we create two classes for the two buttons in the Style Tag. In these classes, we add an image to both the buttons respectively, using the background image property and the URL format for the image. After assigning both classes with their properties, we close the style and head tag and open the body tag to create the content for our browser’s page. First, we give the border a heading with the help of the h1 tag, which is a heading size defined in HTML. Then, we create two buttons. In both these buttons, we assign the relative class defined in the Style Tag. After this, we close the tabs and open this file on our browser after saving it.
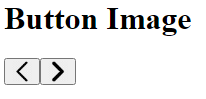
The previous output is the outcome of our script. As we can see, both the buttons are aligned and the images from the style classes are inserted correctly. Now, the default buttons are transformed into the next and previous icons for a web page by using CSS.
Conclusion
In this article, we discussed several examples of adding the images to a button using CSS. We used the Inline CSS and Style Tag CSS to add the images to a default button in an HTML file. We implemented several effects on a button to add an image like the hover effect or cover style background by using the Notepad++ to edit the HTML file. We used the different properties in the CSS styling of the button element to transform them into an attractive attribute in our webpage.
About the author
Aqsa Yasin
I am a self-motivated information technology professional with a passion for writing. I am a technical writer and love to write for all Linux flavors and Windows.