- How TO — Split Buttons
- Split Button Dropdowns
- How To Create a Split Button
- Example
- Example Explained
- Example
- Digital Transformation and Java Video Training
- Java | Integration | MuleSoft | Digital Transformation | API-led connectivity | RESTful API
- Create buttons from UL elements
- CSS Essential Training
- CSS Essential Training
- Button in list css
How TO — Split Buttons
Learn how to create a split button dropdown with CSS.
Split Button Dropdowns
Hover over the arrow icon to open the dropdown menu:
How To Create a Split Button
Step 1) Add HTML:
Create a dropdown menu that appears when the user moves the mouse over an icon.
Example
Example Explained
Use any element to open the dropdown menu, e.g. a , or
element.
Use a container element (like ) to create the dropdown menu and add the dropdown links inside it.
Wrap a element around the button and the to position the dropdown menu correctly with CSS.
Step 2) Add CSS:
Example
/* Dropdown Button */
.btn background-color: #2196F3;
color: white;
padding: 16px;
font-size: 16px;
border: none;
outline: none;
>
/* The container — needed to position the dropdown content */
.dropdown position: absolute;
display: inline-block;
>
/* Dropdown Content (Hidden by Default) */
.dropdown-content display: none;
position: absolute;
background-color: #f1f1f1;
min-width: 160px;
z-index: 1;
>
/* Links inside the dropdown */
.dropdown-content a color: black;
padding: 12px 16px;
text-decoration: none;
display: block;
>
/* Change color of dropdown links on hover */
.dropdown-content a:hover
/* Show the dropdown menu on hover */
.dropdown:hover .dropdown-content display: block;
>
/* Change the background color of the dropdown button when the dropdown content is shown */
.btn:hover, .dropdown:hover .btn background-color: #0b7dda;
>
Tip: Go to our CSS Dropdowns Tutorial to learn more about dropdowns.
Tip: Go to our Clickable Dropdowns to learn more about clickable dropdowns
Digital Transformation and Java Video Training
Java | Integration | MuleSoft | Digital Transformation | API-led connectivity | RESTful API
Create buttons from UL elements
The Unordered List HTML element can be manipulated by using CSS to create clickable buttons. Reusing a block element is efficient as the basic structure of the button set is already inherent in the UL element, all that remains to do is restyle it so that it looks and behave like buttons.
CSS Essential Training

If you want to learn more about CSS and all the related technologies you can do so with a free trial at LinkedInLearning.com.
To start we need a list of the buttons we want to style. The HTML is very simple:
If viewed in a browser it will display as follows:
Notice that the UL element has been given the id buttons. This is used by the CSS to identify the Unordered List.
Now for the CSS. We style only two elements of the list.
- Each list item so that it appears like a button
- The link and hover action so that it has nice hover behavior
To create the look of a button we first need to bring each list item up so that it lays horizontally rather than vertically. We do this by declaring that the elements float to the left.
Now that the list items are aligned horizontally we need to style them to appear like buttons so we remove the list style.
We align the text to the center, size the button by defining the width and line-height and create a space between each button by defining a margin. I have also given the buttons a background color of black.
Now we style the link. We remove the line that appears under the link.
We do this for both the link and hover actions. Also, we want the link element to behave like a block element. This will allow us to give the element background a color when we hover over it. We set the display property to block.
We now have the following CSS code.
#buttons li a < text-decoration: none; color: #FFFFFF; display: block; >#buttons li a:hover
As you can see I have defined the text color for the link and the background color for the hover action.

This is how the buttons will look in the browser. The colors can be changed and you might like the color palettes I have defined in the article Common color palettes.
CSS Essential Training
If you want to learn more about CSS and all the related technologies you can do so with a free trial at LinkedInLearning.com.
Button in list css
One thing many people underestimate about CSS is it’s extreme flexibility when applied to otherwise «static» HTML features. One of the best example of which is being Lists: in CSS-less HTML, Lists are (funnily enough) only good for Listing. But with CSS, we can mix it up a bit, taking advantage of the way Lists work to create ourselves a nice-looking and lightweight menu.
Why lists?
Simply put, with the flexibility given by CSS, Lists can be applied in quite creative ways. There’s a few advantages to using lists, as such:
- Lists are easily de-natured to function as almost «un-formatted» text; this means they can be designed to do almost anything.
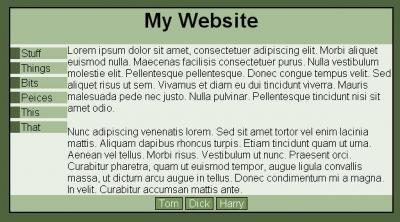
Here we see a quickly mocked-up website I’ve made for this tutorial.
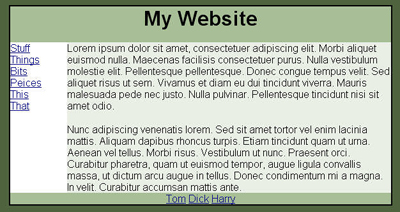
We are going to be turning this into the following live example.
That unformatted HTML menu and footer sticks out like a sore thumb, doesn’t it?
In the past, the only ways to make a more attractive menu would be to write a javascript (which are often slow, buggy, and don’t always display correctly), use imagemaps (bloated and easily broken by browser and user error alike) or using images as links (which needlessly takes up filesize, as without CSS you need seperate images for every button).
Thankfully, though, with the use of CSS and lists, we can make this page a lot more attractive, and often without having to even leave the text editor window. And this tutorial will (hopefully) show you how.
First Example
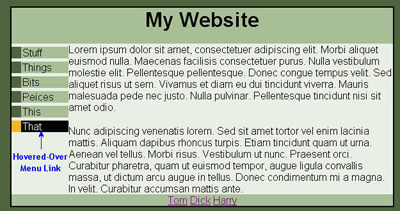
First of all, we’re going to jazz up the sidebar. We’ll be modifying the HTML a bit, then changing the CSS; each declaration will have a little explaination to help with understanding it. Once we’re done, it’ll look like this:
First of all, we need to put the sidebar into a list and a DIV. Currently, the sidebar looks like this:
With the changes applied, it should look like this:
Now we will add a few entries to the CSS:
| .menu padding: 0px; margin: 0px; > |
This is simply setting the new DIV we made up so it doesn’t add padding or such to the menu that’s being placed inside it; this should ensure it displays correctly. If you aren’t nesting this DIV inside another (or a table cell), it may be best to set height/width.
| .menu ul list-style: none; padding: 0px; margin: 0px; text-align: left; > |
This is prepatory «de-naturing» of the way unordered lists work. This removes the bulletpoint from the list (list-style: none), then removes any padding or margins imposed by the UL tag.
| .menu li border-top: 5px solid #E9EFE5; > |
While the code -is- for a «border», this is actually a little trick that allows you to put a ‘spacer’ between two items in the list (or in this case, items on the menu). This declaration is the one which puts the ‘gaps’ between each menu item; if you want the first menu item to be flush to the header you should instead used border-bottom.
| .menu a display: block; background-color: #A8BE96; color: #000; text-decoration: none; width: 100%; border-left: 15px solid #4F633F; padding-left: 2px; > |
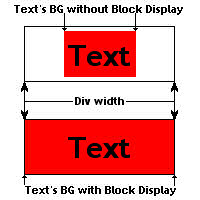
Now we get to the ‘guts’ of it: first of all, «Display: Block» is a useful little CSS function that automatically makes the text ‘fill’ the horizontal width of the DIV it’s inside. You can’t see how this is ‘filled’ normally — however, if you get the text a background color, like it is done here, you can see the effect — the background color, which would usually only fill the area the text is in, now fills the whole width of the DIV.
Here’s an illustration to better show how display: block works:
Besides this, we set the color of the link to black (A is the HTML tag for Link, remember?), disable the HTML underlining of A tags, and also stop a bug from occuring (without width: 100%, the menu often ends up with multiple bugs).
Also, we run into another little trick of CSS: By adding a «thick» left border to the menu, we create a type of stylish bullet (in the screenshot, these are the darker green square next to the menu link text). Padding is added so the link text isn’t slammed up against the bullet/border.
| .menu a:hover text-decoration: none; color: #fff; background-color: #000; border-left: 15px solid #EFB52B; > |
The menu we have created wouldn’t be complete without a little hover-over functionality. This declaration causes the text color to become white, the background of the link to become black, and the ‘bullet’ we created to turn orange when the link is hovered over, like in the image.
Lastly, we need to change the color of the background of the table cell the DIV is located within. But since this is somewhat off-topic from what we’re doing now, I won’t bother to explain it here.
Another Example
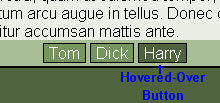
In case you don’t fully understand how this works, I’m going to show another example. This time, we’re going to be stylising those footer links, which currently are still basic HTML. Instead of turning them into stylish menu «bars», though, we’ll be turning these ones into buttons. Once we’re done, we’ll have some footer buttons that look like this:
We’ll be using lists for these ones as well, so as last time, we need to change the HTML code accordingly:
Now, once again, we set up the CSS; but this time, it’ll be a bit different.
| .footer padding: 0px; margin: 0px; > |
Preperation for button-style lists is the same as that for the menubar ones.
| .footer ul list-style: none; padding: 2px; margin: 2px; > |
Now it’s a little different — we don’t want want to totally de-nature UL this time, so we’ll instead give it some padding and margins so the div has some ‘breathing space’; otherwise we might find the foot being clamped around the buttons, and that’s not what we want in this situation.
Instead of using BLOCK, we set INLINE this time. BLOCK automatically stacks each list item on top of the previous, as well as filling the width of the item to 100% of the DIV’s width; obviously when we’re working on a horizontal layout we don’t want this. INLINE, on the other hand, simply arranges all items in a list into a horizontal string — exactly what we need.
| .footer a background-color: #77955F; text-decoration: none; color: #fff; border: 1px solid #000; padding-left: 5px; padding-right: 5px; > |
Once again we reach the meat-and-potatoes of the design, though it’s a little different looking this time. First of all, the background color is now used for the «unhovered» state of the button.
Also, the border is now all-around and hairline, to give the button it’s ‘buttonised’ look (You may want to experiment with setting the border width to 4-6 pixels and giving it an INSET or OUTSET or CHISELED appearance to further improve this ‘buttonised’ look).
Lastly, we use a little padding on either side of the text so the button isn’t so «tight» around our text.
| .footer a:hover color: #fff; background-color: #4F633F; border: 1px solid #000; > |
This is what changes we want made to the button when hovered over; in this case, the background color is darkened. (the other two declarations are redundant but may help with compatibility).
The result
With these two implementations of CSS, we now how a webpage that looks like so:
Now that’s a bit nicer, isn’t it?
The uses for these CSS tricks are far from statified, however — there are many more things you can do with lists to create other styles of menus and buttons. One example could be to use an image or pattern as the background image for these buttons; with playing around with the code it’s possible to create javascript-free multi-stage buttons, stylised text links, and even animated buttons.