- Module Madness: installing Python modules on Windows
- Visual Studio Express
- Build Your First Python Module with a C Extension
- Wheels and eggs
- Standalone EXEs
- 5. Building C and C++ Extensions on Windows
- 5.1. A Cookbook Approach
- 5.2. Differences Between Unix and Windows
- 5.3. Using DLLs in Practice
- Table of Contents
Module Madness: installing Python modules on Windows
In this article I’ll explain how to set up a compiler to build C/C++ modules on a Windows PC, and how to install modules from eggs and wheels. I’ll also provide some recommendations on essential modules.
As I mentioned in my first article on setting up Python, some python modules require a C/C++ compiler to build. In many cases, the developers of such modules will provide an .exe installer for Windows users, but if you have a compiler set up, you can simply download and install the modules using pip, which is much quicker and easier. Unfortunately, Windows does not come with a built-in compiler, so you have to install one.
Visual Studio Express
Visual Studio Express is the free version of Visual Studio, Microsoft’s IDE and compiler suite. It’s easy to setup. Just go to http://www.visualstudio.com/en-us/downloads/download-visual-studio-vs, and install the latest version of Visual Studio Express for Windows Desktop. At the time of writing, Visual Studio Express 2013 is available on the downloads page. I currently use the 2012 edition, which doesn’t seem to be available any more.
After 30 days, you will be required to register the program, but don’t worry — it will remain free.
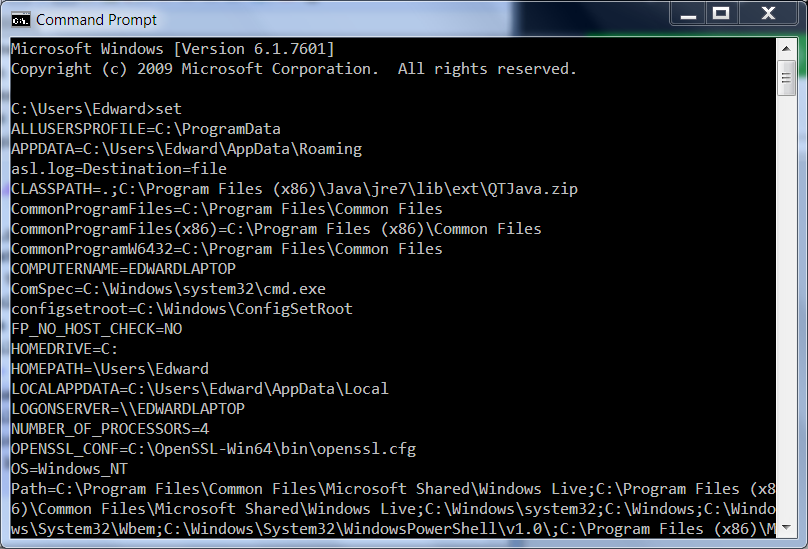
When you install Visual Studio Express 2013, an environment variable called VS120COMNTOOLS will be added to your system. You can check the environment variable has been added by opening the Command Prompt, typing «set», and hitting enter.
Unfortunately, the Python package distribution module, distutils, only recognizes the version of Visual Studio used to build your Python interpreter. Currently, the official Python interpreters on python.org were made with Visual Studio 2008 (version 9.0), so when you try to build a module, distutils looks for an environment variable called VS90COMNTOOLS. Luckily, there is a very simple work-around. I can’t guarantee it will work all of the time, but it has worked for me.
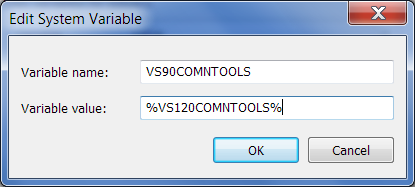
Simply create a VS90COMNTOOLS environment variable, and point it to your VS120COMNTOOLS. There is a good explanation of how to add an environment variable at https://kb.wisc.edu/cae/page.php?id=24500. In our case, the Variable Name should be VS90COMNTOOLS, and the Variable Value should be %VS120COMNTOOLS%. (see below)
Build Your First Python Module with a C Extension
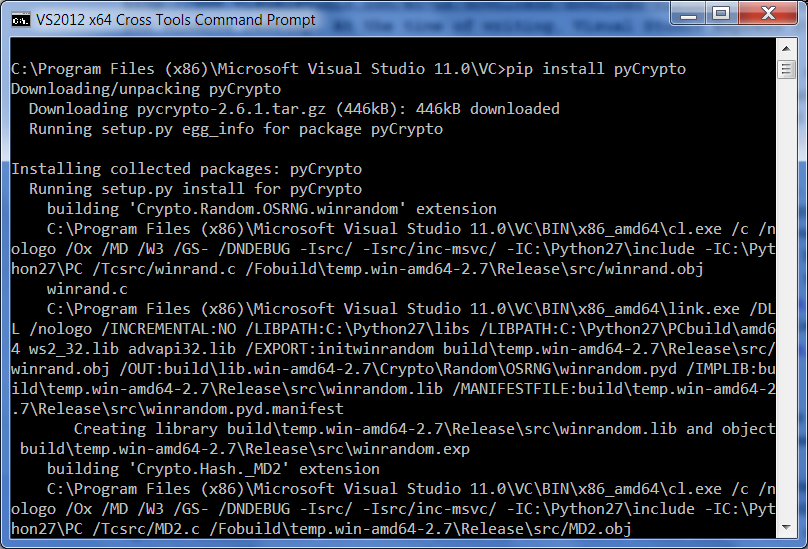
Once you’ve made a VS90COMNTOOLS environment variable that points to %VS120COMNTOOLS%, distutils will automatically use your compiler when you build modules using setup.py or pip install. To see if everything is working, let’s try to install pyCrypto, a popular cryptography module
First open a Visual Studio command prompt. The Visual Studio command prompts are command prompts with compilers added to the path. You can find them in the the start menu under All Programs > Microsoft Visual Studio 2013. Open the VS command prompt for your system architecture (x64 Cross Tools or x86 Native Tools for 64-bit or 32-bit, respectively). Then simply type «pip install pyCrytpo». If everything is set up properly, the package will download, compile, and install automatically. You’ll see a bunch of compiler options whizzing up your screen, like in the image below.
To quickly test the module, start python in interactive mode (type «python» on the command line) and enter «import Crypto». If nothing happens, the module has been installed successfully. Congratulations, you compiled a program!
Wheels and eggs
Unfortunately, there are some modules that are just too much trouble to compile on Windows, usually because they require 3rd party libraries. Fortunately, many developers provide pre-compiled binaries in the form of «wheels» or «eggs». Eggs can be installed with easy_install (which is part of the setuptools module). To download and install an egg, simply type «easy_install» followed by the name of the module. For example, «easy_install zope.interface» will download and install the egg for the zope.interface module.
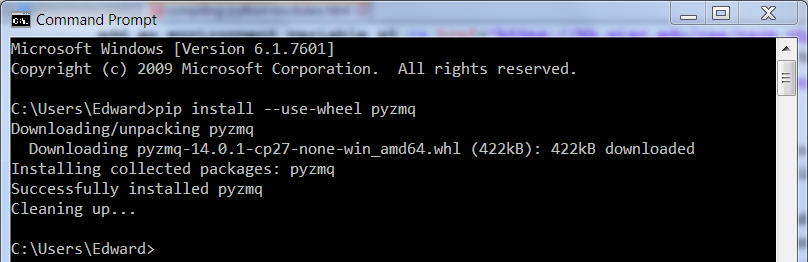
However, a supposedly better (though I don’t know why — it’s beyond my technical understanding) method is to install a wheel. To install wheels, you first need the wheel module (of course, another module. ). On your command line enter «pip install wheel», and the module will be downloaded and installed. Now you can install wheels with pip by adding the —use-wheel switch. PyZMQ is a popular module that is distributed as a wheel. To try install it, enter on your command line «pip install —use-wheel pyzmq». (see below)
Standalone EXEs
There are a few modules that can’t easily be compiled on Windows, and are not distributed as wheels or eggs. In these cases, you will have to download an exe or msi and manually go through the setup wizard. You can usually find an exe by going to the official Python package index(a.k.a. pypi), and searching for the module you need. You will be able to either download the executable directly from the module’s page on pypi, or there will be a link to a download page. Try searching pypi for lxml and installing the exe (at time of writing, version 3.2.5 and 3.3.0 beta are available on pypi). It’s a great module that drastically simplifies working with xml and html.
Whenever you go to download a module, I recommend using your Visual Studio command promp, so the compiler is ready. I’ve developed a sort of order of operations when trying to install modules. First I try pip (e.g. pip install module). That usually works, but if it doesn’t, I try «pip install —use-wheel module». If that fails, open a non-visual studio command prompt and try easy_install (e.g. easy_install module). Finally, if all else fails, go to pypi, search for the module, and download and run its setup.exe installer.
In my next article, I’ll explain how to setup NumPy, SciPy, matplotlib, and IPython, but I think you should now know everything you need to know to begin a module-downloading binge. Here’s a list of some very useful modules:
Copyright 2013 Confused by Code
5. Building C and C++ Extensions on Windows
This chapter briefly explains how to create a Windows extension module for Python using Microsoft Visual C++, and follows with more detailed background information on how it works. The explanatory material is useful for both the Windows programmer learning to build Python extensions and the Unix programmer interested in producing software which can be successfully built on both Unix and Windows.
Module authors are encouraged to use the distutils approach for building extension modules, instead of the one described in this section. You will still need the C compiler that was used to build Python; typically Microsoft Visual C++.
This chapter mentions a number of filenames that include an encoded Python version number. These filenames are represented with the version number shown as XY ; in practice, ‘X’ will be the major version number and ‘Y’ will be the minor version number of the Python release you’re working with. For example, if you are using Python 2.2.1, XY will actually be 22 .
5.1. A Cookbook Approach
There are two approaches to building extension modules on Windows, just as there are on Unix: use the distutils package to control the build process, or do things manually. The distutils approach works well for most extensions; documentation on using distutils to build and package extension modules is available in Distributing Python Modules (Legacy version) . If you find you really need to do things manually, it may be instructive to study the project file for the winsound standard library module.
5.2. Differences Between Unix and Windows
Unix and Windows use completely different paradigms for run-time loading of code. Before you try to build a module that can be dynamically loaded, be aware of how your system works.
In Unix, a shared object ( .so ) file contains code to be used by the program, and also the names of functions and data that it expects to find in the program. When the file is joined to the program, all references to those functions and data in the file’s code are changed to point to the actual locations in the program where the functions and data are placed in memory. This is basically a link operation.
In Windows, a dynamic-link library ( .dll ) file has no dangling references. Instead, an access to functions or data goes through a lookup table. So the DLL code does not have to be fixed up at runtime to refer to the program’s memory; instead, the code already uses the DLL’s lookup table, and the lookup table is modified at runtime to point to the functions and data.
In Unix, there is only one type of library file ( .a ) which contains code from several object files ( .o ). During the link step to create a shared object file ( .so ), the linker may find that it doesn’t know where an identifier is defined. The linker will look for it in the object files in the libraries; if it finds it, it will include all the code from that object file.
In Windows, there are two types of library, a static library and an import library (both called .lib ). A static library is like a Unix .a file; it contains code to be included as necessary. An import library is basically used only to reassure the linker that a certain identifier is legal, and will be present in the program when the DLL is loaded. So the linker uses the information from the import library to build the lookup table for using identifiers that are not included in the DLL. When an application or a DLL is linked, an import library may be generated, which will need to be used for all future DLLs that depend on the symbols in the application or DLL.
Suppose you are building two dynamic-load modules, B and C, which should share another block of code A. On Unix, you would not pass A.a to the linker for B.so and C.so ; that would cause it to be included twice, so that B and C would each have their own copy. In Windows, building A.dll will also build A.lib . You do pass A.lib to the linker for B and C. A.lib does not contain code; it just contains information which will be used at runtime to access A’s code.
In Windows, using an import library is sort of like using import spam ; it gives you access to spam’s names, but does not create a separate copy. On Unix, linking with a library is more like from spam import * ; it does create a separate copy.
5.3. Using DLLs in Practice
Windows Python is built in Microsoft Visual C++; using other compilers may or may not work. The rest of this section is MSVC++ specific.
When creating DLLs in Windows, you must pass pythonXY.lib to the linker. To build two DLLs, spam and ni (which uses C functions found in spam), you could use these commands:
cl /LD /I/python/include spam.c ../libs/pythonXY.lib cl /LD /I/python/include ni.c spam.lib ../libs/pythonXY.lib
The first command created three files: spam.obj , spam.dll and spam.lib . Spam.dll does not contain any Python functions (such as PyArg_ParseTuple() ), but it does know how to find the Python code thanks to pythonXY.lib .
The second command created ni.dll (and .obj and .lib ), which knows how to find the necessary functions from spam, and also from the Python executable.
Not every identifier is exported to the lookup table. If you want any other modules (including Python) to be able to see your identifiers, you have to say _declspec(dllexport) , as in void _declspec(dllexport) initspam(void) or PyObject _declspec(dllexport) *NiGetSpamData(void) .
Developer Studio will throw in a lot of import libraries that you do not really need, adding about 100K to your executable. To get rid of them, use the Project Settings dialog, Link tab, to specify ignore default libraries. Add the correct msvcrtxx.lib to the list of libraries.