Java Projects
This project will get you making your first game in Java! Take my starter code (I explain how it works) and build your own game! Whether your a beginner or intermediate programmer, I layout some ideas for you on what to build next to progress your skills. This is a great project for all Java students, and might even look good on that portfolio for your resume. Have fun developing your first video game!
Links
What’s up guys? Today I wanna show you how to make a video game in Java. If you’re in that beginner-to-intermediate range of learning how to program, and you’re looking for a project that isn’t super boring, you’re in the right place. Or even if you need a project to add to your resume: this is something that’s really visual, that can be really impressive looking.
This is an active tutorial. I’ve designed this project specifically for you to write your own code, and to make a video game that’s all your own.
We’ll be making a 2D game, using the Java Swing library, and this project builds off of the work we did in the Bob Ross «Joy of Coding» video. So if you get really confused as I start to go through this, or if you need some more practice with 2D graphics, then you should go back and do that project first. And that should give you everything you need to be ready for this one.
My idea for this project was: there’s certain things in developing a game that are just kinda difficult, but they’re unavoidable. And I don’t want to overwhelm you with things you might not be ready for yet, that maybe are acting as a barrier to you having fun with code. So I thought I’d start you off with like a template project. Just a real simple game that gets you passed some of those initial hurdles, so you can get to the fun parts.
Now I’m not going to do a full code-along this time, but I want to get you familiar with the codebase you’ll be working with. So what I think we’ll do is: in the first half of this video I want to show you how I built up this code, So that you can feel comfortable with it even if you don’t understand what every line does.
Then in the second half I want to give you a bunch of ideas and direction for different ways you can build out your game. Sort of like little homework projects that can all add up to a game that’s uniquely yours. And I’m going to be breaking down those ideas from easiest to hardest, so you can properly progress your skills as you work on your game.
So if you’re ready, the first thing you’ll want to do is: download this project off of Github, run it once to make sure it’s working, and then come back here and we’ll talk through the code. You can either clone it, if you’re familiar with Git, or you can just download the .ZIP file.
import javax.swing.*; class App < private static void initWindow() < // create a window frame and set the title in the toolbar JFrame window = new JFrame("Can't Stop, Won't Stop, GameStop"); // when we close the window, stop the app window.setDefaultCloseOperation(JFrame.EXIT_ON_CLOSE); // create the jpanel to draw on. // this also initializes the game loop Board board = new Board(); // add the jpanel to the window window.add(board); // pass keyboard inputs to the jpanel window.addKeyListener(board); // don't allow the user to resize the window window.setResizable(false); // fit the window size around the components (just our jpanel). // pack() should be called after setResizable() to avoid issues on some platforms window.pack(); // open window in the center of the screen window.setLocationRelativeTo(null); // display the window window.setVisible(true); >public static void main(String[] args) < // invokeLater() is used here to prevent our graphics processing from // blocking the GUI. https://stackoverflow.com/a/22534931/4655368 // this is a lot of boilerplate code that you shouldn't be too concerned about. // just know that when main runs it will call initWindow() once. SwingUtilities.invokeLater(new Runnable() < public void run() < initWindow(); >>); > > import java.awt.*; import java.awt.event.*; import java.util.ArrayList; import java.util.Random; import javax.swing.*; public class Board extends JPanel implements ActionListener, KeyListener < // controls the delay between each tick in ms private final int DELAY = 25; // controls the size of the board public static final int TILE_SIZE = 50; public static final int ROWS = 12; public static final int COLUMNS = 18; // controls how many coins appear on the board public static final int NUM_COINS = 5; // suppress serialization warning private static final long serialVersionUID = 490905409104883233L; // keep a reference to the timer object that triggers actionPerformed() in // case we need access to it in another method private Timer timer; // objects that appear on the game board private Player player; private ArrayListcoins; public Board() < // set the game board size setPreferredSize(new Dimension(TILE_SIZE * COLUMNS, TILE_SIZE * ROWS)); // set the game board background color setBackground(new Color(232, 232, 232)); // initialize the game state player = new Player(); coins = populateCoins(); // this timer will call the actionPerformed() method every DELAY ms timer = new Timer(DELAY, this); timer.start(); >@Override public void actionPerformed(ActionEvent e) < // this method is called by the timer every DELAY ms. // use this space to update the state of your game or animation // before the graphics are redrawn. // prevent the player from disappearing off the board player.tick(); // give the player points for collecting coins collectCoins(); // calling repaint() will trigger paintComponent() to run again, // which will refresh/redraw the graphics. repaint(); >@Override public void paintComponent(Graphics g) < super.paintComponent(g); // when calling g.drawImage() we can use "this" for the ImageObserver // because Component implements the ImageObserver interface, and JPanel // extends from Component. So "this" Board instance, as a Component, can // react to imageUpdate() events triggered by g.drawImage() // draw our graphics. drawBackground(g); drawScore(g); for (Coin coin : coins) < coin.draw(g, this); >player.draw(g, this); // this smooths out animations on some systems Toolkit.getDefaultToolkit().sync(); > @Override public void keyTyped(KeyEvent e) < // this is not used but must be defined as part of the KeyListener interface >@Override public void keyPressed(KeyEvent e) < // react to key down events player.keyPressed(e); >@Override public void keyReleased(KeyEvent e) < // react to key up events >private void drawBackground(Graphics g) < // draw a checkered background g.setColor(new Color(214, 214, 214)); for (int row = 0; row < ROWS; row++) < for (int col = 0; col < COLUMNS; col++) < // only color every other tile if ((row + col) % 2 == 1) < // draw a square tile at the current row/column position g.fillRect( col * TILE_SIZE, row * TILE_SIZE, TILE_SIZE, TILE_SIZE ); >> > > private void drawScore(Graphics g) < // set the text to be displayed String text = "$" + player.getScore(); // we need to cast the Graphics to Graphics2D to draw nicer text Graphics2D g2d = (Graphics2D) g; g2d.setRenderingHint( RenderingHints.KEY_TEXT_ANTIALIASING, RenderingHints.VALUE_TEXT_ANTIALIAS_ON); g2d.setRenderingHint( RenderingHints.KEY_RENDERING, RenderingHints.VALUE_RENDER_QUALITY); g2d.setRenderingHint( RenderingHints.KEY_FRACTIONALMETRICS, RenderingHints.VALUE_FRACTIONALMETRICS_ON); // set the text color and font g2d.setColor(new Color(30, 201, 139)); g2d.setFont(new Font("Lato", Font.BOLD, 25)); // draw the score in the bottom center of the screen // https://stackoverflow.com/a/27740330/4655368 FontMetrics metrics = g2d.getFontMetrics(g2d.getFont()); // the text will be contained within this rectangle. // here I've sized it to be the entire bottom row of board tiles Rectangle rect = new Rectangle(0, TILE_SIZE * (ROWS - 1), TILE_SIZE * COLUMNS, TILE_SIZE); // determine the x coordinate for the text int x = rect.x + (rect.width - metrics.stringWidth(text)) / 2; // determine the y coordinate for the text // (note we add the ascent, as in java 2d 0 is top of the screen) int y = rect.y + ((rect.height - metrics.getHeight()) / 2) + metrics.getAscent(); // draw the string g2d.drawString(text, x, y); >private ArrayList populateCoins() < ArrayListcoinList = new ArrayList<>(); Random rand = new Random(); // create the given number of coins in random positions on the board. // note that there is not check here to prevent two coins from occupying the same // spot, nor to prevent coins from spawning in the same spot as the player for (int i = 0; i < NUM_COINS; i++) < int coinX = rand.nextInt(COLUMNS); int coinY = rand.nextInt(ROWS); coinList.add(new Coin(coinX, coinY)); >return coinList; > private void collectCoins() < // allow player to pickup coins ArrayListcollectedCoins = new ArrayList<>(); for (Coin coin : coins) < // if the player is on the same tile as a coin, collect it if (player.getPos().equals(coin.getPos())) < // give the player some points for picking this up player.addScore(100); collectedCoins.add(coin); >> // remove collected coins from the board coins.removeAll(collectedCoins); > > import java.awt.event.KeyEvent; import java.awt.Graphics; import java.awt.image.BufferedImage; import java.awt.image.ImageObserver; import java.awt.Point; import java.io.File; import java.io.IOException; import javax.imageio.ImageIO; public class Player < // image that represents the player's position on the board private BufferedImage image; // current position of the player on the board grid private Point pos; // keep track of the player's score private int score; public Player() < // load the assets loadImage(); // initialize the state pos = new Point(0, 0); score = 0; >private void loadImage() < try < // you can use just the filename if the image file is in your // project folder, otherwise you need to provide the file path. image = ImageIO.read(new File("images/player.png")); >catch (IOException exc) < System.out.println("Error opening image file: " + exc.getMessage()); >> public void draw(Graphics g, ImageObserver observer) < // with the Point class, note that pos.getX() returns a double, but // pos.x reliably returns an int. https://stackoverflow.com/a/30220114/4655368 // this is also where we translate board grid position into a canvas pixel // position by multiplying by the tile size. g.drawImage( image, pos.x * Board.TILE_SIZE, pos.y * Board.TILE_SIZE, observer ); >public void keyPressed(KeyEvent e) < // every keyboard get has a certain code. get the value of that code from the // keyboard event so that we can compare it to KeyEvent constants int key = e.getKeyCode(); // depending on which arrow key was pressed, we're going to move the player by // one whole tile for this input if (key == KeyEvent.VK_UP) < pos.translate(0, -1); >if (key == KeyEvent.VK_RIGHT) < pos.translate(1, 0); >if (key == KeyEvent.VK_DOWN) < pos.translate(0, 1); >if (key == KeyEvent.VK_LEFT) < pos.translate(-1, 0); >> public void tick() < // this gets called once every tick, before the repainting process happens. // so we can do anything needed in here to update the state of the player. // prevent the player from moving off the edge of the board sideways if (pos.x < 0) < pos.x = 0; >else if (pos.x >= Board.COLUMNS) < pos.x = Board.COLUMNS - 1; >// prevent the player from moving off the edge of the board vertically if (pos.y < 0) < pos.y = 0; >else if (pos.y >= Board.ROWS) < pos.y = Board.ROWS - 1; >> public String getScore() < return String.valueOf(score); >public void addScore(int amount) < score += amount; >public Point getPos() < return pos; >> import java.awt.Graphics; import java.awt.image.BufferedImage; import java.awt.image.ImageObserver; import java.awt.Point; import java.io.File; import java.io.IOException; import javax.imageio.ImageIO; public class Coin < // image that represents the coin's position on the board private BufferedImage image; // current position of the coin on the board grid private Point pos; public Coin(int x, int y) < // load the assets loadImage(); // initialize the state pos = new Point(x, y); >private void loadImage() < try < // you can use just the filename if the image file is in your // project folder, otherwise you need to provide the file path. image = ImageIO.read(new File("images/coin.png")); >catch (IOException exc) < System.out.println("Error opening image file: " + exc.getMessage()); >> public void draw(Graphics g, ImageObserver observer) < // with the Point class, note that pos.getX() returns a double, but // pos.x reliably returns an int. https://stackoverflow.com/a/30220114/4655368 // this is also where we translate board grid position into a canvas pixel // position by multiplying by the tile size. g.drawImage( image, pos.x * Board.TILE_SIZE, pos.y * Board.TILE_SIZE, observer ); >public Point getPos() < return pos; >> Now let’s talk about some of the things you can do with this starter code, to build out your own game. You’re not meant to do all of these. Just pick and choose things you like or want to try. And if you have any ideas that aren’t on these lists, definitely just go for it.
Beginner
- Change the colors that are being used.
- Change the image files that are being used.
- Change how many points you get per coin.
- Make instance or class variables to control hardcoded values like the ones just mentioned.
- Use WASD instead of arrows for movement.
- Change the dimensions of the game board.
- Make a new coin appear whenever the player picks one up.
- Change the tile size.
- Remember to update your image files, or scale the images.
Intermediate
- Make coins disappear after some time.
- By ticks, or using a separate timer, or after the player has moved so many squares.
- Could count up or down.
- Could replace the score or be in addition to the score.
- Display it like the score.
- In a single play session.
- Or across all sessions by reading/writing to a file.
Advanced
- Add obstacles to block player movement.
- Add an object type that reduces your score when touched. Or maybe it ends the game.
- Make an object type that moves around on its own. Could be like the ghosts from pacman.
- Add sounds.
- When a player moves, or picks up coins.
- A constant sound track.
- A sound that plays when you first open the game.
- Can play around with the tick rate when developing this.
- React to both pressed and released.
- Can enable diagonal movements.
- Fixes the issue caused by holding down a key, and makes for a more responsive experience.
- So maybe the viewport moves as the player approaches an edge.
- Or maybe the player stays in the middle and the whole viewport moves with the player whenever the player moves.
- Can be as simple as changing some colors in the game.
- Or maybe you’ve got health potions to restore player health.
- Maybe move this off of the game board itself, to some designated area on the canvas. I recommend still using just the single JPanel if you want to do this.
Expert
To dive even deeper into developing your Java 2D game, I recommend checking out this series of tutorials for guidance and inspiration: https://zetcode.com/javagames/
Alright so good luck on building what’s probably your first computer game! Hopefully you’ve got a lot of ideas, and some sense of how you might accomplish them. I really tried to strip this project down, and make it as easy for you to build off of as possible.
Once you’ve finished your project, and you’re wondering what’s next? First of all I’m super proud of you: you’ve accomplished something most people will only ever dream of. And the next step would be to just make another game, but push yourself to be a little more ambitious this second time around.
And then after that you’re ready to graduate to a proper game development library. I’ve never used any Java game development libraries, so I can’t really give you any recommendations there. But let me know if you end up finding one you like, and maybe I can check that out in a future video.

AP Computer Science A — Study Session
Get prepared for the AP Computer Science A exam! I’ll let you know what to expect and go through some example questions from the official …
My name is Ben and I help people learn how to code by gaming. I believe in the power of project-based learning to foster a deep understanding and joy in the craft of software development. On this site I share programming tutorials, coding-game reviews, and project ideas for you to explore.
Создание игры на Java без сторонних библиотек, часть первая
Привет хаброжители. Данный пост является «рерайтом» моего поста для песочницы. На этот раз я постараюсь охватить больше тем, чем тогда.
Почему Java?
Ничего объективного я тут не скажу, а скажу лишь то, что я люблю этот язык, и мне нравиться писать на нем. Да, на Java нет игр AAA-класса, но Java предоставляет огромные возможности, больше кол-во встроенных средств и быстроту написания кода.
IDE
Начнем с выбора IDE. Я являюсь фанатом Eclipse и посоветую вам его.
Если же почему-то вам он не понравился, вы можете использовать NetBeans, Intellij IDEA или командную строку и ваш любимый редактор.JDK
И скачаем JDK последней версии: JDK 7u4
Скорее всего проблем с установкой IDE у вас не возникнет, а если у вас 64-битная система, все же посоветую устанавливать 32-битный Eclipse, так как иногда бывают ошибки и Eclipse у вас просто не запустится.
Под катом мы приступим к созданию игры.
Класс Game
Итак, создаем проект, в нем класс Game(попутно создав в нем точку входа). Данный класс должен наследовать класс Canvas и реализовать интерфейс Runnable:
public class Game extends Canvas implements Runnable < private static final long serialVersionUID = 1L; public void run() < //функция run появляется после того, как мы добавили "implements Runnable" >public static void main(String[] args) < >>Создадим переменную running типа Boolean, которая, как вы уже догадались будет показывать нам запущена ли игра, или нет.
Создадим функцию start() и в ней мы будем создавать новый поток и переводить running в true:
Создадим три функции — update(long delta), render() и init(). Я надеюсь что их значение вам понятно. В функции run() создадим главный игровой цикл, перед ним будем вызывать init(), а в нем самом render() и update(). Так же мы будем вычислять разницу между кадрами(delta time).
public void run() < long lastTime = System.currentTimeMillis(); long delta; init(); while(running) < delta = System.currentTimeMillis() - lastTime; lastTime = System.currentTimeMillis(); update(delta); render(); >> public void init() < >public void render() < >public void update(long delta)
Пока поработаем над функцией render().
public void render() < BufferStrategy bs = getBufferStrategy(); if (bs == null) < createBufferStrategy(2); //создаем BufferStrategy для нашего холста requestFocus(); return; >Graphics g = bs.getDrawGraphics(); //получаем Graphics из созданной нами BufferStrategy g.setColor(Color.black); //выбрать цвет g.fillRect(0, 0, getWidth(), getHeight()); //заполнить прямоугольник g.dispose(); bs.show(); //показать >Вам наверное уже не терпится запустить и попробовать, но не спешите. Мы должны создать фрейм и добавить наш холст на него. Заодно и объявим три переменных.
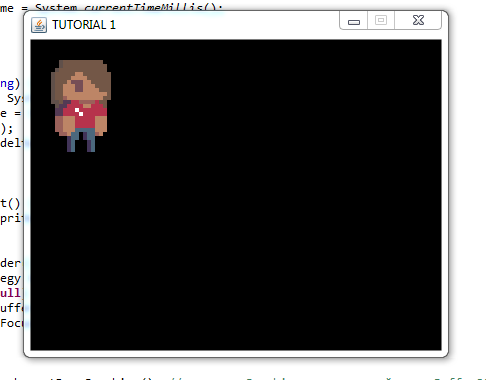
public static int WIDTH = 400; //ширина public static int HEIGHT = 300; //высота public static String NAME = "TUTORIAL 1"; //заголовок окна public static void main(String[] args) < Game game = new Game(); game.setPreferredSize(new Dimension(WIDTH, HEIGHT)); JFrame frame = new JFrame(Game.NAME); frame.setDefaultCloseOperation(JFrame.EXIT_ON_CLOSE); //выход из приложения по нажатию клавиши ESC frame.setLayout(new BorderLayout()); frame.add(game, BorderLayout.CENTER); //добавляем холст на наш фрейм frame.pack(); frame.setResizable(false); frame.setVisible(true); game.start(); >Примерно вот так выглядит наш класс Game сейчас.
Класс Sprite
Создадим новый класс Sprite. Поскольку этот класс небольшой, я сразу приведу весь его код с комментариями:
import java.awt.Graphics; import java.awt.Image; public class Sprite < private Image image; //изображение public Sprite(Image image) < this.image = image; >public int getWidth() < //получаем ширину картинки return image.getWidth(null); >public int getHeight() < //получаем высоту картинки return image.getHeight(null); >public void draw(Graphics g,int x,int y) < //рисуем картинку g.drawImage(image,x,y,null); >>Сразу же проверим работоспособность. Возьмем эту картинку и скопируем ее в папку с нашим классом Sprite. Добавим функцию getSprite() в класс Game(временно).
public Sprite getSprite(String path) < BufferedImage sourceImage = null; try < URL url = this.getClass().getClassLoader().getResource(path); sourceImage = ImageIO.read(url); >catch (IOException e) < e.printStackTrace(); >Sprite sprite = new Sprite(Toolkit.getDefaultToolkit().createImage(sourceImage.getSource())); return sprite; >Добавим нашу картинку в папку assets(папку создать в корне проекта), саму папку надо добавить в build path.
Далее создаем переменную hero типа Sprite. В функции init() инициализируем ее. В Функции render() рисуем:
//в "шапку" public static Sprite hero; //в init() hero = getSprite("man.png"); //в render() после g.fillRect(0, 0, getWidth(), getHeight()); hero.draw(g, 20, 20);Input
Для обработки инпута мы создадим класс, наследующий KeyAdapter:
private class KeyInputHandler extends KeyAdapter
Тут же и объявим две переменных в шапке класса Game:
private boolean leftPressed = false; private boolean rightPressed = false;Внутри класса KeyInputHandler создадим две функции:
public void keyPressed(KeyEvent e) < //клавиша нажата if (e.getKeyCode() == KeyEvent.VK_LEFT) < leftPressed = true; >if (e.getKeyCode() == KeyEvent.VK_RIGHT) < rightPressed = true; >> public void keyReleased(KeyEvent e) < //клавиша отпущена if (e.getKeyCode() == KeyEvent.VK_LEFT) < leftPressed = false; >if (e.getKeyCode() == KeyEvent.VK_RIGHT) < rightPressed = false; >>Теперь в функции init() добавим следующее:
addKeyListener(new KeyInputHandler());Создадим переменные x и y для героя(так как пока что мы еще не написали класс Entity). Сделаем чтобы герой всегда рисовался на этих координатах.
private static int x = 0; private static int y = 0; hero.draw(g, x, y);А теперь в функции update() будем проверять нажаты ли клавиши и изменять x-координату.
public void update(long delta) < if (leftPressed == true) < x--; >if (rightPressed == true) < x++; >>