- CSS Padding, Border and Margin — HTML Element Box
- How Padding, Border and Margin Properties Affect HTML Elements
- Box Model Browser Defaults
- Margin Space
- Make All Browser Elements Boxes the Same
- Reset CSS
- YUI Reset
- normalize.css
- All Together Now
- See Also
- Abbreviations
- Acknowledgements
- Do you have a question or comment about this article?
- Css padding margin background color border background
- By Emmanuel Chinonso
- Defining color values
- Border style
- Build modern projects using Bootstrap 5 and Contrast
- Visually Build and Generate Code for your Frontend.
CSS Padding, Border and Margin — HTML Element Box
Padding, Border and Margin properties affect the space around an HTML element. When learning to author web pages understanding how the space around content is defined and used is fundamental design knowledge. The content of each item on a HTML page uses a Box Model when displayed in a web browser. This article is a tutorial on understanding the content, padding, border and margin parts of that model.
How Padding, Border and Margin Properties Affect HTML Elements
There are two major types of HTML elements block, where the element content starts below the previous element, and inline, where the content starts next to the previous elements content. For example the paragraph element,
, element separates text into blocks (this paragraph and the one following are in there own
element. Compared to the emphasized element, , which usually gives text an italic look directly in the place it is used.
Each element has some content, then the space around content is defined in terms of:
- Padding (the space between the content and the border)
- Border (the line around the content and padding)
- Margin (the space between the border and the surrounding elements)
This is illustrated in this diagram from the CSS specification. CSS stands for Cascading Style Sheets, style sheets are used to format all the visual aspects of a web page.

The padding, border and margin can be broken down into top, right, bottom and left segments, illustrated in the diagram. (I.e. TP for top padding, RB for right border, BM for bottom margin, LB for left border, etc.) This is know as the Box Model. All the parts of the Box Model can be formatted with CSS.
Box Model Browser Defaults
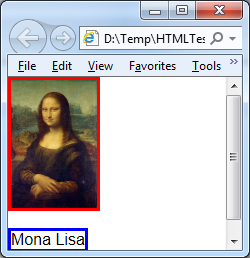
A simple HTML page can be used to see the Box Model in action. Create a HTML page with an image (e.g. save the Mona Lisa picture below).
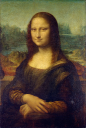
Add a red border to the image and some text with a blue border, the borders are added using inline CSS. (On Windows this file can be created in Notepad, or use Notepad++ which adds helpful text color coding when editing an HTML file).

Mona Lisa

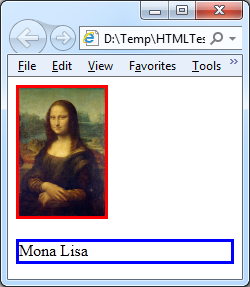
The above example code shows that the image element, , is an inline element (the border is local to the element) and the paragraph,
is a block element (the border is the width of the web page).
Margin Space
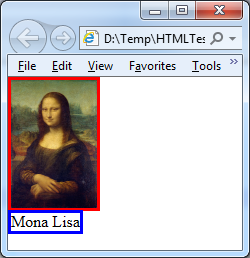
Notice the white space between the edge of the browser window and the red and blue borders. This is not the result of a default margin setting on the elements, but on the element of the HTML document. This can be removed by setting the body’s margin to zero, style=»margin:0;» . The white space between the two elements is the result of a default margin on the paragraph element. To get the paragraph element’s border to wrap just the content, and not extend to the width of the page, the width of the
element can be restricted (for example using a style such as width:100px; , or by wrapping the text in a and setting the border on that):
Mona Lisa

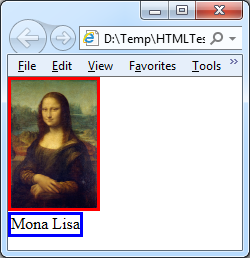
The remaining small white space between the two borders is reserved for text descenders ( is an inline element so text can be next to it and space is saved below a line for letters like ‘g’ and ‘p’). To completely remove the space set the image display as a block (using style display:block; ) or wrap it in a with a height style set to the image height (plus allowances for padding and border settings).
Make All Browser Elements Boxes the Same
There are some small differences on how default settings for the HTML elements box model, as well as other HTML aspects, are displayed between browsers. The differences depend upon:
- Different browser makers: IE and Edge from Microsoft; Chrome from Google; Firefox from Mozilla; Safari from Apple; and Opera
- Browser versions
- Operating systems and versions
- Mobile browsers v desktop browsers
The display differences can be catered for by using easily available style sheets. Otherwise the alternative is to try and figure out the work arounds required for the default settings for the various browsers yourself. Example stylesheets include Reset CSS, HTML5 Reset (derived from Reset CSS), normalize.css, and YUI CSS Reset. Either add a reset style sheet to your web site or link to one on a Content Delivery Network (CDN), e.g.:
Mona Lisa
These reset style sheets are more controlled than the Universal Reset method, which uses the global * selector: *
Reset CSS
YUI Reset
normalize.css
All Together Now
This example illustrates some of the padding, border and margin settings all together. The page background is set to pink ( fuchsia ). The background for image and paragraph span is yellow . They are surrounded by a (with border and background color set to black and white for the image, and green and silver for the paragraph).
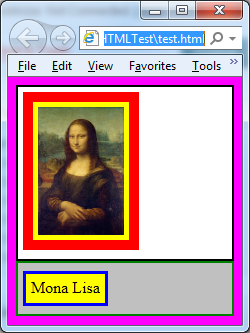
Mona Lisa
This illustrates how the padding shows the background color and how margin is transparent (note borders can be set transparent ). To set different size sides for padding and margin add a hypen and the word top, right, bottom or left, as in margin-left:10px; or padding-bottom:10px; . There is also the shorthand of following padding or margin with one to four numbers to represent the top, right, bottom, left values, for example:
p < margin: 2em >/* margins set to 2em */ p < margin: 1px 5px >/* top,bottom to 1px, right, left = 5px */ p < margin: 1em 3em 3em >/* top to 1em, right to 3em, bottom to 3em, left to 3em (same as right) */ p < margin: 5px 10px 10px 20px >/* top to 5px, right to 10px, bottom to 10px, left to 20px */ /* Below is the same as one immediately above */ p
When using the numbers remember the order by using hands on a clock moving in a clockwise direction (top, right, bottom, left). Individual border edge widths can be set in a similar way using border-top-width, border-right-width, border-bottom-width, border-left-width, likewise for color: border-top-color, border-right-color, border-bottom-color, border-left-color.
Read more about the Box Model, padding, borders and margins in the CSS specification, including settings not covered here. There is an article at http://learn.shayhowe.com/html-css/opening-the-box-model/ which provides additional detail and covers positioning. Some of the demo code can be seen in action on the Box Model Demo HTML page.
See Also
- For more HTML articles see HTML in the index.
- For a full list of all the articles in Tek Eye see the full site alphabetical Index.
Abbreviations
- HTML – HyperText Mark-up Language
- CSS – Cascading Style Sheets
- CDN – Content Delivery Network
Acknowledgements
Author: Daniel S. Fowler Published: 2013-01-28 Updated: 2017-06-11


Do you have a question or comment about this article?
(Alternatively, use the email address at the bottom of the web page.)
↓markdown↓ CMS is fast and simple. Build websites quickly and publish easily. For beginner to expert.
Free Android Projects and Samples:
Css padding margin background color border background
CSS Colors, Backgrounds, Borders, Margins and Padding

By Emmanuel Chinonso
CSS Colors, Backgrounds, Borders, Margins and Padding
CSS color property defines the text color or the foreground color of an element.
Colors are specified using predefined names such as RGB, HEX, HSL, RGBA, HSLA values.
Colors in CSS are predefined with color name. Example are grey, red, blue, green etc.
Defining color values
The format for setting color values are A color keyword like «green», «yellow», «transparent», etc are used. A hex value is like #ff0000 , #00ff00 , etc . A RGB value is like rgb(255, 0, 0) .
CSS Background color: HTML element are set with background colors
h1 style ="background-color: yellow;">Hello Worldh1>
CSS Text Color: Text color can also be set in CSS.
h1 style = "color: tomato;" > Hello worldh1>
CSS Background:
This property allows CSS to add background effects for elements. We are going to look at several background properties. We have already looked at background-colors.
Background Image:
The CSS Background image specifies the use of an image on the background of an element. By default, the image is repeated to cover the entire element.
bodybackground-image: url("google.jpg");>
CSS Background-repeat:
Some images should only be repeated horizontally or vertically, or they will look strange
bodybackground-image: url("google.jpg");background-repeat: repeat-x;>
The background-image can also be shown once
bodybackground-image: url("google.jpg");background-repeat: no-repeat;>
The background-position is also used to specify the position an image should be.
bodybackground-image: url("google.jpg");background-repeat: no-repeat;background-position: right-top;>
This property allows you to define the border area of an element’s box. It appears between the margin and padding of an element. It allows you to also show the style, width, and color of an element’s border. Some of the values allowed in the border property are dotted, dashed, solid, double, groove (defines a 3d grooved border), ridge, inset, outset, none, and hidden.
Border-width:
This property shows the width of the borders. The width can be specific size(in, px, pt, cm, em, etc)
bodyborder-style: inset;border-width: 5px;>
Border color:
This property shows sets the color of the border. The color can be in HEX, RGB, HSL and transparent. In the case the color is not set it takes the color of the element.
p.oneborder-style: solid;border-color: blue;>
Border style
It is possible to specify different border for each side.
pborder-top-style: dotted;border-right-style: solid;border-bottom-style: dotted;border-left-style: solid;>
CSS Margins:
The CSS Margin property allows you to set space around the border of an element. It’s not usually affected by background-color, it’s always transparent. CSS margin has a property for specifying the margin for each side of an element.
pmargin-top: 100px;margin-bottom: 100px;margin-right: 150px;margin-left: 80px;>
CSS Padding: Padding is used to create space around the element’s content, inside a defined border. Individual sides of the element are also padded.
divpadding-top: 50px;padding-right: 30px;padding-bottom: 50px;padding-left: 80px;>
Padding and element width:
The width property specifies the width of the element’s content area. The content area is the portion inside the padding, border, and margin of an element. The padding added to the element when the width is also stated is calculated together to give the total width.
divwidth: 300px;padding: 22px;>
In these code you will see that the actual width is not 300px but 344px (300 + 22px of left padding + 22px of right padding>.
Build modern projects using Bootstrap 5 and Contrast
Trying to create components and pages for a web app or website from scratch while maintaining a modern User interface can be very tedious. This is why we created Contrast, to help drastically reduce the amount of time we spend doing that. so we can focus on building some other aspects of the project.
Contrast Bootstrap PRO consists of a Premium UI Kit Library featuring over 10000+ component variants. Which even comes bundled together with its own admin template comprising of 5 admin dashboards and 23+ additional admin and multipurpose pages for building almost any type of website or web app.
See a demo and learn more about Contrast Bootstrap Pro by clicking here.

CSS Font
CSS Height and Width
Visually Build and Generate Code for your Frontend.
Use Windframe to visually build webpages in minutes using tailwind css
Generate HTML, Angular, React, Vue code for your websites on the fly and spend less time centering divs 🙂