- border
- Пример
- border-style
- Try it
- Constituent properties
- Syntax
- Values
- Formal definition
- Formal syntax
- Examples
- All property values
- HTML
- CSS
- Result
- Specifications
- Browser compatibility
- See also
- Found a content problem with this page?
- MDN
- Support
- Our communities
- Developers
- border-style
- Синтаксис
- Значения
- Объектная модель
- Браузеры
- Тег solid в html
- Синтаксис solid
- Пример использования solid в css
- Задаем solid через атрибут style
- Результат применения значения solid через атрибут style
- Задаем solid через тег style
- Результат применения значения solid через атрибут style
- Задаем solid через файл css
border
Свойство border отвечает за отрисовку видимой границы блока. Часто видимую границу блока называют рамкой.
Само свойство border является шорткатом (короткой записью) и объединяет в себе значение для нескольких полных свойств:
Пример
Скопировать ссылку «Пример» Скопировано
Украсим текстовую карточку цветной сплошной рамкой.
Повседневная практика показывает, .
div class="element"> p>Повседневная практика показывает, . p> div>
Зададим рамку толщиной 5 пикселей, сплошную, цвета #ED6742:
.element border: 5px solid #ed6742;>.element border: 5px solid #ed6742; >

🛠 Ещё немного про треугольники. А точнее, стрелки. Их тоже можно создать при помощи border , но тут понадобится подключить свойство transform , чтобы повернуть элемент с рамками на 45 градусов в нужную сторону:
div class="arrows"> div class="arrow _prev">div> div class="arrow _next">div> div> .arrows max-width: 1200px; height: 250px; margin: 0 auto; background-color: #f1f1f1;> .arrow /* Рисуем квадрат */ width: 50px; height: 50px; /* Задаём левую рамку */ border-left: 5px solid #ff0001; /* Задаём нижнюю рамку */ border-bottom: 5px solid #ff0001;> .arrow._prev /* Поворачиваем квадрат нижним левым углом влево */ transform: rotate(45deg);> .arrow._next /* Поворачиваем квадрат нижним левым углом вправо */ transform: rotate( -135deg );>.arrows max-width: 1200px; height: 250px; margin: 0 auto; background-color: #f1f1f1; > .arrow /* Рисуем квадрат */ width: 50px; height: 50px; /* Задаём левую рамку */ border-left: 5px solid #ff0001; /* Задаём нижнюю рамку */ border-bottom: 5px solid #ff0001; > .arrow._prev /* Поворачиваем квадрат нижним левым углом влево */ transform: rotate(45deg); > .arrow._next /* Поворачиваем квадрат нижним левым углом вправо */ transform: rotate( -135deg ); >
Чем не стрелки для слайдера? 🤗
🛠 Часто встречающийся дизайнерский приём — появление рамки вокруг элемента при наведении на него курсора мыши.
Если просто добавлять рамку по селектору :hover , то элемент будет дёргаться. Причина в том, что размер элемента увеличивается на ширину рамки. Чтобы подобных подёргиваний не происходило, изначально задайте рамку нужной толщины, но установите ей прозрачный цвет ( transparent ). А по наведению курсора просто меняйте цвет на нужный. Profit! Вы прекрасны 😄
border-style
The border-style shorthand CSS property sets the line style for all four sides of an element’s border.
Try it
Constituent properties
This property is a shorthand for the following CSS properties:
Syntax
/* Keyword values */ border-style: none; border-style: hidden; border-style: dotted; border-style: dashed; border-style: solid; border-style: double; border-style: groove; border-style: ridge; border-style: inset; border-style: outset; /* top and bottom | left and right */ border-style: dotted solid; /* top | left and right | bottom */ border-style: hidden double dashed; /* top | right | bottom | left */ border-style: none solid dotted dashed; /* Global values */ border-style: inherit; border-style: initial; border-style: revert; border-style: revert-layer; border-style: unset;
The border-style property may be specified using one, two, three, or four values.
- When one value is specified, it applies the same style to all four sides.
- When two values are specified, the first style applies to the top and bottom, the second to the left and right.
- When three values are specified, the first style applies to the top, the second to the left and right, the third to the bottom.
- When four values are specified, the styles apply to the top, right, bottom, and left in that order (clockwise).
Each value is a keyword chosen from the list below.
Values
Describes the style of the border. It can have the following values:
Like the hidden keyword, displays no border. Unless a background-image is set, the computed value of the same side’s border-width will be 0 , even if the specified value is something else. In the case of table cell and border collapsing, the none value has the lowest priority: if any other conflicting border is set, it will be displayed.
Like the none keyword, displays no border. Unless a background-image is set, the computed value of the same side’s border-width will be 0 , even if the specified value is something else. In the case of table cell and border collapsing, the hidden value has the highest priority: if any other conflicting border is set, it won’t be displayed.
Displays a series of rounded dots. The spacing of the dots is not defined by the specification and is implementation-specific. The radius of the dots is half the computed value of the same side’s border-width .
Displays a series of short square-ended dashes or line segments. The exact size and length of the segments are not defined by the specification and are implementation-specific.
Displays a single, straight, solid line.
Displays two straight lines that add up to the pixel size defined by border-width .
Displays a border with a carved appearance. It is the opposite of ridge .
Displays a border with an extruded appearance. It is the opposite of groove .
Displays a border that makes the element appear embedded. It is the opposite of outset . When applied to a table cell with border-collapse set to collapsed , this value behaves like ridge .
Displays a border that makes the element appear embossed. It is the opposite of inset . When applied to a table cell with border-collapse set to collapsed , this value behaves like groove .
Formal definition
- border-top-style : none
- border-right-style : none
- border-bottom-style : none
- border-left-style : none
- border-bottom-style : as specified
- border-left-style : as specified
- border-right-style : as specified
- border-top-style : as specified
Formal syntax
border-style =
=
none |
hidden |
dotted |
dashed |
solid |
double |
groove |
ridge |
inset |
outset
Examples
All property values
Here is an example of all the property values.
HTML
pre class="b1">nonepre> pre class="b2">hiddenpre> pre class="b3">dottedpre> pre class="b4">dashedpre> pre class="b5">solidpre> pre class="b6">doublepre> pre class="b7">groovepre> pre class="b8">ridgepre> pre class="b9">insetpre> pre class="b10">outsetpre>
CSS
pre height: 80px; width: 120px; margin: 20px; padding: 20px; display: inline-block; background-color: palegreen; border-width: 5px; box-sizing: border-box; > /* border-style example classes */ .b1 border-style: none; > .b2 border-style: hidden; > .b3 border-style: dotted; > .b4 border-style: dashed; > .b5 border-style: solid; > .b6 border-style: double; > .b7 border-style: groove; > .b8 border-style: ridge; > .b9 border-style: inset; > .b10 border-style: outset; > Result
Specifications
Browser compatibility
BCD tables only load in the browser
See also
Found a content problem with this page?
This page was last modified on Jun 30, 2023 by MDN contributors.
Your blueprint for a better internet.
MDN
Support
Our communities
Developers
Visit Mozilla Corporation’s not-for-profit parent, the Mozilla Foundation.
Portions of this content are ©1998– 2023 by individual mozilla.org contributors. Content available under a Creative Commons license.
border-style
Устанавливает стиль границы вокруг элемента. Допустимо задавать индивидуальные стили для разных сторон элемента.
Синтаксис
border-style: [none | hidden | dotted | dashed | solid | double | groove | ridge | inset | outset] | inherit
Значения
Для управления видом границы предоставляется несколько значений свойства border-style . Вид зависит от используемого браузера и заданной толщины границы. В табл. 1 приведены названия стилей и получаемая рамка при разных значениях толщины — 1, 3, 5 и 7 пикселов.
Кроме перечисленных в таблице значений используются следующие ключевые слова.
none Не отображает границу и ее толщина ( border-width ) задается нулевой. hidden Имеет тот же эффект, что и none за исключением применения border-style к ячейкам таблицы, у которой значение свойства border-collapse установлено как collapse . В этом случае вокруг ячейки граница не будет отображаться вообще. inherit Наследует значение родителя.
Разрешается использовать одно, два, три или четыре значения, разделяя их между собой пробелом. Эффект зависит от количества и указан в табл. 2.
| Число значений | Результат |
|---|---|
| 1 | Стиль границы будет задан для всех сторон элемента. |
| 2 | Первое значение устанавливает стиль верхней и нижней границы, второе — левой и правой. |
| 3 | Первое значение задает стиль верхней границы, второе — одновременно левой и правой границы, а третье — нижней границы. |
| 4 | Поочередно устанавливается стиль верхней, правой, нижней и левой границы. |
HTML5 CSS2.1 IE Cr Op Sa Fx
Lorem ipsum dolor sit amet, consectetuer adipiscing elit, sed diem nonummy nibh euismod tincidunt ut lacreet dolore magna aliguam erat volutpat.
Результат данного примера показан на рис. 1.
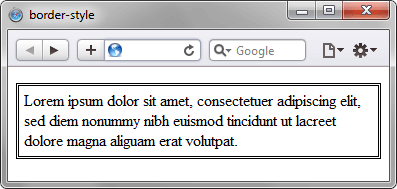
Рис. 1. Применение свойства border-style
Объектная модель
[window.]document.getElementById(» elementID «).style.borderStyleБраузеры
Браузер Internet Explorer до шестой версии включительно при толщине границы 1px отображает dotted как dashed . При толщине 2px и выше значение dotted работает корректно. Эта ошибка исправлена в IE7, но только для всех границ толщиной 1px. Если одна из границ блока имеет толщину 2px и выше, то в IE7 значение dotted превращается в dashed .
Internet Explorer до версии 7.0 включительно не поддерживает значения hidden и inherit .
Стиль границы в разных браузерах может несколько различаться при использовании значений groove , ridge , inset или outset .
Тег solid в html
твердый, сплошной, прочный, основательный — прил
Синтаксис solid
Добавляется толщина в единицах измерения, в данном случае пиксели — 1px.
Начертание нашего бордюра — solid — сплошной.
Пример использования solid в css
Для того, чтобы продемонстрировать, как это будет в сборе в html теге, нам понадобится пример, разберем его в следующем пункте:
Задаем solid через атрибут style
Когда требуется использование точечно, т.е. в одном месте используется атрибут style attribute style внутри тега.
Сразу перейдем к практике:
Для того, чтобы разобрать пример нам понадобится какой-то блок, пусть это будет div :
Внутрь помещаем атрибут style:
Результат применения значения solid через атрибут style
Данный вариант использования значения solid применяется точечно в одном месте. когда нет повторений на странице.
Задаем solid через тег style
Не будем долго ломать голову и используем тоже див :
В отличии от предыдущего пункта, создаем тег style style
Создаем класс — «example_solid», он у нас будет размещаться и в теге «div», а в теге «style» будут прописаны свойства данного класса, класс задается точкой, внутри класса помещаем ранее использованные свойства и значение нашего «солида»
Результат применения значения solid через атрибут style
Данный вариант использования значения solid применяется на одной, или нескольких страницах, когда есть повторения на странице.
Задаем solid через файл css
Следующий вариант использования значения solid — в файле css file css — абсолютно аналогично предыдущему пункту, только с той разницей, что класс располагается в файле css!
Для этого вам потребуется:
Расположить выше приведенные стили в созданном файле css.
Данный вариант использования значения solid применяется в том случае, когда требуется данный эффект распространить на весь сайт.