- border
- Пример
- border-color
- Синтаксис
- Значения
- Объектная модель
- Браузеры
- CSS по категориям
- Селекторы
- Making a Transparent Border with CSS — with Pictures and Examples
- Using the transparent property of border in CSS
- Changing the opacity of the border in CSS using RGBA
- Make a transparent border with padding in CSS
- CSS border-color Property
- Browser Support
- CSS Syntax
- Property Values
- More Examples
- Example
- Example
- Example
- Example
- Example
- Example
border
Свойство border отвечает за отрисовку видимой границы блока. Часто видимую границу блока называют рамкой.
Само свойство border является шорткатом (короткой записью) и объединяет в себе значение для нескольких полных свойств:
Пример
Скопировать ссылку «Пример» Скопировано
Украсим текстовую карточку цветной сплошной рамкой.
Повседневная практика показывает, .
div class="element"> p>Повседневная практика показывает, . p> div>
Зададим рамку толщиной 5 пикселей, сплошную, цвета #ED6742:
.element border: 5px solid #ed6742;>.element border: 5px solid #ed6742; >

🛠 Ещё немного про треугольники. А точнее, стрелки. Их тоже можно создать при помощи border , но тут понадобится подключить свойство transform , чтобы повернуть элемент с рамками на 45 градусов в нужную сторону:
div class="arrows"> div class="arrow _prev">div> div class="arrow _next">div> div> .arrows max-width: 1200px; height: 250px; margin: 0 auto; background-color: #f1f1f1;> .arrow /* Рисуем квадрат */ width: 50px; height: 50px; /* Задаём левую рамку */ border-left: 5px solid #ff0001; /* Задаём нижнюю рамку */ border-bottom: 5px solid #ff0001;> .arrow._prev /* Поворачиваем квадрат нижним левым углом влево */ transform: rotate(45deg);> .arrow._next /* Поворачиваем квадрат нижним левым углом вправо */ transform: rotate( -135deg );>.arrows max-width: 1200px; height: 250px; margin: 0 auto; background-color: #f1f1f1; > .arrow /* Рисуем квадрат */ width: 50px; height: 50px; /* Задаём левую рамку */ border-left: 5px solid #ff0001; /* Задаём нижнюю рамку */ border-bottom: 5px solid #ff0001; > .arrow._prev /* Поворачиваем квадрат нижним левым углом влево */ transform: rotate(45deg); > .arrow._next /* Поворачиваем квадрат нижним левым углом вправо */ transform: rotate( -135deg ); >
Чем не стрелки для слайдера? 🤗
🛠 Часто встречающийся дизайнерский приём — появление рамки вокруг элемента при наведении на него курсора мыши.
Если просто добавлять рамку по селектору :hover , то элемент будет дёргаться. Причина в том, что размер элемента увеличивается на ширину рамки. Чтобы подобных подёргиваний не происходило, изначально задайте рамку нужной толщины, но установите ей прозрачный цвет ( transparent ). А по наведению курсора просто меняйте цвет на нужный. Profit! Вы прекрасны 😄
border-color
Устанавливает цвет границы на разных сторонах элемента. Свойство позволяет задать цвет границы сразу для всех сторон элемента или только для указанных.
Синтаксис
border-color: [цвет | transparent] | inherit
Значения
transparent Устанавливает прозрачный цвет. inherit Наследует значение родителя.
Разрешается использовать одно, два, три или четыре значения, разделяя их между собой пробелом. Результат зависит от количества и указан в табл. 1.
| Число значений | Результат |
|---|---|
| 1 | Цвет границы будет установлен для всех сторон элемента. |
| 2 | Первое значение устанавливает цвет верхней и нижней границы, второе — левой и правой. |
| 3 | Первое значение задает цвет верхней границы, второе — одновременно левой и правой границы, а третье — нижней границы. |
| 4 | Поочередно устанавливается цвет верхней, правой, нижней и левой границы. |
HTML5 CSS2.1 CSS3 IE Cr Op Sa Fx
Lorem ipsum dolor sit amet
Lorem ipsum dolor sit amet, consectetuer adipiscing elit, sed diem nonummy nibh euismod tincidunt ut lacreet dolore magna aliguam erat volutpat.
Результат данного примера показан на рис. 1.
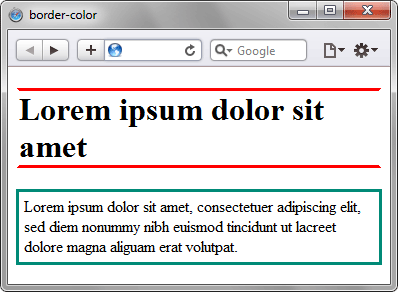
Рис. 1. Использование свойства border-color
Объектная модель
[window.]document.getElementById(» elementID «).style.borderColorБраузеры
Internet Explorer 6 не поддерживает значение transparent . Браузер Internet Explorer до версии 7.0 включительно не поддерживает inherit .
Цвет границы в разных браузерах может несколько различаться при использовании значений стиля groove , ridge , inset или outset .
Не выкладывайте свой код напрямую в комментариях, он отображается некорректно. Воспользуйтесь сервисом cssdeck.com или jsfiddle.net, сохраните код и в комментариях дайте на него ссылку. Так и результат сразу увидят.
CSS по категориям

Поля

Анимация

Градиент

Скруглённые уголки

Изображения

Псевдоэлементы

Псевдоклассы

Печать

Контент

Интерфейс

Таблица

Отступы

Список

Текст

Шрифт

Форматирование

Размеры

Позиционирование

Границы

Цвет и фон
Селекторы
- Селекторы тегов
- Идентификаторы
- Классы
- Мультиклассы
- Универсальный селектор
- Вложенные селекторы
- Дочерние селекторы
- Соседние селекторы
- Родственные селекторы
- Селекторы атрибутов
- [атрибут=»значение»]
- [атрибут^=»значение»]
- [атрибут$=»значение»]
- [атрибут*=»значение»]
- [атрибут~=»значение»]
- [атрибут|=»значение»]
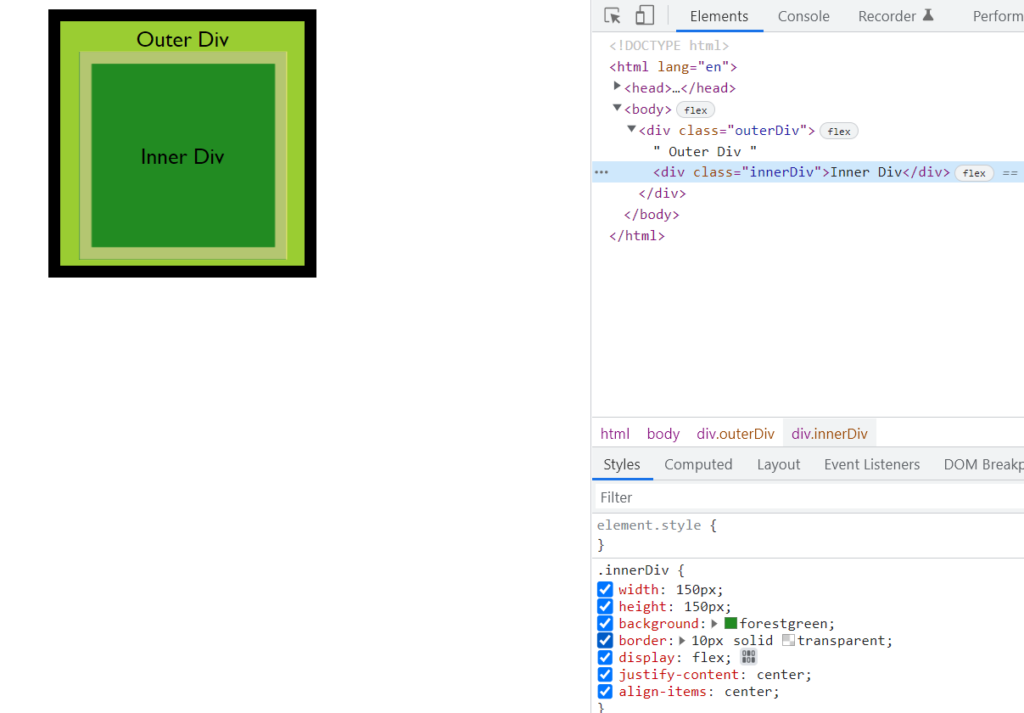
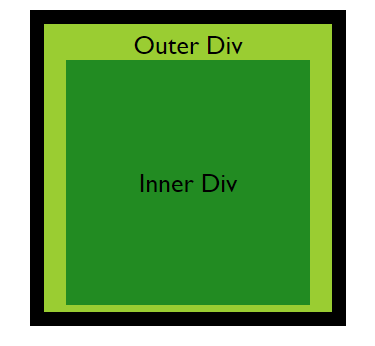
Making a Transparent Border with CSS — with Pictures and Examples

Using the transparent property of border in CSS
Now, let’s try to make the Outer Div’s border transparent. To do so, in our CSS file at line #14, we will change our code to —
border: 10px solid transparent;
The Output will be as follows —
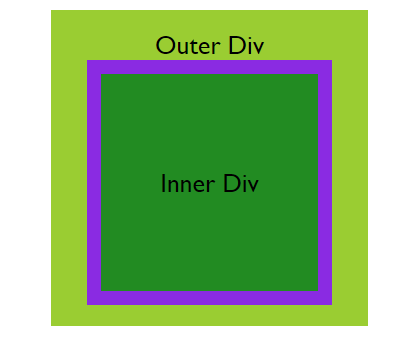
The actual width of our Outer Div element on applying transparent border is now —
200px + 10px + 10px = 220px (10px width of transparent border on both sides of the Outer Div is added to the actual width of element)
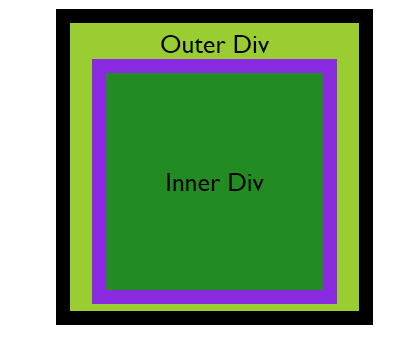
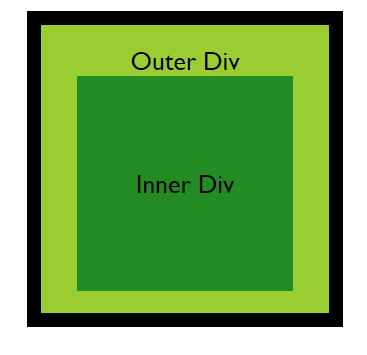
Now, if we remove transparency from our Outer Div’s border and try to make the Inner Div’s border transparent by the following codes —
border: 10px solid black; /* Outer Div remove transparency at line #14 */
border: 10px solid transparent; /* Inner Div apply transparency at line #26 */
We will get the following Output —
The actual width of our Outer Div element on applying border is now —
200px + 10px + 10px = 220px (10px width of border on both sides of the Outer Div is added to the actual width of element)
The actual width of our Inner Div element on applying transparent border is now —
150px + 10px + 10px = 170px (10px width of border on both sides of the Inner Div is added to the actual width of element)
Note: When a border is applied on any HTML element, it is always applied over that element in addition to the present dimensions of that element.
So when we make the border transparent for an element, the part of that element that is below the border will become visible.
That’s why when we make the border of Inner Div transparent in the above example, we see the additional part of the Inner Div(10px borders on each side).
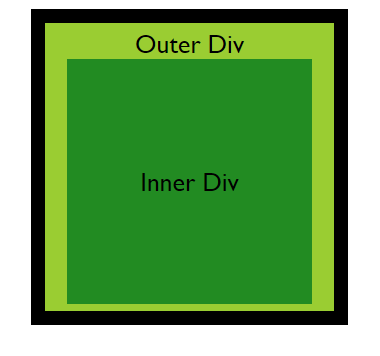
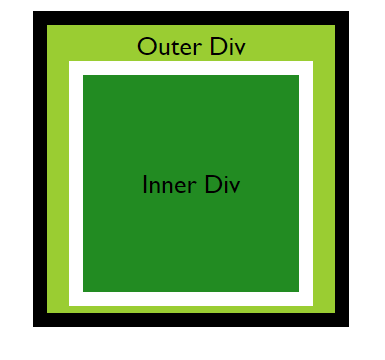
But when we remove the border property of CSS from our Inner Div HTML element by commenting out Line #26 to remove border property —
/* border: 10px solid black; */
We get the following Output —
The actual width of our Outer Div element on applying border is now —
200px + 10px + 10px = 220px (10px width of border on both sides of the Outer Div is added to the actual width of element)
The actual width of our Inner Div element on applying transparent border is now — 150px.
Since we removed the border property from our Inner Div, the part of the Outer Div element below the border of our Inner Div is now visible.
You can compare all the pictures displayed above in this article and see the differences. Focus on the text «Outer Div» inside the pictures to get more clarity in understanding.
Changing the opacity of the border in CSS using RGBA
A lot of times, I get asked — can we change the opacity of the border in CSS?
Yes, we can change the opacity of the border of any HTML Element using RGBA.
NOTE: rgba(255, 255, 255) denotes the color White. rgba(255, 255, 255, 0.5) denotes the color White with opacity of 0.5.
In our above CSS code, at line #26, we change the opacity, or some call it transparency, of our Inner Div Element —
border: 10px solid rgba(255, 255, 255, 0.5);
Here is the Output for the above code —
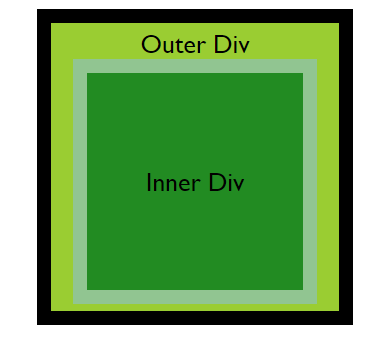
The number 0.5 inside rgba denotes the opacity of the border we are giving to our InnerDiv HTML Element.
If we change opacity to 1 or more than 1,
border: 10px solid rgba(255, 255, 255, 1);
we get the following Output —
If we change opacity to 0,
border: 10px solid rgba(255, 255, 255, 0);
we get the following Output —
Hence we can see that making the border opacity to 0 using rgba(255, 255, 255, 0) will also make the border of our element transparent.
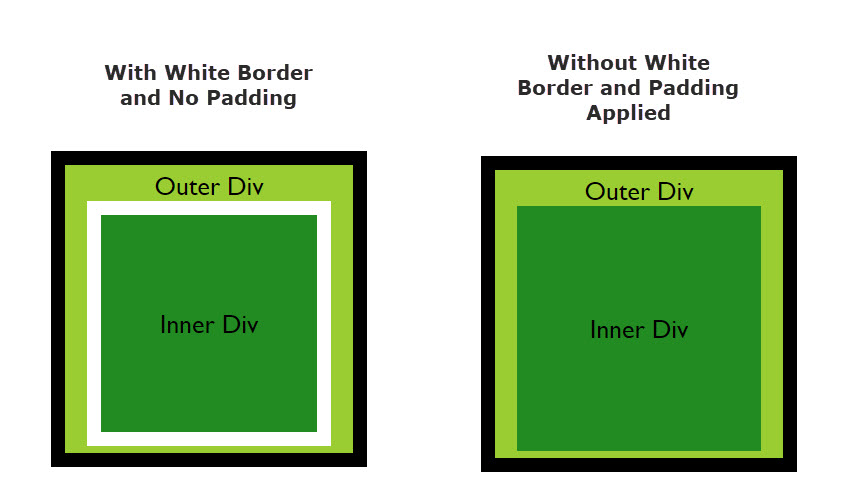
Make a transparent border with padding in CSS
There are other ways to make an HTML Element’s border transparent using CSS’ padding property.
For instance, let’s try to give transparency to the border of the width of 10px.
Removing the border property and applying padding property to the element of 10px.
/* border: 10px solid white; */
padding: 10px;
Here is the Image representing the Output for better comparison and understanding.
I hope you enjoyed this article.
CSS border-color Property
The border-color property sets the color of an element’s four borders. This property can have from one to four values.
If the border-color property has four values:
- border-color: red green blue pink;
- top border is red
- right border is green
- bottom border is blue
- left border is pink
If the border-color property has three values:
- border-color: red green blue;
- top border is red
- right and left borders are green
- bottom border is blue
If the border-color property has two values:
- border-color: red green;
- top and bottom borders are red
- right and left borders are green
If the border-color property has one value:
Note: Always declare the border-style property before the border-color property. An element must have borders before you can change the color.
Default value: The current color of the element Inherited: no Animatable: yes. Read about animatable Try it Version: CSS1 JavaScript syntax: object.style.borderColor=»#FF0000 blue» Try it Browser Support
The numbers in the table specify the first browser version that fully supports the property.
CSS Syntax
Property Values
Value Description Demo color Specifies the border color. Look at CSS Color Values for a complete list of possible color values. Default color is the current color of the element Demo ❯ transparent Specifies that the border color should be transparent Demo ❯ initial Sets this property to its default value. Read about initial inherit Inherits this property from its parent element. Read about inherit More Examples
Example
Set a color for the border with a HEX value:
Example
Set a color for the border with an RGB value:
Example
Set a color for the border with an RGBA value:
Example
Set a color for the border with a HSL value:
Example
Set a color for the border with a HSLA value:
Example
Set a different border-color for each side of an element: