- How to Make Shadow on Border-Bottom
- How can I set border bottom to none while using box shadow inset?
- How to add a shadow for underline (bottom border) in css
- CSS Border Shadow On One Side Of the Border
- How to create a drop shadow only on one side of an element?
- UPDATE 4
- How to make border bottom inside block?
- How to make shadow on border-bottom?
- Answer by Roy Hebert
- Definition and Usage
- Answer by Ernesto Dunn
- Answer by Anakin Montgomery
- Answer by Wrenley Pena
- Answer by Bellamy Shepherd
- Answer by Harley Harrington
- Answer by Alec McLaughlin
- Related
- Все о свойстве border
- Основы
- Border-Radius
- Несколько границ
- Изменение углов
- CSS фигуры
- Создание Speech Bubble
- Итог
How to Make Shadow on Border-Bottom
It’s actually much simpler, whatever you set the blur to (3rd value), set the spread (4th value) to the negative of it.
How can I set border bottom to none while using box shadow inset?
The reason I am using ‘box-shadow:inset’ instead of the regular border
style because it does not alters my box size and shifts my box out of
position.
You can still try to make a border (with border-bottom: none; ) and add box-sizing: border-box , which will include the borders (and padding) in the overall width and height of the element.
How to add a shadow for underline (bottom border) in css
find fiddle demo
h1.headerone text-shadow:0 0 5px black;
/* text-decoration:underline; I didn't use this because gap is low */
position:relative;
>
h1.headerone:before content:'';
position:absolute;
bottom:-2px;
left:0;
width:100%;
height:2px;
background:#000;
box-shadow:0 0 5px black;
>
CSS Border Shadow On One Side Of the Border
to do this, you have to use position property and use background image instead of border
.divider < color: #282837; width: 70%; margin: 20px auto; overflow: hidden; text-align: center; line-height: 1.2em; font-size: 30px; text-transform: uppercase; font-weight: 400;position: relative;>
.divider-2 < color: red; >
.divider:before < content: ""; vertical-align: middle; display: inline-block; width: 15%; border-bottom: 1px dashed #9A9A9A;position: absolute;top: 20px;left: 0px;>
.divider:after
How to create a drop shadow only on one side of an element?
UPDATE 4
Same as update 3 but with modern css (=fewer rules) so that no special positioning on the pseudo element is required.
#box background-color: #3D6AA2;
width: 160px;
height: 90px;
position: absolute;
top: calc(10% - 10px);
left: calc(50% - 80px);
>

.box-shadow:after content:"";
position:absolute;
width:100%;
bottom:1px;
z-index:-1;
transform:scale(.9);
box-shadow: 0px 0px 8px 2px #000000;
>
How to make border bottom inside block?
An inset box shadow seems to be what you require
How to make shadow on border-bottom?
If you want to change the depth of the shadow, simply increase the height style in the after pseudo element. You can also obviously darken, lighten, or change colors in the linear gradient styles.,This example uses the :after pseudo element along with a linear gradient with transparency in order to put a drop shadow on a container that extends exactly to the sides of the element you wish to shadow.,It seems like in the answers provided the issue was always how the box border would either be visible on the left and right of the object or you’d have to inset it so far that it didn’t shadow the whole length of the container properly., What makes the right angle special enough to be distinguished in the French metric system?
Answer by Roy Hebert
The box-shadow property attaches one or more shadows to an element.,Add shadows to different elements:,Note: To attach more than one shadow to an element, add a comma-separated list of shadows (see «Try it Yourself» example below). ,HTML DOM reference: boxShadow property
Definition and Usage
The box-shadow property attaches one or more shadows to an element.
Answer by Ernesto Dunn
-webkit-box-shadow: -2px -1px 15px 7px rgba(0,0,0,0.5); -moz-box-shadow: -3px -2px 30px 14px rgba(0,0,0,0.425); box-shadow: -4px -3px 45px 21px rgba(0,0,0,0.35); Answer by Anakin Montgomery
Learning CenterBlogGet insights on scaling, management, and product development for founders and engineering managers.Community PostsRead programming tutorials, share your knowledge, and become better developers together.Hot TopicsAndroidAngulariOSJavaScriptNode.jsPythonReactBlockchainEthereum,Mobile App DevelopmentAndroidiOSIonicKotlinReact NativeSwiftXcode,So with that in mind, we can now use the box-shadow to resolve our previous issue. So I added a new box and drawn the borders with the box-shadow property:,Hi! Thanks for responding why the designer made some borders with box-shadow on my new project 🙂
So, adding a border to a box, is pretty simple when you use the border property. Let’s start a first basic example by drawing a small square and adding a red border to it. I volontarly add some content to the div , with a small padding in it, it’ll be necessary for the next of the article:
Now, suppose you need to add some style when your mouse go above the square like strengthening the border. Let’s make our first solution with the border property:
So here is a small recap of drawing borders with the box-shadow property:
box-shadow: 0 1px 0 0 red; /* Border bottom */ box-shadow: 0 -1px 0 0 red; /* Border top */ box-shadow: -1px 0 0 0 red; /* Border left */ box-shadow: 1px 0 0 0 red; /* Border right */ box-shadow: 0 0 0 1px red; /* All the borders by using the spread properties */ So with that in mind, we can now use the box-shadow to resolve our previous issue. So I added a new box and drawn the borders with the box-shadow property:
Now let’s add the hover case:
Answer by Wrenley Pena
The horizontal offset of the shadow, positive means the shadow will be on the right of the box, a negative offset will put the shadow on the left of the box.,The vertical offset of the shadow, a negative one means the box-shadow will be above the box, a positive one means the shadow will be below the box.,You can expand the shadow with a negative value to hide the other sides. This code creates a 5px black inset shadow on the left side of the box only: ,gives you a shadow on the right and on the left of the element, while the top and the bottom stretch completely to the edges of the browser.
Used in casting shadows off block-level elements (like divs).
Using a negative spread radius, you can get squeeze in a box shadow and only push it off one edge of a box.
Answer by Bellamy Shepherd
In this example, we include three shadows: an inset shadow, a regular drop shadow, and a 2px shadow that creates a border effect (we could have used an outline instead for that third shadow).,The box-shadow CSS property adds shadow effects around an element’s frame. You can set multiple effects separated by commas. A box shadow is described by X and Y offsets relative to the element, blur and spread radius, and color.,…for a long, straight shadow edge, this should create a color transition the length of the blur distance that is perpendicular to and centered on the shadow’s edge, and that ranges from the full shadow color at the radius endpoint inside the shadow to fully transparent at the endpoint outside it., If not specified (default), the shadow is assumed to be a drop shadow (as if the box were raised above the content). The presence of the inset keyword changes the shadow to one inside the frame (as if the content was depressed inside the box). Inset shadows are drawn inside the border (even transparent ones), above the background, but below content.
/* Keyword values */ box-shadow: none; /* offset-x | offset-y | color */ box-shadow: 60px -16px teal; /* offset-x | offset-y | blur-radius | color */ box-shadow: 10px 5px 5px black; /* offset-x | offset-y | blur-radius | spread-radius | color */ box-shadow: 2px 2px 2px 1px rgba(0, 0, 0, 0.2); /* inset | offset-x | offset-y | color */ box-shadow: inset 5em 1em gold; /* Any number of shadows, separated by commas */ box-shadow: 3px 3px red, -1em 0 0.4em olive; /* Global keywords */ box-shadow: inherit; box-shadow: initial; box-shadow: revert; box-shadow: unset; Answer by Harley Harrington
This is good except one issue. If two boxes are stacked and you want to add a left or right shadow, there will be gaps like in below screenshot.,with border removed and with darker shade it look like below,Very cool! Thanks for sharing! I created a Codepen for the rules and added a few others as well: http://codepen.io/zeckdude/pen/oxywmm,Here’s a complete list for one-sided, two-sided and three-sided variants: https://codepen.io/eyecatchup/full/wLZgMJ
/* Shadows */ .shadow-top < box-shadow: 0 -10px 20px -5px rgba(115,115,115,0.75); >.shadow-right < box-shadow: 10px 0 20px -5px rgba(115,115,115,0.75); >.shadow-bottom < box-shadow: 0 10px 20px -5px rgba(115,115,115,0.75); >.shadow-left < box-shadow: -10px 0 20px -5px rgba(115,115,115,0.75); >.shadow-all < box-shadow: 0 0 20px rgba(115,115,115,0.75); >.shadow-top-right < box-shadow: 0 -10px 20px -5px rgba(115,115,115,0.75), 10px 0 20px -5px rgba(115,115,115,0.75); >.shadow-top-bottom < box-shadow: 0 -10px 20px -5px rgba(115,115,115,0.75), 0 10px 20px -5px rgba(115,115,115,0.75); >.shadow-top-left < box-shadow: 0 -10px 20px -5px rgba(115,115,115,0.75), -10px 0 20px -5px rgba(115,115,115,0.75); >.shadow-bottom-right < box-shadow: 0 10px 20px -5px rgba(115,115,115,0.75), 10px 0 20px -5px rgba(115,115,115,0.75); >.shadow-left-right < box-shadow: -10px 0 20px -5px rgba(115,115,115,0.75), 10px 0 20px -5px rgba(115,115,115,0.75); >.shadow-bottom-left < box-shadow: 0 10px 20px -5px rgba(115,115,115,0.75), -10px 0 20px -5px rgba(115,115,115,0.75); >.shadow-top-bottom-right < box-shadow: 0 -10px 20px -5px rgba(115,115,115,0.75), 0 10px 20px -5px rgba(115,115,115,0.75), 10px 0 20px -5px rgba(115,115,115,0.75); >.shadow-top-bottom-left < box-shadow: 0 -10px 20px -5px rgba(115,115,115,0.75), 0 10px 20px -5px rgba(115,115,115,0.75), -10px 0 20px -5px rgba(115,115,115,0.75); >.shadow-inset
Answer by Alec McLaughlin
An exploration of the CSS box-shadow property.
box-shadow: inset 0 0 5px 5px olive;box-shadow: 0 0 5px 5px olive;box-shadow: 0 10px 10px -5px;color: red; box-shadow: 0 0 10px 5px;color: red; box-shadow: 0 0 10px 5px blue;box-shadow: -5px -5px 30px 5px red, 5px 5px 30px 5px blue;Related
Show notification at bottom-center in mobile devices in REACT NOTIFICATION COMPONENT LIBRARY Removing the bottom error caps only on matplotlib Footer at bottom of browser except when I scroll How can I add a responsive bottom margin for an element inside Angular mat-dialog Why bottom positioned footer inside moves below viewport if height is always equal to viewport’s height Footer position — bottom and center [duplicate] Scroll to bottom of an overflowing div in React How to make footer stick to bottom [duplicate] How to hide bottom side Css How can i remove padding bottom in React material UI Card “MuiCardContent-root:last-child” default padding bottom? Is there a way to automatically get to the bottom of a virtual scroll? How to make shadow on border-bottom? Auto scrolling to bottom of page How To hide bottom view of position is absolute when keyboard is active in React Native? How to set top and bottom margin in .HTML using jspdf Curve bottom side of the div to the inside with CSS How I put triangle to bottom border which have relative parents Add element to bottom of container and shift elements up How to add footer to bottom of each page when converting HTML to PDF Create a curved bottom navigation (before after implementation)
Все о свойстве border
Все знакомы с css параметром border, но есть ли вещи, которые мы не знаем о нем?
Основы
border-width: thick; border-style: solid; border-color: black;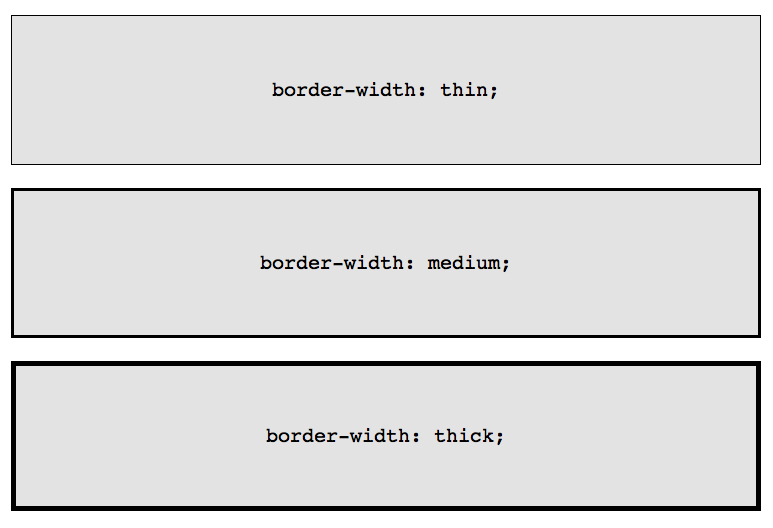
Например у параметра border-width есть три параметра: thin, medium, thick:
Если необходимо менять цвет границы при наведении на объект:
Border-Radius
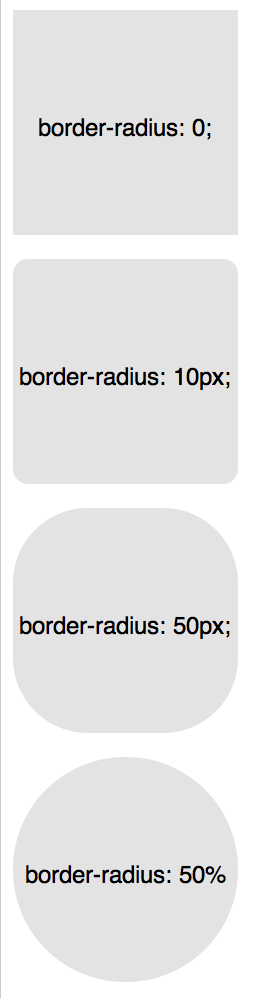
border-radius — это новый параметр CSS3 для отображения закругленных углов, который корректно работает во всех современных браузерах, за исключением Internet Explorer 8 (и более старых версий).
Для каждого угла можно назначить свое закругление:
border-top-left-radius: 20px; border-top-right-radius: 0; border-bottom-right-radius: 30px; border-bottom-left-radius: 0;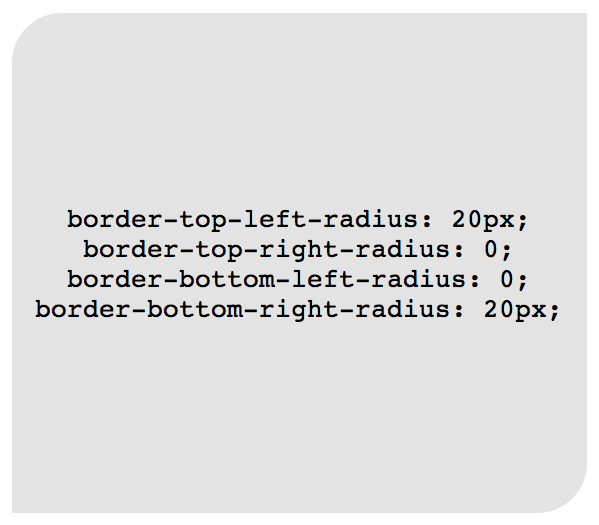
В приведенном примере необязательно назначать «0» border-top-right-radius и border-bottom-left-radius, если они не наследуют значения, которые должны быть изменены.
Всю конструкцию можно сжать в одну строку:
/* top left, top right, bottom right, bottom left */ border-radius: 20px 0 30px 0;
Здесь описаны самые простые и популярные примеры применения параметра border. Перейдем к более сложным.
Несколько границ
Border-Style
solid, dashed, and dotted — самые популярные значения параметра border-style, но давайте рассмотрим другие, например, groove and ridge.
border: 20px groove #e3e3e3;border-color: #e3e3e3; border-width: 20px; border-style: groove;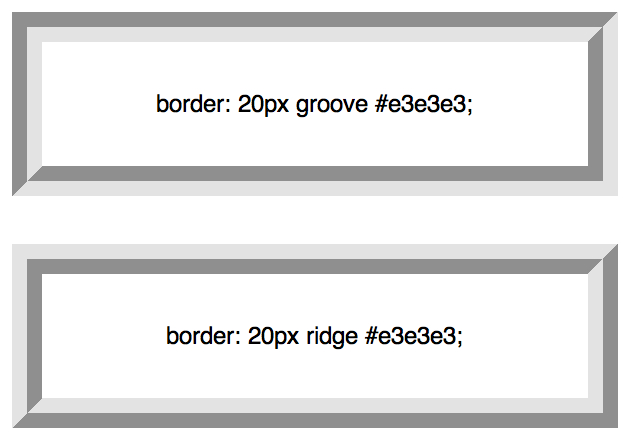
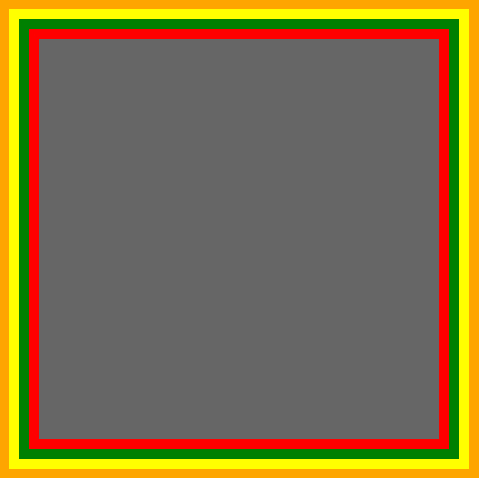
Outline

Этот способ отлично работает, но ограничен созданием двойной рамки. Если вам необходимо отобразить несколько границ элемента, то необходимо использовать другую технику.
Псевдоэлементы
.box < width: 200px; height: 200px; background: #e3e3e3; position: relative; border: 10px solid green; >/* Create two boxes with the same width of the container */ .box:after, .box:before < content: ''; position: absolute; top: 0; left: 0; bottom: 0; right: 0; >.box:after < border: 5px solid red; outline: 5px solid yellow; >.box:before

Возможно это не самое элегантное решение, однако оно работает
Box-Shadow
Изменение углов
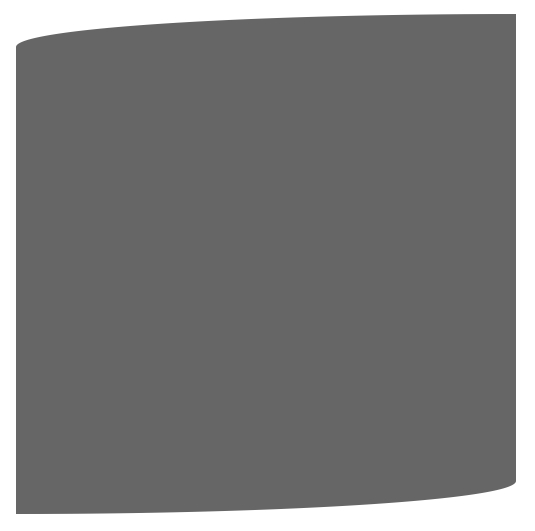
border-radius: 50px / 100px; /* horizontal radius, vertical radius */border-top-left-radius: 50px 100px; border-top-right-radius: 50px 100px; border-bottom-right-radius: 50px 100px; border-bottom-left-radius: 50px 100px;Эта техничка бывает полезна, если необходимо имитировать искривление, а не закругление. Например, так можно получить эффект скрученной бумаги:
CSS фигуры
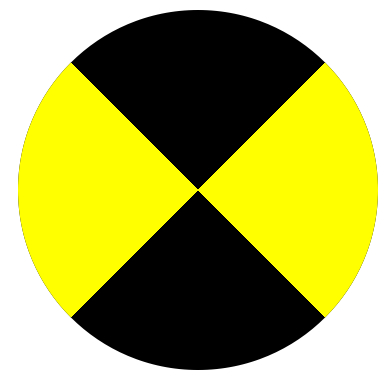
Наиболее частым примером использования CSS фигур является отображение стрелок. Чтобы понять, как это работает, необходимо разобраться с использованием отдельного border-color для каждой стороны и установкой значения «0» для width и height:
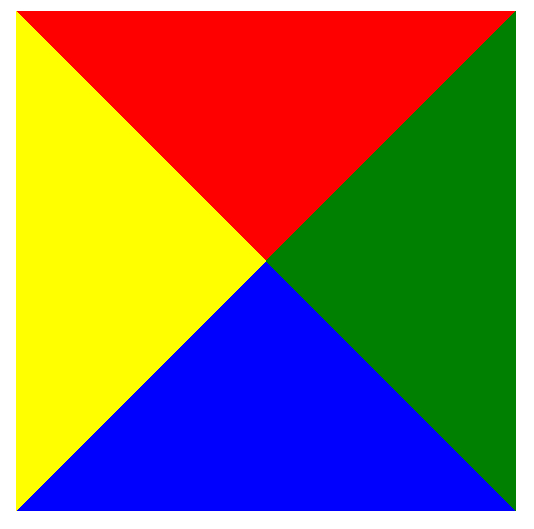
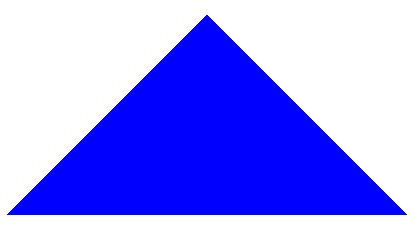
А теперь оставляем только синий треугольник:
Создание Speech Bubble
Теперь нужно расположить стрелку-треугольник в нужном месте. Вот наш цветной квадратик:
Оставляем только четверть квадратика:
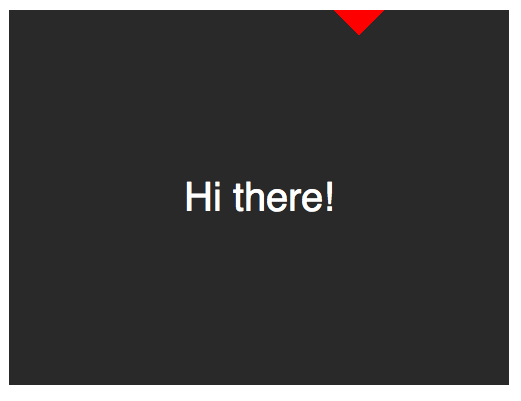
Теперь перемещаем ниже и закрашиваем:
.speech-bubble < /* … other styles */ border-radius: 10px; >.speech-bubble:after < content: ''; position: absolute; width: 0; height: 0; border: 15px solid; border-top-color: #292929; top: 100%; left: 50%; margin-left: -15px; /* adjust for border width */ >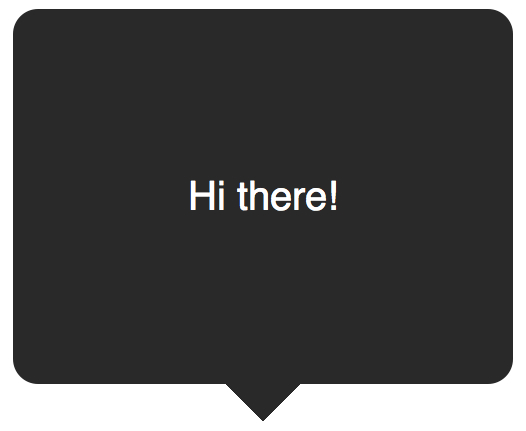
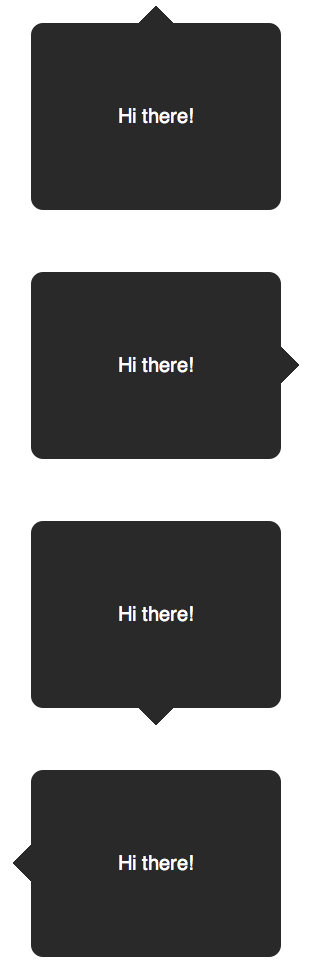
Примеры применения:
/* Speech Bubbles Usage: Apply a class of .speech-bubble and .speech-bubble-DIRECTIONHi there*/ .speech-bubble < position: relative; background-color: #292929; width: 200px; height: 150px; line-height: 150px; /* vertically center */ color: white; text-align: center; border-radius: 10px; font-family: sans-serif; >.speech-bubble:after < content: ''; position: absolute; width: 0; height: 0; border: 15px solid; >/* Position the Arrow */ .speech-bubble-top:after < border-bottom-color: #292929; left: 50%; bottom: 100%; margin-left: -15px; >.speech-bubble-right:after < border-left-color: #292929; left: 100%; top: 50%; margin-top: -15px; >.speech-bubble-bottom:after < border-top-color: #292929; top: 100%; left: 50%; margin-left: -15px; >.speech-bubble-left:after
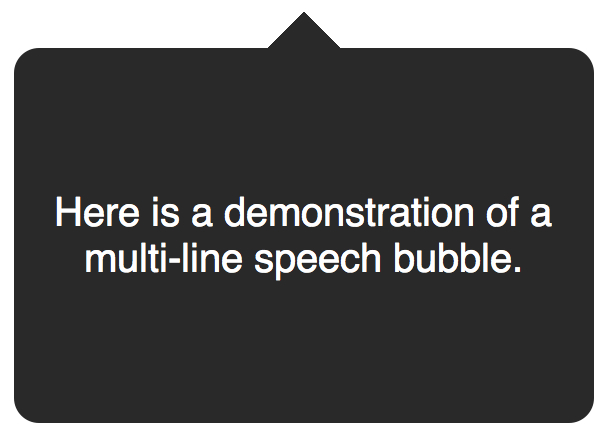
Вертикальное центрирование текста
минус использования line-height при вертикальном центрировании в ограничении текста одной строкой. Для решения этой проблемы, можно применить display: table к нашему Speech Bubble и display: table-cell к тексту:
.speech-bubble < /* other styles */ display: table; >.speech-bubble p
Еще один пример нестандартного использования границ:
Итог
Использование параметра border не ограничивается одним лишь «1px solid black», с помощью границ можно создавать различные фигуры, причем достаточно один раз написать CSS-класс и применять его к множеству элементов на странице.