- Writing a Binary Search Tree in Python with Examples
- 🔗 What is a binary search tree?
- 🔗 Why would I use a binary search tree?
- 🔗 Pros of a BST
- 🔗 Cons of a BST
- 🔗 Implementing a B-tree in Python
- 🔗 Step 1 — BSTNode Class
- 🔗 Step 2 — Insert
- 🔗 Step 3 — Get Min and Get Max
- 🔗 Step 4 — Delete
- 🔗 Step 5 — Exists
- 🔗 What’s the difference between a Binary Tree and a Linked List?
- Обход двоичного дерева на Python
- Что такое двоичное дерево?
- Строим двоичное дерево на Python
- Обход двоичного дерева
- Pre-Order
- Post-Order
- In-Order
Writing a Binary Search Tree in Python with Examples
Curated backend podcasts, videos and articles. All free.
If you’re looking to become a backend developer, or just stay up-to-date with the latest backend technologies and trends, you found the right place. Subscribe below to get a copy of our newsletter, The Boot.dev Beat, each month in your inbox. No spam, no sponsors, totally free.
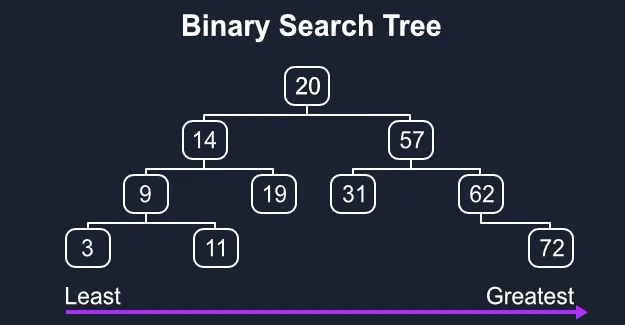
🔗 What is a binary search tree?
A binary search tree, or BST for short, is a tree where each node is a value greater than all of its left child nodes and less than all of its right child nodes. Read on for an implementation of a binary search tree in Python from scratch!
Also, if you’re interested in learning Python data structures from the ground up, check out my Learn Python and Learn Algorithms courses on Boot.dev.
🔗 Why would I use a binary search tree?
Binary trees are useful for storing data in an organized manner so that it can be quickly retrieved, inserted, updated, and deleted. This arrangement of nodes allows each comparison to skip about half of the rest of the tree, so each operation as a whole is lightning fast.
To be precise, binary search trees provide an average Big-O complexity of O(log(n)) for search, insert, update, and delete operations. log(n) is much faster than the linear O(n) time required to find elements in an unsorted array. Many popular production databases such as PostgreSQL and MySQL use binary trees under the hood to speed up CRUD operations.
🔗 Pros of a BST
- When balanced, a BST provides lightning-fast O(log(n)) insertions, deletions, and lookups.
- Binary search trees are simple to implement. An ordinary BST, unlike a balanced red-black tree, requires very little code to get running.
🔗 Cons of a BST
- Slow for a brute-force search. If you need to iterate over each node, you might have more success with an array.
- When the tree becomes unbalanced, all fast O(log(n)) operations quickly degrade to O(n) .
- Since pointers to whole objects are typically involved, a BST can require quite a bit more memory than an array, although this depends on the implementation.
🔗 Implementing a B-tree in Python
🔗 Step 1 — BSTNode Class
Our implementation won’t use a Tree class, but instead just a Node class. Binary trees are really just a pointer to a root node that in turn connects to each child node, so we’ll run with that idea.
First, we create a constructor:
We’ll allow a value, which will also act as the key, to be provided. If one isn’t provided we’ll just set it to None . We’ll also initialize both children of the new node to None .
🔗 Step 2 — Insert
We need a way to insert new data into the tree. Inserting a new node should append it as a leaf node in the proper spot.
10 10 / \ Insert 5 / \ 2 60 ---------> 2 60 / \ / \ 1 3 1 3 \ 5 The insert method is as follows:
If the node doesn’t yet have a value, we can just set the given value and return . If we ever try to insert a value that also exists, we can also simply return as this can be considered a “no-op”. If the given value is less than our node’s value and we already have a left child then we recursively call insert on our left child. If we don’t have a left child yet then we just make the given value our new left child. We can do the same (but inverted) for our right side.
🔗 Step 3 — Get Min and Get Max
getMin and getMax are useful helper functions, and they’re easy to write! They are simple recursive functions that traverse the edges of the tree to find the smallest or largest values stored therein.
🔗 Step 4 — Delete
The delete operation is one of the more complex ones. It is a recursive function as well, but it also returns the new state of the given node after performing the delete operation. This allows a parent whose child has been deleted to properly set it’s left or right data member to None .
🔗 Step 5 — Exists
The exists function is another simple recursive function that returns True or False depending on whether a given value already exists in the tree.
It’s useful to be able to print out the tree in a readable format. The inorder method print’s the values in the tree in the order of their keys.
Full Binary Search Tree in Python
Where would you use a binary search tree in real life?
There are many applications of binary search trees in real life, and one of the most common use cases is in storing indexes and keys in a database.
For example, in MySQL or PostgreSQL when you create a primary key column, what you’re really doing is creating a binary tree where the keys are the values of the column, and those nodes point to database rows. This lets the application easily search database rows by providing a key. For example, getting a user record by the email primary key.
There are many applications of binary search trees in real life, and one of the most common use cases is storing indexes and keys in a database.
For example, when you create a primary key column in MySQL or PostgreSQL, you create a binary tree where the keys are the values of the column and the nodes point to database rows. This allows the application to easily search for database rows by specifying a key, for example, to find a user record using the email primary key.
Other common uses include:
- Pathfinding algorithms in video games (A*) use BSTs
- File compression using a Huffman encoding scheme uses a binary search tree
- Rendering calculations — Doom (1993) was famously the first game to use a BST
- Compilers for low-level coding languages parse syntax using a BST
- Almost every database in existence uses BSTs for key lookups
🔗 What’s the difference between a Binary Tree and a Linked List?
While binary trees and linked lists both use pointers to keep track of nodes, binary trees are more efficient for searching. In fact, linked lists are O(n) when used to search for a specific element — that’s pretty bad! Linked lists excel at removing and inserting elements quickly in the middle of the list.
Обход двоичного дерева на Python
Да, двоичные деревья — не самая любимая тема программистов. Это одна из тех старых концепций, о целесообразности изучения которых постоянно ведутся споры. В работе вам довольно редко придется реализовывать двоичные деревья и обходить их, так зачем же уделять им так много внимания на технических собеседованиях?
Сегодня мы не будем переворачивать двоичное дерево (ффухх!), но рассмотрим пару методов его обхода. К концу статьи вы поймете, что двоичные деревья не так страшны, как кажется.
Что такое двоичное дерево?
Недавно мы разбирали реализацию связных списков на Python. Каждый такой список состоит из некоторого количества узлов, указывающих на другие узлы. А если бы узел мог указывать не на один другой узел, а на большее их число? Вот это и есть деревья. В них каждый родительский узел может иметь несколько узлов-потомков. Если у каждого узла максимум два узла-потомка (левый и правый), такое дерево называется двоичным (бинарным).
В приведенном выше примере «корень» дерева, т. е. самый верхний узел, имеет значение 1. Его потомки — 2 и 3. Узлы 3, 4 и 5 называют «листьями»: у них нет узлов-потомков.
Строим двоичное дерево на Python
Как построить дерево на Python? Реализация будет похожей на наш класс Node в реализации связного списка. В этом случае мы назовем класс TreeNode .
Определим метод __init__() . Как всегда, он принимает self . Также мы передаем в него значение, которое будет храниться в узле.
class TreeNode: def __init__(self, value):
Установим значение узла, а затем определим левый и правый указатель (для начала поставим им значение None ).
class TreeNode: def __init__(self, value): self.value = value self.left = None self.right = None
И… все! Что, думали, что деревья куда сложнее? Если речь идет о двоичном дереве, единственное, что его отличает от связного списка, это то, что вместо next у нас тут есть left и right .
Давайте построим дерево, которое изображено на схеме в начале статьи. Верхний узел имеет значение 1. Далее мы устанавливаем левые и правые узлы, пока не получим желаемое дерево.
tree = TreeNode(1) tree.left = TreeNode(2) tree.right = TreeNode(3) tree.left.left = TreeNode(4) tree.left.right = TreeNode(5)
Обход двоичного дерева
Итак, вы построили дерево и теперь вам, вероятно, любопытно, как же его увидеть. Нет никакой команды, которая позволила бы вывести на экран дерево целиком, тем не менее мы можем обойти его, посетив каждый узел. Но в каком порядке выводить узлы?
Самые простые в реализации обходы дерева — прямой (Pre-Order), обратный (Post-Order) и центрированный (In-Order). Вы также можете услышать такие термины, как поиск в ширину и поиск в глубину, но их реализация сложнее, ее мы рассмотрим как-нибудь потом.
Итак, что из себя представляют три варианта обхода, указанные выше? Давайте еще раз посмотрим на наше дерево.
При прямом обходе мы посещаем родительские узлы до посещения узлов-потомков. В случае с нашим деревом мы будем обходить узлы в таком порядке: 1, 2, 4, 5, 3.
Обратный обход двоичного дерева — это когда вы сначала посещаете узлы-потомки, а затем — их родительские узлы. В нашем случае порядок посещения узлов при обратном обходе будет таким: 4, 5, 2, 3, 1.
При центрированном обходе мы посещаем все узлы слева направо. Центрированный обход нашего дерева — это посещение узлов 4, 2, 5, 1, 3.
Давайте напишем методы обхода для нашего двоичного дерева.
Pre-Order
Начнем с определения метода pre_order() . Наш метод принимает один аргумент — корневой узел (расположенный выше всех).
Дальше нам нужно проверить, существует ли этот узел. Вы можете возразить, что лучше бы проверить существование потомков этого узла перед их посещением. Но для этого нам пришлось бы написать два if-предложения, а так мы обойдемся одним.
def pre_order(node): if node: pass
Написать обход просто. Прямой обход — это посещение родительского узла, а затем каждого из его потомков. Мы «посетим» родительский узел, выведя его на экран, а затем «обойдем» детей, вызывая этот метод рекурсивно для каждого узла-потомка.
# Выводит родителя до всех его потомков def pre_order(node): if node: print(node.value) pre_order(node.left) pre_order(node.right)
Просто, правда? Можем протестировать этот код, совершив обход построенного ранее дерева.
Post-Order
Переходим к обратному обходу. Возможно, вы думаете, что для этого нужно написать еще один метод, но на самом деле нам нужно изменить всего одну строчку в предыдущем.
Вместо «посещения» родительского узла и последующего «обхода» детей, мы сначала «обойдем» детей, а затем «посетим» родительский узел. То есть, мы просто передвинем print на последнюю строку! Не забудьте поменять имя метода на post_order() во всех вызовах.
# Выводит потомков, а затем родителя def post_order(node): if node: post_order(node.left) post_order(node.right) print(node.value)
Каждый узел-потомок посещен до посещения его родителя.
In-Order
Наконец, напишем метод центрированного обхода. Как нам обойти левый узел, затем родительский, а затем правый? Опять же, нужно переместить предложение print!
# выводит левого потомка, затем родителя, затем правого потомка def in_order(node): if node: in_order(node.left) print(node.value) in_order(node.right)
Вот и все, мы рассмотрели три простейших способа совершить обход двоичного дерева.