- Php server configuration page
- View phpInfo
- Select PHP version
- Select PHP configuration file
- Edit selected configuration file
- Edit Basic and Modules
- Enable/Disable Zend OpCache Accelerator
- View Zend OpCache Control Panel
- Show PHP Settings with phpinfo and Example PHP $_SERVER Display Page
- View PHP Environment Configuration Settings and Superglobals on a Page
- Show PHP Settings Examples
- Showing the $_SERVER Settings in a PHP Script
- Storing and Displaying PHP Application Settings
- Displaying PHP Magic Constants
- A Comprehensive Web Page to Show PHP Settings
- Also See
- Do you have a question or comment about this article?
Php server configuration page
PHP is a general-purpose scripting language designed for creating dynamic web pages. The Apache server uses a PHP processor module to generate the final web page being served. It interprets code embedded into HTML documents. PHP has been pre-configured for test, production and development. A UniController sub-menu allows you to easily switch between the three configurations. This page covers configuration and additional features for maintaining PHP.
| View phpInfo | — Runs PHP function phpinfo() |
| Select PHP version | — Versions 7.x to 8.x |
| Select PHP configuration file | — php_test.ini, php_development.ini or php_production.ini |
| Edit selected configuration file | — Edit file in Notepad |
| Edit Basic and Modules | — Edit Basic Configuration and Enable/Disable PHP Modules |
| Enable/Disable Zend OpCache Accelerator | — Enable/Disable Zend OpCache PHP Accelerator |
| View Zend OpCache Control Panel | — View Zend OpCache PHP Accelerator Control Panel |
Note: A default installation of Uniform Server Zero installs PHP as an Apache module.
View phpInfo
This menu button opens a page in the default browser that runs the PHP function phpinfo(), displaying a wealth of information relating to PHP. The page provides very detailed information and a menu splits this into smaller sections, making it easier to read.
- url: http://localhost/us_extra/phpinfo.php — Page displayed
- Location: C:\UniServerZ\home\us_extra\phpinfo.php
- Configuration — Displays PHP Core configuration.
- Environment — PHP current environment.
- Modules — List all modules.
- Extensions — Overview and details (includes functions) for all loaded extensions.
- Variables — List all currently available PHP variables.
- General — Intro information.
Select PHP version
The Uniform Server Zero provides switching between PHP versions 7.x to 8.x. To achieve this, you need to download a suitable PHP plugin for each version.
Note: While Apache is running, menu option is disabled (greyed out) to prevent problems.
- Click version you wish to use (A-F).
- Previous selection is deselected and new selection enabled.
- Selected PHP version is indicated by a check marker (E).
Note 1: For the new settings to become effective, you must restart the Apache server.
Note 2: Greyed out menu button indicates that PHP version plugin is not installed.
Note: For full menu details, see PHP Version Switching page.
Select PHP configuration file
The Uniform Server Zero provides switching between PHP configuration files php_test.ini, php_development.ini and php_production.ini
PHP > Select PHP configuration file
Note: While Apache is running, menu option is disabled (greyed out) to prevent problems.
- Click configuration file you wish to use (A-C).
- Previous selection is deselected and new selection enabled.
- Selected configuration file is indicated by a check marker (C).
Note: For the new settings to become effective, you must restart the Apache server.
Test Configuration file
PHP > Select PHP configuration file > php_test.ini
Note: In the following, phpxx represents the PHP version selected (covered above).
- File path: UniServerZ\core\phpxx\php_test.ini
- This configuration file is pre-configured and can be modified for testing before making changes to the other two configuration files.
- Note: In a default installation of The Uniform Server Zero, the current configuration is a copy of this file (php_test.ini = php_production.ini).
Development Configuration file
PHP > Select PHP configuration file > php_development.ini
- File path: UniServer\core\phpxx\php_development.ini
- This configuration file is pre-configured for development.
- Note: Errors are displayed in the user’s browser and also directed to log file.
Production Configuration file
PHP > Select PHP configuration file > php_production.ini
- File path: UniServerZ\core\phpxx\php_production.ini
- This configuration file is pre-configured for production use.
- Note: Errors are not displayed; these are directed to Apache’s log file.
Edit selected configuration file
The following menu allows you to edit the currently selected (covered above) PHP configuration file in Notepad.
Note: While Apache is running, menu option is disabled (greyed out) to prevent problems.
PHP > Edit selected configuration file
- Note: This configuration file is the active configuration. When Apache is started, the contents of this file will configure PHP.
Edit Basic and Modules
Edit Basic Configuration
PHP > Edit Basic and Modules > Edit Basic Configuration
This menu item allows you to change commonly configured PHP options.
Note: While Apache is running, menu option is disabled (greyed out) to prevent problems.
- Test (1): Before changing either development or production, use this file for temporary testing.
- Development (2): Configuration file used for development. Errors will be written to the screen. You can enable other parameters for testing.
- Production (3): Configuration file used for production. Prevents errors being written to screen. The initial settings tighten security, using Production Value by default. Any changes you wish to be permanent should be made in this file.
Note 1: After making changes, click the corresponding Update button. This writes the modified data to the associated configuration file.
Note 2: Changes to the current configuration are used next time the servers are started.
Note 3: For test, development and production configuration files to become effective, you need to select the appropriate file and restart Apache.
Note 4: Do not enable Short Open Tags. Doing so will conflict with other languages, such as XML’s open tag. For detailed information, see PHP Short Open Tags.
PHP Modules Enable/Disable
The following sub-menu allows you to enable or disable PHP extensions for the currently selected PHP configuration file:
PHP > Edit Basic and Modules > PHP Modules Enable/Disable
Note: While Apache is running, menu option is disabled (greyed out) to prevent problems.
Note: After changing state, you must restart the Apache server for the new configuration to be recognized.
File modified is the currently selected PHP configuration. Current selected config is shown at the top; for example:
Enable/Disable Zend OpCache Accelerator
The Uniform Server Zero provides support for the Zend OpCache PHP Accelerator. The following UniController sub-menu allows you to enable or disable it.
PHP > Enable/Disable Zend OpCache Accelerator
Note: While Apache is running, menu option is disabled (greyed out) to prevent problems.
Note 1: For the new settings to become effective, you must restart the Apache server.
Note 2: A greyed out menu option indicates the accelerator is unavailable.
View Zend OpCache Control Panel
The Uniform Server Zero provides support for the Zend OpCache PHP accelerator. The following UniController sub-menu allows you to display the accelerator’s controller in your default browser.
PHP > View Zend OpCache Control Panel
Note: View Zend OpCache Control Panel menu button greyed out indicates Apache and MySQL not running. The button is enabled when Apache and MySQL are running and PHP is installed.
Zend OpCache provides faster PHP execution through opcode caching and optimization. It improves PHP performance by storing precompiled script bytecode in the shared memory.
The Uniform Server Zero default installation has Zend OpCache disabled.
The Zend OpCache Control Panel is shown on the right.
Show PHP Settings with phpinfo and Example PHP $_SERVER Display Page
PHP is a great computer and web site scripting language, and extremely popular. It is used primarily for developing interactive web sites and many use it for day-to-day programming tasks.
View PHP Environment Configuration Settings and Superglobals on a Page
There are several versions in general use and sometimes the configuration of PHP between servers and machines needs to be compared. The phpinfo() function is a one line solution to show the current live PHP set up. To show PHP settings simply create a one line PHP web file on the server containing and point the browser at it. HTML tags are NOT required because the phpinfo() function pumps them out.
Note: phpinfo() outputs a lot of useful information, information that hackers find interesting, use it with care. Ideally do not have the phpinfo() page on a public facing web site. On the occasions you do expose it, take precautions to reduce information leakage. Put the page in a password protected directory, do not call it phpinfo.php, as this is obvious to hackers (use something more obscure and a reminder to delete it when finished, e.g. quick-config-check.php), finally don’t forget to delete it when the PHP settings have been checked.
A PHP script will need access to other settings that PHP provides, often via system wide globals known as the superglobals. The $_SERVER array provides access to the _SERVER superglobal and is shown by phpinfo() in a table. Occasionally it can be worthwhile viewing such values from another PHP file. This can be done in a few lines of code. The rest of this article provides some examples on showing PHP settings and global values in web pages.
(See Copying Code from the Articles if you need help on copying the code shown in this tutorial.)
Show PHP Settings Examples
Normally a minimal web page would require the following tags for a basic structure:
Content goes here! But to show PHP settings only one line is required. Create a PHP file, e.g. php-test.php, on the web server’s public directory (for the Apache server the default directory location for web files is usually /var/www/html). Add the call to phpinfo() to the file and save it:
Point the browser at the web page, e.g. http://www.example.com/php-test.php :
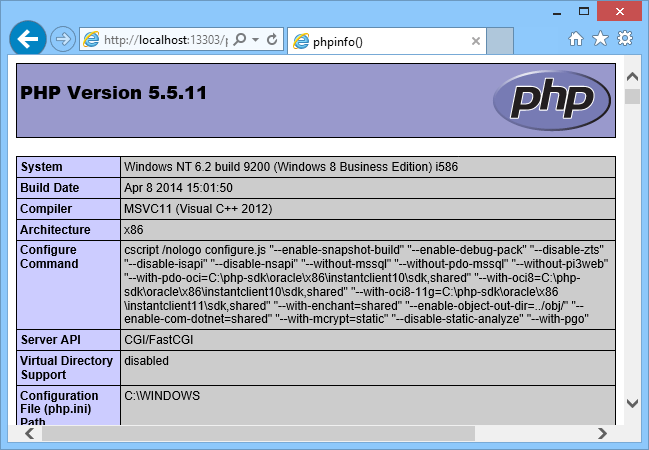
This produces a lengthy web page with comprehensive information on the PHP and web server configuration. The PHP variables stored in the $_SERVER global array are towards the end of the page, under PHP Variables. To see just the variables change the call to phpinfo() to phpinfo(INFO_VARIABLES), for other options for phpinfo() see the phpinfo documentation.
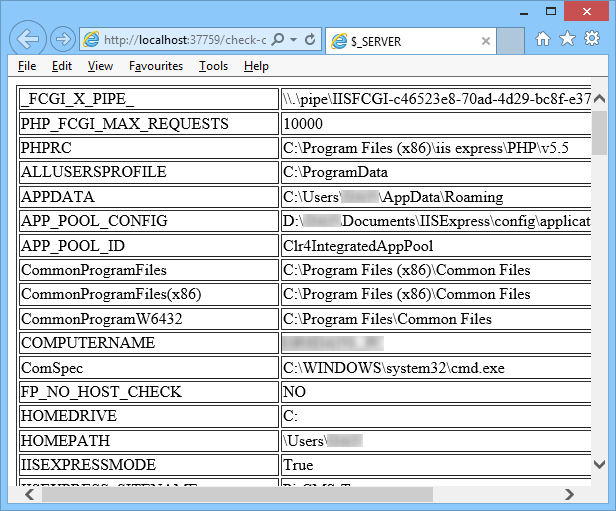
Showing the $_SERVER Settings in a PHP Script
The _SERVER superglobal is an array of useful strings, e.g. REQUEST_URI. Each value or the whole array can be output from any web file to aid debugging, not just through phpinfo(), here is an example a PHP file to print the whole array (to read a single value simple use the key required, e.g. $request_url=$_SERVER[«REQUEST_URI»]; ):
"; foreach ($_SERVER as $key=>$val )< print "".$key." ".$val." Notice the use of the => operator to assign the name of the array key to the $key variable, see the PHP documentation on foreach.
See the PHP superglobals documentation for further information.
An alternative method is capture the output of phpinfo() for display in your own PHP files:
Storing and Displaying PHP Application Settings
An array can be used to support configuration information for your PHP application itself. Add the required settings to a key, value array and use the same method as for the superglobals to read the values:
"data/customers", "SQLITE_NAME" => "customer", ); ?> Our Settings (Array) "; foreach ($APP_SETTINGS as $key=>$val )< print "".$key." ".$val." 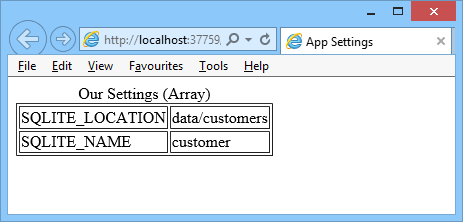
Displaying PHP Magic Constants
There are eight constants available that relate to the particular PHP script being executed, see the PHP Magic constants documentation for information on all eight. The __DIR__ and __FILE__ constants are probably the most used of the eight:
".__DIR__.""; echo "".__FILE__."
"; ?> 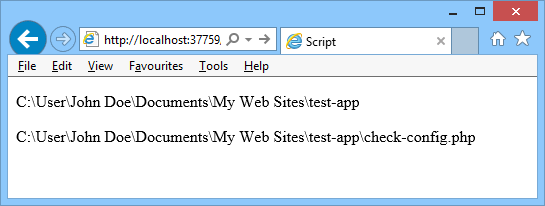
A Comprehensive Web Page to Show PHP Settings
Finally, combining the information discussed here it is possible to produce a PHP page that displays a lot of useful environment and application information:
"data/customers", "SQLITE_NAME" => "customer", ); ?> Our Settings (Array) "; foreach ($APP_SETTINGS as $key=>$val )< echo "".$key." ".$val." Script directory: ".__DIR__."
"; echo "PHP File: ".__FILE__."
"; ob_start(); phpinfo(INFO_VARIABLES); echo ob_get_clean(); ?> Also See
Author: Daniel S. Fowler Published: 2015-06-20 Updated: 2018-03-29


Do you have a question or comment about this article?
(Alternatively, use the email address at the bottom of the web page.)
↓markdown↓ CMS is fast and simple. Build websites quickly and publish easily. For beginner to expert.
Free Android Projects and Samples: