- How To Create Backend APIs Using Spring Boot?
- What is an API?
- What is Spring?
- Building REST API with Spring Boot
- Create the Spring Boot Project
- Configure JPA, Spring Data Source and Hibernate
- Create an Entity Class
- Create JPA (Java Persistence API) Data Repository layer
- Create Rest Controllers and map API requests
- Build and run the Project
- RECENT POSTS
- Backend java spring boot
- Инициализация проекта
- Request Params
- Path Variable
- HTTP-методы
- Реализация основных методов
- GET-запрос: получение пользователей
- PUT-запрос: обновление списка постов пользователя
- DELETE-запрос: удаление пользователя по username
- Материалы по теме
How To Create Backend APIs Using Spring Boot?
A web application consists of three layers at the very least: client-side (frontend), server-side (backend), and database (persistence layer). You might find different developers for each layer of web applications, but one who works on all of the three layers is a full-stack developer.
The frontend development consists of HTML, CSS, and JavaScript along with JavaScript’s frameworks and libraries. Working on the backend involves server-side scripting programming languages such as Java, .Net, PHP, Go, Python, Ruby, and more. Lastly, the persistence layer comprises one or more SQL or NoSQL databases, although the advent of Big Data has enabled non-conventional databases to store data.
Some technologies are more popular than others among these three web application layers. However, when technologies cover the frontend, the backend and database layer is called “a stack”. Some of the popular stacks that are being used by full-stack developers include:
- MEAN: MongoDB, Express, AngularJS and Node.js.
- MERN: MongoDB, Express, ReactJS and Node.js
- LAMP/LEMP: Linux, Apache/ Nginx (pronounced engine-x), MySQL and PHP
- Django Stack: Django, python and MySQL
- Ruby on Rails: Ruby, PHP and MySQL
Single-page applications (SPAs) and progressive web applications (PWAs) have become the norm in full-stack development and server-side rendering (SSR) have appeared to overcome their limitations. Moreover, the web applications’ frontend needs to work with the backend to offer smooth functionalities and features to the users. To address this issue, the concept of the backend for the frontend has come into view and helps developers to align the backend with the frontend using APIs.
What is an API?
Application Programming Interfaces (APIs) are the set of definitions and protocols that help two software components to communicate. It acts as a middleman between services without having to know how they are implemented. By allowing apps to exchange functions and data securely, APIs simplify the app development process.
Put simply, API allows businesses to open up the features and data of the application to external business partners, third-party developers and internal departments of the company. API uses a documented interface to enable products and services to communicate with each other and use data and functionalities from each other. A document that describes how such an interface can be built or used is called an API specification.
Here’s how APIs work:
- A client initiates an API call to retrieve data from the application — also known as a request. Leveraging the API’s URI (Uniform Resource Identifier), this request is then processed from the application to the web server and includes headers, a request verb and occasionally a request body.
- After the API receives a valid request it makes a call to the external program or web server.
- The web server sends the requested information as a response to the API.
- Finally, API sends the response to the client application.
Now that we have a basic understanding of what APIs are, we are going to introduce you to Spring Boot — a Java framework that helps in developing backend APIs.
What is Spring?
Spring has been widely adopted by developers to build scalable applications. From web apps to big data, configuration to security — whatever the application’s infrastructure needs, there’s a Spring project to help. Some of the Spring projects are Spring Boot, Spring Framework, Spring Cloud, Spring Cloud Data Flow, Spring Data, Spring Integration, Spring Batch, Spring Control, Spring Security and more.
Although Spring MVC can be used to create REST API, the configurations are manual and each dependency needs to be defined separately, so, it can be time-consuming and overwhelming for new developers.
To solve this problem, we have Spring Boot. Spring Boot is a Spring framework module that creates a complete production-ready environment that can be fully configured using its prebuilt codebase. It allows developers to create REST APIs with minimal configuration.
Spring boot is better suited for building REST APIs because:
- It has an embedded tomcat server to run applications
- It doesn’t require complex XML configurations.
- It includes an auto-configuration feature that configures an application for certain dependencies automatically.
- It can also auto-configure Spring libraries and third-party libraries.
Building REST API with Spring Boot
REST has become the de facto standard for developing APIs on the web as they are easy to build and use. To create REST API with Spring Boot, we will also use Spring Initializr which creates the structure of Spring Boot projects for you.
But why should we create a REST API?
As REST embraces the rules of the web including its benefits, architecture and more. By building on top of HTML, REST APIs help in building scalable services, evolvable APIs, backward compatible APIs, stateless to stateful services, and securable services. One thing to notice before moving ahead is that REST is not a standard but an approach that can help in developing web-scale applications.
To create REST API, we need to:
- Create the Spring Boot Project
- Configure JPA, Spring Data Source and Hibernate
- Create an Entity Class
- Create JPA (Java Persistence API) Data Repository layer
- Create Rest Controllers and map API requests
- Build and run the Project
Create the Spring Boot Project
To begin, go to Spring Initializr and create a project with the below settings:
Web: Provides support for building web applications, including RESTful services, using Spring MVC and Apache Tomcat.
SQL: Java Persistence API with Spring Data and Hibernate is used to persist data in SQL stores.
Developer Tools: It allows you to restart applications quickly, perform LiveReloads, and configure the environment for better development.
Ops: Spring Boot Ops is a community project which manages and monitors your applications. It also offers a user interface on top of the Spring Boot Actuator endpoints.
After creating a project, generate, download and import it to the development environment.
Configure JPA, Spring Data Source and Hibernate
We are using MySQL database as datasource, where spring.datasource.username & spring.datasource.password are username and passwords of MySQL.
Hibernate is used by Spring Boot for implementation of Spring Data JPA and generates better SQL for the database that is why we configure spring.jpa.properties.hibernate.dialect.
spring.jpa.hibernate.ddl-auto, automatically exports or validates schema DDL to the database as part of SessionFactory creation.
Create an Entity Class
Create JPA (Java Persistence API) Data Repository layer
Create Rest Controllers and map API requests
Build and run the Project
We hope that this article might have helped you in building backend APIs using Spring Boot. Now you know that the first step in creating an API is to create a project on Spring Initializr. After that only you can define the database configurations, define entity class, and build the JPA repository layer. After achieving this, the last two steps include mapping API requests while creating the Rest controller and finally, building and running the project.
However, if you are a business owner who wants to transform their web app idea into reality with the help of experts, then you should hire developers with years of hands-on experience in the same area.
RECENT POSTS
If you enjoy our content here then you’ll love the stuff we share on LinkedIn
Backend java spring boot

Архитектура современных приложений состоит из отдельных модулей, как показано на рисунке выше. Эти модули часто называют Frontend и Backend. Frontend – это модуль, который отвечает за юзер-интерфейс и логику, которые предоставляется приложением при использовании. Так, например когда мы заходим в соцсети через браузер, мы взаимодействуем именно с FrontEnd-модулем приложения. То, как отображаются наши посты в виде сторисов или карточек, сообщения и другие активности реализуются именно в FrontEnd-модуле. А все данные, которые мы видим, хранятся и обрабатываются в Backend или серверной части приложения. Эти модули обмениваются между собой посредством разных архитектурных стилей: REST, GRPC и форматов сообщений – JSON и XML.
В этой статье мы напишем примитивную серверную часть социальной сети с использованием Spring Boot, запустим свой сервер, рассмотрим разные типы HTTP запросов и их применение.
Необходимое требование к читателю: умение писать на Java и базовые знания Spring Framework. Данная статья познакомит вас со Spring Boot и даст базовые понятия данного фреймворка.
Инициализация проекта
Чтобы создать Spring Boot проект, перейдем на страницу https://start.spring.io/ и выберем необходимые зависимости: в нашем случае Spring Web. Чтобы запустить проект, необходима минимальная версия Java 17. Скачиваем проект и открываем в любом IDE (в моем случае – Intellij Idea)
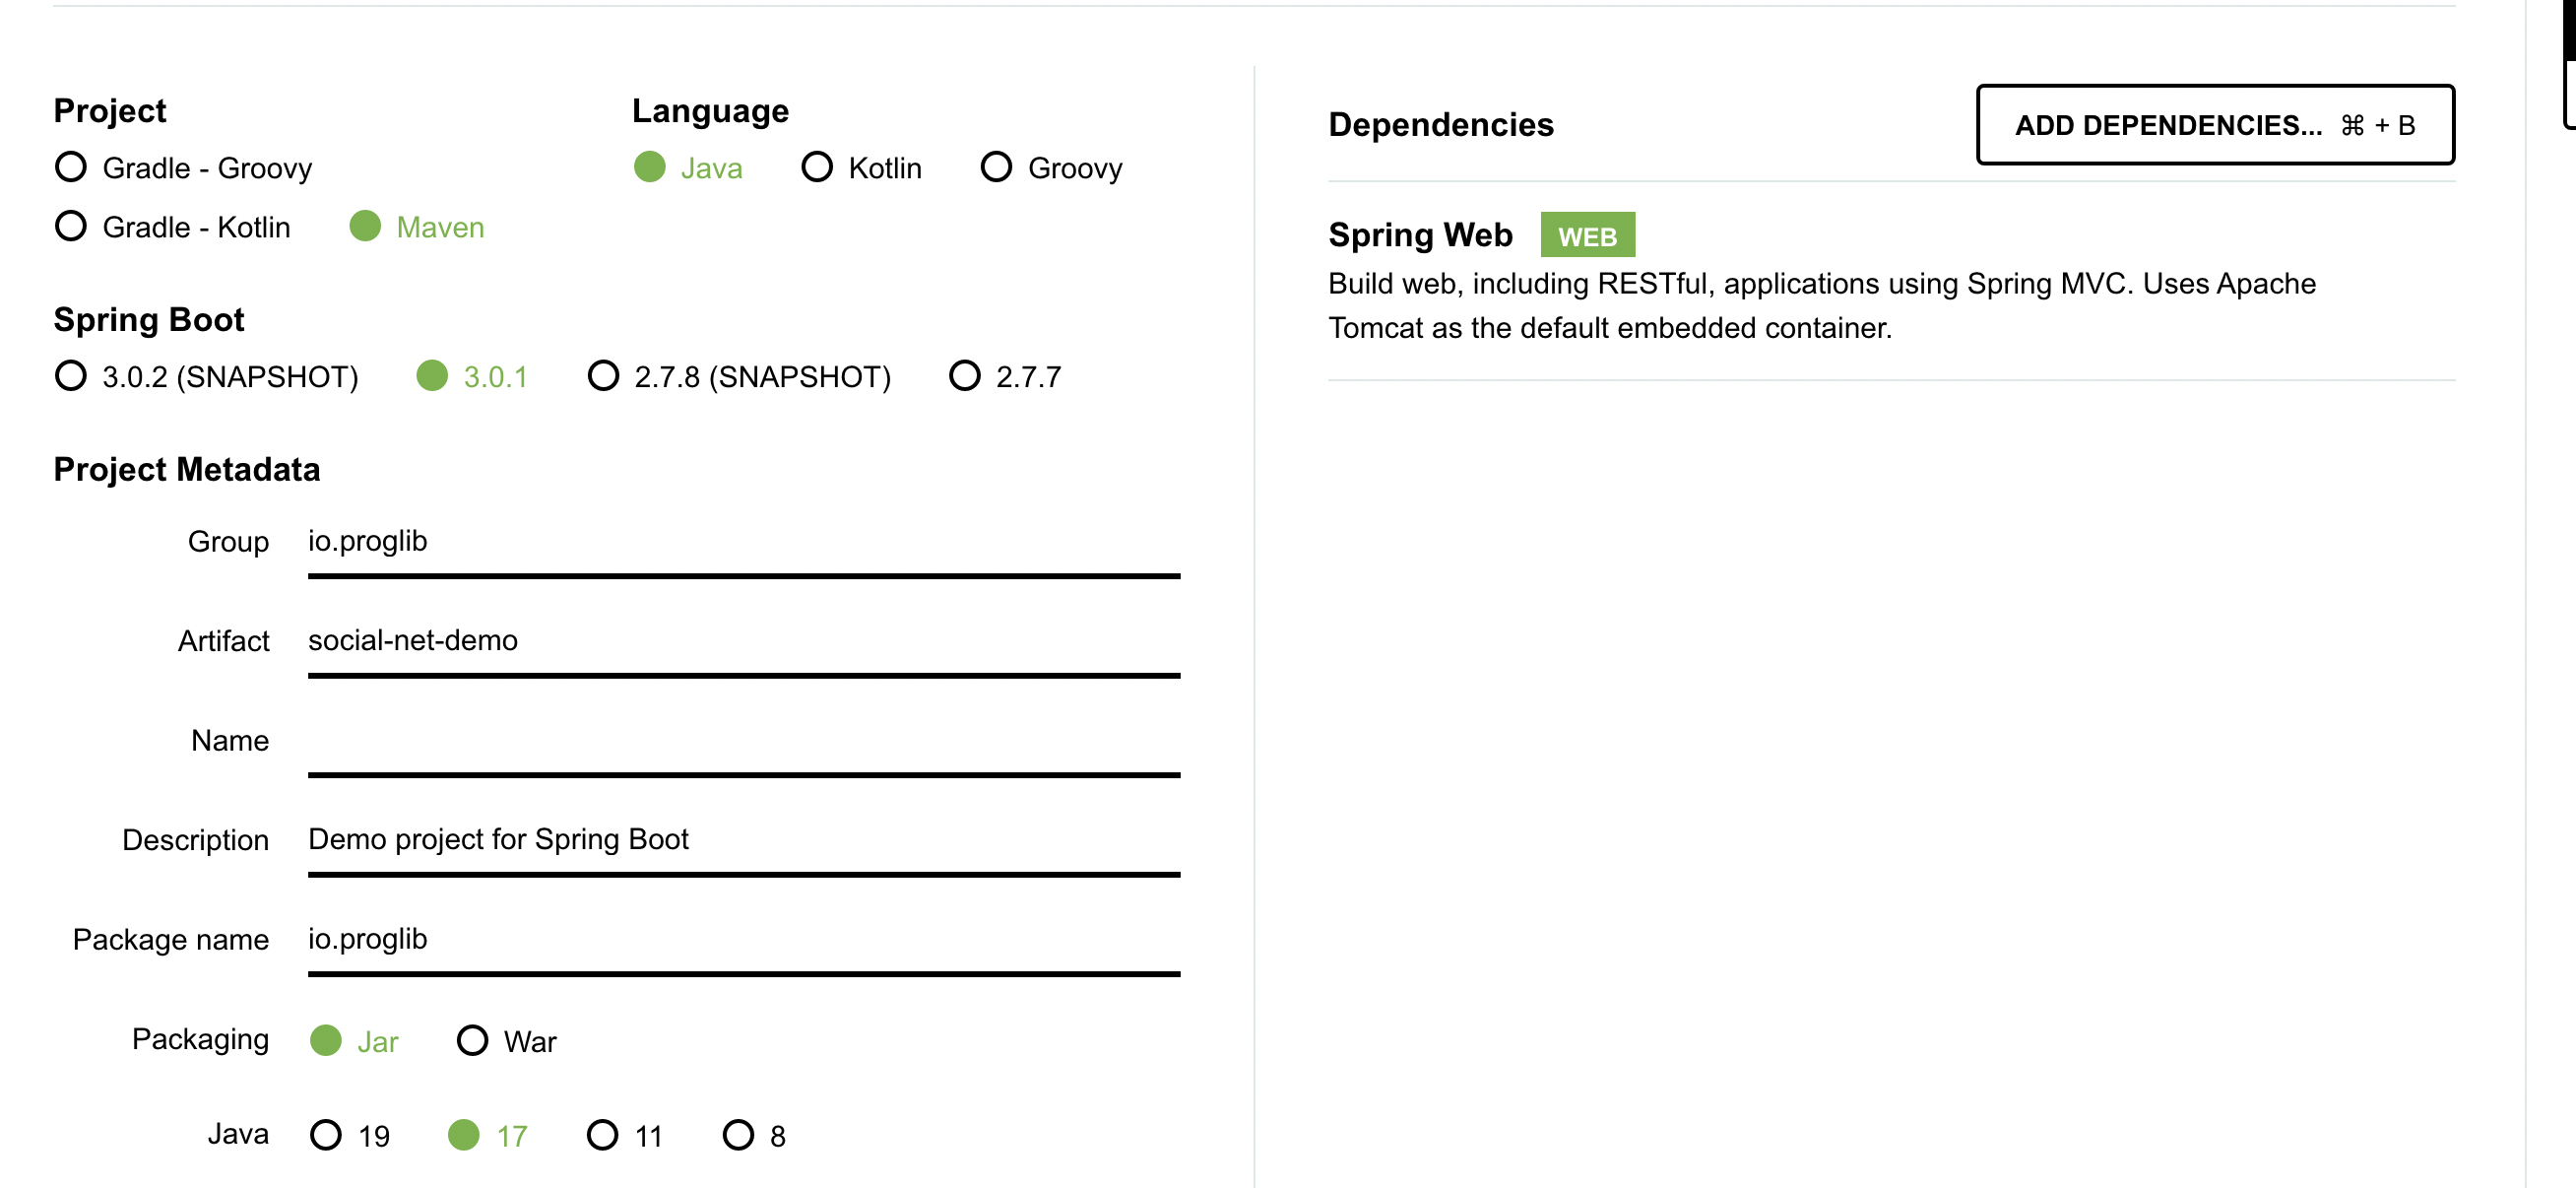
Spring Web – зависимость, которая предоставляет контейнер сервлетов Apache Tomcat (является дефолтным веб-сервером). Проще говоря, сервлеты – это классы, которые обрабатывают все входящие запросы.
Открываем проект и запускаем.
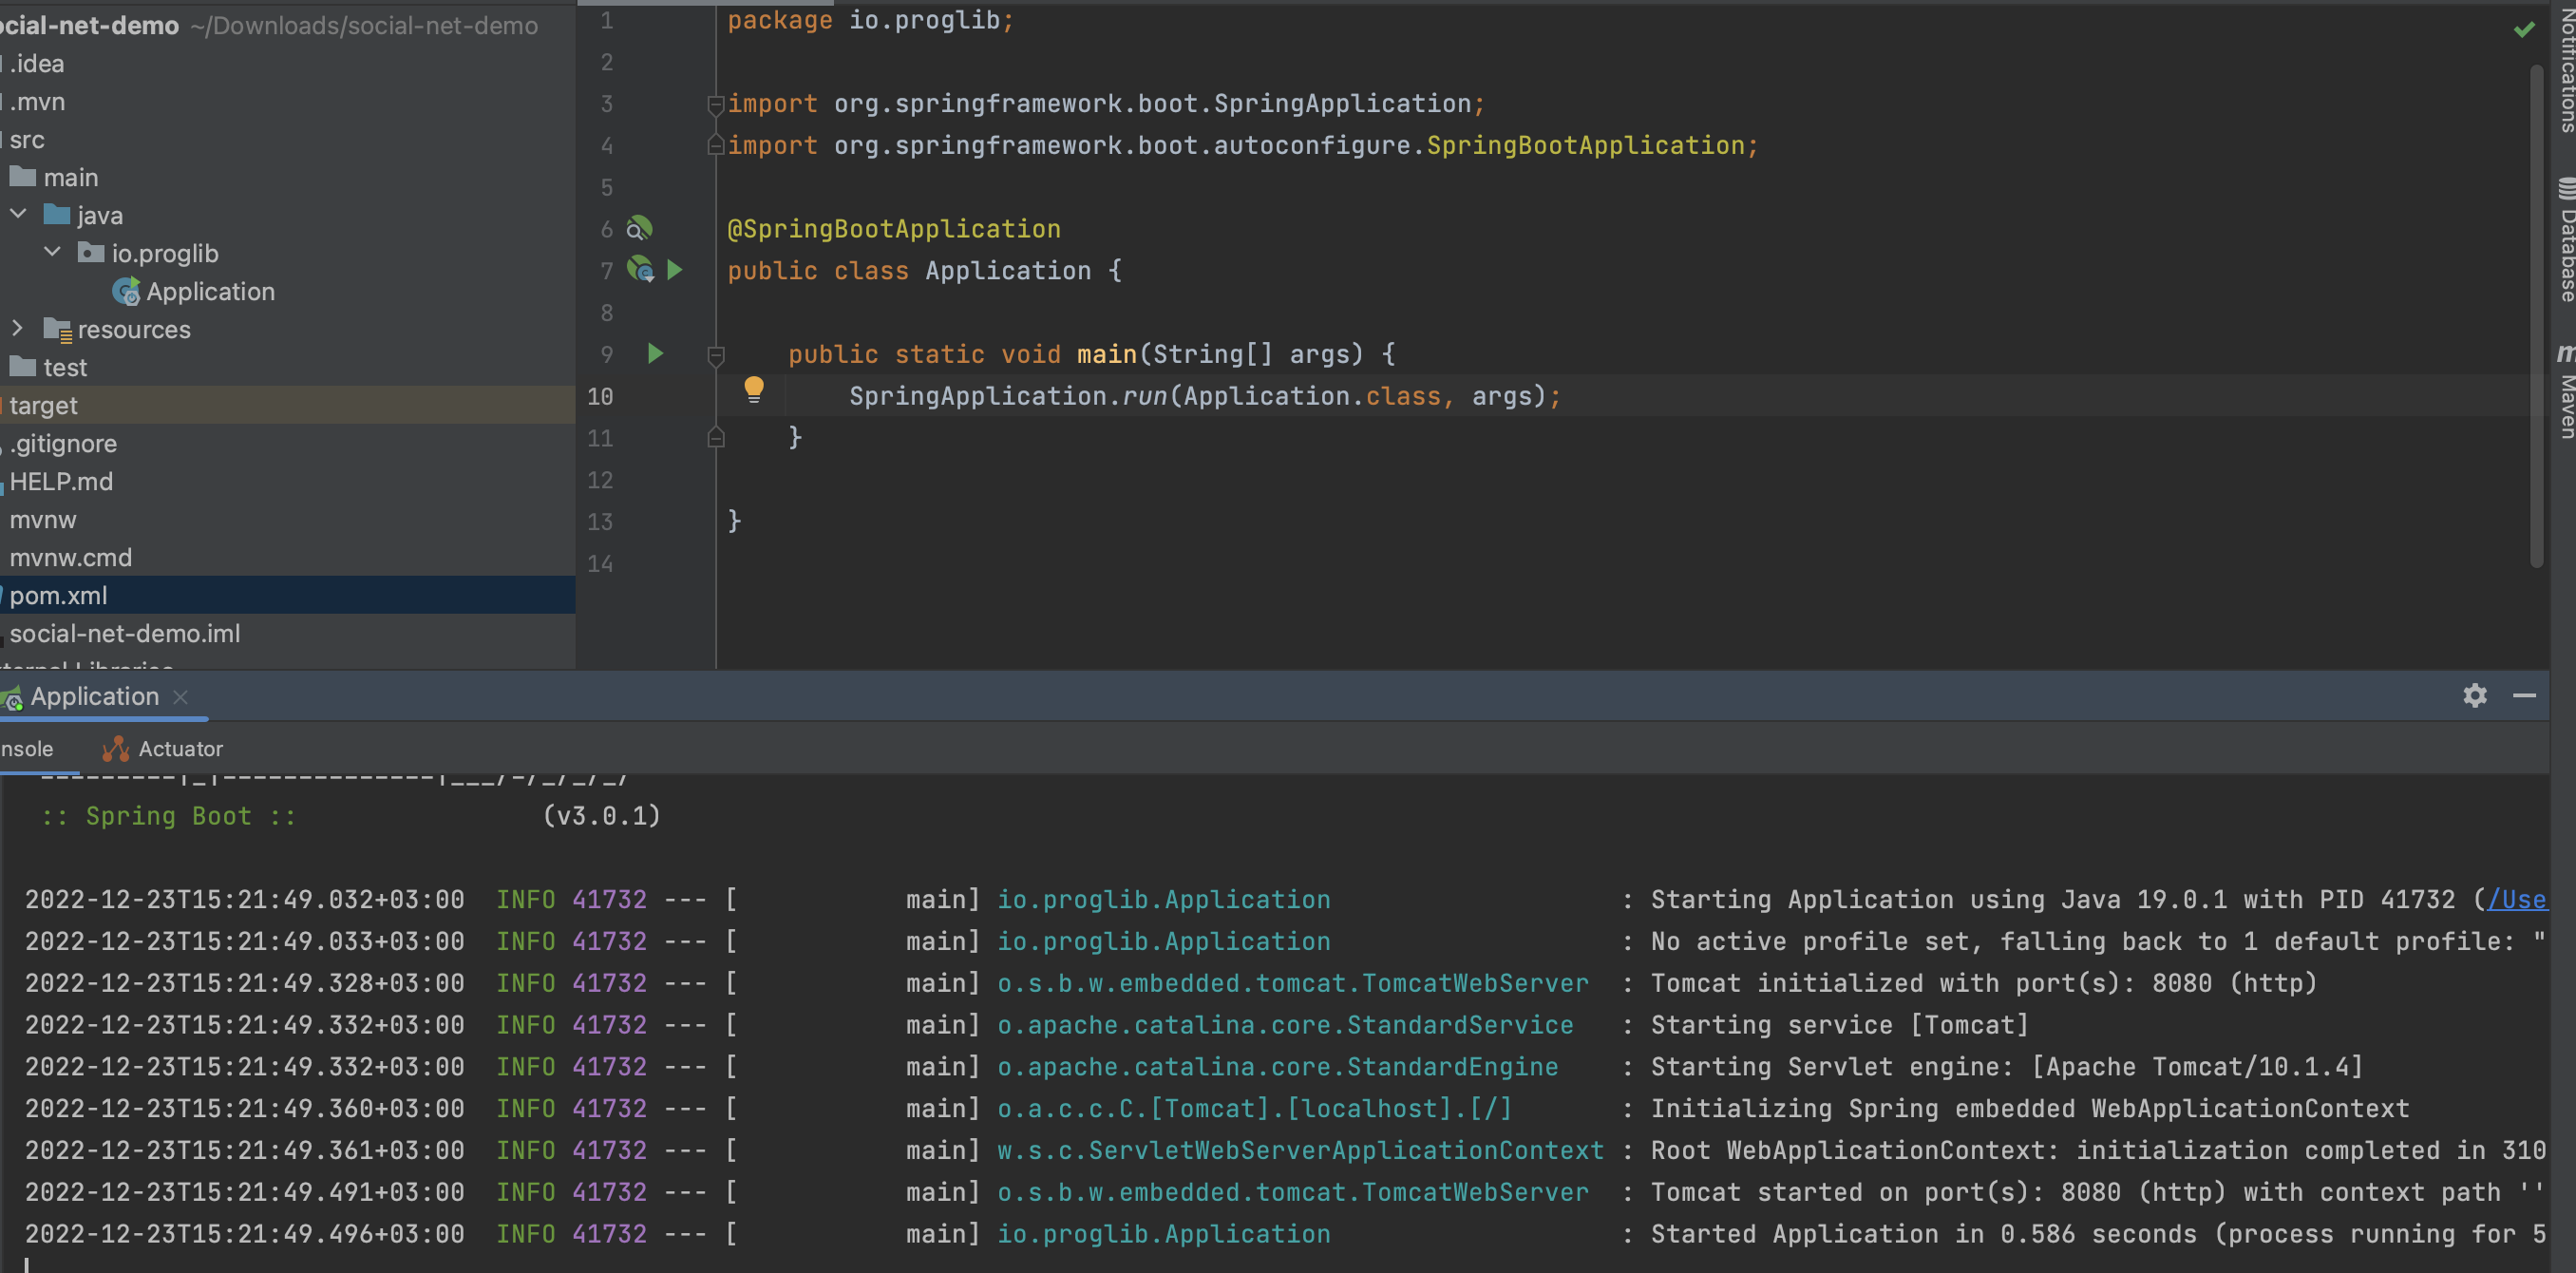
Мы видим, что проект запустился и готов обрабатывать запросы на порту 8080 – Tomcat started on port(s): 8080 (http) .
Теперь создадим свой первый класс – GreetingController . Controller-классы ответственны за обработку входящих запросов и возвращают ответ.
Чтобы сделать наш класс Controller , достаточно прописать аннотацию @RestController . @RequestMapping указывает, по какому пути будет находиться определённый ресурс или выполняться логика.

Если отправить запрос по адресу http://localhost:8080/ , мы получим ошибку, т. к. по этому пути не определены логика обработки запроса и ресурсы.
🧩☕ Интересные задачи по Java для практики можно найти на нашем телеграм-канале «Библиотека задач по Java»
Request Params
При отправке запросов мы часто используем переменные в запросе, чтобы передавать дополнительную информацию или же делать запросы гибкими. Параметр в запросе передаётся в конце адреса ( =url ) сервера и указывается после вопросительного знака ( =? ).
Например, http://localhost:8080/greet?name=Alice . Параметр запроса является = name cо значением = Alice .
Чтобы обрабатывать переменную запроса, используется аннотация @RequestParam . Параметры запроса могут быть опциональными или же обязательными. @RequestParam(«name») означает следующее: взять ту переменную из запроса, название которого равно name .

Вдобавок, запрос может содержать несколько параметров.
Например, http://localhost:8080/greet/full?name=John&surname=Smith . Параметры выделяются знаком & . В этом запросе два параметра: name=John и surname=Smith .
Чтобы обработать каждый параметр запроса, нужно пометить каждую переменную @RequestParam .

Path Variable
PathVariable по применению похож на @Request Param . @PathVariable также является параметром запроса, но используются внутри адреса запроса. Например,
RequestParam – http://localhost:8080/greet/full?name=John&surname=Smith
PathVariable – http://localhost:8080/greet/John . В этом случае John является PathVariable.
В запросе можно указывать несколько PathVariable, как и в случае RequestParam

Запрос с двумя параметризованными PathVariable.

HTTP-методы
Когда мы говорим о запросах, мы также подразумеваем HTTP-метод, который используется при отправке этого запроса. Каждый запрос представляет собой некий HTTP-метод. Например, когда мы переходим в браузере по адресу http://localhost:8080/greet/John/Smith , наш браузер отправляет GET-запрос на сервер.
Большая часть информационных систем обмениваются данными посредством HTTP-методов. Основными HTTP-методами являются – POST , GET , PUT , DELETE . Эти четыре запроса также называют CRUD-запросами.
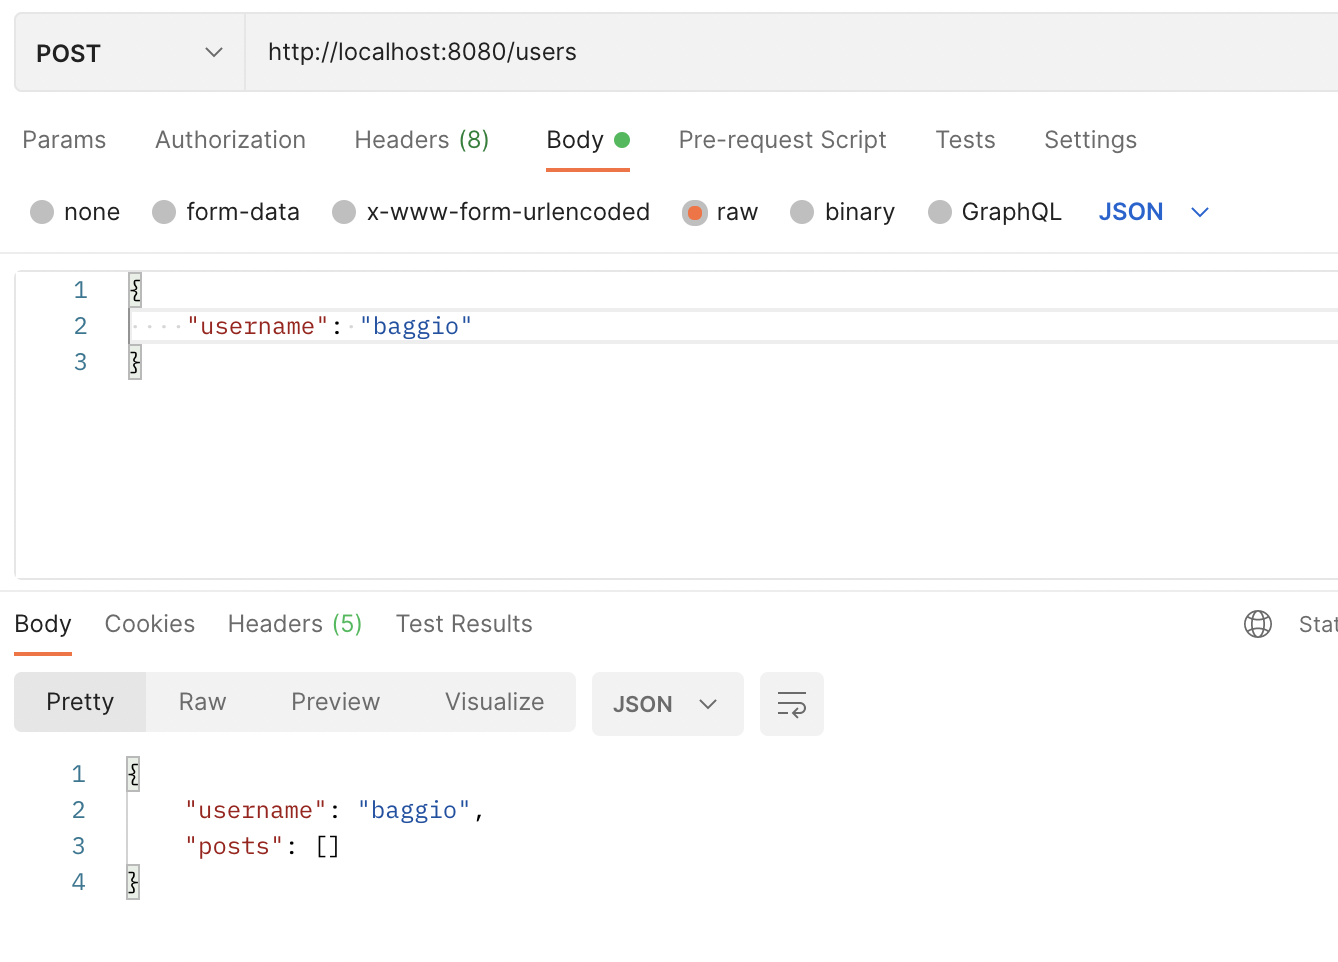
- POST-метод – используется при создании новых ресурсов или данных. Например, когда мы загружаем новые посты в соцсетях, чаще всего используется POST-запросы. POST-запрос может иметь тело запроса.
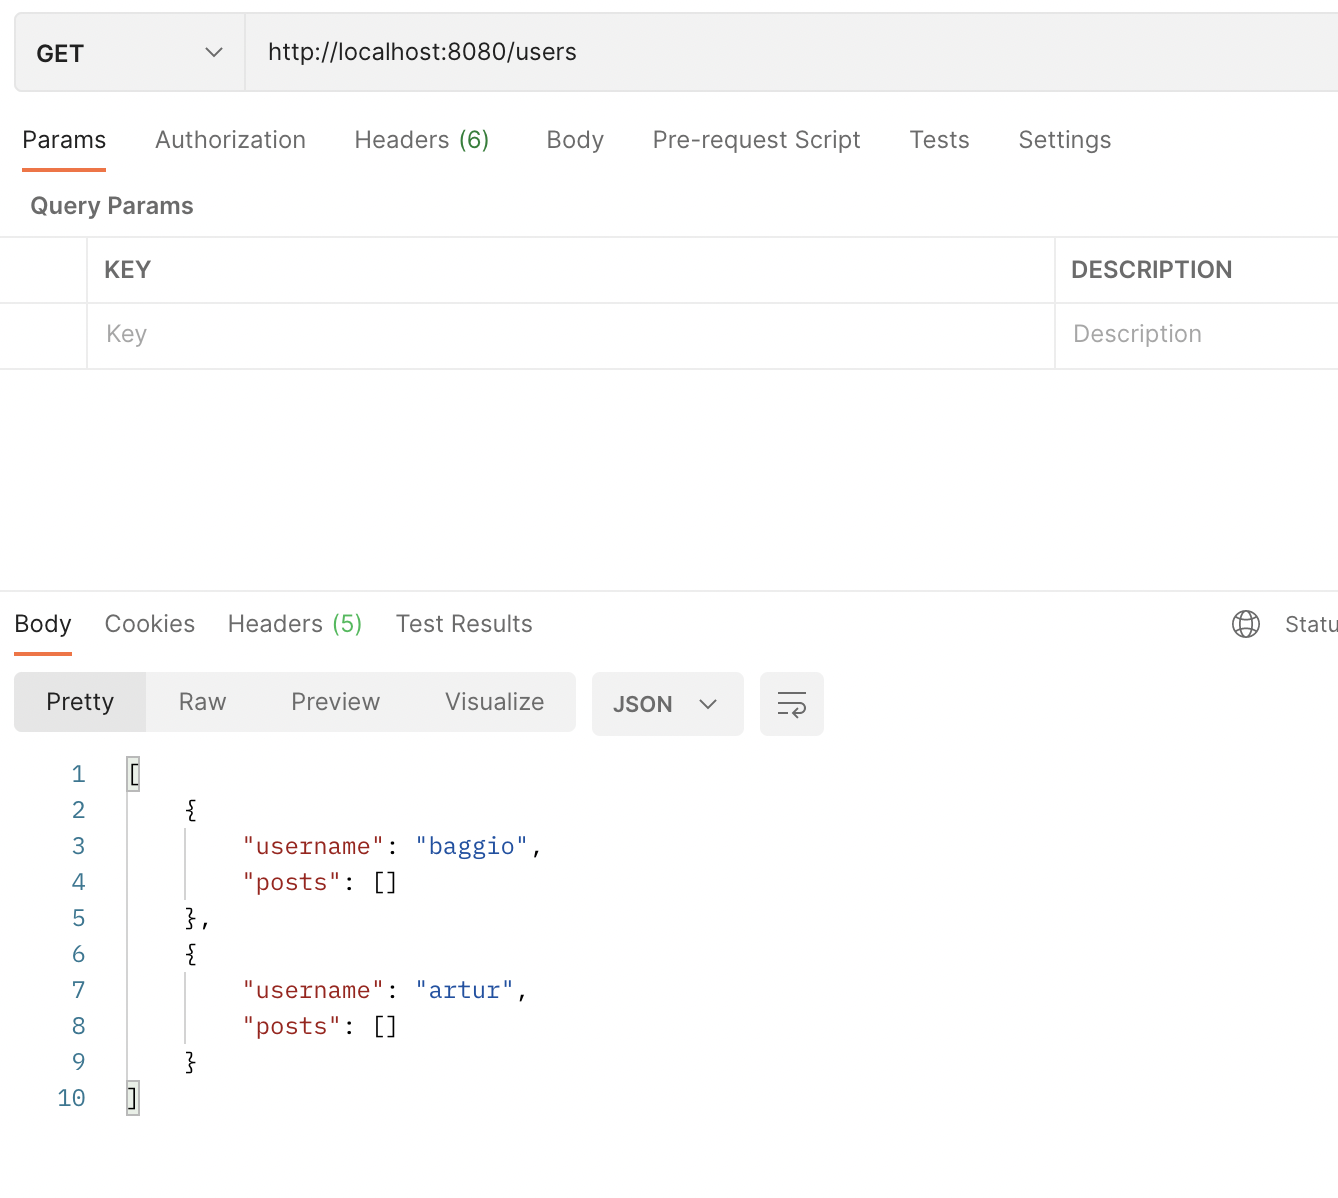
- GET-метод – используется при получении данных. Например, при открытии любого веб-приложения, отправляется именно GET-запрос для получения данных и отображения их на странице. GET-запрос не имеет тела запроса.
- PUT-метод – используется для обновления данных, а также может иметь тело запроса, как и POST.
- DELETE-метод – используется для удаления данных.
Реализация основных методов
Давайте создадим сущности и реализуем методы, чтобы наш сервер принимал все четыре запроса. Для этого создадим сущности User и Post , и будем проводить операции над ними.
Для простоты User имеет только два поля: username и список постов posts , а сущность Post имеет поле description и imageUrl .
GET-запрос: получение пользователей
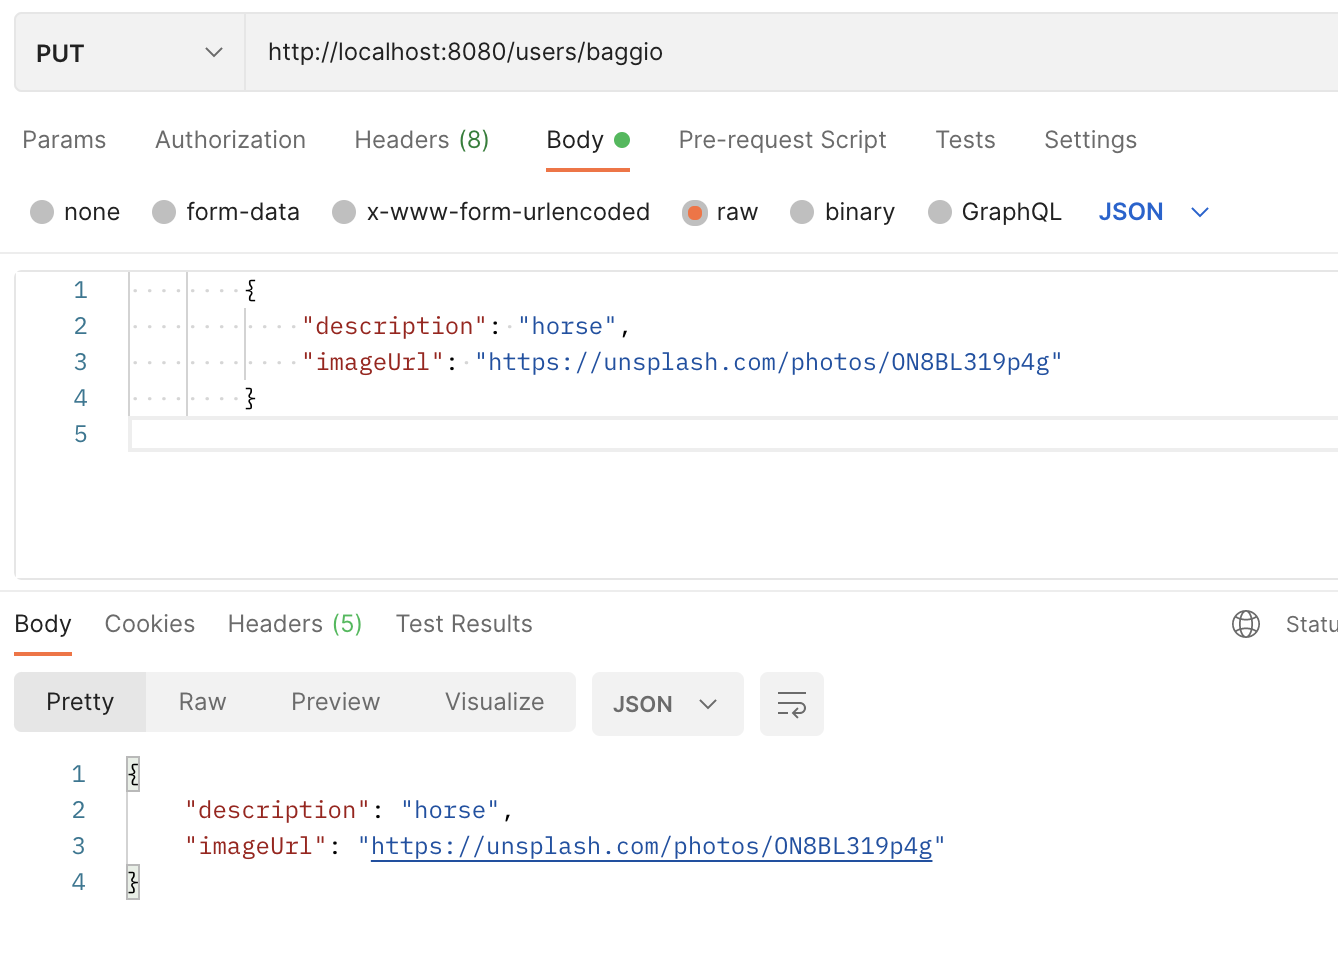
PUT-запрос: обновление списка постов пользователя
DELETE-запрос: удаление пользователя по username
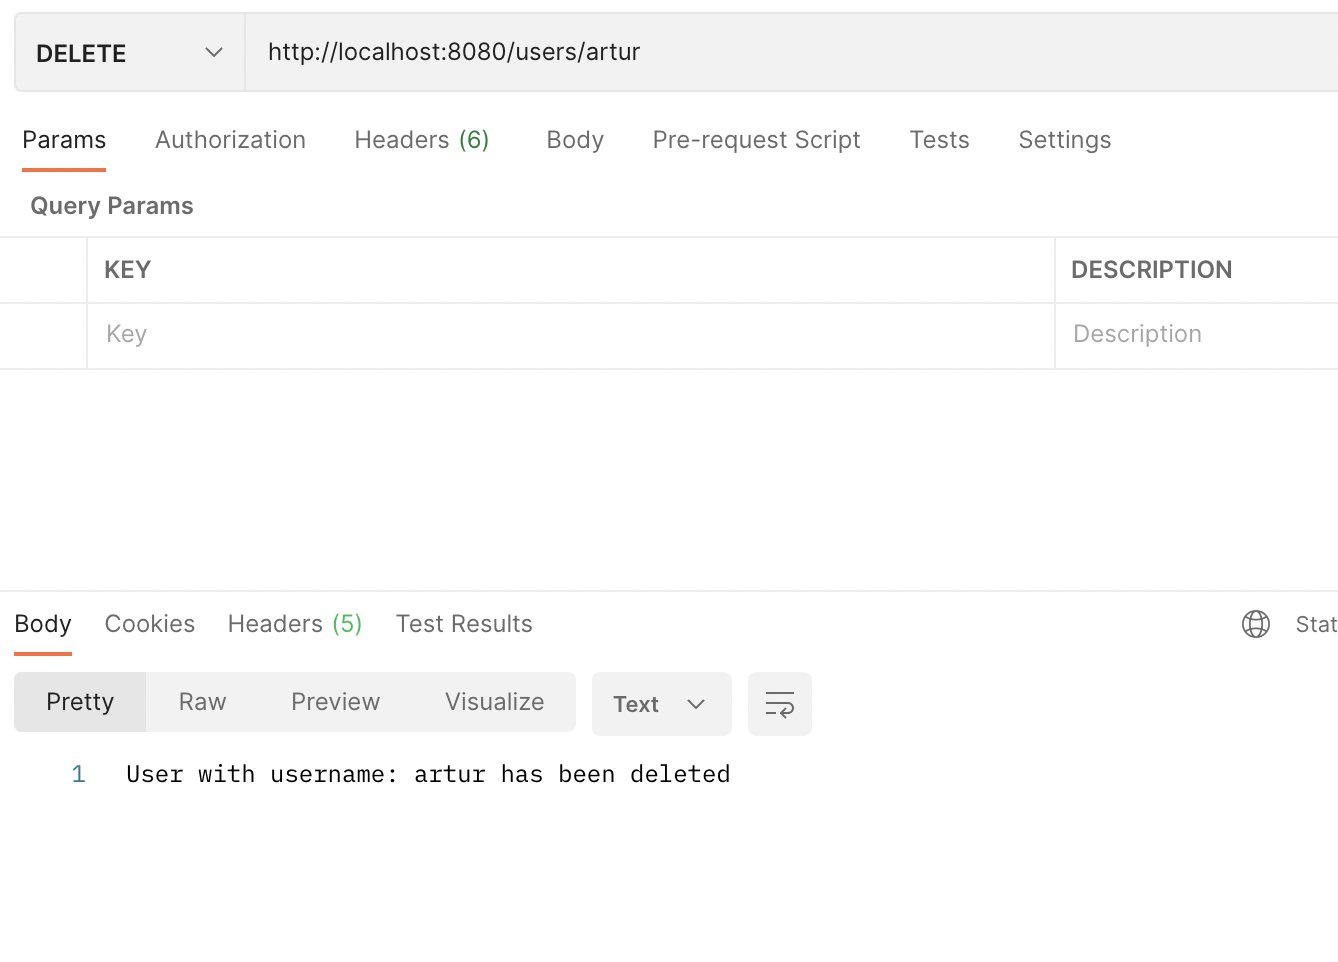
В этой статье мы рассмотрели архитектуру современных web-приложений, а также написали свою серверную часть приложения, получив поверхностные знания по Spring Boot , HTTP запросы и параметры запросов.