- How to Run Python Script at Startup in Ubuntu
- Prerequisites
- Running a Python Script at Startup in Ubuntu
- Step 1: Create Your Python Script
- Auto Start Python Script on Boot (Ubuntu 20.04, Systemd)
- Create Bash Script
- Create Python Script
- Test Systemd
- Anaconda
- Как установить в автозапуск python-скрипт используя systemd
- 1. Простой python-scrypt
- 2. Создание файла сервиса.
- 3. Включение нового добавленного сервиса.
- 4. Запуск/Остановка/Статус сервиса
- Как поставить на автозапуск python скрипт в linux?
- Войдите, чтобы написать ответ
- Комп виснет наглухо, в логах есть следы, кто может разобрать, в чём причина?
How to Run Python Script at Startup in Ubuntu
The reputation of Python as a programming language speaks for itself. This programming language is attributed as general-purpose, high level, and interpreted.
Most Linux users are in love with the Python programming language due to its code readability which makes it easy to follow and master even for a beginner in the programming world.
Some advantages of Python Programming language are listed below:
- Open-source and community development support.
- Rich in third-party modules.
- User-friendly data structures.
- Dynamically typed programming language.
- Interpreted language.
- Highly efficient.
- Portable and interactive.
- Extensive libraries support.
The above-mentioned features make Python ideal for projects related to software development (desktop, web, gaming, scientific, image processing, and graphic design applications), operating systems, database access, prototyping, and language development.
This article will address the use of Python as a scripting language in an operating system environment (Ubuntu).
Prerequisites
Ensure you meet the following requirements:
- You are a sudoer/root user on a Linux operating system distribution.
- You can comfortably interact with the Linux command-line environment, interpret, and execute its associated commands.
- You have the latest version of Python installed on Ubuntu.
Confirm that you have Python installed by running the command:
$ python3 --version Python 3.8.10
Running a Python Script at Startup in Ubuntu
The following steps will help us achieve the main objective of this article.
Step 1: Create Your Python Script
Create your Python script if it does not already exist. For this article guide purpose, we will create and use the following Python script.
Add the following Python script.
from os.path import expanduser import datetime file = open(expanduser("~") + '/Desktop/i_was_created.txt', 'w') file.write("This LinuxShellTips Tutorial Actually worked!\n" + str(datetime.datetime.now())) file.close() Upon rebooting our Ubuntu system, the above Python script should be able to create a file called i_was_created.txt on the Ubuntu Desktop (Desktop). Inside this file, we should find the text This LinuxShellTips Tutorial Actually worked! together with the date and time of its creation.
Next, move the Python Script to a directory where it can be executed with root user privileges upon system restart. One such viable directory, in this case, is /bin.
Let us move the script using the mv command.
$ sudo mv python_test_code.py /bin
Now create a cron job scheduler that will periodically handle the execution of the above-created Python script (In this case during system startup).
At the bottom of this file, add the line:
@reboot python3 /bin/python_test_code.py &
Save and close the file and then confirm the creation of the cron job schedule:
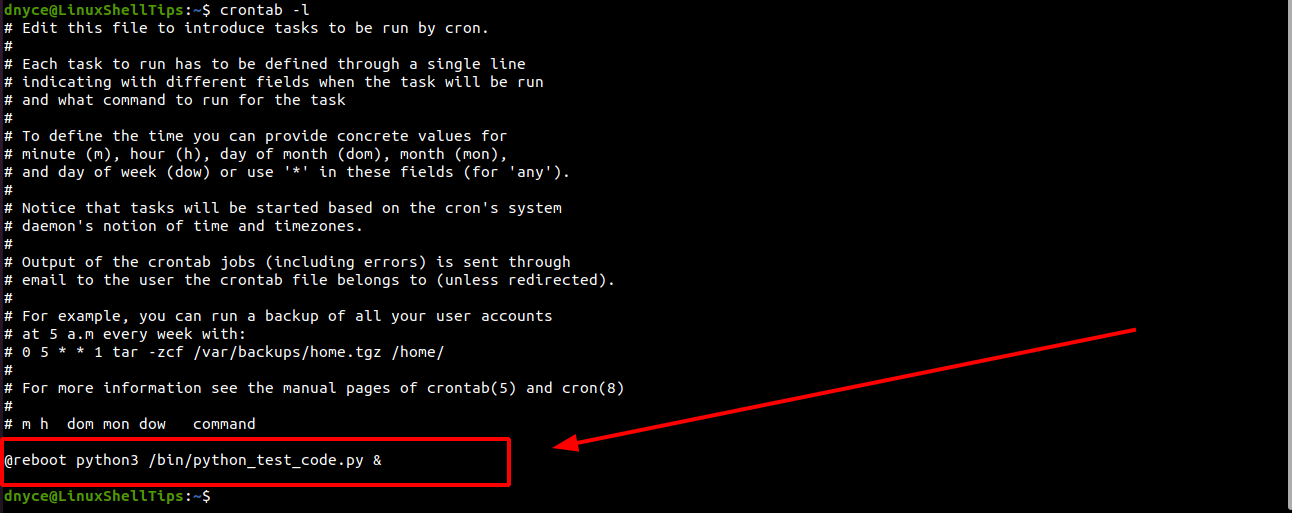
The @reboot portion of the above line tells the cron job scheduler to execute the script at system startup. The & parameter informs the cron job scheduler to execute the Python script in the background so as not to interfere with normal system startup.
We are now ready to reboot our system
Let us check if our file was created:
$ cat ~/Desktop/i_was_created.txt && echo ''
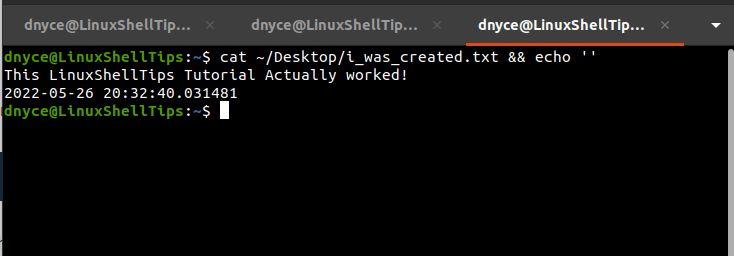
The existence of the above file confirms the Python script was successfully executed at the Ubuntu system startup.
Auto Start Python Script on Boot (Ubuntu 20.04, Systemd)
NOTE: Use After=network.service if you require network.
Create Bash Script
#!/bin/bash # cd /code/python/myapppython3 /code/python/myapp/run.py >> /code/logs/myapp.log 2>&1Create Python Script
nano /code/python/myapp/run.pyimport signalimport timeimport datetime is_shutdown = False def stop(sig, frame): print(f"SIGTERM at datetime.datetime.now()>") global is_shutdown is_shutdown = True def ignore(sig, frsma): print(f"SIGHUP at datetime.datetime.now()>") signal.signal(signal.SIGTERM, stop)signal.signal(signal.SIGHUP, ignore) print(f"START at datetime.datetime.now()>") while not is_shutdown: print('.', end='', flush=True) time.sleep(1) print(f"END at datetime.datetime.now()>")Test Systemd
sudo chmod 744 /code/scripts/myapp.shsudo chmod 664 /etc/systemd/system/myapp.servicesudo systemctl daemon-reloadsudo systemctl enable myapp.servicesudo systemctl start myapp.servicesudo systemctl start status.servicesudo systemctl stop myapp.serviceRestart server to test if the service started on reboot
Anaconda
Systemd is run as root by default. If you are using Anaconda (or maybe pyenv ), current user might not run the same python version/environment as root.
NOTE: I tried changing the user via Service.User , but it still uses the system default python interpreter
You can find the python interpreter path using which python or python -c «import sys; print(sys.executable)»
which pythonsudo which pythonEdit the bash script to use the correct python interpreter
/opt/conda/bin/python3 /code/python/myapp/run.py >> /code/logs/myapp.log 2>&1❤️ Is this article helpful?
Buy me a coffee ☕ or support my work via PayPal to keep this space 🖖 and ad-free.
Do send some 💖 to @d_luaz or share this article.
A dream boy who enjoys making apps, travelling and making youtube videos. Follow me on @d_luaz
Travelopy — discover travel places in Malaysia, Singapore, Taiwan, Japan.
Как установить в автозапуск python-скрипт используя systemd

Компьютерное
Иногда требуется какой-то скрипт или программу запускать как системный сервис. Это можно легко провернуть, если в вашем дистрибутиве используется система инициализации и управления демонами — systemd.
Для примера, я создам простейший python-скрипт который будет слушать 9988 порт и добавлю его в автозагрузку при старте операционной системы.
1. Простой python-scrypt
sudo nano /usr/bin/dummy_service.py
#!/usr/bin/python3 import socket s = socket.socket(socket.AF_INET, socket.SOCK_STREAM) s.bind(("localhost", 9988)) s.listen(1) while True: conn, addr = s.accept() data = conn.recv(1024) conn.close() my_function_that_handles_data(data) 2. Создание файла сервиса.
Теперь создадим файл сервиса для с помощью которого расскажем systemd что нам требуется. Файл должен иметь расширение .service и находиться в директории /lib/systemd/system/
sudo nano /lib/systemd/system/dummy.service
Добавим информацию о нашем сервисе (можете изменить местоположение скрипта и описание сервиса):
[Unit] Description=Dummy Service After=multi-user.target Conflicts=getty@tty1.service [Service] Type=simple ExecStart=/usr/bin/python3 /usr/bin/dummy_service.py StandardInput=tty-force [Install] WantedBy=multi-user.target
Мне кажется из содержимого всё и так понятно — какая строка и за что отвечает.
3. Включение нового добавленного сервиса.
Вы добавили, наконец-то, ваш сервис в систему. теперь необходимо перезапустить демон systemctl чтобы он прочел новый файл. Каждый раз как вы вносите изменения в .service файлы вам нужно перезапустить демон.
sudo systemctl daemon-reload
Теперь включим запуск сервиса при загрузке системы, и запустим сам сервис.
sudo systemctl enable dummy.service sudo systemctl start dummy.service
4. Запуск/Остановка/Статус сервиса
В конце проверим статус нашего нового сервиса:
sudo systemctl status dummy.service
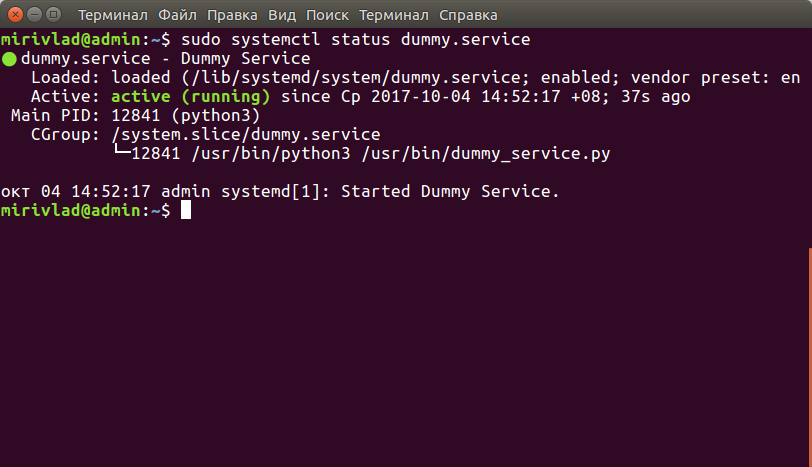
Проверим что наш python-скрипт слушает нужный нам порт:

Команды для запуска, остановки и перезапуска сервиса:
sudo systemctl stop dummy.service #Для остановки сервиса sudo systemctl start dummy.service #Для запуска сервиса sudo systemctl restart dummy.service #Для перезапуска сервиса
Как поставить на автозапуск python скрипт в linux?
Есть запускаю просто из под рута в консоле — всё срабатывает ок. Приложение запускается, всё отрабатывает ок.
Но не понимаю как это поставить на автозапуск (провайдер зачастил ребутать серверы).
Скрипт сервиса:
[Unit] Description=My Script Service After=default.target [Service] Type=simple ExecStart=/root/runserver.sh Restart=always User=root [Install] WantedBy=multi-user.target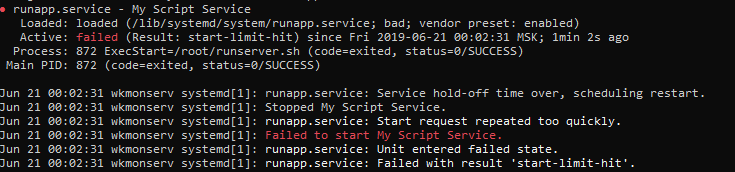
Лежит в /lib/systemd/system/runapp.service
Скрин статуса:
Заодно подскажите куда как прописать правила iptables так же при старте 🙂
Что читаю и пытаюсь повторить — не работает :\

1. Вам влом прочитать документацию на инструменты используемые вами
— docs.gunicorn.org/en/stable/deploy.html
2. Вам влом в гугле вбить запрос на поиск методов деплоя используемых вами инструментов
— https://bartsimons.me/gunicorn-as-a-systemd-service/
3. Вам влом изучать операционную систему и её инструменты
— https://habr.com/ru/company/southbridge/blog/255845/
4. Выкиньте нафиг свой скрипт, systemd супервизор и он не занимается запуском скриптиков, а если уж очень хочется то не забывайте про «переменные среды».
Но зато не влом прийти и написать много букав на тостере и при этом даже не удосужились указать операционную систему, конкретную а не общее Linux коих 100500 дистров и у многих свои приколы.
[Unit] Description=My Script Service [Service] WorkingDirectory=/home/dev/myapp ExecStart=source venv/bin/activate && gunicorn -c gunicorn_config.py run_app:app Restart=always RestartSec=30 #перезагрузка сервиса, если вдруг упадет. StandardOutput=syslog StandardError=syslog SyslogIdentifier=my-python-app #Environment=NODE_ENV=production PORT=3080 (это для nodejs, но можете тоже поиграть, если надо). [Install] WantedBy=multi-user.targetПопробуйте разместить в /etc/systemd/
iptables на разных осях по разному. Создаете скрипт типа:
#! /bin/sh iptables -F iptables -X iptables -t nat -F iptables -t nat -X iptables -t mangle -F iptables -t mangle -X iptables -t raw -F iptables -t raw -X iptables -t security -F iptables -t security -X iptables -P INPUT DROP iptables -P OUTPUT ACCEPT iptables -P FORWARD DROP iptables -A INPUT -m state --state ESTABLISHED,RELATED -j ACCEPTПо iptables нашел такое решение https://help.ubuntu.com/community/IptablesHowTo#Tips
+ наверно так же на сервис повешу, спасибо.
У меня VPS ubuntu 16.04
Еще помогло это https://habr.com/ru/post/351566/, у меня фласк, но суть так же
+ там есть очень важный момент — в конфиге гуникорна не должен стоять параметр daemon=True