- How to Install Apache with PHP-FPM on Ubuntu 22.04
- Step 1: Update your system
- Step 2: Install Apache
- Step 3: Install PHP-FPM
- Step 4: Configure Apache to use PHP-FPM
- Step 5: Test the configuration
- Conclusion
- How to Install Apache with PHP-FPM on Ubuntu 20.04
- Step 1 – Installing Apache
- Step 2 – Install PHP with FPM
- Step 3 – Apache Configuration
How to Install Apache with PHP-FPM on Ubuntu 22.04
Apache and PHP-FPM are both widely used in web development to serve dynamic content. While Apache is the most popular web server used today, PHP-FPM is a FastCGI process manager that provides a faster and more efficient way to process PHP requests. Combining the two can significantly improve the performance of a website.
In this article, we will provide a step-by-step guide on how to install Apache with PHP-FPM on Ubuntu 22.04.
Step 1: Update your system
Before installing any new software, you should update your system to ensure that all packages are up to date. You can do this by running the following command in the terminal:
sudo apt update && sudo apt upgrade Step 2: Install Apache
To install Apache on Ubuntu 22.04, run the following command in the terminal:
Once the installation is complete, you can start the Apache service by running the following command:
sudo systemctl start apache2 You can also enable Apache to start at boot time by running the following command:
sudo systemctl enable apache2 Step 3: Install PHP-FPM
The default repositories may not contain the latest PHP version packages. So we always prefer to use ondrej/php PPA for installing PHP that contains most of the versions.
- To configure PPA, run the following commands:
sudo apt install python-software-propertiessudo add-apt-repository ppa:ondrej/php
sudo apt install php8.2 php8.2-fpm sudo systemctl start php8.2-fpm sudo systemctl enable php8.2-fpm Step 4: Configure Apache to use PHP-FPM
- To configure Apache to use PHP-FPM, you need to enable the “proxy_fcgi” and “proxy” modules. You can do this by running the following command:
sudo a2enmod proxy_fcgi proxy sudo nano /etc/apache2/sites-available/example.com.conf sudo a2ensite example.com.conf sudo systemctl reload apache2 Step 5: Test the configuration
To test the Apache with PHP-FPM configuration, create a new PHP file in the document root directory of your website:
sudo nano /var/www/html/test.php Add the following lines to the file:
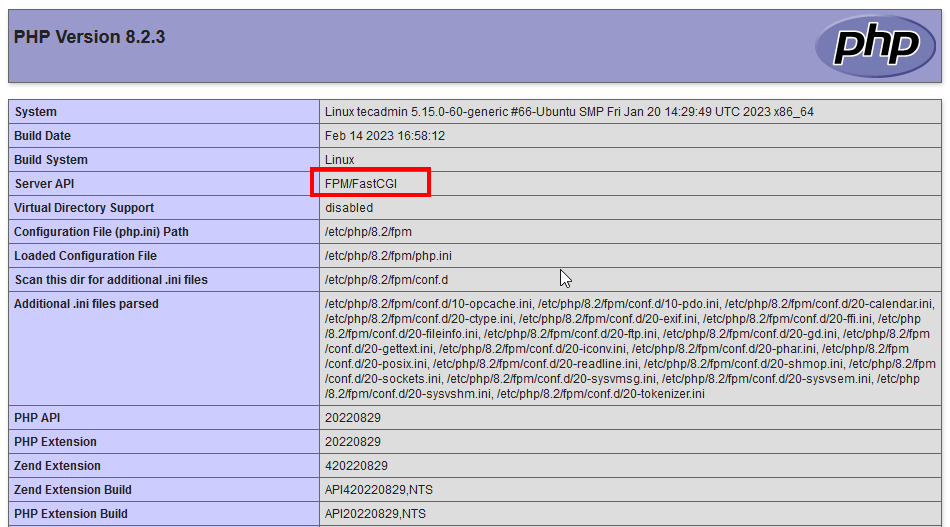
Save the file and exit the text editor. Then, open your web browser and navigate to “http://example.com/test.php”. If everything is configured correctly, you should see the PHP information page.
Conclusion
Installing Apache with PHP-FPM on Ubuntu 22.04 can enhance website performance and overall user experience. Apache is a widely used web server, while PHP-FPM is a FastCGI process manager that enables efficient processing of PHP requests. Together, they provide a powerful combination that can optimize website speed and performance. By following the step-by-step guide in this article, you can easily install Apache with PHP-FPM on Ubuntu 22.04 and take advantage of its benefits.
How to Install Apache with PHP-FPM on Ubuntu 20.04
PHP FPM (FastCGI Process Manager) is an alternative implementation of PHP FastCGI. It provides some additional features like Adaptive process spawning which is useful for sites. This tutorial will help you to install Apache with PHP-FPM/FastCGI on Ubuntu 20.04 system. In this tutorial, we are using PHP 7.4 and configure with Apache using PHP-FPM and FastCGI.
You can also visit the previous tutorial to configure Apache with multiple PHP versions using PHP-FPM/FastCGI on Ubuntu systems.
Step 1 – Installing Apache
Apache web server debian packages are available under the default repositories. Login to your Ubuntu system with sudo privileges account. Open a terminal and execute the following commands:
sudo apt update sudo apt install apache2 libapache2-mod-fcgid
The above commands will install Apache and FastCGI module to your server.
Step 2 – Install PHP with FPM
Next, install PHP and PHP-FPM on your Ubuntu system. For this tutorial, we choose PHP 7.4 to install using
For the PHP installation we recommend to use ppa:ondrej/php PPA. Execute below couple of commands to add the PPA to your system.
sudo apt install software-properties-common sudo add-apt-repository ppa:ondrej/php
Then install PHP 7.4 (or required version) the latest version available on the day of writing this tutorial. Simply execute follows commands for the installation of PHP and PHP-FPM packages.
sudo apt update sudo apt install php7.4 php7.4-fpm
Note:- When you are using PHP-FPM. All the PHP modules configurations are residing under /etc/php/7.4/fpm directory. You can read more about enable/disable PHP modules.
After installing the packages php7.4-fpm service will automatically be started. To make sure, type:
sudo systemctl status php7.4-fpm ● php7.4-fpm.service - The PHP 7.4 FastCGI Process Manager Loaded: loaded (/lib/systemd/system/php7.4-fpm.service; enabled; vendor preset: enabled) Active: active (running) since Sat 2020-05-09 04:41:44 UTC; 19s ago Docs: man:php-fpm7.4(8) Process: 375077 ExecStartPost=/usr/lib/php/php-fpm-socket-helper install /run/php/php-fpm.sock /etc/php/7.4/fpm/pool.d/www.conf 74 (code=exited> Main PID: 375073 (php-fpm7.4) Status: "Processes active: 0, idle: 2, Requests: 0, slow: 0, Traffic: 0req/sec" Tasks: 3 (limit: 2283) Memory: 9.3M CGroup: /system.slice/php7.4-fpm.service ├─375073 php-fpm: master process (/etc/php/7.4/fpm/php-fpm.conf) ├─375075 php-fpm: pool www └─375076 php-fpm: pool www May 09 04:41:43 tecadmin systemd[1]: Starting The PHP 7.4 FastCGI Process Manager. May 09 04:41:44 tecadmin systemd[1]: Started The PHP 7.4 FastCGI Process Manager.
Step 3 – Apache Configuration
Now, You need to enable some of the Apache modules required for the FastCGI confiugration. You can enable the requird module by running command:
sudo a2enmod actions fcgid alias proxy_fcgi
Then configure Apache Virtual Host to run with FPM/FastCGI. For this tutorial, we use default VirtualHost. Edit VirtualHost host configuration file in a text editor. You can also create a new configuration as per your choice.
sudo vim /etc/apache2/sites-available/000-default.conf
Update the configuration as followings.