- Как работать с MySQL в Android? Часть 1
- Что вам потребуется?
- Шаг 1. Установка WEB-сервера.
- Шаг 2. Создание БД
- Шаг 3. Подключение к MySQL базе с помощью PHP
- Шаг 4. Базовые CRUD операции в PHP
- Запись строки в БД
- Чтение строки с БД
- Получение всех продуктов с БД
- Обновление продукта в БД
- Удаление продукта с БД
- Android — PHP/MYSQL
- PHP — MYSQL
- Creating Database
- Creating Tables
- Inserting Values in tables
- PHP — GET and POST methods
- Android — Connecting MYSQL
- Connecting Via Get Method
- Connecting Via Post Method
- Example
- PHP — MYSQL part
- Android Part
Как работать с MySQL в Android? Часть 1
На днях мне пришлось подключится к внешней БД MySQL в Android приложении, которое бы использовало ресурсы готового сервиса, так вот в данном уроке я покажу как я это сделал.
В данном уроке мы с вами сделаем простое Android-приложения, который будет вызывать PHP скрипт для выполнения основных CRUD (Create, Read, Update, Delete) операций.
Android приложение будет вызывать PHP скрипт, который будет подключается к базе данных MySQL и выполнить какие то операции.
Что вам потребуется?
1) WEB-сервер для PHP. Будем использовать сборку DenWer.
Шаг 1. Установка WEB-сервера.
Так как мы будем работать со сборкой Denwer, то для начала скачиваем её тут http://www.denwer.ru/
После того как вы его установили и проверили, что он работает, переходим к следующему шагу.
Шаг 2. Создание БД
Так как мы подняли WebServer Denwer в нем уже вшита MySQL база данных, давайте создадим базу и таблицу (products) в ней.
CREATE TABLE products( pid int(11) primary key auto_increment, name varchar(100) not null, price decimal(10,2) not null, description text, created_at timestamp default now(), updated_at timestamp );
В конце видео создания БД я не зря показал локальный IP, так как я использую виртуальную ОС для удобства. В вашем случае вы будите обращаться к localhost или же 127.0.0.1 .
Шаг 3. Подключение к MySQL базе с помощью PHP
Давайте создадим PHP класс, который будет отвечать за подключение к БД. Основная цель этого класса – открытие и закрытие соединения с БД.
Но, для того что бы подключатся к БД нам нужно где то хранить требуемые параметры для подключения к БД для этого создадим [C:\WebServers\home\devserver.com\www\db_config.php] со следующим содержимым:
А теперь создадим в той же директории файл [C:\WebServers\home\devserver.com\www\db_connect.php] со следующим содержимым:
connect(); > function __destruct() < $this->close(); > function connect() < require 'db_config.php'; $con = mysql_connect(DB_SERVER, DB_USER, DB_PASSWORD) or die(mysql_error()); $db = mysql_select_db(DB_DATABASE) or die(mysql_error()) or die(mysql_error()); return $con; >function close() < mysql_close(); >> ?>
Шаг 4. Базовые CRUD операции в PHP
В этом уроке я покрываю основные CRUD (Create, Read, Update, Delete) операций для MySQL с помощью PHP.
Запись строки в БД
Создадим в нашем PHP проекте новый файл create_product.php который будет обеспечивать возможность записи продукта в БД.
Для приведенного выше кода JSON ответ будет примерно таким:
Когда POST параметр(ы) отсутствует:
Когда продукт успешно добавлен:
Когда ошибка при добавлении данных в БД:
Чтение строки с БД
Создадим новый PHP файл в нашем проекте и назовем его get_product_details.php со следующим содержанием:
Ответ JSON для вышеупомянутого файла будет следующим.
При успешном получении продукта:
Получение всех продуктов с БД
Для того чтобы вывести весь список продуктов на устройство нам нужно получить все продукты с БД.
Создадим get_all_products.php со следующим содержимым:
0) < $response["products"] = array(); while ($row = mysql_fetch_array($result)) < $product = array(); $product["pid"] = $row["pid"]; $product["name"] = $row["name"]; $product["price"] = $row["price"]; $product["created_at"] = $row["created_at"]; $product["updated_at"] = $row["updated_at"]; array_push($response["products"], $product); >$response["success"] = 1; echo json_encode($response); > else < $response["success"] = 0; $response["message"] = "No products found"; echo json_encode($response); >?>
JSON ответ выше приведенного кода будет таким:
Обновление продукта в БД
Создайте файл с именем update_product.php со следующим содержимым:
Ответ JSON выше кода, когда продукт успешно обновлены будет следующим:
Удаление продукта с БД
Последняя операция удаления из базы данных. Создайте новый файл назовите delete_product.php и вставьте следующий код:
Когда продукт удачно будет удален то JSON ответ будет таким:
Когда продукт не найден, то таким:
Теперь наконец-то мы можем приступить к программированию на Android. То что мы описали выше на PHP будем использовать как API слой. И наше приложение будет общаться с MySQL сервером по средством JSON формата и GET, POST запросов.
Android — PHP/MYSQL
In this chapter , we are going to explain, how you can integrate PHP and MYSQL with your android application. This is very useful in case you have a webserver, and you want to access its data on your android application.
MYSQL is used as a database at the webserver and PHP is used to fetch data from the database. Our application will communicate with the PHP page with necessary parameters and PHP will contact MYSQL database and will fetch the result and return the results to us.
PHP — MYSQL
Creating Database
MYSQL database can be created easily using this simple script. The CREATE DATABASE statement creates the database.
Creating Tables
Once database is created, its time to create some tables in the database. The CREATE TABLE statement creates the database.
Inserting Values in tables
When the database and tables are created. Now its time to insert some data into the tables. The Insert Into statement creates the database.
PHP — GET and POST methods
PHP is also used to fetch the record from the mysql database once it is created. In order to fetch record some information must be passed to PHP page regarding what record to be fetched.
The first method to pass information is through GET method in which $_GET command is used. The variables are passed in the url and the record is fetched. Its syntax is given below −
$username = $_GET['username']; $password = $_GET['password']; $result = mysqli_query($con,"SELECT Role FROM table1 where Username='$username' and Password='$password'"); $row = mysqli_fetch_array($result); $data = $row[0]; if($data) < echo $data; >mysqli_close($con); ?>
The second method is to use POST method. The only change in the above script is to replace $_GET with $_POST. In Post method, the variables are not passed through URL.
Android — Connecting MYSQL
Connecting Via Get Method
There are two ways to connect to MYSQL via PHP page. The first one is called Get method. We will use HttpGet and HttpClient class to connect. Their syntax is given below −
URL url = new URL(link); HttpClient client = new DefaultHttpClient(); HttpGet request = new HttpGet(); request.setURI(new URI(link));
After that you need to call execute method of HttpClient class and receive it in a HttpResponse object. After that you need to open streams to receive the data.
HttpResponse response = client.execute(request); BufferedReader in = new BufferedReader (new InputStreamReader(response.getEntity().getContent()));
Connecting Via Post Method
In the Post method, the URLEncoder,URLConnection class will be used. The urlencoder will encode the information of the passing variables. It’s syntax is given below −
URL url = new URL(link); String data = URLEncoder.encode("username", "UTF-8") + "=" + URLEncoder.encode(username, "UTF-8"); data += "&" + URLEncoder.encode("password", "UTF-8") + "=" + URLEncoder.encode(password, "UTF-8"); URLConnection conn = url.openConnection(); The last thing you need to do is to write this data to the link. After writing, you need to open stream to receive the responded data.
OutputStreamWriter wr = new OutputStreamWriter(conn.getOutputStream()); wr.write( data ); BufferedReader reader = new BufferedReader(new InputStreamReader(conn.getInputStream()));
Example
The below example is a complete example of connecting your android application with MYSQL database via PHP page. It creates a basic application that allows you to login using GET and POST method.
PHP — MYSQL part
In this example a database with the name of temp has been created at 000webhost.com. In that database, a table has been created with the name of table1. This table has three fields. (Username, Password, Role). The table has only one record which is («admin»,»admin»,»administrator»).
The php page has been given below which takes parameters by post method.
$username = $_POST['username']; $password = $_POST['password']; $result = mysqli_query($con,"SELECT Role FROM table1 where Username='$username' and Password='$password'"); $row = mysqli_fetch_array($result); $data = $row[0]; if($data) < echo $data; >mysqli_close($con); ?>
Android Part
To experiment with this example , you need to run this on an actual device on which wifi internet is connected.
| Steps | Description |
|---|---|
| 1 | You will use Android studio IDE to create an Android application and name it as PHPMYSQL under a package com.example.phpmysql. |
| 2 | Modify src/MainActivity.java file to add Activity code. |
| 3 | Create src/SiginActivity.java file to add PHPMYSQL code. |
| 4 | Modify layout XML file res/layout/activity_main.xml add any GUI component if required. |
| 5 | Modify res/values/string.xml file and add necessary string components. |
| 6 | Modify AndroidManifest.xml to add necessary permissions. |
| 7 | Run the application and choose a running android device and install the application on it and verify the results. |
Here is the content of src/com.example.phpmysql/MainActivity.java.
package com.example.phpmysql; import android.app.Activity; import android.os.Bundle; import android.view.View; import android.widget.EditText; import android.widget.TextView; public class MainActivity extends Activity < private EditText usernameField,passwordField; private TextView status,role,method; @Override protected void onCreate(Bundle savedInstanceState) < super.onCreate(savedInstanceState); setContentView(R.layout.activity_main); usernameField = (EditText)findViewById(R.id.editText1); passwordField = (EditText)findViewById(R.id.editText2); status = (TextView)findViewById(R.id.textView6); role = (TextView)findViewById(R.id.textView7); method = (TextView)findViewById(R.id.textView9); >public void login(View view) < String username = usernameField.getText().toString(); String password = passwordField.getText().toString(); method.setText("Get Method"); new SigninActivity(this,status,role,0).execute(username,password); >public void loginPost(View view) < String username = usernameField.getText().toString(); String password = passwordField.getText().toString(); method.setText("Post Method"); new SigninActivity(this,status,role,1).execute(username,password); >> Here is the content of src/com.example.phpmysql/SigninActivity.java.
package com.example.phpmysql; import java.io.BufferedReader; import java.io.InputStreamReader; import java.io.OutputStreamWriter; import java.net.URI; import java.net.URL; import java.net.URLConnection; import java.net.URLEncoder; import org.apache.http.HttpResponse; import org.apache.http.client.HttpClient; import org.apache.http.client.methods.HttpGet; import org.apache.http.impl.client.DefaultHttpClient; import android.content.Context; import android.os.AsyncTask; import android.widget.TextView; public class SigninActivity extends AsyncTask < private TextView statusField,roleField; private Context context; private int byGetOrPost = 0; //flag 0 means get and 1 means post.(By default it is get.) public SigninActivity(Context context,TextView statusField,TextView roleField,int flag) < this.context = context; this.statusField = statusField; this.roleField = roleField; byGetOrPost = flag; >protected void onPreExecute() < >@Override protected String doInBackground(String. arg0) < if(byGetOrPost == 0)< //means by Get Method try< String username = (String)arg0[0]; String password = (String)arg0[1]; String link = "http://myphpmysqlweb.hostei.com/login.php?username="+username+"& password="+password; URL url = new URL(link); HttpClient client = new DefaultHttpClient(); HttpGet request = new HttpGet(); request.setURI(new URI(link)); HttpResponse response = client.execute(request); BufferedReader in = new BufferedReader(new InputStreamReader(response.getEntity().getContent())); StringBuffer sb = new StringBuffer(""); String line=""; while ((line = in.readLine()) != null) < sb.append(line); break; >in.close(); return sb.toString(); > catch(Exception e) < return new String("Exception: " + e.getMessage()); >> else < try< String username = (String)arg0[0]; String password = (String)arg0[1]; String link="http://myphpmysqlweb.hostei.com/loginpost.php"; String data = URLEncoder.encode("username", "UTF-8") + "=" + URLEncoder.encode(username, "UTF-8"); data += "&" + URLEncoder.encode("password", "UTF-8") + "=" + URLEncoder.encode(password, "UTF-8"); URL url = new URL(link); URLConnection conn = url.openConnection(); conn.setDoOutput(true); OutputStreamWriter wr = new OutputStreamWriter(conn.getOutputStream()); wr.write( data ); wr.flush(); BufferedReader reader = new BufferedReader(new InputStreamReader(conn.getInputStream())); StringBuilder sb = new StringBuilder(); String line = null; // Read Server Response while((line = reader.readLine()) != null) < sb.append(line); break; >return sb.toString(); > catch(Exception e) < return new String("Exception: " + e.getMessage()); >> > @Override protected void onPostExecute(String result) < this.statusField.setText("Login Successful"); this.roleField.setText(result); >> Add the following content to build.gradle and rebuild the whole project.
Here is the content of activity_main.xml.
Here is the content of Strings.xml.
PHPMYSQL Settings Hello world! Username Password Login - Get Login - Post Login Application Login Status Login Role Not login Not assigned Login Method Choose Method
Here is the content of AndroidManifest.xml.

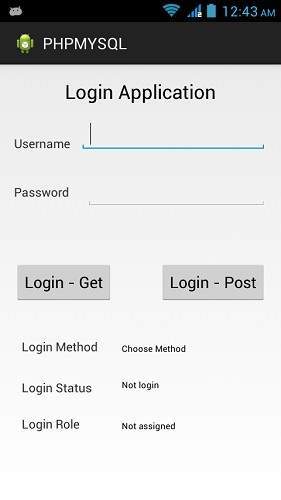
Let’s try to run your PHPMYSQL application. I assume you have connected your actual Android Mobile device with your computer. To run the app from Android studio, open one of your project’s activity files and click Run icon from the tool bar. Before starting your application, Android studio will display following window to select an option where you want to run your Android application.

Select your mobile device as an option and then check your mobile device which will display following screen −
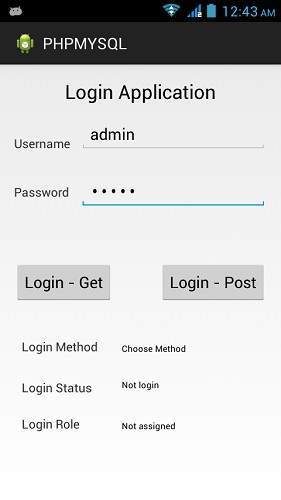
Now just type in your username and password. In my case i am typing admin as username and password. It is shown in the figure −
Now press the Get button and wait a few seconds and response will be downloaded and will be shown to you. In this case, the response is the ROLE that is fetched in case of admin as username and password.It is shown in the figure below −
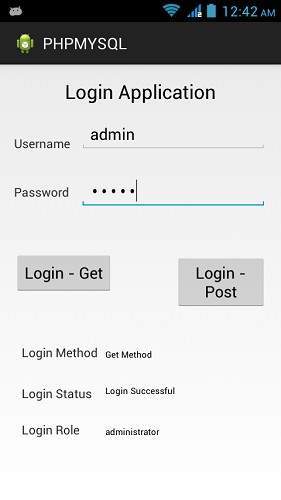
Now again press the POST button and same result would appear. It is shown in the figure below −