- How to make a .jar out from an android studio project in Java?
- Method 1: Export as JAR from Android Studio
- Method 2: Use command line tools
- Android studio java jar
- Introduction
- Create a project
- Create a jar module
- MyClass.kt
- build.gradle
- Add jar task
- 🎅MnogoBlog
- ⛄как создать сайт на wordpress, настроить и оптимизировать wordpress
- Как в Android studio и libgdx создать jar (exe) файл для desktop, html5
How to make a .jar out from an android studio project in Java?
A JAR (Java ARchive) is a package file format typically used to aggregate many Java class files and associated metadata and resources (text, images, etc.) into one file for distribution. If you have an Android Studio project that you want to package into a JAR file, here are two methods to accomplish that:
Method 1: Export as JAR from Android Studio
Here are the steps to export an Android Studio project as a JAR file using the «Export as JAR» option:
- Open your Android Studio project.
- Go to «File» -> «Project Structure».
- In the Project Structure window, select «app» under «Modules».
- Click on the «Artifacts» tab.
- Click on the «+» icon and select «JAR».
- In the «Create JAR from Modules» window, select the module you want to export as a JAR file.
- Choose the «Main Class» for your JAR file.
- Set the output directory and JAR file name.
- Click «OK» to create the JAR file.
Here is an example of how to use the exported JAR file in another Java project:
import com.example.mylibrary.MyClass; public class Main public static void main(String[] args) MyClass myClass = new MyClass(); myClass.myMethod(); > >In this example, «MyClass» is a class from the exported JAR file that contains a method called «myMethod()». We import the class and use it in our «Main» class.
And here is an example of how to create a JAR file programmatically using the «jar» command:
import java.io.*; import java.util.jar.*; public class CreateJar public static void main(String[] args) throws IOException File file = new File("myjar.jar"); FileOutputStream fos = new FileOutputStream(file); JarOutputStream jos = new JarOutputStream(fos, new Manifest()); String[] classFiles = "com/example/mylibrary/MyClass.class">; for (String classFile : classFiles) File f = new File(classFile); JarEntry jarEntry = new JarEntry(classFile); jarEntry.setTime(f.lastModified()); jos.putNextEntry(jarEntry); FileInputStream fis = new FileInputStream(f); byte[] buffer = new byte[1024]; int bytesRead; while ((bytesRead = fis.read(buffer)) != -1) jos.write(buffer, 0, bytesRead); > fis.close(); > jos.close(); fos.close(); > >In this example, we create a JAR file called «myjar.jar» that contains the «MyClass» class from the «com.example.mylibrary» package. We use a «JarOutputStream» to write the class file to the JAR file.
Method 2: Use command line tools
Here are the steps to create a .jar file from an Android Studio project using command line tools:
- Open the Terminal or Command Prompt.
- Navigate to the root folder of your Android Studio project.
- Create a directory called «jar» using the following command:
javac -d jar -cp "path/to/your/android/sdk/platforms/android-xx/android.jar" app/src/main/java/com/example/myapp/*.javaManifest-Version: 1.0 Main-Class: com.example.myapp.MainClassjar cvfm myapp.jar MANIFEST.MF com/example/myapp/*.classThat’s it! You have successfully created a .jar file from your Android Studio project using command line tools.
Android studio java jar
I wanted to consolidate some Java classes into a common library so that it can be shared among Android projects. A Java archive file (*.jar) is a typical container for this purpose. Android Studio can generate and use a Java archive (Jar) file containing commonly used classes and resources. But since we are using Android Studio, an Android project must be created first, then a Jar module can then be created and added. The following steps illustrate the process in creating a Jar file.
Generating a Java archive (*.jar) file
- Start up Android Studio.

Select Start a new Android Studio project.

The Create New Project dialog box appears.
Type in an Application name and a Company Domain. Select a Project location. Click Next.

The Target Android Devices page appears.
Choose a Minimum SDK, e.g. API 14. Click Next.

The Add an activity to Mobile page appears.
Select Add No Activity. Click Finish.

The Create New Module dialog box appears.
Select Java library.

The Customize the Activity page appears.
In the Library name field, type in the name of the library e.g. libDijkstra . In the Java class name field, type in the name of the class e.g. MyClass . Press Enter.

Double click on build.
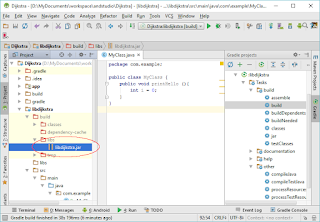
The Java archive file is generated, e.g. libdijkstra.jar.
- In Android Studio, create a new project or open up an existing project e.g. MyApplication that you want to use the Java archive file library.
- In the Project view, expand the libs node of your app, as shown below.

Using the Windows Explorer, select and copy the Java archive file (*.jar) e.g. libdijkstra.jar. In Android Studio, right click on the libs folder of the app. Paste the Jar file.

The Copy dialog box appears.
If necessary, change the name. Click OK.

The Project Structure dialog box appears.
Select app. On the right side, click the plus +.

The Select Path dialog box appears.
Browse and select the Java archive file e.g. libdijkstra.jar. Click OK.

Now the classes and methods in the Java archive file can be used in your app, as shown in the example below.
Introduction
I will explain how to make an executable jar using Android Studio.
Version The OS version is as follows.
Microsoft Windows 10 Home 10.0.18363 N/A build 18363 The versions of Android Studio are as follows.
Android Studio 4.0 Build #AI-193.6911.18.40.6514223, built on May 21, 2020 Runtime version: 1.8.0_242-release-1644-b01 amd64 VM: OpenJDK 64-Bit Server VM by JetBrains s.r.o The java version is as follows.
java -version java version "1.8.0_251" Java(TM) SE Runtime Environment (build 1.8.0_251-b08) Java HotSpot(TM) 64-Bit Server VM (build 25.251-b08, mixed mode) Create a project
Follow the steps below to create a project.
Start Android Studio. Select Start a new Android Studio project. Create a No Activity project. Name it «My Application» (default). Let’s say the Language is «Kotlin».
Create a jar module
Follow the steps below to add a jar module in your project.
Select File —New —New Module . Select Java or Kotlin Library. Set the Library name to «lib» (default). Let the Class name be «MyClass».
fun main Open MyClass.kt. Replace the content with the following:
MyClass.kt
package com.example.lib fun main(args: Array) <> The screen of the state executed so far is as follows.

Add the following to your lib build.gradle:
build.gradle

Add jar task
Follow the steps below to add a jar task.
Select View —Tool Windows —Gradle. Window is displayed. Double-click My Application —Tasks —build —jar. The build will start.
The screen of the state executed so far is as follows.

You will have a jar in the following path:
Open a command prompt. Navigate to the path where lib.jar is located. Run the following command: If you can execute it without error, you can see that you have a jar that can be executed as expected.
🎅MnogoBlog
⛄как создать сайт на wordpress, настроить и оптимизировать wordpress


Как в Android studio и libgdx создать jar (exe) файл для desktop, html5
🎅MnogoBlog > Android и LibGDX > Как в Android studio и libgdx создать jar (exe) файл для desktop, html5
Вы создали игру, анимацию с помощью Android Studio и фреймворка libgdx, а далее хотите сохранить данный проект для desktop версии (ПК версии) или html5 (то есть создать билд), тогда вам нужно сделать следующее:.
Скачать исходники для статьи можно ниже
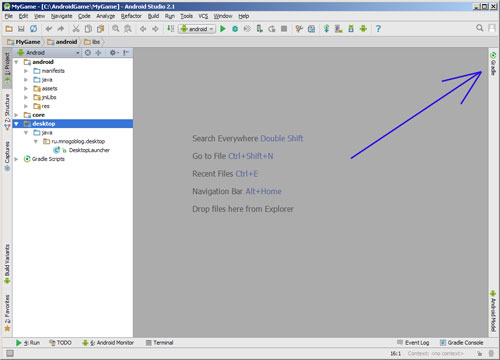
Заходим в Android Studio и справа находим окно Gradle:
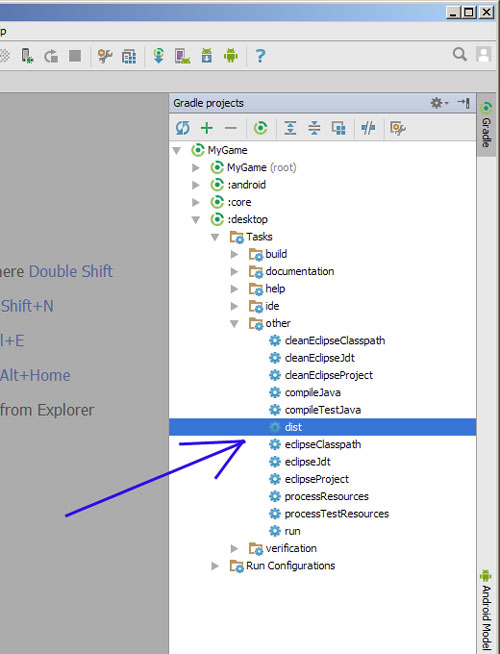
В открывшемся окне находим нужный билд, в данном примере, сохраним проект для desktop (ПК) версии, аналогично с HTML5, поэтому раскрываем пункт “:desktop”, потом подпункт “Tasks”, и подпункт “other”, в нём ищем пункт “dist” и запускаем его:
После чего появиться сообщение об успешном построении билда:
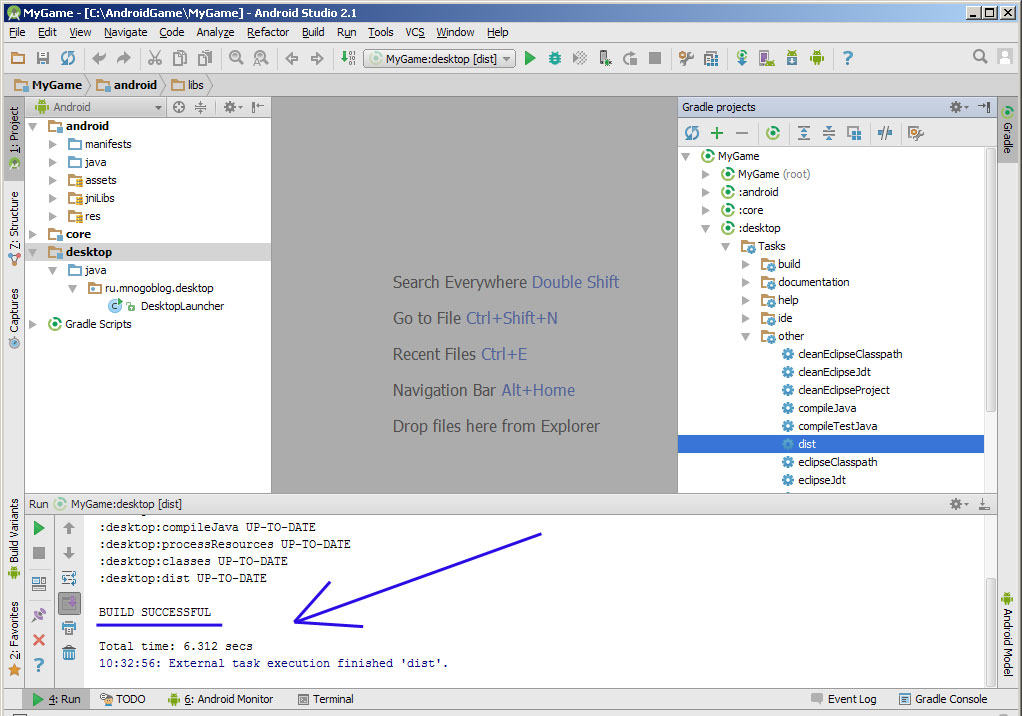
То есть у вас появиться Jar файл в папке вашего проекта.
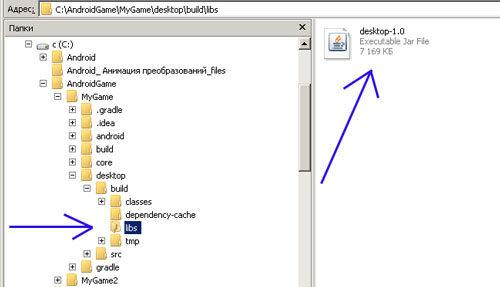
Для desktop версии заходим в папку проекта, в моём примере, папка проекта называется “MyGame”, далее в папку “desktop”, после в папку “build” и в папку “libs”, где у нас будет лежать JAR файл!
С HTML5 – всё аналогично – папка проекта – папка “HTML5” -папка “build” и папка “libs”.
Если вам понадобиться превратить файл JAR в EXE файл, то воспользуйтесь бесплатными программами – Jar2Exe, launch4G!