- Saved searches
- Use saved searches to filter your results more quickly
- MahakAggarwal/Android_Simple_Calculator
- Name already in use
- Sign In Required
- Launching GitHub Desktop
- Launching GitHub Desktop
- Launching Xcode
- Launching Visual Studio Code
- Latest commit
- Git stats
- Files
- README.md
- About
- Android calculator in java
- Android calculator in java
- Table of Contents
- Calculator
- Step-by-Step Implementation
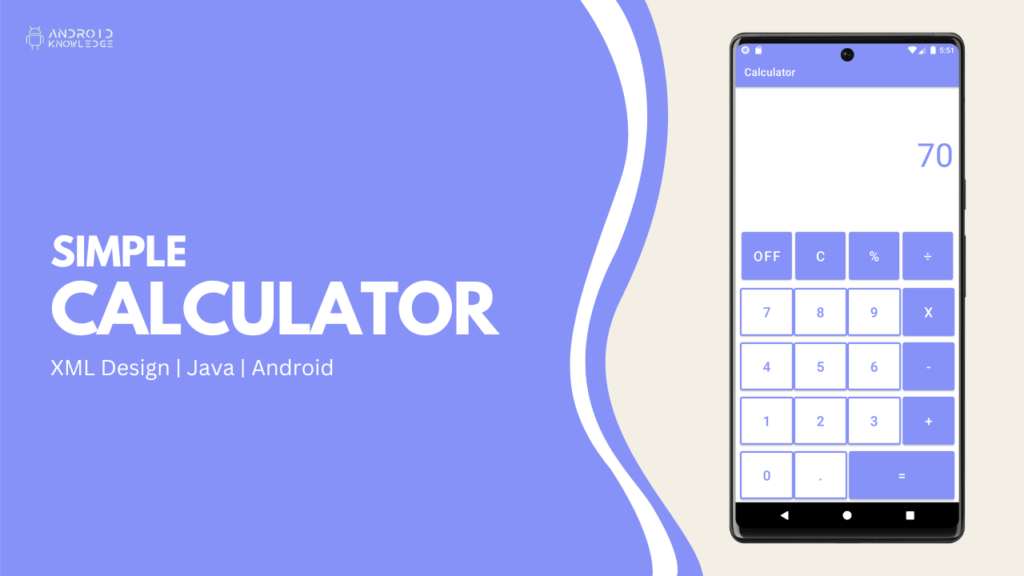
- Output
- AK Bonus Point:
Saved searches
Use saved searches to filter your results more quickly
You signed in with another tab or window. Reload to refresh your session. You signed out in another tab or window. Reload to refresh your session. You switched accounts on another tab or window. Reload to refresh your session.
A Simple calculator made using Android Studio
MahakAggarwal/Android_Simple_Calculator
This commit does not belong to any branch on this repository, and may belong to a fork outside of the repository.
Name already in use
A tag already exists with the provided branch name. Many Git commands accept both tag and branch names, so creating this branch may cause unexpected behavior. Are you sure you want to create this branch?
Sign In Required
Please sign in to use Codespaces.
Launching GitHub Desktop
If nothing happens, download GitHub Desktop and try again.
Launching GitHub Desktop
If nothing happens, download GitHub Desktop and try again.
Launching Xcode
If nothing happens, download Xcode and try again.
Launching Visual Studio Code
Your codespace will open once ready.
There was a problem preparing your codespace, please try again.
Latest commit
Git stats
Files
Failed to load latest commit information.
README.md
Simple Calculator Android Application
The application provides basic calculation functionality – addition, subtraction, multiplication, division, modulus, power, and square root in addition to providing buttons for numbers, decimal point, ‘Clear’, and backspace. It uses string, colour, dimension and style resources. The base layout used in Constraint layout with components like LinearLayout, TextViews, Buttons, and ImageButton. There are two layouts – one for portrait mode and one for landscape mode. A separate java class is used for the calculation implementation. SavedInstanceState is used to make sure that the data doesn’t clear if the screen is rotated. There is no keyboard input – it is done using the buttons provided on the screen. The following possible errors are considered, and appropriate action is taken –
- Making sure that there is only one decimal point in a number
- The length of the number of characters does not exceed by 10
- The root button works even if there is no first number provided
- Possible division errors
When the backspace button is long pressed, all the contents are cleared. Methods are created and reused to reduce code duplication. Compatibility classes are used to provide backwards compatibility for older android versions.
![]()
This icon represents the application. Made using Font Awesome Icons and MDBootstrap. It follows material design guidelines.
Android Studio Version: 3.1.4 Gradle Version: 4.6 Minimum Android SDK: 19 Target Android SDK: 28


The usage of the application is self-explanatory. However, the following steps can be followed –
- Enter a number (up to 10 digits) using the number pad provided
- Enter an operation using the number pad
- Enter the second number (up to 10 digits)
- Press the ‘=’ button to perform the calculation
- Use the backspace button to delete the last character
- Enter the first number before entering an operation.
- Use ‘C’ button to clear all the fields
About
A Simple calculator made using Android Studio
Android calculator in java
Зная некоторые основы компоновки и такие элементы как TextView, EditText и Button, уже можно составить более менее полноценное приложение. В данном случае мы сделаем простенький калькулятор.
Для этого создадим новый проект и определим в файле activity_main.xml следующий интерфейс:
В итоге весь интерфейс будет выглядеть следующим образом:
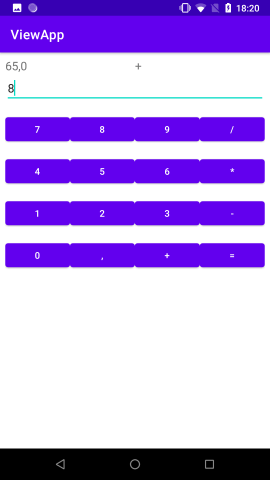
Корневой контейнер компоновки представляет элемент ConstraintLayout . Сверху в нем определены два текстовых поля TextView: одно для вывода результата вычислений и одно для вывода текущего знака операции.
Затем идет элемент EditText, предназначенный для ввода чисел.
И далее расположены четыре элемента LinearLayout с горизонтальными рядами кнопок. Чтобы все кнопки занимали равное пространство внутри контейнера, для них установлены атрибуты android:layout_weight=»1″ и android:layout_width=»0dp» .
Кроме того, для числовых кнопок в качестве обработчика нажатия установлен метод onNumberClick , а для кнопок со знаками операций атрибут onClick указывает на метод onOperationClick .
Теперь изменим класс MainActivity :
package com.example.viewapp; import androidx.appcompat.app.AppCompatActivity; import android.os.Bundle; import android.view.View; import android.widget.Button; import android.widget.EditText; import android.widget.TextView; public class MainActivity extends AppCompatActivity < TextView resultField; // текстовое поле для вывода результата EditText numberField; // поле для ввода числа TextView operationField; // текстовое поле для вывода знака операции Double operand = null; // операнд операции String lastOperation = "="; // последняя операция @Override protected void onCreate(Bundle savedInstanceState) < super.onCreate(savedInstanceState); setContentView(R.layout.activity_main); // получаем все поля по id из activity_main.xml resultField = findViewById(R.id.resultField); numberField = findViewById(R.id.numberField); operationField = findViewById(R.id.operationField); >// сохранение состояния @Override protected void onSaveInstanceState(Bundle outState) < outState.putString("OPERATION", lastOperation); if(operand!=null) outState.putDouble("OPERAND", operand); super.onSaveInstanceState(outState); >// получение ранее сохраненного состояния @Override protected void onRestoreInstanceState(Bundle savedInstanceState) < super.onRestoreInstanceState(savedInstanceState); lastOperation = savedInstanceState.getString("OPERATION"); operand= savedInstanceState.getDouble("OPERAND"); resultField.setText(operand.toString()); operationField.setText(lastOperation); >// обработка нажатия на числовую кнопку public void onNumberClick(View view) < Button button = (Button)view; numberField.append(button.getText()); if(lastOperation.equals("=") && operand!=null)< operand = null; >> // обработка нажатия на кнопку операции public void onOperationClick(View view)< Button button = (Button)view; String op = button.getText().toString(); String number = numberField.getText().toString(); // если введенно что-нибудь if(number.length()>0)< number = number.replace(',', '.'); try< performOperation(Double.valueOf(number), op); >catch (NumberFormatException ex) < numberField.setText(""); >> lastOperation = op; operationField.setText(lastOperation); > private void performOperation(Double number, String operation) < // если операнд ранее не был установлен (при вводе самой первой операции) if(operand ==null)< operand = number; >else < if(lastOperation.equals("="))< lastOperation = operation; >switch(lastOperation) < case "=": operand =number; break; case "/": if(number==0)< operand =0.0; >else < operand /=number; >break; case "*": operand *=number; break; case "+": operand +=number; break; case "-": operand -=number; break; > > resultField.setText(operand.toString().replace('.', ',')); numberField.setText(""); > > Разберем этот код. Вначале в методе onCreate() получаем все поля из activity_main.xml, текст которых будет изменяться:
resultField = findViewById(R.id.resultField); numberField = findViewById(R.id.numberField); operationField = findViewById(R.id.operationField);
Результат операции будет попадать в переменную operand, которая представляет тип Double, а знак операции — в переменную lastOperation:
Double operand = null; String lastOperation = " brush:java;"> Button button = (Button)view; numberField.append(button.getText()); if(lastOperation.equals(" равно"), то мы сбрасываем переменную operand. В методе onOperationClick происходит обработка нажатия на кнопку со знаком операции:
Button button = (Button)view; String op = button.getText().toString(); String number = numberField.getText().toString(); if(number.length()>0)< number = number.replace(',', '.'); try< performOperation(Double.valueOf(number), op); >catch (NumberFormatException ex) < numberField.setText(""); >> lastOperation = op; operationField.setText(lastOperation); Здесь получаем ранее введенное число и введенную операцию и передаем их в метод performOperation() . Так как в метод передается не просто строка, а число Double, то нам надо преобразовать строку в чсло. И поскольку теоретически могут быть введены нечисловые символы, то для отлова исключения, которое может возникнуть при преобразовании используется конструкция try. catch.
Кроме того, так как разделителем целой и дробной части в Double в java является точка, то нам надо заменить запятую на точку, так как предполагается, что мы используем в качестве разделителя запятую.
А методе performOperation() выполняем собственно операцию. При вводе первой операции, когда операнд еще не установлен, мы просто устанавливаем операнд:
При вводе второй и последующих операций применяем предыдущую операцию, знак которой хранится в переменной lastOperation, к операнду operand и второму числу, которое было введено в числовое поле. Полученный результат операции сохраняем в переменной operand.
Android calculator in java

Table of Contents
Calculator
We have created a simple calculator app in android studio which is entirely beginner friendly. It performs basic operations such as addition, subtraction, multiplication, division, and percentage.
It consists of numbers and commonly used buttons such as dot, clear, and switch-off buttons.
We have set onClickListener on each button and assigned them a particular task according to their functionality while the equals button will perform all the calculations. For that, we have created a different method called allCalculations() which will work on the if condition for all the operations.
With the help of the below steps, you can easily create a calculator app in android studio. The calculator app in the android studio is not advanced but well equipped for a beginner to use or present as a college project.
Step-by-Step Implementation
Step 1: Open Android Studio, Create New Project, Choose Empty Activity, and Click Finish.

Step 2: Add Color in the colors.xml file.
Add our brand color or any other color of your choice, we have used #8692f7 lavender color as our primary color.
Go to res -> values -> colors.xml and add the below line:
Step 3: Change the theme colors.
We want to keep a constant color so we will change our theme color as well.
Go to res -> themes.xml and change two colors, colorPrimary, and colorPrimaryVariant. These two will change the action bar color and we also want to change the status bar color.
But, it will automatically get changed because the status bar color is already set to colorPrimaryVariant.
- @color/lavender
- @color/lavender
- @color/white
- @color/teal_200
- @color/teal_700
- @color/black
- ?attr/colorPrimaryVariant
Step 4: Create buttons_layout.xml.
We will create a different XML file for the button layout so that the code does not become congested in activity_main.xml then later we will include the layout file in our activity_main.xml seamlessly.
Right-click on res -> layout and click New -> Layout Resource File then name the file buttons_layout.xml.
Step 5: Go to activity_main.xml.
In this activity, we will create an input and output display where our numbers and result will be displayed
For that, we will use two TextView one for input and another one for output.
We will also make sure to include the button layout in our activity.
Step 6: Go to MainActivity.java.
In this activity, create all the variables for the buttons and then initialize all of them with their respective id.
Add on click listener to each and every button and perform operations in it.
We have created one method called as allCalculations() which calculates the results and displays them in the output display field.
package com.example.calculator; import androidx.appcompat.app.AppCompatActivity; import android.os.Bundle; import android.view.View; import android.widget.TextView; import com.google.android.material.button.MaterialButton; import java.text.DecimalFormat; public class MainActivity extends AppCompatActivity < private static final char ADDITION = '+'; private static final char SUBTRACTION = '-'; private static final char MULTIPLICATION = '*'; private static final char DIVISION = '/'; private static final char PERCENT = '%'; private char currentSymbol; private double firstValue = Double.NaN; private double secondValue; private TextView inputDisplay, outputDisplay; private DecimalFormat decimalFormat; private MaterialButton button0, button1, button2, button3, button4, button5, button6, button7, button8, button9, buttonDot, buttonAdd, buttonSub, buttonMultiply, buttonDivide, buttonPercent, buttonClear, buttonOFF, buttonEqual; @Override protected void onCreate(Bundle savedInstanceState) < super.onCreate(savedInstanceState); setContentView(R.layout.activity_main); decimalFormat = new DecimalFormat("#.##########"); inputDisplay = findViewById(R.id.input); outputDisplay = findViewById(R.id.output); button0 = findViewById(R.id.btn0); button1 = findViewById(R.id.btn1); button2 = findViewById(R.id.btn2); button3 = findViewById(R.id.btn3); button4 = findViewById(R.id.btn4); button5 = findViewById(R.id.btn5); button6 = findViewById(R.id.btn6); button7 = findViewById(R.id.btn7); button8 = findViewById(R.id.btn8); button9 = findViewById(R.id.btn9); buttonAdd = findViewById(R.id.add); buttonSub = findViewById(R.id.subtract); buttonDivide = findViewById(R.id.division); buttonDot = findViewById(R.id.btnPoint); buttonMultiply = findViewById(R.id.multiply); buttonClear = findViewById(R.id.clear); buttonOFF = findViewById(R.id.off); buttonEqual = findViewById(R.id.equal); buttonPercent = findViewById(R.id.percent); button0.setOnClickListener(new View.OnClickListener() < @Override public void onClick(View view) < inputDisplay.setText(inputDisplay.getText() + "0"); >>); button1.setOnClickListener(new View.OnClickListener() < @Override public void onClick(View view) < inputDisplay.setText(inputDisplay.getText() + "1"); >>); button2.setOnClickListener(new View.OnClickListener() < @Override public void onClick(View view) < inputDisplay.setText(inputDisplay.getText() + "2"); >>); button3.setOnClickListener(new View.OnClickListener() < @Override public void onClick(View view) < inputDisplay.setText(inputDisplay.getText() + "3"); >>); button4.setOnClickListener(new View.OnClickListener() < @Override public void onClick(View view) < inputDisplay.setText(inputDisplay.getText() + "4"); >>); button5.setOnClickListener(new View.OnClickListener() < @Override public void onClick(View view) < inputDisplay.setText(inputDisplay.getText() + "5"); >>); button6.setOnClickListener(new View.OnClickListener() < @Override public void onClick(View view) < inputDisplay.setText(inputDisplay.getText() + "6"); >>); button7.setOnClickListener(new View.OnClickListener() < @Override public void onClick(View view) < inputDisplay.setText(inputDisplay.getText() + "7"); >>); button8.setOnClickListener(new View.OnClickListener() < @Override public void onClick(View view) < inputDisplay.setText(inputDisplay.getText() + "8"); >>); button9.setOnClickListener(new View.OnClickListener() < @Override public void onClick(View view) < inputDisplay.setText(inputDisplay.getText() + "9"); >>); buttonAdd.setOnClickListener(new View.OnClickListener() < @Override public void onClick(View view) < allCalculations(); currentSymbol = ADDITION; outputDisplay.setText(decimalFormat.format(firstValue) + "+"); inputDisplay.setText(null); >>); buttonSub.setOnClickListener(new View.OnClickListener() < @Override public void onClick(View view) < allCalculations(); currentSymbol = SUBTRACTION; outputDisplay.setText(decimalFormat.format(firstValue) + "-"); inputDisplay.setText(null); >>); buttonMultiply.setOnClickListener(new View.OnClickListener() < @Override public void onClick(View view) < allCalculations(); currentSymbol = MULTIPLICATION; outputDisplay.setText(decimalFormat.format(firstValue) + "x"); inputDisplay.setText(null); >>); buttonDivide.setOnClickListener(new View.OnClickListener() < @Override public void onClick(View view) < allCalculations(); currentSymbol = DIVISION; outputDisplay.setText(decimalFormat.format(firstValue) + "/"); inputDisplay.setText(null); >>); buttonPercent.setOnClickListener(new View.OnClickListener() < @Override public void onClick(View view) < allCalculations(); currentSymbol = PERCENT; outputDisplay.setText(decimalFormat.format(firstValue) + "%"); inputDisplay.setText(null); >>); buttonDot.setOnClickListener(new View.OnClickListener() < @Override public void onClick(View view) < inputDisplay.setText(inputDisplay.getText() + "."); >>); buttonClear.setOnClickListener(new View.OnClickListener() < @Override public void onClick(View view) < if (inputDisplay.getText().length() >0) < CharSequence currentText = inputDisplay.getText(); inputDisplay.setText(currentText.subSequence(0, currentText.length() - 1)); >else < firstValue = Double.NaN; secondValue = Double.NaN; inputDisplay.setText(""); outputDisplay.setText(""); >> >); buttonOFF.setOnClickListener(new View.OnClickListener() < @Override public void onClick(View view) < finish(); >>); buttonEqual.setOnClickListener(new View.OnClickListener() < @Override public void onClick(View view) < allCalculations(); outputDisplay.setText(decimalFormat.format(firstValue)); firstValue = Double.NaN; currentSymbol = '0'; >>); > private void allCalculations() < if (!Double.isNaN(firstValue)) < secondValue = Double.parseDouble(inputDisplay.getText().toString()); inputDisplay.setText(null); if (currentSymbol == ADDITION) firstValue = this.firstValue + secondValue; else if (currentSymbol == SUBTRACTION) firstValue = this.firstValue - secondValue; else if (currentSymbol == MULTIPLICATION) firstValue = this.firstValue * secondValue; else if (currentSymbol == DIVISION) firstValue = this.firstValue / secondValue; else if (currentSymbol == PERCENT) firstValue = this.firstValue % secondValue; >else < try < firstValue = Double.parseDouble(inputDisplay.getText().toString()); >catch (Exception e) < >> > > Output
AK Bonus Point:
If you have any queries or errors, please feel free to comment below 🙂
Please subscribe to my YouTube Channel 🙂