- Пишем первое приложение для Android
- Установка необходимых программ и утилит
- Запуск виртуального устройства
- Список устройств
- Создание проекта
- Структура проекта
- Первые строки
- Square.java
- Player.java
- Game.java
- Определение победителя
- WinnerCheckerHorizontal.java
- WinnerCheckerVertical.java
- WinnerCheckerDiagonalLeft.java
- WinnerCheckerDiagonalRight.java
- Видео готового приложения
- How to Make Your First App in Java
- Get Started With Android Studio
- Install Android Studio
- Understand Android Studio
- Java Android App Development
- Making the First Changes to Your App
Пишем первое приложение для Android
В любом деле самое сложное — это начало. Часто бывает тяжело войти в контекст, с чем столкнулся и я, решив разработать свое первое Android-приложение. Настоящая статья для тех, кто хочет начать, но не знает с чего.
Статья затронет весь цикл разработки приложения. Вместе мы напишем простенькую игру “Крестики-Нолики” с одним экраном (в ОС Android это называется Activity).
Отсутствие опыта разработки на языке Java не должно стать препятствием в освоении Android. Так, в примерах не будут использоваться специфичные для Java конструкции (или они будет минимизированы на столько, на сколько это возможно). Если Вы пишете, например, на PHP и знакомы с основополагающими принципами в разработке ПО, эта статья будет вам наиболее полезна. В свою очередь так как, я не являюсь экспертом по разработке на Java, можно предположить, что исходный код не претендует на лейбл “лучшие практики разработки на Java”.
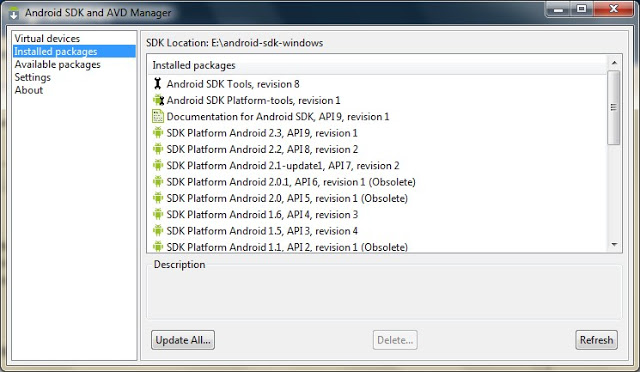
Установка необходимых программ и утилит
- JDK — набор для разработки на языке Java;
- Android SDK and AVD Manager — набор утилит для разработки + эмулятор;
- IDE c поддержкой разработки для Android:
- Eclipse + ADT plugin;
- IntelliJ IDEA Community Edition;
- Netbeans + nbandroid plugin;
Утилиты устанавливаются в определенном выше порядке. Ставить все перечисленные IDE смысла нет (разве только если Вы испытываете затруднения с выбором подходящей). Я использую IntelliJ IDEA Community Edition, одну из самых развитых на данный момент IDE для Java.
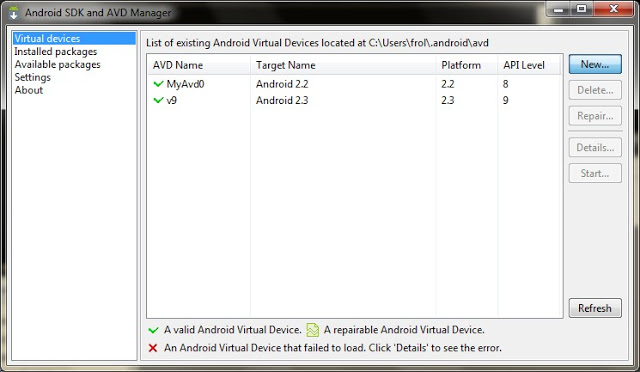
Запуск виртуального устройства
Запустив AVD Manager и установив дополнительные пакеты (SDK различных версий), можно приступить к созданию виртуального устройства с необходимыми параметрами. Разобраться в интерфейсе не должно составить труда.
Список устройств
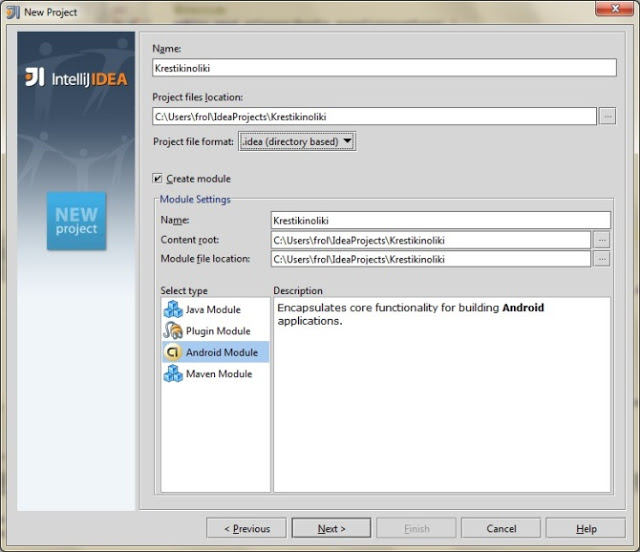
Создание проекта
Мне всегда не терпится приступить к работе, минимизируя подготовительные мероприятия, к которым относится создание проекта в IDE, особенно, когда проект учебный и на продакшн не претендует.


По нажатию кнопки F6 проект соберется, откомпилируется и запустится на виртуальном девайсе.
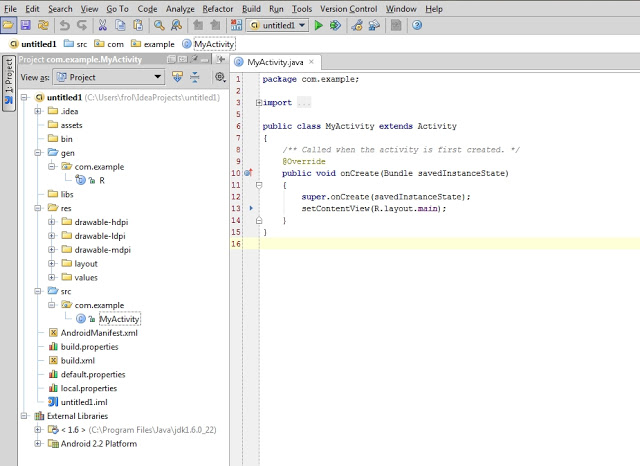
Структура проекта
На предыдущем скриншоте видна структура проекта. Так как в этой статье мы преследуем сугубо практические цели, заострим внимание лишь на тех папках, которые будем использовать в процессе работы. Это следующие каталоги: gen, res и src.
В папке gen находятся файлы, которые генерируются автоматически при сборке проекта. Вручную их менять нельзя.
Папка res предназначена для хранения ресурсов, таких как картинки, тексты (в том числе переводы), значения по-умолчанию, макеты (layouts).
src — это папка в которой будет происходить основная часть работы, ибо тут хранятся файлы с исходными текстами нашей программы.
Первые строки
Как только создается Activity (экран приложения), вызывается метод onCreate(). IDE заполнила его 2 строчками:
super.onCreate(savedInstanceState); setContentView(R.layout.main); Метод setContentView (равносильно this.setContentView) устанавливает xml-макет для текущего экрана. Далее xml-макеты будем называть «layout», а экраны — «Activity». Layout в приложении будет следующий:
Для этого приложения идеально подойдет TableLayout. Id можно присвоить любому ресурсу. В данном случае, TableLayout присвоен При помощи метода findViewById() можно получить доступ к виду:
private TableLayout layout; // это свойство класса KrestikinolikiActivity public void onCreate(Bundle savedInstanceState)
Теперь необходимо реализовать метод buildGameField(). Для этого требуется сгенерировать поле в виде матрицы. Этим будет заниматься класс Game. Сначала нужно создать класс Square для ячеек и класс Player, объекты которого будут заполнять эти ячейки.
Square.java
package com.example; public class Square < private Player player = null; public void fill(Player player) < this.player = player; >public boolean isFilled() < if (player != null) < return true; >return false; > public Player getPlayer() < return player; >> Player.java
package com.example; public class Player < private String name; public Player(String name) < this.name = name; >public CharSequence getName() < return (CharSequence) name; >> Все классы нашего приложения находятся в папке src.
Game.java
package com.example; public class Game < /** * поле */ private Square[][] field; /** * Конструктор * */ public Game() < field = new Square[3][3]; squareCount = 0; // заполнение поля for (int i = 0, l = field.length; i < l; i++) < for (int j = 0, l2 = field[i].length; j < l2; j++) < field[i][j] = new Square(); squareCount++; >> > public Square[][] getField() < return field; >> Инициализация Game в конструкторе KrestikinolikiActivity.
public KrestikinolikiActivity() < game = new Game(); game.start(); // будет реализован позже >Метод buildGameField() класса KrestikinolikiActivity. Он динамически добавляет строки и колонки в таблицу (игровое поле):
private Button[][] buttons = new Button[3][3]; //(. ) private void buildGameField() < Square[][] field = game.getField(); for (int i = 0, lenI = field.length; i < lenI; i++ ) < TableRow row = new TableRow(this); // создание строки таблицы for (int j = 0, lenJ = field[i].length; j < lenJ; j++) < Button button = new Button(this); buttons[i][j] = button; button.setOnClickListener(new Listener(i, j)); // установка слушателя, реагирующего на клик по кнопке row.addView(button, new TableRow.LayoutParams(TableRow.LayoutParams.WRAP_CONTENT, TableRow.LayoutParams.WRAP_CONTENT)); // добавление кнопки в строку таблицы button.setWidth(107); button.setHeight(107); >layout.addView(row, new TableLayout.LayoutParams(TableLayout.LayoutParams.WRAP_CONTENT, TableLayout.LayoutParams.WRAP_CONTENT)); // добавление строки в таблицу > > В строке 8 создается объект, реализующий интерфейс View.OnClickListener. Создадим вложенный класс Listener. Он будет виден только из KrestikinolikiActivity.
public class Listener implements View.OnClickListener < private int x = 0; private int y = 0; public Listener(int x, int y) < this.x = x; this.y = y; >public void onClick(View view) < Button button = (Button) view; >> public class Game < /** * игроки */ private Player[] players; /** * поле */ private Square[][] field; /** * начата ли игра? */ private boolean started; /** * текущий игрок */ private Player activePlayer; /** * Считает колличество заполненных ячеек */ private int filled; /** * Всего ячеек */ private int squareCount; /** * Конструктор * */ public Game() < field = new Square[3][3]; squareCount = 0; // заполнение поля for (int i = 0, l = field.length; i < l; i++) < for (int j = 0, l2 = field[i].length; j < l2; j++) < field[i][j] = new Square(); squareCount++; >> players = new Player[2]; started = false; activePlayer = null; filled = 0; > public void start() < resetPlayers(); started = true; >private void resetPlayers() < players[0] = new Player("X"); players[1] = new Player("O"); setCurrentActivePlayer(players[0]); >public Square[][] getField() < return field; >private void setCurrentActivePlayer(Player player) < activePlayer = player; >public boolean makeTurn(int x, int y) < if (field[x][y].isFilled()) < return false; >field[x][y].fill(getCurrentActivePlayer()); filled++; switchPlayers(); return true; > private void switchPlayers() < activePlayer = (activePlayer == players[0]) ? players[1] : players[0]; >public Player getCurrentActivePlayer() < return activePlayer; >public boolean isFieldFilled() < return squareCount == filled; >public void reset() < resetField(); resetPlayers(); >private void resetField() < for (int i = 0, l = field.length; i < l; i++) < for (int j = 0, l2 = field[i].length; j < l2; j++) < field[i][j].fill(null); >> filled = 0; > > Определение победителя
К. О. подсказывает, что в крестики-нолики выирывает тот, кто выстроет X или O в линию длиной, равной длине поля по-вертикали, или по-горизонтали, или по-диагонали. Первая мысль, которая приходит в голову — это написать методы для каждого случая. Думаю, в этом случае хорошо подойдет паттерн Chain of Responsobility. Определим интерфейс
package com.example; public interface WinnerCheckerInterface
Так как Game наделен обязанностью выявлять победителя, он реализует этот интерфейс. Настало время создать виртуальных «лайнсменов», каждый из которых будет проверять свою сторону. Все они реализует интерфейс WinnerCheckerInterface.
WinnerCheckerHorizontal.java
package com.example; public class WinnerCheckerHorizontal implements WinnerCheckerInterface < private Game game; public WinnerCheckerHorizontal(Game game) < this.game = game; >public Player checkWinner() < Square[][] field = game.getField(); Player currPlayer; Player lastPlayer = null; for (int i = 0, len = field.length; i < len; i++) < lastPlayer = null; int successCounter = 1; for (int j = 0, len2 = field[i].length; j < len2; j++) < currPlayer = field[i][j].getPlayer(); if (currPlayer == lastPlayer && (currPlayer != null && lastPlayer !=null)) < successCounter++; if (successCounter == len2) < return currPlayer; >> lastPlayer = currPlayer; > > return null; > > WinnerCheckerVertical.java
package com.example; public class WinnerCheckerVertical implements WinnerCheckerInterface < private Game game; public WinnerCheckerVertical (Game game) < this.game = game; >public Player checkWinner() < Square[][] field = game.getField(); Player currPlayer; Player lastPlayer = null; for (int i = 0, len = field.length; i < len; i++) < lastPlayer = null; int successCounter = 1; for (int j = 0, len2 = field[i].length; j < len2; j++) < currPlayer = field[j][i].getPlayer(); if (currPlayer == lastPlayer && (currPlayer != null && lastPlayer !=null)) < successCounter++; if (successCounter == len2) < return currPlayer; >> lastPlayer = currPlayer; > > return null; > > WinnerCheckerDiagonalLeft.java
package com.example; public class WinnerCheckerDiagonalLeft implements WinnerCheckerInterface < private Game game; public WinnerCheckerDiagonalLeft(Game game) < this.game = game; >public Player checkWinner() < Square[][] field = game.getField(); Player currPlayer; Player lastPlayer = null; int successCounter = 1; for (int i = 0, len = field.length; i < len; i++) < currPlayer = field[i][i].getPlayer(); if (currPlayer != null) < if (lastPlayer == currPlayer) < successCounter++; if (successCounter == len) < return currPlayer; >> > lastPlayer = currPlayer; > return null; > > WinnerCheckerDiagonalRight.java
package com.example; public class WinnerCheckerDiagonalRight implements WinnerCheckerInterface < private Game game; public WinnerCheckerDiagonalRight(Game game) < this.game = game; >public Player checkWinner() < Square[][] field = game.getField(); Player currPlayer; Player lastPlayer = null; int successCounter = 1; for (int i = 0, len = field.length; i < len; i++) < currPlayer = field[i][len - (i + 1)].getPlayer(); if (currPlayer != null) < if (lastPlayer == currPlayer) < successCounter++; if (successCounter == len) < return currPlayer; >> > lastPlayer = currPlayer; > return null; > > //(. ) /** * "Судьи" =). После каждого хода они будут проверять, * нет ли победителя */ private WinnerCheckerInterface[] winnerCheckers; //(. ) public Game() < //(. ) winnerCheckers = new WinnerCheckerInterface[4]; winnerCheckers[0] = new WinnerCheckerHorizontal(this); winnerCheckers[1] = new WinnerCheckerVertical(this); winnerCheckers[2] = new WinnerCheckerDiagonalLeft(this); winnerCheckers[3] = new WinnerCheckerDiagonalRight(this); //(. ) >public Player checkWinner() < for (WinnerCheckerInterface winChecker : winnerCheckers) < Player winner = winChecker.checkWinner(); if (winner != null) < return winner; >> return null; > public void onClick(View view) < Button button = (Button) view; Game g = game; Player player = g.getCurrentActivePlayer(); if (makeTurn(x, y)) < button.setText(player.getName()); >Player winner = g.checkWinner(); if (winner != null) < gameOver(winner); >if (g.isFieldFilled()) < // в случае, если поле заполнено gameOver(); >> private void gameOver(Player player) < CharSequence text = "Player \"" + player.getName() + "\" won!"; Toast.makeText(this, text, Toast.LENGTH_SHORT).show(); game.reset(); refresh(); >private void gameOver()
Для Java, gameOver(Player player) и gameOver() — разные методы. Воспользовавшись Builder’ом Toast.makeText, можно быстро создать и показать уведомление. refresh() обновляет состояние поля:
private void refresh() < Square[][] field = game.getField(); for (int i = 0, len = field.length; i < len; i++) < for (int j = 0, len2 = field[i].length; j < len2; j++) < if (field[i][j].getPlayer() == null) < buttons[i][j].setText(""); >else < buttons[i][j].setText(field[i][j].getPlayer().getName()); >> > > Готово! Надеюсь, эта статья помогла Вам освоиться в мире разработки под OS Android. Благодарю за внимание!
Видео готового приложения
PS: статья была опубликована по просьбе комментаторов этого поста.
How to Make Your First App in Java

Arooha Arif Last updated Aug 4, 2021
Are you a budding developer who knows the basics of Java and wants to make their first app using Android Studio? With the Play Store currently hosting 2.89 million Android apps and growing every minute, it’s a great decision to learn and eventually master Android app development.
Get Started With Android Studio
To make an Android app, you need an Integrated Development Environment (IDE), and Android Studio is the official IDE for creating Android Apps.
Install Android Studio
To install and get started with Android Studio, check out my post on How to Use Android Studio.


Understand Android Studio
Now that Android Studio is ready to use, you can start by creating your first project. Give your project a name and give it a unique package name too. Then, choose the minimum SDK you want to support with your app.
As it says beneath the Minimum SDK bar, with each API level, the features that you can use in your app increase. However, your app will run on fewer devices. The Create New Project dialog includes an estimator for the percentage of devices your app will run on.

You will then be asked to select the layout of your app. Let’s choose Empty Activity so that we have a lot of room to experiment and learn.

Once you give your activity a name—let’s name it MainActivity for this tutorial—Android Studio will take a moment to create your first project. Now, you have in front of you the main code editor where you will be able to write the code for your app.

The big section on your right is the Editor Window, where you write the code of your app. On your left and below that are the tool windows. These let you easily navigate and work on a specific task of your project, for example browsing files or viewing debugging information.
The two bars that you see on top are the Toolbar, which allows you to perform common tasks in Android Studio, like building, running, and debugging apps, and the Navigation Bar, which lets you navigate through the project and the currently opened class file.
Take a few minutes to study the screen. It will make more sense once you start making an Android app with Java.
Now that you understand the basics of Android Studio, it is time to finally make your first Java Android app.
Java Android App Development
Now, if you look at the left side of your screen, you will see two folders. One of them holds your app’s code and is named after the title of your project. In this case, it would be MyFirstJavaApp. The other folder contains Gradle Scripts, which is a free tool Android Studio uses to turn your app’s code into .apk files.
First, you click to open the MyFirstJavaApp folder and access the code of your app. Then, you click on the app folder. This has three folders which hold different elements of your project: manifests, java, and res.
To start, select res, which contains a file called activity_main.xml. Clicking on this file will allow you to access the layout of your main Activity. On screen, it will look like this:

The empty Activity that we chose has a ConstraintLayout , which is the root of the hierarchy, as you can see on the screen. It has just one element, TextView , that says Hello World. The constraint layout is a container for the components of your Activity and helps keep them spatially organized.
You have two basic ways to make changes to your Activity layout:
- Edit the layout .xml file with the graphical user interface. You can drag and drop any elements of your choice to create your app. This is the default option and is accessed with the Design tab at the bottom of the window.
- You can also edit the layout .xml file directly by clicking on the Text tab. Here, rather than dragging and dropping the elements, you write the layout code for your app from scratch.
The first method is great for you if you do not have much experience with writing code and your focus is learning to make a Java app using Android Studio. However, if you love to write code and want to get better at writing apps, the second method would be your way to go.
Making the First Changes to Your App
Now you have myriad options open. Let’s experiment with changing the TextView a little. Open the code editor to see the code of TextView element which is going to look like this:
You can also change the text’s color and the font style, but I am not choosing to do that here. However, I have put the text in bold. Let’s run it on the AVD or the device to see how it looks.

Here is the code for these changes: