Sometimes, you need to add live search functionality for populating data without loading the whole page. This tutorial shows you how you can implement Ajax live data search using a PHP mysql database. And you can use the free source code of ajax live data search using jquery php MySQL.
PHP Mysql and jquery Ajax live search from database example. In this tutorial, you will learn how to implement ajax search in PHP and MySQL database.
How to Create Live Search Box Using PHP MySQL and jQuery AJAX
First Create a Database Connection File
Create an ajax search form
Create a PHP Script for Search to DB
1. First Create a Database Connection File
In this step, you will create a file name db.php and update the below code into your file.
The below code is used to create a MySQL database connection in PHP. When we insert form data into MySQL database, there we will include this file:
2. Create an ajax search form
In this step, you need to create an ajax search form and update the below code into your ajax search form.
Search for users
3. Create a PHP Script for Search to DB
In this step, you need to create one file name ajax-db-search.php and update the below code into your file.
The below code is to search into a MySQL database table using an Ajax PHP script:
How to Insert Form Data Using jQuery Ajax in PHP MySQL
insert data in MySQL db in PHP using jquery ajax without page refresh. In this tutorial, you will learn how to create and submit a simple form in PHP and store from data into MySQL database using jQuery ajax.
And this tutorial also guides on how to send data to MySQL database using AJAX + jQuery + PHP without reloading the whole page and show a client-side validation error message if it has an error in the form.
How to Insert Data to MySQL Database from PHP using jQuery Ajax
Step 1 – Create Database And Table
Step 2 – Create a Database Connection File
Step 3 – Create An Ajax POST Form in PHP
Step 4 – Create An Ajax Data Store File
First of all, go to your PHPMyAdmin and create a table name customers with the following fields: name, email, message.
Step 1 – Create Database And Table
First of all, navigate to your phpmyadmin panel and create database and table using the following sql queries:
CREATE DATABASE my_db; CREATE TABLE `customers` ( `id` int(10) UNSIGNED NOT NULL, `name` varchar(255) COLLATE utf8mb4_unicode_ci NOT NULL, `email` varchar(255) COLLATE utf8mb4_unicode_ci NOT NULL, `message` varchar(255) COLLATE utf8mb4_unicode_ci NOT NULL, `created_date` date DEFAULT NULL ) ENGINE=InnoDB DEFAULT CHARSET=utf8mb4 COLLATE=utf8mb4_unicode_ci;
Step 2 – Create a Database Connection File
In this step, you will create a file name db.php and update the below code into your file.
The below code is used to create a MySQL database connection in PHP. When you insert form data into MySQL database, there you will include this file:
Step 3 – Create An Ajax Post Form in PHP
In this step, you need to create an ajax form and update the below code into your ajax-form.php file.
Ajax POST request with JQuery and PHP - Tutsmake.com
Step 4 – Create Ajax Form PHP File
Now you need to create a new file name store.php and update the below code into your store.php file.
The below code is used to store form data into a MySQL database table name customers. If form successfully submitted to the database, it will return success message otherwise it returns an error.
Conclusion
In this tutorial, you have learned how to create a simple form and store data into a MySQL database without reloading or refreshing the whole web page with client-side validation using jQuery ajax in PHP.
Why do we need to use AJAX? AJAX can help us communicate to the server from the user interface without reloading our page and help to lessen the server bandwidth cost, and it improves user experience.
Some big websites like Google, Youtube, Facebook, and many more using this technique, so if you are an aspirant web developer, you should learn AJAX.
In this tutorial, we will implement PHP & MySQL AJAX example using JQuery Library with simple Employee Saving & Getting records for us to test the POST & GET method AJAX.
So, we will start now with our code. Let’s build our index.html below.
Index.html
PHP & MySQL AJAX example Using jQuery
Add New Employee
'; > else < html += '
'; html += 'No records found!'; html += '
'; > // Insert the HTML Template and display all employee records $("#employees-list").html(html); > >); > function submitForm() < $("#btnSubmit").on("click", function() < var $this = $("#btnSubmit"); //submit button selector using ID var $caption = $this.html();// We store the html content of the submit button var form = "#form"; //defined the #form ID var formData = $(form).serializeArray(); //serialize the form into array var route = $(form).attr('action'); //get the route using attribute action // Ajax config $.ajax(< type: "POST", //we are using POST method to submit the data to the server side url: route, // get the route value data: formData, // our serialized array data for server side beforeSend: function () , success: function (response) , error: function (XMLHttpRequest, textStatus, errorThrown) < // You can put something here if there is an error from submitted request >>); >); > function resetForm() < $('#form')[0].reset(); >$(document).ready(function() < // Get all employee records all(); // Submit form using AJAX submitForm(); >);
I hope in this AJAX Example you will have enough foundation how to use the AJAX using jQUERY.
Recommendations:
Add form validations
Add cross-site request forgery (CSRF)
prevent from SQL Injection
Email validations if the correct format and the email is not yet existing in our database
User login so that the logged user can add employee
PHP: Как получить и отобразить данные из базы данных в PHP с помощью Ajax
В этом руководстве вы узнаете, как получать и отображать данные из базы данных в PHP с помощью jQuery ajax.
В этом посте мы создадим список клиентов и добавим кнопку просмотра в этот список клиентов. После этого у нас будут извлекаться данные из базы данных при нажатии кнопки просмотра в PHP и отображать данные на веб-странице без перезагрузки всей веб-страницы с помощью jQuery ajax.
Как получить и отобразить данные из базы данных с помощью Ajax без обновления страницы
Выполните следующие шаги для того, чтоб научиться получать и отображать данные из базы данных MySQL в PHP с помощью ajax без перезагрузки веб-страницы:
Шаг 1 — Создать базу данных и таблицу
Прежде всего, перейдите на панель phpmyadmin и создайте базу данных и таблицу, используя следующий запрос sql:
CREATE DATABASE my_db; CREATE TABLE `customers` ( `id` int(10) UNSIGNED NOT NULL, `fname` varchar(255) COLLATE utf8mb4_unicode_ci NOT NULL, `lname` varchar(255) COLLATE utf8mb4_unicode_ci NOT NULL, `email` varchar(255) COLLATE utf8mb4_unicode_ci NOT NULL, `created_date` date DEFAULT NULL ) ENGINE=InnoDB DEFAULT CHARSET=utf8mb4 COLLATE=utf8mb4_unicode_ci;
Шаг 2 — Подключение к базе данных MySQL
На этом этапе вы создадите файл с именем mydbCon.php и обновите приведенный ниже код в свой файл.
Следующий код используется для создания подключения к базе данных MySQL в PHP. Кроме того, вы можете использовать PHP-код для подключения к базе данных при извлечении, вставке, обновлении или удалении записей из базы данных MySQL с использованием и без использования ajax:
Шаг 3 — Получить данные списка из базы данных
Отображение данных в таблице HTML.
Итак, создайте файл customers.php и добавьте в него следующий код:
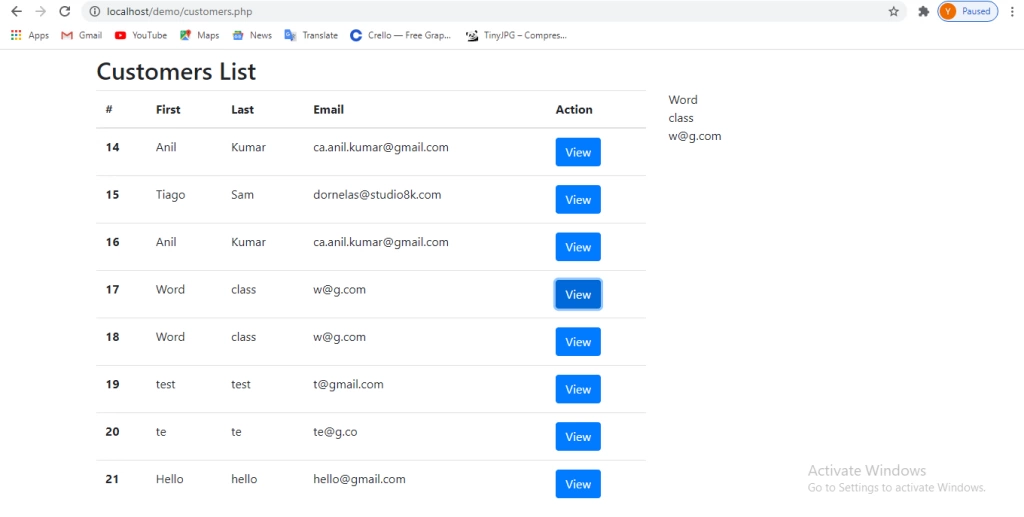
Customers List
#
First
Last
Email
Action
num_rows > 0) : ?>
">View
No Data Found
Шаг 4 — Получение и отображение с использованием Ajax без перезагрузки страницы
На этом этапе извлеките данные из базы данных с помощью запроса ajax. Поэтому создайте файл ajax-fetch-record.php и отобразите данные из базы данных с помощью ajax без обновления или перезагрузки всей веб-страницы.
Итак, обновите следующий код в файле ajax-fetch-record.php:
Как получить данные из базы данных на php с помощью ajax и jquery, будет выглядеть как на следующем изображении:
Здесь вы узнали, как получать данные из таблицы MySQL в PHP с помощью jQuery ajax без перезагрузки или обновления всей веб-страницы.