- Saved searches
- Use saved searches to filter your results more quickly
- License
- adafruit/Adafruit_Python_ADS1x15
- Name already in use
- Sign In Required
- Launching GitHub Desktop
- Launching GitHub Desktop
- Launching Xcode
- Launching Visual Studio Code
- Latest commit
- Git stats
- Files
- README.md
- About
- Read Analog Value Using ADS1115 16-Bit ADC with Raspberry Pi
- Required Material
- ADS1115 Chip
- Specification
- ADS1115 Chip Pinout
- ADS1115 16-bit ADC module
- ADS1115 16-bit ADC module Pinout
- ADS1115 Module Schematic Diagram
- ADS115 Input Mode
- ADS1115 I2C Address Selection
- Interfacing ADS1115 16-Bit ADC with Raspberry Pi
- Configuring Raspberry Pi To Use ADS1115
Saved searches
Use saved searches to filter your results more quickly
You signed in with another tab or window. Reload to refresh your session. You signed out in another tab or window. Reload to refresh your session. You switched accounts on another tab or window. Reload to refresh your session.
Python code to use the ADS1015 and ADS1115 analog to digital converters with a Raspberry Pi or BeagleBone black.
License
adafruit/Adafruit_Python_ADS1x15
This commit does not belong to any branch on this repository, and may belong to a fork outside of the repository.
Name already in use
A tag already exists with the provided branch name. Many Git commands accept both tag and branch names, so creating this branch may cause unexpected behavior. Are you sure you want to create this branch?
Sign In Required
Please sign in to use Codespaces.
Launching GitHub Desktop
If nothing happens, download GitHub Desktop and try again.
Launching GitHub Desktop
If nothing happens, download GitHub Desktop and try again.
Launching Xcode
If nothing happens, download Xcode and try again.
Launching Visual Studio Code
Your codespace will open once ready.
There was a problem preparing your codespace, please try again.
Latest commit
Git stats
Files
Failed to load latest commit information.
README.md
DEPRECATED LIBRARY. Adafruit Python ADS1x15
This library has been deprecated! We are leaving this up for historical and research purposes but archiving the repository.
We are now only supporting the use of our CircuitPython libraries for use with Python.
Check out this guide for info on using character LCDs with the CircuitPython library: https://github.com/adafruit/Adafruit_CircuitPython_ADS1x15
About
Python code to use the ADS1015 and ADS1115 analog to digital converters with a Raspberry Pi or BeagleBone black.
Read Analog Value Using ADS1115 16-Bit ADC with Raspberry Pi
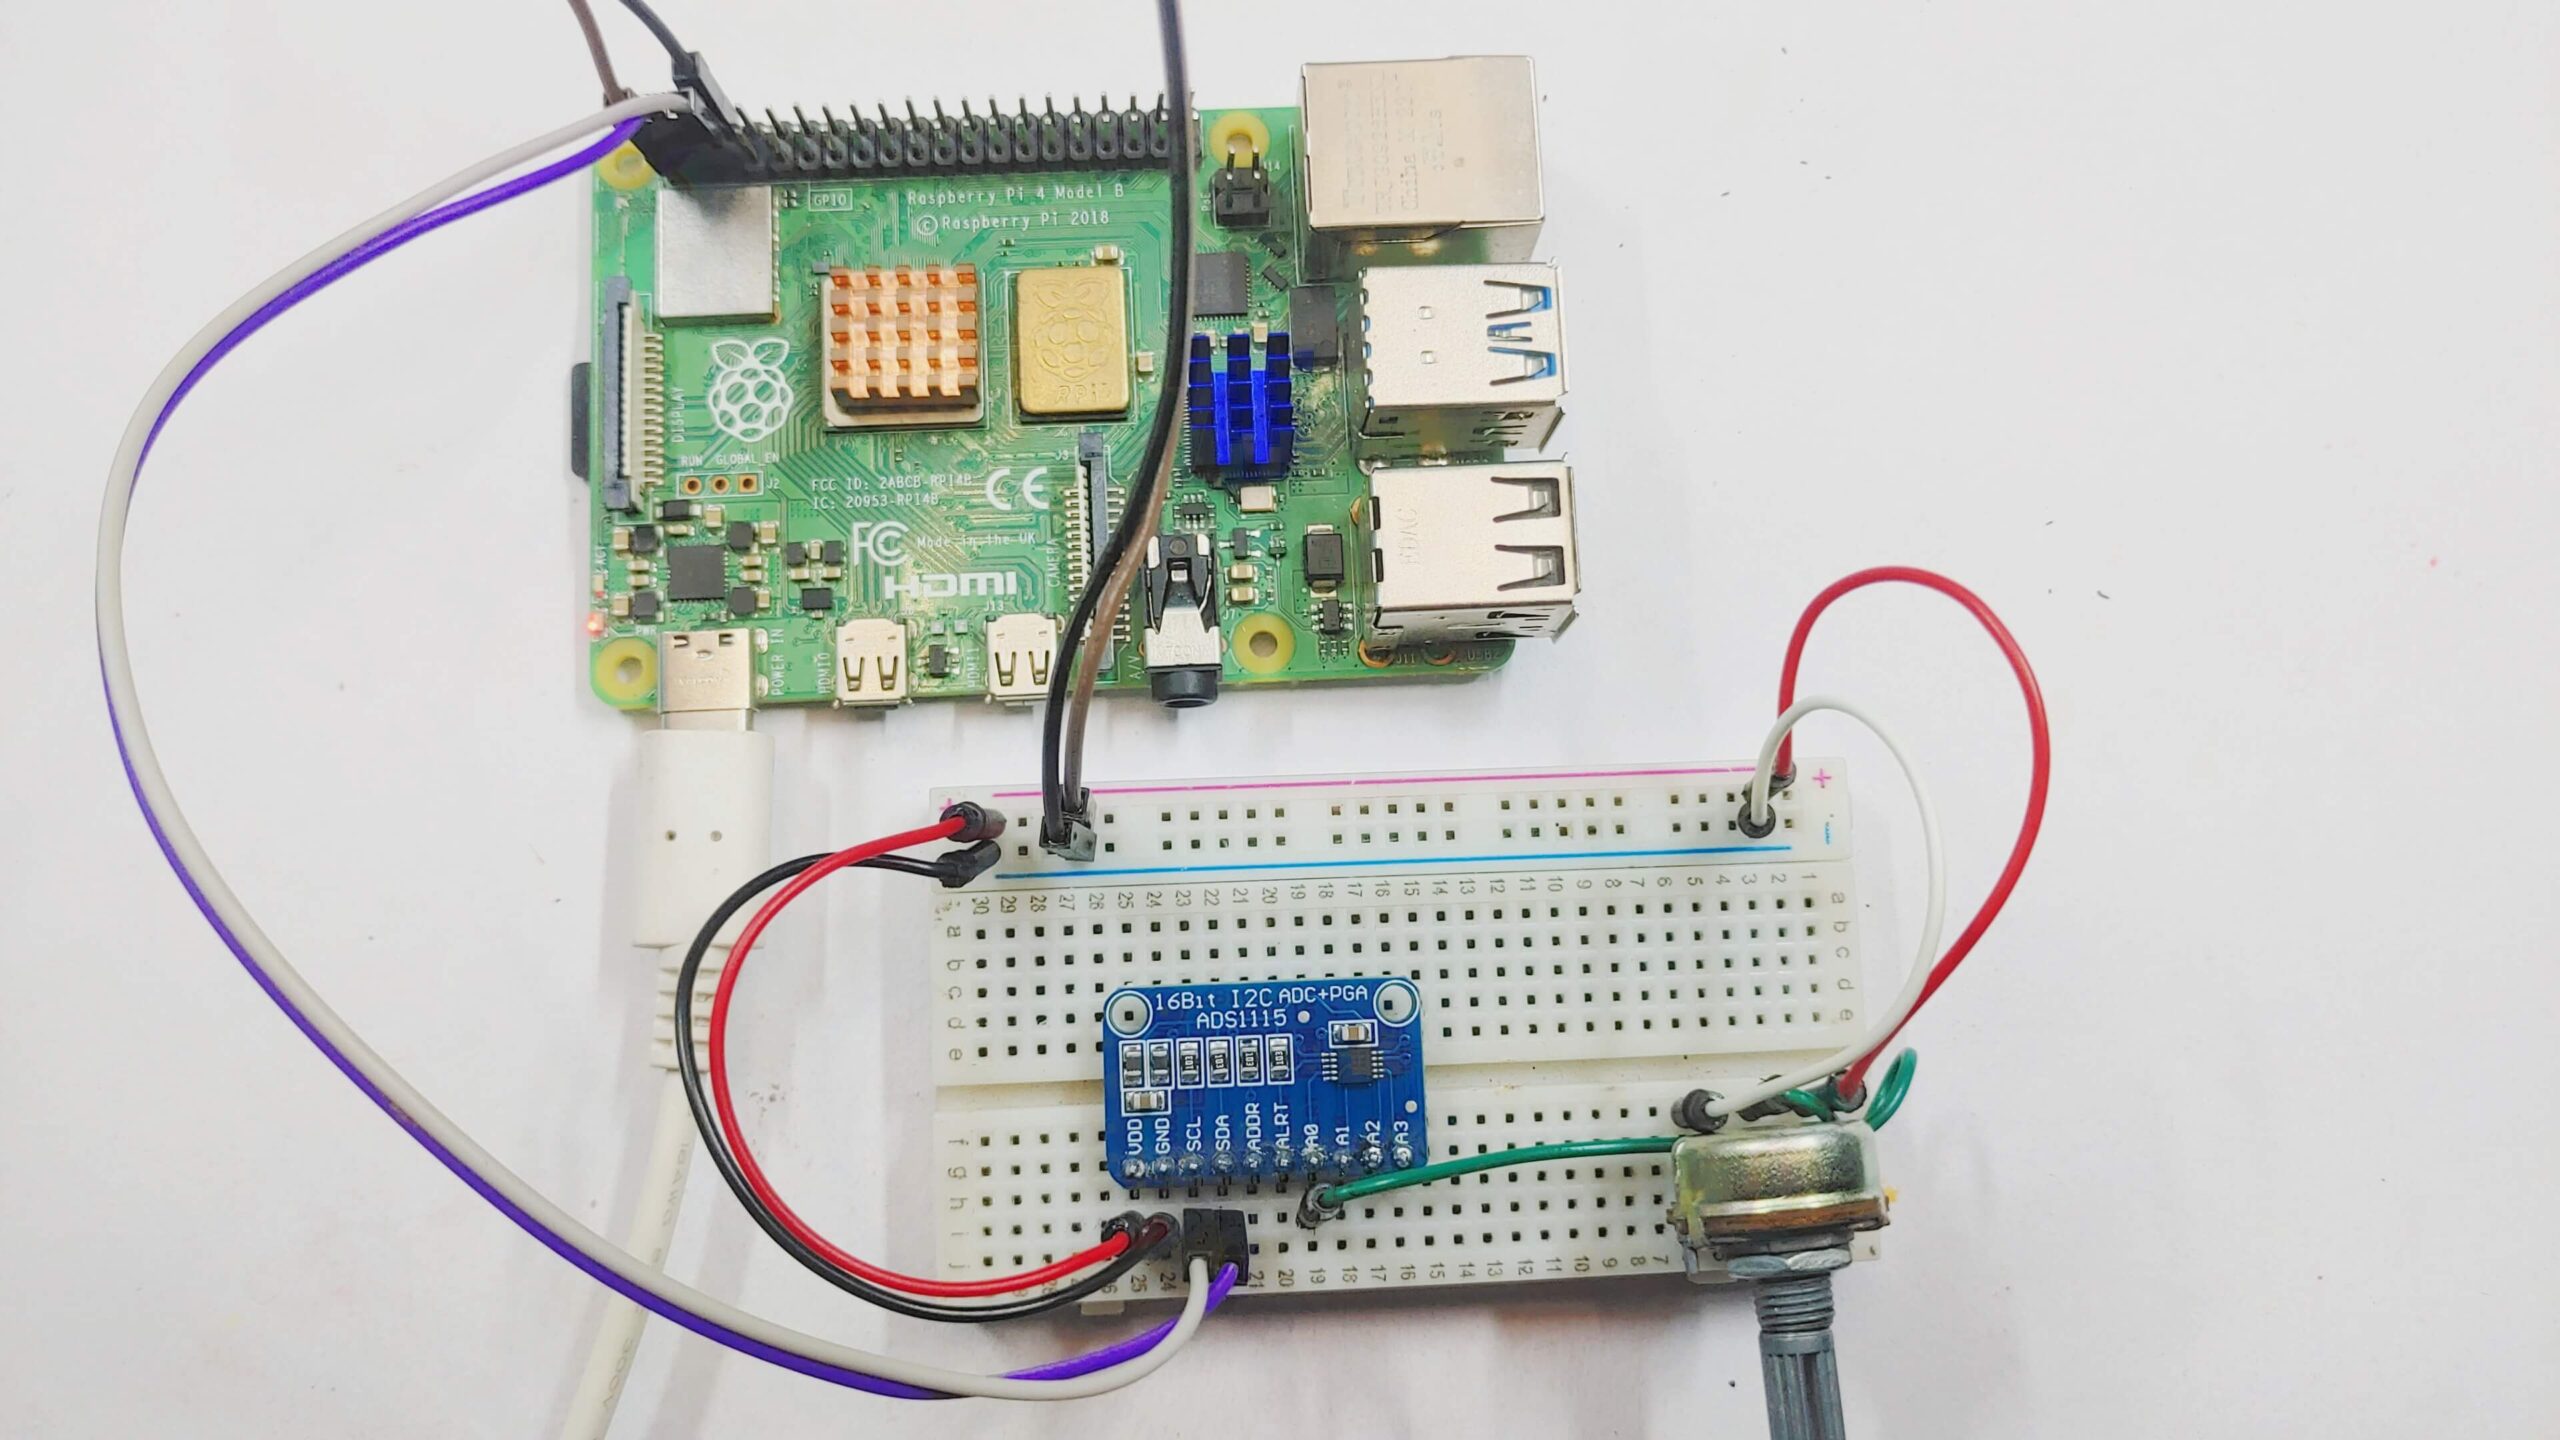
Learn how to use ADS1115 16-Bit ADC With Raspberry Pi. In this tutorial, we will be using the ADS1115 16-bit ADC with the Raspberry Pi to read an analog value from a sensor. ADS1115 is a useful device to read multiple analog sensors with the Raspberry Pi, Arduino, or another microcontroller. We’ll be using the ADS1x15 library to control the ADC.
The GPIO pins on the Raspberry Pi are designed to output a digital signal of either high or low or to read a digital input of either high or low .
However, by using an external analog-to-digital converter (ADC) chip, such as the ADS1115, it is possible to read the values of analog input devices, such as potentiometers, and convert them into digital signals.
ADS1115 ADC allows us to interface analog sensors with digital systems. Many sensors, e.g. temperature and light sensors, produce analog signals. ADC is required to process these signals and convert analog input signals into digital data that can be processed by Raspberry Pi or any microcontroller.
Required Material
- Raspberry Pi 4 (or any model)
- ADS1115 16-bit ADC module
- Breadboard
- Jumper wires
- 10kΩ Potentiometer (or any analog sensor)
ADS1115 Chip
The ADS1115 chip is a high-accuracy, low-power, 16-bit Analog-to-Digital Converter (ADC) chip. It is manufactured by Texas Instruments and it was developed to provide accurate and reliable measurements of analog signals.

Specification
- Supply Voltage: 2.0-5.5 VDC
- 16-bit Resolution
- Continuous current consumption: 150uA
- 4 channels in individual mode, 2 channels in comparator mode
- Communication interface: I2C
- The internal stabilized reference voltage (Vref)
- Programmable Comparator
- Programmable Data Rate: 8sps To 860sps
- Internal Oscillator
- Internal PGA (Programmable Gain Amplifier).
- Pin-selectable Addresses
- Four Single-ended Or Two Differential Inputs
- Programmable Comparator
- Operating Temperature Range: –40°C to +125°C
- Single-Cycle Settling
ADS1115 Chip Pinout

| Pin Number | Pin Name | Function |
|---|---|---|
| 1 | ADDRESS | I2C slave address select |
| 2 | ALERT | Comparator output |
| 3 | GND | Ground |
| 4 to 7 | AIN0 to AIN3 | Analog input channels 0-3 |
| 8 | VDD | Power supply |
| 9 | SDA | Serial data |
| 10 | SCL | Serial clock input. |
ADS1115 16-bit ADC module
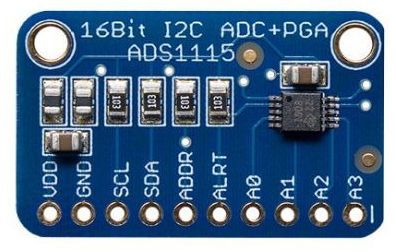
ADS1115 16-bit ADC module is a small electronic device that allows you to convert analog signals to digital signals. ADS1115 has four analog input channels(A0-A3), which means it can measure up to four different analog signals.
ADS1115 uses the I2C communication protocol to communicate with the Raspberry Pi or other microcontroller. This means that it can be easily attached to your tasks. it has a high resolution of 16 bits, which means it can measure analog signals with very high accuracy.
You may want to refer to our last post for more detailed information.
- How to Interface ADS1115 16-Bit ADC with Arduino
- Interfacing ADS1115 Analog-to-Digital Converter with Raspberry Pi Pico
- How to Interface ADS1115 16-Bit ADC with ESP8266
- How To Use ADS1115 16-Bit ADC with ESP32
ADS1115 16-bit ADC module Pinout
The ADS1115 16-bit ADC module has 10 pins in total. Here is a brief overview of the pinout:
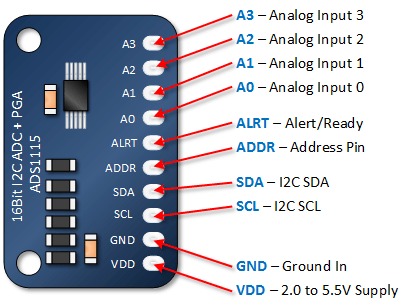
- VDD: Power supply voltage input (3.0V to 5.5V).
- SCL: Serial clock pin used for I2C communication.
- SDA: Serial data pin used for I2C communication.
- GND: Ground pin.
- ADDR: Address pin used to set the I2C address of the module.
- ALERT: Alert pin that can be used to trigger an interrupt.
- A0: Analog input channel 0.
- A1: Analog input channel 1.
- A2: Analog input channel 2.
- A3: Analog input channel 3.
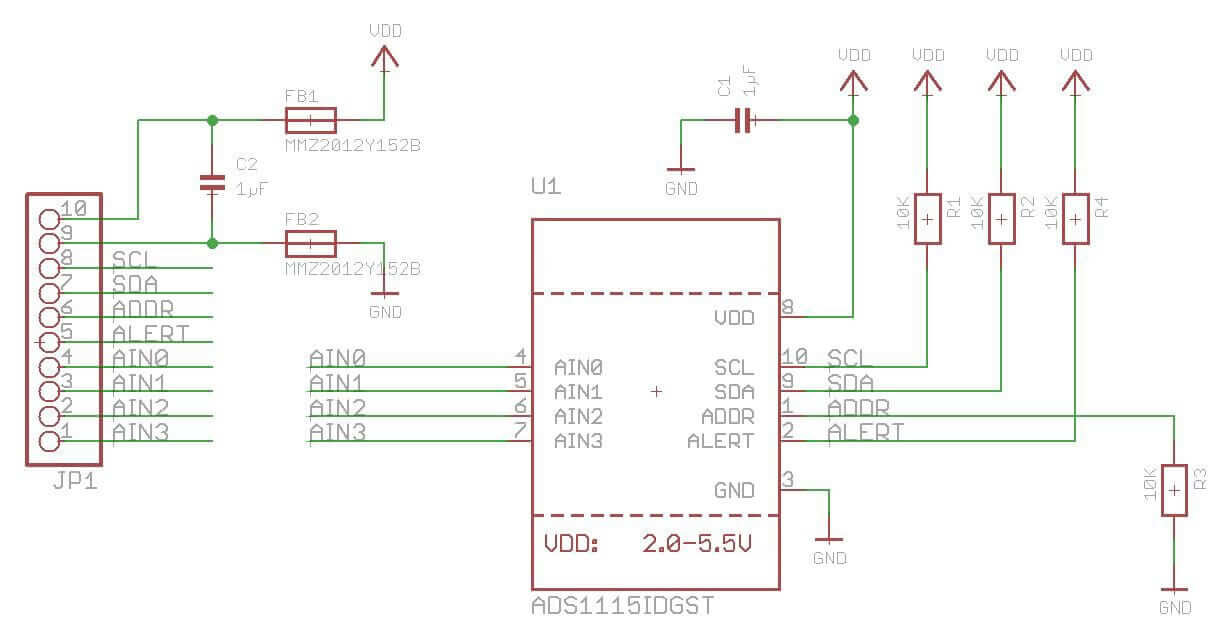
ADS1115 Module Schematic Diagram
ADS115 Input Mode
The 4 inputs can be operated in 3 different modes.
ADS1115 I2C Address Selection
You can go through the available addresses by connecting the ADDR pin as noted below. The board already has a pull-down resistor that controls ADDR to GND which defines the default address of 0x48.
| DDR Pin Connection | I2C Address |
|---|---|
| GND | 0x48 (Already) |
| VDD | 0x49 |
| SDA | 0x4A |
| SCL | 0x4B |
Interfacing ADS1115 16-Bit ADC with Raspberry Pi
Connect the ADS1115 to Raspberry Pi using I2C communication. then connect VCC and GND pins to the 3.3V and GND pins of the Raspberry Pi, respectively.
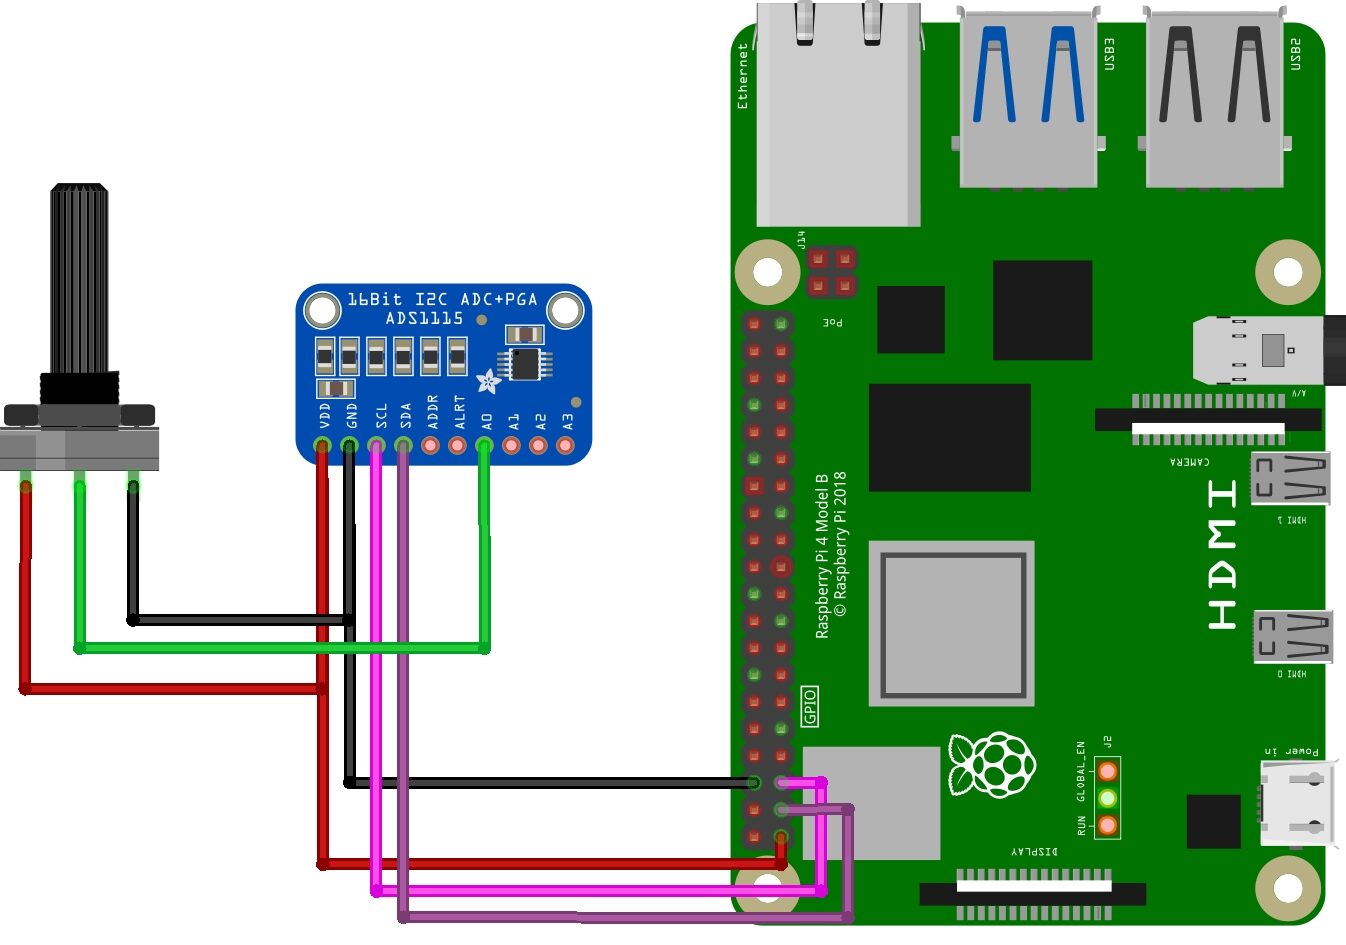
| ADS1115 | Raspberry Pi |
|---|---|
| VDD | 3.3V |
| GND | GND |
| SCL | SCL (GPIO3) |
| SDA | SDA (GPIO2) |
Configuring Raspberry Pi To Use ADS1115
Install ADS1115 python library for Raspberry Pi
To install the required library for the ADS1115 module follow these steps:
- Open a terminal window on your Raspberry Pi.
- Run the following command to install the ADS1x15 Python library.