- Admin bar в html
- Admin & Dashboard
- Admin Dashboard Panel in HTML CSS & JavaScript | Admin Panel With Source Code
- Admin Dashboard Panel in HTML CSS & JavaScript
- You Might Like This:
- Sidebar Menu [Source Code]
- Building a Static Admin Bar for the Browser
- A Couple of Considerations
- Part 1: Basic Markup
- Useful Resources
- Part 2: Initial Styling
- Useful Resources
- Part 3: Yellow Bits
- Useful Resources
- Part 4: Search Form Markup and Styling
- Useful Resources
- Part 5: CSS3 Dropdown Menu
- Useful Resources
- Next Time.
Admin bar в html
Admin & Dashboard
Frameworks
- Angular 8 (3)
- Angular JS (3)
- Bootstrap 3 (8)
- Bootstrap 4 (84)
- Bootstrap 5 (17)
- Boxicons (1)
- Chart.js (33)
- Echarts.js (1)
- Fancybox (1)
- Favicon (4)
- Feather icons (4)
- Flaticon (3)
- FontAwesome (74)
- Google fonts (63)
- Google Map (13)
- Ionicons (4)
- Isotope (1)
- jQuery (47)
- Lightbox (2)
- Material icon (6)
- Nucleo Icon (2)
- Owl Carousel (6)
- Popper.js (3)
- React JS (9)
- Swiper (1)
- Tailwind CSS (8)
- Themify (13)
- Unicons (1)
- Vanilla JS (1)
- Vue.js (3)
Tags
- Accordions (13)
- Animation (8)
- Burger Menu (9)
- Business & Corporate (4)
- Call to action button (5)
- Carousel (17)
- Clean (88)
- Color palette (6)
- Contact form (1)
- Dark mode (5)
- Dark Template (6)
- Datatables (72)
- Dropdown (81)
- eCommerce Template (5)
- Email Subscription (2)
- Full Width (3)
- Fun Fact Counters (2)
- Gallery (7)
- Google Maps (33)
- Gradient (7)
- Hero Header (2)
- HTML5 & CSS3 (110)
- Left Sidebar (10)
- Login Form (36)
- Material Design (14)
- Medical Template (3)
- Multilingual (3)
- Multipage (66)
- Multipurpose (26)
- One page (1)
- On hover effect (108)
- Open source (17)
- Parallax Effect (1)
- Photography Template (3)
- Portfolio Template (3)
- Preloader (4)
- Pricing table (10)
- Progress bar (30)
- Pug file (1)
- Responsive (15)
- Restaurant Template (3)
- RTL (6)
- SCSS (20)
- Slide Out Menu (3)
- Slider (4)
- Smooth scroll (19)
- Social Media Icons (2)
- Sticky Navigation Bar (49)
- Timeline (4)
- Travel & Tourism Template (2)
- Video Player (3)
Admin Dashboard Panel in HTML CSS & JavaScript | Admin Panel With Source Code
Hello friend, I hope you are doing adorable. Today you are going to learn to create a Responsive Admin Dashboard Panel with Side Navigation Menu Bar using HTML CSS and JavaScript. Recently I have created a Simple Admin Dashboard Panel, you can say this is will be the advanced version of the admin panel.
Admin (Administrative) Panel or Dashboard is the interface that is the overview collection of the important data. This type of interface can be available on any type of app or website. For example, on the youtube studio, the owner of that channel can watch technical data of his videos.
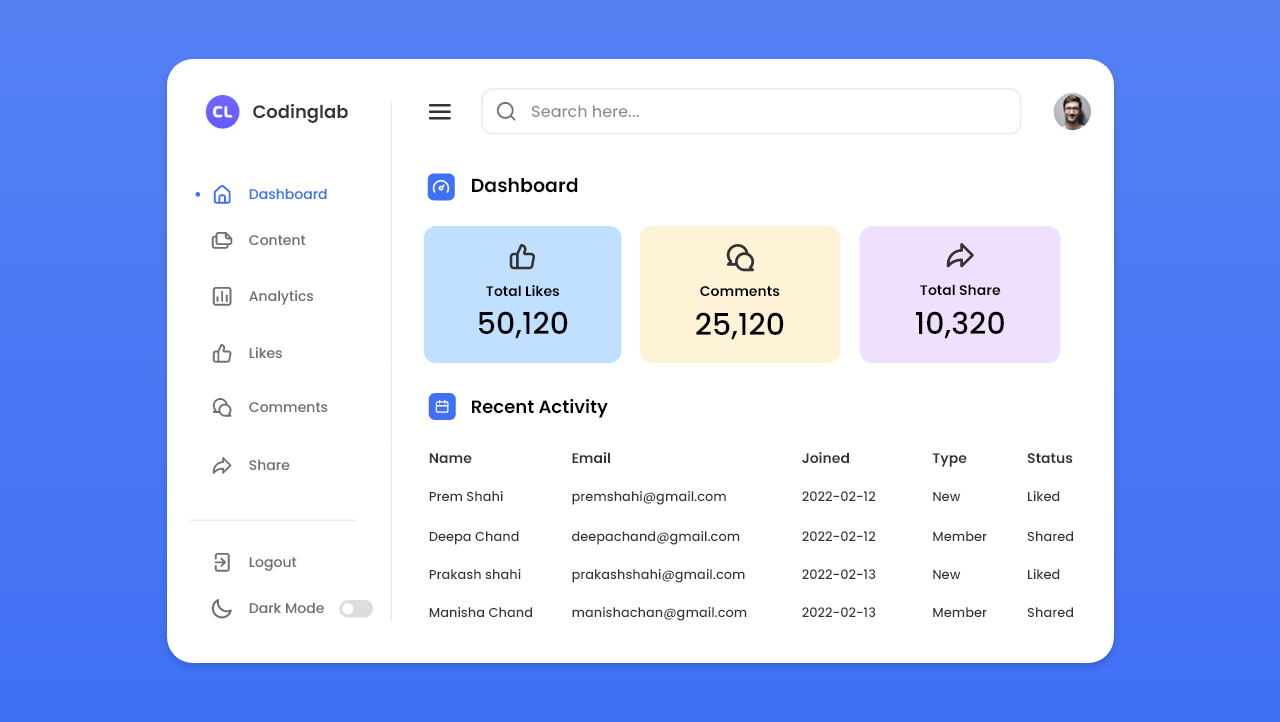
Have a quick look at the given image of our project [Admin Dashboard Panel], At the right side of the interface I have added a sidebar that contains the logo image, name, and some navigation links, and at the bottom, we can see an interesting section “Dark Mode” with a toggle button. Basically, if you click on that toggle button this admin panel’s interface changed into dark mode. On the left side, you can see a sidebar toggle button which is for opening or closing that sidebar. And the search box and other data summaries.
For your better information let’s watch the real demo of this project [Admin Dashboard Panel], how it looks when the sidebar is closed, and the dark mode of this interface.
Admin Dashboard Panel in HTML CSS & JavaScript
I have provided all the HTML CSS and JavaScript code that I have used to create this Admin Dashboard Panel. Before jumping into the source code file, you need to know the basic explanation of this video tutorial.
As you have seen in the video tutorial at first our Admin Dashboard Panel is in opened status with light mode. When I clicked on the sidebar toggle button, the sidebar was closed and when I clicked on the dark mode’s toggle the admin panel’s interface changed into dark mode. And also if you close the sidebar or tuned the dark mode on and refresh the webpage it did not change, to keep this feature and I have used local storage.
I hope you can easily make this admin dashboard panel with dark and light mode features. If you are feeling difficulty creating this, I have provided all HTML CSS, and JavaScript code below.
You Might Like This:
Sidebar Menu [Source Code]
To get the following HTML CSS & JavaScript code for Admin Dashboard Panel with Dark/Light Mode features. You need to create two files one is an HTML file and another is a CSS file. After creating these two files then you can copy-paste the given codes on your document. You can also download all source code files from the given download button.
/* ===== Google Font Import - Poppins ===== */ @import url('https://fonts.googleapis.com/css2?family=Poppins:wght@200;300;400;500;600&display=swap'); * < margin: 0; padding: 0; box-sizing: border-box; font-family: 'Poppins', sans-serif; >:root < /* ===== Colors ===== */ --primary-color: #0E4BF1; --panel-color: #FFF; --text-color: #000; --black-light-color: #707070; --border-color: #e6e5e5; --toggle-color: #DDD; --box1-color: #4DA3FF; --box2-color: #FFE6AC; --box3-color: #E7D1FC; --title-icon-color: #fff; /* ====== Transition ====== */ --tran-05: all 0.5s ease; --tran-03: all 0.3s ease; --tran-03: all 0.2s ease; >body < min-height: 100vh; background-color: var(--primary-color); >body.dark < --primary-color: #3A3B3C; --panel-color: #242526; --text-color: #CCC; --black-light-color: #CCC; --border-color: #4D4C4C; --toggle-color: #FFF; --box1-color: #3A3B3C; --box2-color: #3A3B3C; --box3-color: #3A3B3C; --title-icon-color: #CCC; >/* === Custom Scroll Bar CSS === */ ::-webkit-scrollbar < width: 8px; >::-webkit-scrollbar-track < background: #f1f1f1; >::-webkit-scrollbar-thumb < background: var(--primary-color); border-radius: 12px; transition: all 0.3s ease; >::-webkit-scrollbar-thumb:hover < background: #0b3cc1; >body.dark::-webkit-scrollbar-thumb:hover, body.dark .activity-data::-webkit-scrollbar-thumb:hover < background: #3A3B3C; >nav < position: fixed; top: 0; left: 0; height: 100%; width: 250px; padding: 10px 14px; background-color: var(--panel-color); border-right: 1px solid var(--border-color); transition: var(--tran-05); >nav.close < width: 73px; >nav .logo-name < display: flex; align-items: center; >nav .logo-image < display: flex; justify-content: center; min-width: 45px; >nav .logo-image img < width: 40px; object-fit: cover; border-radius: 50%; >nav .logo-name .logo_name < font-size: 22px; font-weight: 600; color: var(--text-color); margin-left: 14px; transition: var(--tran-05); >nav.close .logo_name < opacity: 0; pointer-events: none; >nav .menu-items < margin-top: 40px; height: calc(100% - 90px); display: flex; flex-direction: column; justify-content: space-between; >.menu-items li < list-style: none; >.menu-items li a < display: flex; align-items: center; height: 50px; text-decoration: none; position: relative; >.nav-links li a:hover:before < content: ""; position: absolute; left: -7px; height: 5px; width: 5px; border-radius: 50%; background-color: var(--primary-color); >body.dark li a:hover:before < background-color: var(--text-color); >.menu-items li a i < font-size: 24px; min-width: 45px; height: 100%; display: flex; align-items: center; justify-content: center; color: var(--black-light-color); >.menu-items li a .link-name < font-size: 18px; font-weight: 400; color: var(--black-light-color); transition: var(--tran-05); >nav.close li a .link-name < opacity: 0; pointer-events: none; >.nav-links li a:hover i, .nav-links li a:hover .link-name < color: var(--primary-color); >body.dark .nav-links li a:hover i, body.dark .nav-links li a:hover .link-name < color: var(--text-color); >.menu-items .logout-mode < padding-top: 10px; border-top: 1px solid var(--border-color); >.menu-items .mode < display: flex; align-items: center; white-space: nowrap; >.menu-items .mode-toggle < position: absolute; right: 14px; height: 50px; min-width: 45px; display: flex; align-items: center; justify-content: center; cursor: pointer; >.mode-toggle .switch < position: relative; display: inline-block; height: 22px; width: 40px; border-radius: 25px; background-color: var(--toggle-color); >.switch:before < content: ""; position: absolute; left: 5px; top: 50%; transform: translateY(-50%); height: 15px; width: 15px; background-color: var(--panel-color); border-radius: 50%; transition: var(--tran-03); >body.dark .switch:before < left: 20px; >.dashboard < position: relative; left: 250px; background-color: var(--panel-color); min-height: 100vh; width: calc(100% - 250px); padding: 10px 14px; transition: var(--tran-05); >nav.close ~ .dashboard < left: 73px; width: calc(100% - 73px); >.dashboard .top < position: fixed; top: 0; left: 250px; display: flex; width: calc(100% - 250px); justify-content: space-between; align-items: center; padding: 10px 14px; background-color: var(--panel-color); transition: var(--tran-05); z-index: 10; >nav.close ~ .dashboard .top < left: 73px; width: calc(100% - 73px); >.dashboard .top .sidebar-toggle < font-size: 26px; color: var(--text-color); cursor: pointer; >.dashboard .top .search-box < position: relative; height: 45px; max-width: 600px; width: 100%; margin: 0 30px; >.top .search-box input < position: absolute; border: 1px solid var(--border-color); background-color: var(--panel-color); padding: 0 25px 0 50px; border-radius: 5px; height: 100%; width: 100%; color: var(--text-color); font-size: 15px; font-weight: 400; outline: none; >.top .search-box i < position: absolute; left: 15px; font-size: 22px; z-index: 10; top: 50%; transform: translateY(-50%); color: var(--black-light-color); >.top img < width: 40px; border-radius: 50%; >.dashboard .dash-content < padding-top: 50px; >.dash-content .title < display: flex; align-items: center; margin: 60px 0 30px 0; >.dash-content .title i < position: relative; height: 35px; width: 35px; background-color: var(--primary-color); border-radius: 6px; color: var(--title-icon-color); display: flex; align-items: center; justify-content: center; font-size: 24px; >.dash-content .title .text < font-size: 24px; font-weight: 500; color: var(--text-color); margin-left: 10px; >.dash-content .boxes < display: flex; align-items: center; justify-content: space-between; flex-wrap: wrap; >.dash-content .boxes .box < display: flex; flex-direction: column; align-items: center; border-radius: 12px; width: calc(100% / 3 - 15px); padding: 15px 20px; background-color: var(--box1-color); transition: var(--tran-05); >.boxes .box i < font-size: 35px; color: var(--text-color); >.boxes .box .text < white-space: nowrap; font-size: 18px; font-weight: 500; color: var(--text-color); >.boxes .box .number < font-size: 40px; font-weight: 500; color: var(--text-color); >.boxes .box.box2 < background-color: var(--box2-color); >.boxes .box.box3 < background-color: var(--box3-color); >.dash-content .activity .activity-data < display: flex; justify-content: space-between; align-items: center; width: 100%; >.activity .activity-data < display: flex; >.activity-data .data < display: flex; flex-direction: column; margin: 0 15px; >.activity-data .data-title < font-size: 20px; font-weight: 500; color: var(--text-color); >.activity-data .data .data-list < font-size: 18px; font-weight: 400; margin-top: 20px; white-space: nowrap; color: var(--text-color); >@media (max-width: 1000px) < nav< width: 73px; >nav.close < width: 250px; >nav .logo_name < opacity: 0; pointer-events: none; >nav.close .logo_name < opacity: 1; pointer-events: auto; >nav li a .link-name < opacity: 0; pointer-events: none; >nav.close li a .link-name < opacity: 1; pointer-events: auto; >nav ~ .dashboard < left: 73px; width: calc(100% - 73px); >nav.close ~ .dashboard < left: 250px; width: calc(100% - 250px); >nav ~ .dashboard .top < left: 73px; width: calc(100% - 73px); >nav.close ~ .dashboard .top < left: 250px; width: calc(100% - 250px); >.activity .activity-data < overflow-X: scroll; >> @media (max-width: 780px) < .dash-content .boxes .box< width: calc(100% / 2 - 15px); margin-top: 15px; >> @media (max-width: 560px) < .dash-content .boxes .box< width: 100% ; >> @media (max-width: 400px) < nav< width: 0px; >nav.close < width: 73px; >nav .logo_name < opacity: 0; pointer-events: none; >nav.close .logo_name < opacity: 0; pointer-events: none; >nav li a .link-name < opacity: 0; pointer-events: none; >nav.close li a .link-name < opacity: 0; pointer-events: none; >nav ~ .dashboard < left: 0; width: 100%; >nav.close ~ .dashboard < left: 73px; width: calc(100% - 73px); >nav ~ .dashboard .top < left: 0; width: 100%; >nav.close ~ .dashboard .top < left: 0; width: 100%; >>const body = document.querySelector("body"), modeToggle = body.querySelector(".mode-toggle"); sidebar = body.querySelector("nav"); sidebarToggle = body.querySelector(".sidebar-toggle"); let getMode = localStorage.getItem("mode"); if(getMode && getMode ==="dark") < body.classList.toggle("dark"); >let getStatus = localStorage.getItem("status"); if(getStatus && getStatus ==="close") < sidebar.classList.toggle("close"); >modeToggle.addEventListener("click", () =>< body.classList.toggle("dark"); if(body.classList.contains("dark"))< localStorage.setItem("mode", "dark"); >else < localStorage.setItem("mode", "light"); >>); sidebarToggle.addEventListener("click", () => < sidebar.classList.toggle("close"); if(sidebar.classList.contains("close"))< localStorage.setItem("status", "close"); >else < localStorage.setItem("status", "open"); >>)If you face any difficulties while creating your Admin Dashboard or your code is not working as expected, you can download the source code files for this Admin Panel Dashboard for free by clicking on the download button, and you can also view a live demo of this card slider by clicking on the view live button.
Building a Static Admin Bar for the Browser
Moving on from our .psd tutorial, this collection of screencasts will walk you through building our admin bar for the browser. We have a few obstacles to take into account, and we’ll be exploring some interesting ways of getting round them. Let’s get going!
A Couple of Considerations
There are a couple of things we need to bear in mind before we jump into building this. Firstly, our admin bar is going to rob its parent website of some pixels at the top of the page. If the web site beneath happens to have valuable content at the very top, it’s going to be masked by the admin bar. For this reason, we’ll need to push the whole web page downwards to begin with.
Secondly, we need to bear in mind that our CSS is going to be a valid part of the overal web page. If we’re not careful, it will influence styling beyond the boundaries of our admin bar — not good.
Lastly (and related to the previous point), our admin bar is open to influence from CSS belonging to the parent web page. We’ll need to make sure our markup and presentation is completely autonomous.
Note: These screencasts were recorded in high definition, so feel free to hit that HD button!
Part 1: Basic Markup
Let’s kick things off by organizing the project structure, and laying out some basic markup. We’ll also make some significant changes to our reset.css, and take a quick look at what’s involved with using Gravatar images.
Useful Resources
Part 2: Initial Styling
Having set out our markup, let’s now establish some styling to make the whole thing look more recognizably ‘admin bar’. We’ll cover some @font-face usage, including the brilliant Web Symbols font for our icons. During the process we’ll also make interesting use of the :first-child , :last-child , and the seldom seen :only-child pseudo selectors.
Useful Resources
- Google Fonts API Droid serif
- The Web Symbols font, from Just Be Nice Studio
- The Whitey subtle background pattern
Part 3: Yellow Bits
In this video we’ll tackle the yellow priority button, and the little notification sign. We’ll look at CSS3 gradients, transitions, and to help us with the various browser vendor prefixes we’ll examine some useful online tools.
Useful Resources
Part 4: Search Form Markup and Styling
It’s time to get the search form looking more respectable. We’ll approach it as semantically as possible using the HTML5 input type=»search» , and then we’ll look at fixing the presentational problems doing so entails.
Useful Resources
- w3.org reference on CSS box-sizing
- w3.org reference on input type=»search»
- w3.org reference on the HTML5 placeholder attribute
- Resetting Webkit’s bizarre search input styling by Glyn Mooney
Part 5: CSS3 Dropdown Menu
We’re now going to use a classic approach to building our dropdown menu in HTML and CSS. We’ll briefly discuss accessibility, and explore some transitional effects to make the whole thing look as smooth as possible.
Useful Resources
Next Time.
We’re nearly done, but there are a couple of details which need sorting out. There’s the tooltip (watch out for that Quick Tip where we look at the HTML5/CSS3 options available to us). We haven’t properly considered cross-browser compatibility yet, and neither have we actually tested our bar within a genuine HTML web page. Plenty still to do then, stay tuned!


