- Insert map in html
- TypeScript
- JavaScript
- CSS
- HTML
- My Google Maps Demo
- Примеры кода
- Начало работы
- 1. Создайте страницу HTML
- My Google Maps Demo
- Как понять код
- 2. Добавьте карту с маркером
- TypeScript
- JavaScript
- Как понять код
- TypeScript
- JavaScript
- TypeScript
- JavaScript
- 3. Получите ключ API
- Советы и устранение неполадок
- HTML Image Maps
- Image Maps
- Example
- How Does it Work?
- The Image
- Create Image Map
- The Areas
- Shape
- Shape=»rect»
- Example
- Shape=»circle»
- Example
- Shape=»poly»
- Example
- Image Map and JavaScript
- Example
- Chapter Summary
- HTML Image Tags
- Google Maps Tutorial
- Google Maps in HTML
- Example
- My First Google Map
- COLOR PICKER
- Report Error
- Thank You For Helping Us!
Insert map in html
Из этой инструкции вы узнаете, как добавить на веб-страницу простую карту Google с маркером. Для этого достаточно будет начального или среднего уровня знаний HTML и CSS и базовых знаний JavaScript. Инструкции уровня специалистов доступны в руководстве для разработчиков.
Ниже показана карта, которую вы создадите с помощью этой инструкции. Маркером на карте отмечена скала Улуру (Айерс-Рок) в австралийском национальном парке Улуру – Ката-Тьюта.
TypeScript
JavaScript
CSS
HTML
My Google Maps Demo
index.htmlПримеры кода
Начало работы
Процесс создания встроенной в веб-страницу карты Google с маркером состоит из трех этапов:
Для работы потребуется веб-браузер. Рекомендуем использовать Google Chrome или другой популярный браузер (Firefox, Safari, Edge), поддерживаемый вашей платформой.
1. Создайте страницу HTML
Ниже приведен код HTML простейшей веб-страницы.
My Google Maps Demo
index.htmlЭто простейшая веб-страница с заголовком уровня h3 и единственным элементом div , на которую вы можете добавить контент по своему усмотрению.
Как понять код
Указанный ниже код создает страницу HTML, состоящую из заглавия и тела.
Чтобы на странице появился заголовок, показанный в примере, добавьте эту строку кода.
Код ниже определяет область страниц, на которой появится карта Google.
На этом этапе между тегами div ничего нет, поэтому на экране появится серое поле. Код ниже задает размер и цвет блока div с помощью стиля CSS.
/* Set the size of the div element that contains the map */ #map < height: 400px; /* The height is 400 pixels */ width: 100%; /* The width is the width of the web page */ >Во фрагменте кода выше style задает размер и цвет блока div . Чтобы карта появилась на экране, ее ширина и высота в блоке div должны составлять более 0 пикс. В нашем примере высота div составляет 400 пикс., а ширина – 100 % видимой на экране области страницы.
Программа начальной загрузки подготавливает Maps JavaScript API к загрузке (до вызова importLibrary() загрузка библиотек не начинается).
Инструкции по получению ключа см. в разделе 3. Получите ключ API.
2. Добавьте карту с маркером
Ниже показано, как подгрузить на странице Maps JavaScript API и написать фрагмент кода JavaScript, добавляющий с помощью этого API карту с маркером.
TypeScript
JavaScript
Во фрагменте кода выше библиотеки Map и AdvancedMarkerView загружаются при вызове функции initMap() .
Как понять код
Фрагмент кода ниже создает новый объект карт Google и добавляет свойства карты (центральную точку и масштаб). Информация о других свойствах объекта доступна здесь.
TypeScript
JavaScript
Во фрагменте выше код new Map() создает новый объект карт Google. Свойство center сообщает API, где должен находиться центр карты.
Свойство zoom задает масштаб карты. Нулю соответствует самый мелкий масштаб (пользователь видит на экране всю планету). Чем больше значение свойства, тем крупнее масштаб видимой карты.
Код ниже помещает на карту маркер. Координаты маркера заданы в свойстве position .
TypeScript
JavaScript
3. Получите ключ API
Ниже объясняется, как аутентифицировать ваше приложение в Maps JavaScript API с помощью ключа API.
Выполните следующие действия:
- Войдите в Google Cloud Console.
- Создайте или выберите проект.
- Нажмите Continue для активации API и всех связанных служб.
- На странице Credentials (Учетные данные) получите ключ API и задайте для него ограничения. Если у вас есть действующий ключ API без ограничений или ключ с ограничениями для браузера, можете использовать его.
- Узнайте, как защитить свою квоту от посторонних и обезопасить ключ API.
- Включите оплату. Инструкции
- Скопируйте весь код из руководства на этой странице в текстовый редактор.
- Замените значение параметра key в URL-адресе своим ключом API (тем, который вы получили только что).
Советы и устранение неполадок
- Чтобы настроить отображение карты, меняйте стиль, свойства и другие переменные. Подробную информацию можно найти в руководствах по стилю и рисованию на карте.
- Используйте Инструменты разработчика в своем веб-браузере, чтобы тестировать и запускать свой код, просматривать отчеты об ошибках и устранять проблемы.
- Открыть консоль в Chrome можно сочетанием клавиш:
Command+Option+J (Mac) или Control+Shift+J (Windows).- Чтобы получить географические координаты (широту и долготу) точки на Google Картах:
- Откройте Google Карты в браузере.
- Нажмите правой кнопкой мыши на точку, координаты которой хотите получить.
- В появившемся контекстном меню выберите Что здесь. Появится карточка в нижней части экрана, в последней строке которой записаны значения широты и долготы.
- Преобразовать адрес в географические координаты можно с помощью службы геокодирования. Узнайте, как начать с ней работу.
Если не указано иное, контент на этой странице предоставляется по лицензии Creative Commons «С указанием авторства 4.0», а примеры кода – по лицензии Apache 2.0. Подробнее об этом написано в правилах сайта. Java – это зарегистрированный товарный знак корпорации Oracle и ее аффилированных лиц.
Последнее обновление: 2023-06-26 UTC.
HTML Image Maps
With HTML image maps, you can create clickable areas on an image.
Image Maps
The HTML tag defines an image map. An image map is an image with clickable areas. The areas are defined with one or more tags.
Try to click on the computer, phone, or the cup of coffee in the image below:
Example
Here is the HTML source code for the image map above:
How Does it Work?
The idea behind an image map is that you should be able to perform different actions depending on where in the image you click.
To create an image map you need an image, and some HTML code that describes the clickable areas.
The Image
The image is inserted using the
tag. The only difference from other images is that you must add a usemap attribute:
The usemap value starts with a hash tag # followed by the name of the image map, and is used to create a relationship between the image and the image map.
Tip: You can use any image as an image map!
Create Image Map
The element is used to create an image map, and is linked to the image by using the required name attribute:
The name attribute must have the same value as the
‘s usemap attribute .
The Areas
Then, add the clickable areas.
A clickable area is defined using an element.
Shape
You must define the shape of the clickable area, and you can choose one of these values:
- rect — defines a rectangular region
- circle — defines a circular region
- poly — defines a polygonal region
- default — defines the entire region
You must also define some coordinates to be able to place the clickable area onto the image.
Shape=»rect»
The coordinates for shape=»rect» come in pairs, one for the x-axis and one for the y-axis.
So, the coordinates 34,44 is located 34 pixels from the left margin and 44 pixels from the top:
The coordinates 270,350 is located 270 pixels from the left margin and 350 pixels from the top:
Now we have enough data to create a clickable rectangular area:
Example
This is the area that becomes clickable and will send the user to the page «computer.htm»:
Shape=»circle»
To add a circle area, first locate the coordinates of the center of the circle:
Then specify the radius of the circle:
Now you have enough data to create a clickable circular area:
Example
This is the area that becomes clickable and will send the user to the page «coffee.htm»:
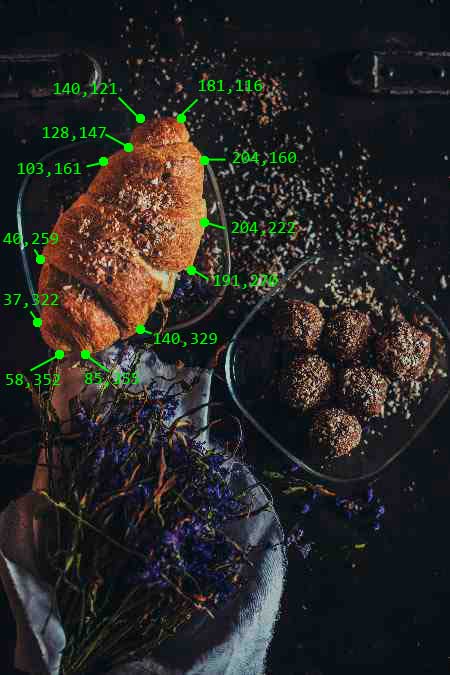
Shape=»poly»
The shape=»poly» contains several coordinate points, which creates a shape formed with straight lines (a polygon).
This can be used to create any shape.
Like maybe a croissant shape!
How can we make the croissant in the image below become a clickable link?
We have to find the x and y coordinates for all edges of the croissant:
The coordinates come in pairs, one for the x-axis and one for the y-axis:
Example
This is the area that becomes clickable and will send the user to the page «croissant.htm»:
Image Map and JavaScript
A clickable area can also trigger a JavaScript function.
Add a click event to the element to execute a JavaScript function:
Example
Here, we use the onclick attribute to execute a JavaScript function when the area is clicked:
Chapter Summary
- Use the HTML element to define an image map
- Use the HTML element to define the clickable areas in the image map
- Use the HTML usemap attribute of the
element to point to an image map
HTML Image Tags
Tag Description Defines an image Defines an image map Defines a clickable area inside an image map Defines a container for multiple image resources For a complete list of all available HTML tags, visit our HTML Tag Reference.
Google Maps Tutorial
This tutorial is about the Google Maps API (Application Programming Interface).
An API is a set of methods and tools that can be used for building software applications.
Google Maps in HTML
This example creates a Google Map in HTML:
Example
My First Google Map
COLOR PICKER
Report Error
If you want to report an error, or if you want to make a suggestion, do not hesitate to send us an e-mail:
Thank You For Helping Us!
Your message has been sent to W3Schools.
Top Tutorials
Top References
Top Examples
Get Certified
W3Schools is optimized for learning and training. Examples might be simplified to improve reading and learning. Tutorials, references, and examples are constantly reviewed to avoid errors, but we cannot warrant full correctness of all content. While using W3Schools, you agree to have read and accepted our terms of use, cookie and privacy policy.