- How to Use Buttons in Java Applications
- How to Use the JButton Class in Java
- How to Listen for Events on Buttons in Java
- Java Code Example for Button Click Events
- Final Thoughts on Buttons and Events in Java
- JButton basic tutorial and examples
- 1. Creating a JButton object
- 2. Adding the button to a container
- 3. Adding event listener for JButton
- 4. Setting mnemonic and hotkey for JButton
- 5. Setting a JButton as the default button
- 6. Customizing JButton’s appearance
- 7. JButton demo program
- Other Java Swing Tutorials:
- About the Author:
- Add comment
- Comments
How to Use Buttons in Java Applications
Developer.com content and product recommendations are editorially independent. We may make money when you click on links to our partners. Learn More.
A button is a Swing component in Java that is usually used to register some action from a user. The action comes in the form of a button being clicked. To use a button in an application or as part of a graphical user interface (GUI), developers need to create an instance of the JButton class. JButton is a class that inherits from JComponent. Therefore, you can apply the JComponent features, such as layout and key bindings, on your buttons.
In this tutorial, programmers will learn how to work with buttons in Java.
Before we begin, have you ever considered taking an online course to learn Java software development? We have a great list of the Top Online Courses to Learn Java to help get you started.
How to Use the JButton Class in Java
To create a button, simply instantiate the JButton class in your Java code like so:
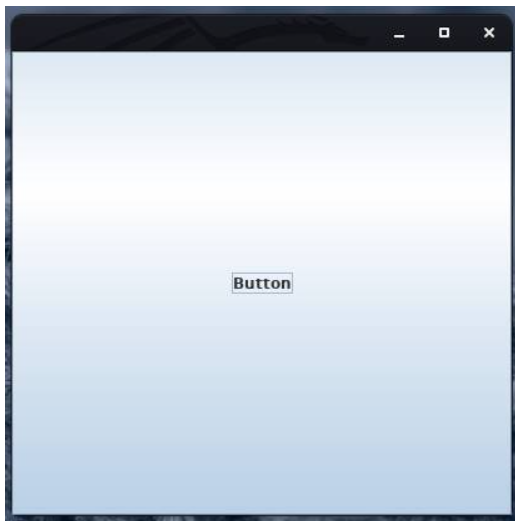
JButton button = new JButton("Button"); Programmers can supply a string (or icon) to the constructor of JButton as an identifier on the screen. Since JButton is a JComponent, you need to add it to a top level container, such as JFrame, JDialog, or JApplet in order for it to appear on screen.
The Java code example below uses the JFrame container:
import javax.swing.*; class SimpleButton < public static void main(String args[])< JFrame frame = new JFrame(); JButton button = new JButton("Button"); frame.add(button); frame.setDefaultCloseOperation(JFrame.EXIT_ON_CLOSE); frame.setSize(400,400); frame.setLocationRelativeTo(null); frame.setVisible(true); >> You should be able to see a button displayed on your screen when you run this code in your integrated development environment (IDE) or code editor:
It is important for developers to note that, when you run the code above, you may not get a similar display. This is because Swing components, by default, take on the look and feel of your application’s environment.
The example code shown does not achieve anything when you click or press the button. In practice, buttons are used to perform some action when a certain event on them occurs (i.e when pressed). This is referred to as listening for an event. The next section discusses how to listen for button events in Java.
How to Listen for Events on Buttons in Java
There are three steps programmers need to follow in order to listen for an event on a button. First, you need to implement the ActionListener interface on your event handling class. You could also extend a class that implements ActionListener instead. Here is how that looks in Java code:
class EventClass implements ActionListener < //some code here >
Second, you need to add an instance of the event handler as an action listener to one or more components using the addActionListener() method:
GuiComponent.addActionListener(EventClassInstance);
The final step is to provide an implementation of the actionPerformed(ActionEvent e) method, which performs some action whenever an event is registered on a component. This method is the only method in the ActionListener interface and it is always called when an action is performed.
Java Code Example for Button Click Events
The Java code example below displays the number of clicks a user has so far made when they click Button1:
import javax.swing.*; import java.awt.*; import java.awt.event.*; class ClicksCount implements ActionListener < int count = 0;// store number of clicks ClicksCount()< JFrame frame = new JFrame(); JButton button1 = new JButton("Button1"); JButton button2 = new JButton("Button2"); button1.addActionListener(this); frame.setLayout(new BoxLayout(frame.getContentPane(), BoxLayout.Y_AXIS)); frame.add(button1); frame.add(button2); frame.getRootPane().setDefaultButton(button1); // sets default button frame.setDefaultCloseOperation(JFrame.EXIT_ON_CLOSE); frame.setSize(450,450); frame.setLocationRelativeTo(null); frame.setVisible(true); >public void actionPerformed(ActionEvent e) < count++; System.out.println("You have clicked the ACTIVE button " + count + " times"); >public static void main(String args[]) < ClicksCount Clicks = new ClicksCount(); >> When you compile and run the code above, you should see two buttons. If you take good notice, you will observe that Button1 has been highlighted. This is because it has been set as the default button:
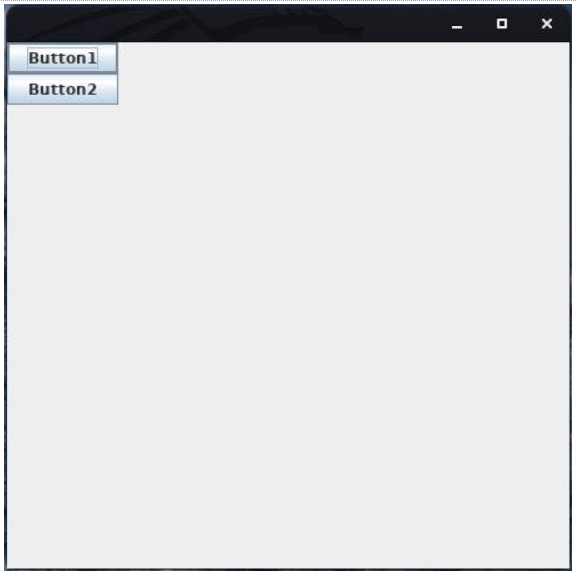
The default button is the button that initially appears to have the focus when the program is first run. When you press Enter on your keyboard, the program clicks this button since it was already selected by default. Pressing Tab will shift focus to the other button.
You can only have, at most, one default button, and you set it by calling the setDefaultButton() method on the root pane of a top-level container.
If you click Button2 in this example, you will notice that there is not a message displayed. This is because no event handler has been registered to listen for events on this button. In other words, you would have to use the addActionListener() method with Button2 to ensure that actionPerformed(ActionEvent e) is called when it is clicked.
Final Thoughts on Buttons and Events in Java
Since you are dealing with Swing components when using buttons and JButtons, remember to import the javax.swing library into your Java code. Also, in order to use an event listener, you need to add the java.awt library, as shown in the last code example. If you do not include these libraries, you will get a compilation error.
JButton basic tutorial and examples
In this Java Swing tutorial, you will learn how to use button that allows the user to perform action in a desktop application.
You know, JButton is a fundamental Swing component that renders a button on screen and responds to user’s clicking event for performing a specific task. This article summarizes common programming practices for using JButton in Swing.
Table of content:
1. Creating a JButton object
JButton button = new JButton("Edit"); Image:
Create a button with only an icon in the file system:
JButton button = new JButton(new ImageIcon("images/start.gif")); Here the icon file start.gif is placed under images directory which is relative to the program.
Image:
Create a button with only icon inside a jar file or in classpath:
String iconPath = "/net/codejava/swing/jbutton/stop.jpg"; Icon icon = new ImageIcon(getClass().getResource(iconPath)); JButton button = new JButton(icon);
Here the icon file stop.jpg is placed under a specific package in the classpath.
Image:
Create a button with a caption and an icon:
JButton button = new JButton("Start", new ImageIcon("images/start.gif")); Image:
2. Adding the button to a container
frame.add(button); dialog.add(button); panel.add(button); applet.getContentPane().add(button);
frame.add(button, BorderLayout.CENTER); panel.add(button, gridbagConstraints);
3. Adding event listener for JButton
button.addActionListener(new ActionListener() < @Override public void actionPerformed(ActionEvent evt) < // do everything here. >>);
button.addActionListener(new ActionListener() < @Override public void actionPerformed(ActionEvent evt) < // delegate to event handler method buttonActionPerformed(evt); >>);
private void buttonActionPerformed(ActionEvent evt) < // do something here. >
public class App extends JFrame implements ActionListener < public App() < // creates the button. // adds event listener: button.addActionListener(this); >@Override public void actionPerformed(ActionEvent evt) < // do something here. >>
Here the container ( JFrame ) must implement the ActionListener interface and override the method actionPerformed() .
4. Setting mnemonic and hotkey for JButton
button.setMnemonic(KeyEvent.VK_E);
The letter E is underlined: so user can invoke that button’s action by pressing Alt + Einstead of clicking mouse.
String mapKey = "KEY_F2"; InputMap inputMap = button.getInputMap(JComponent.WHEN_IN_FOCUSED_WINDOW); inputMap.put(KeyStroke.getKeyStroke("F2"), mapKey); button.getActionMap().put(mapKey, new AbstractAction() < public void actionPerformed(ActionEvent evt) < buttonActionPerformed(evt); >>); 5. Setting a JButton as the default button
A window can have a default button whose action will be invoked when the user hits Enter key. Here is the code to set the button as default button in the frame window:
getRootPane().setDefaultButton(button);
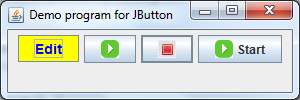
The default button is bold in the window like the 3 rd button in this screenshot:
 6. Customizing JButton’s appearance
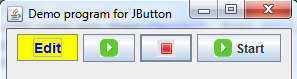
button.setFont(new java.awt.Font("Arial", Font.BOLD, 14)); button.setBackground(Color.YELLOW); button.setForeground(Color.BLUE); Image:
7. JButton demo program
For reference, we created a demo program which incorporates all the practices mentioned above. The program looks like this:
You can download source code of this program in the attachment section.
Other Java Swing Tutorials:
About the Author:

Nam Ha Minh is certified Java programmer (SCJP and SCWCD). He started programming with Java in the time of Java 1.4 and has been falling in love with Java since then. Make friend with him on Facebook and watch his Java videos you YouTube.
Add comment
Comments
merci
I want to add to the button text using a variable. how do I get this to work? jpFormatPanel.add(new JButton(«Format Citation: «
+ strTemplateName
I want to add to the button text using a variable. how do I get this to work? jpFormatPanel.add(new JButton(«Format Citation: »
+ strTemplateName
+ » — »
+ strTemplateCode),
BorderLayout.NORTH);
CodeJava.net shares Java tutorials, code examples and sample projects for programmers at all levels.
CodeJava.net is created and managed by Nam Ha Minh — a passionate programmer.
Copyright © 2012 — 2023 CodeJava.net, all rights reserved.